1. Wprowadzenie
Thank you for choosing the RAVEMEN FR300 and CL01 Bike Lights bundle. This manual provides essential information for the safe and effective use of your new bike lights. Please read it thoroughly before installation and operation, and retain it for future reference.
Zawartość opakowania:
- 1 x RAVEMEN FR300 Front Bike Light
- 1 x RAVEMEN CL01 Rear Bike Light
- Mounting accessories for CL01 (saddle rail mount, seatpost strap, zip ties)
- Kable ładujące USB
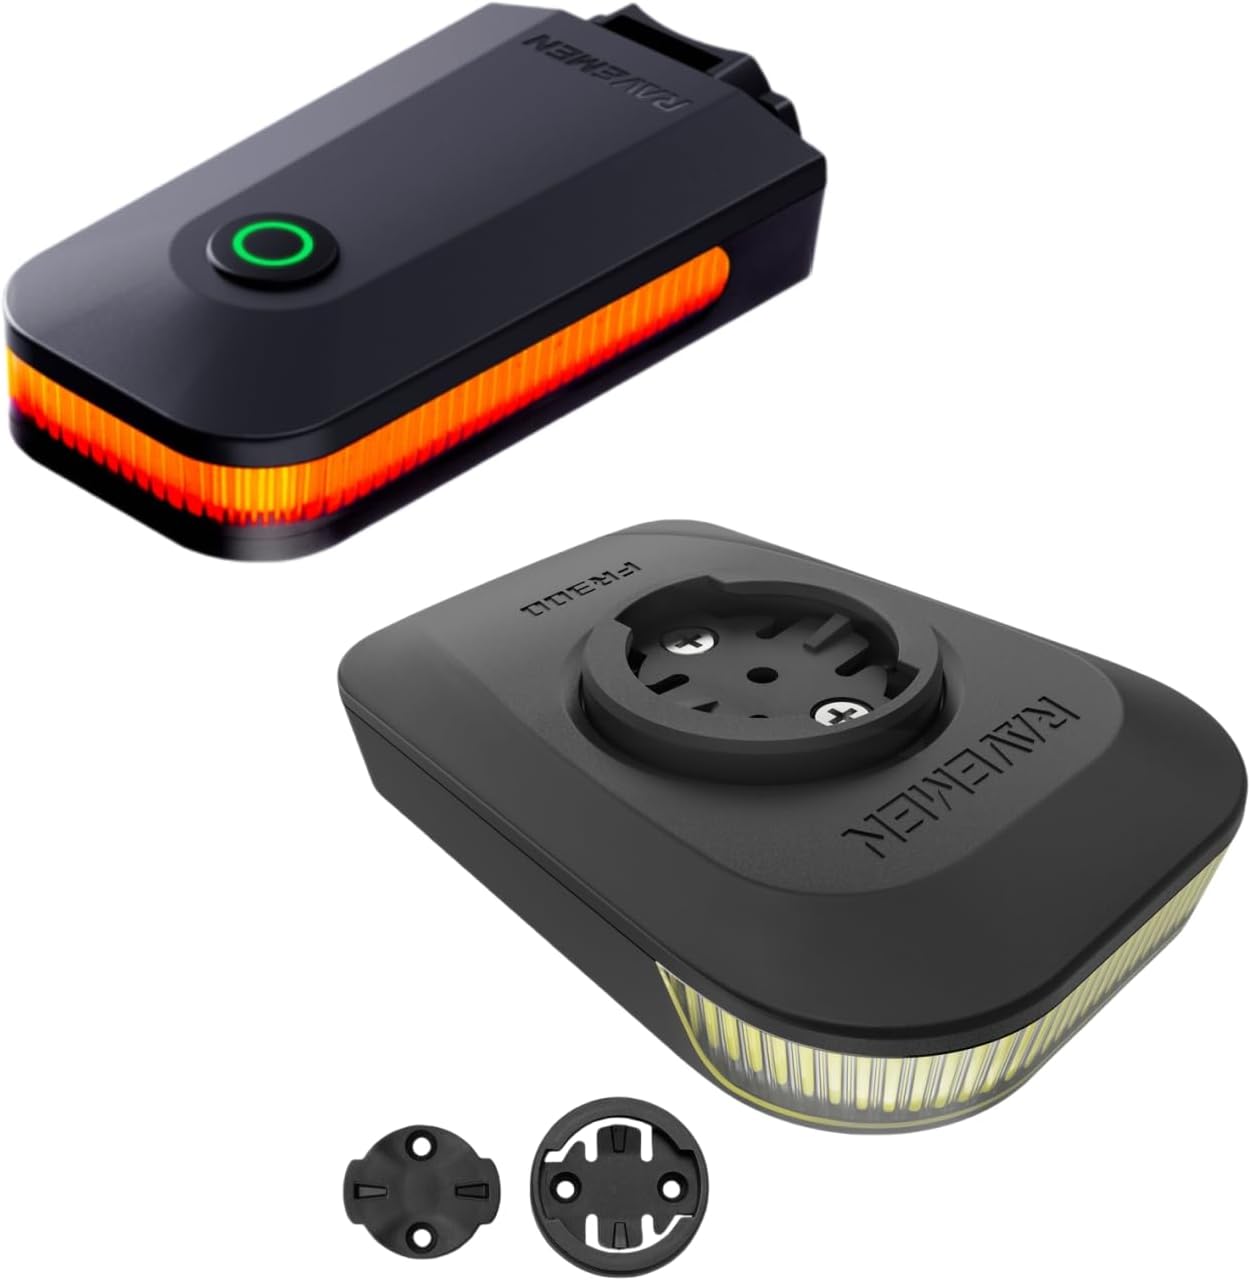
Image 1.1: The RAVEMEN FR300 front light (bottom) and CL01 rear light (top) included in the bundle.
2. Konfiguracja i instalacja
2.1 CL01 Rear Light Mounting
The CL01 rear light offers two primary mounting options: under the saddle rail or on the seatpost.
Mocowanie na szynie siodła:
- Ensure your saddle rails have sufficient spacing. Refer to the diagram below for required dimensions (approximately 42.3mm to 49.15mm).
- Attach the saddle rail mount to the underside of your saddle rails using the provided zip ties.
- Slide the CL01 light onto the mount until it clicks securely into place.
Mocowanie sztycy:
- Secure the seatpost strap to the back of the CL01 light.
- Wrap the strap around your bicycle's seatpost and fasten it securely.
- Adjust the angle of the light for optimal visibility.

Image 2.1: Illustration of the two mounting methods for the CL01 rear light: saddle rail mount (left) and seatpost mount (right).

Image 2.2: Diagram showing the required saddle rail spacing (42.3mm to 49.15mm) for the CL01 saddle rail mount. Please confirm your saddle rail spacing before purchase.
2.2 FR300 Front Light Mounting
The FR300 front light typically mounts to your bicycle's handlebars. Specific mounting instructions will depend on the included bracket type. Generally, secure the bracket to your handlebars and then slide the FR300 light onto the bracket until it locks into place. Ensure the light is firmly attached and pointed forward, slightly angled downwards to illuminate the road without blinding oncoming traffic.
3. Działanie
3.1 Włączanie/wyłączanie zasilania
To power on or off either the FR300 or CL01 light, press and hold the power button for approximately 1-2 seconds. A short press typically cycles through light modes.
3.2 CL01 Rear Light Modes
The CL01 rear light features multiple modes to suit various riding conditions and optimize battery life. Short press the power button to cycle through the modes:
- Wysoki: 5 Lumens, approximately 5 hours runtime
- Niski: 2 Lumens, approximately 10 hours runtime
- Ostrzeżenie migające: 30 Lumens, approximately 9.5 hours runtime
- Szybkie miganie: 5 Lumens, approximately 11 hours runtime
- Powolne miganie: 0.5 Lumens, approximately 45 hours runtime
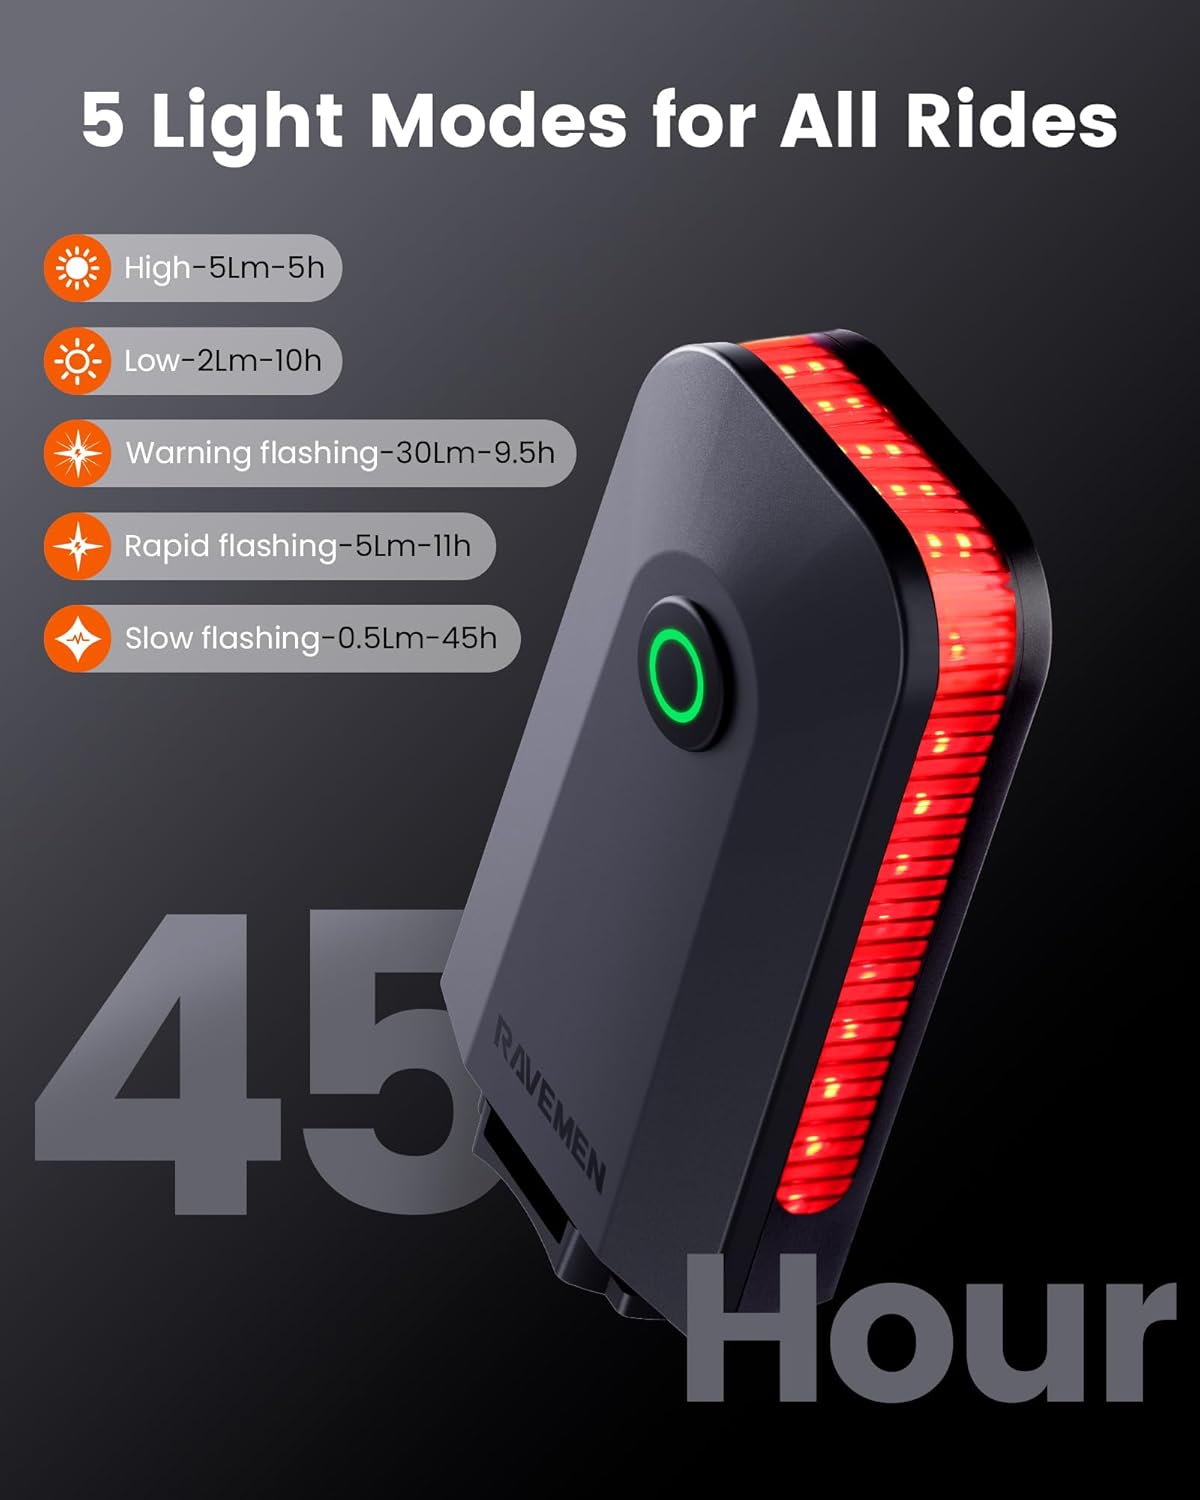
Image 3.1: Visual representation of the CL01 rear light's five modes and their approximate runtimes.
3.3 Smart Auto On/Off Feature (CL01)
The CL01 rear light includes an intelligent auto on/off mode to conserve battery. When activated, the light will automatically turn off after two minutes of stillness. It will then automatically power back on when it detects vibration, indicating you have resumed your ride. This feature is particularly useful for urban cycling with frequent stops.
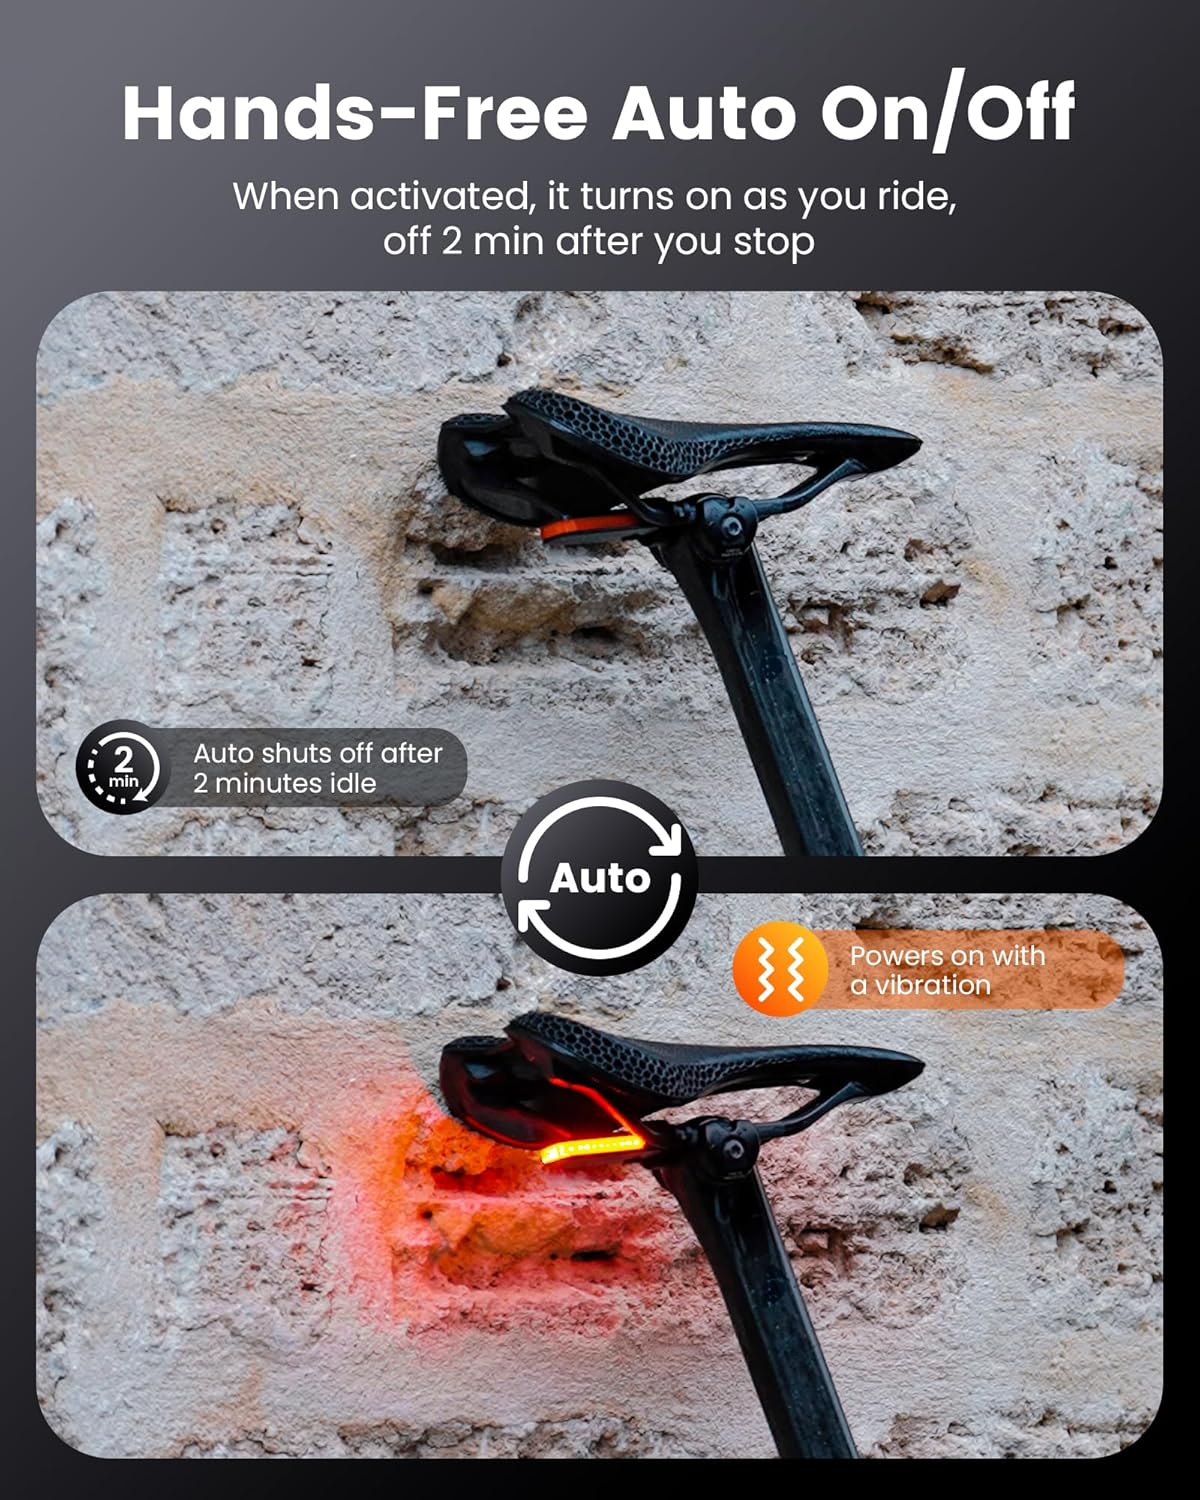
Image 3.2: Illustration of the CL01's auto on/off functionality, showing it powers off after 2 minutes of idle time and powers on with vibration.
3.4 Brake Detection Feature (CL01)
For enhanced safety, the CL01 features a brake detection system. When the light senses a reduction in speed (braking), it automatically increases its brightness for 2 seconds. This alerts following vehicles or cyclists to your deceleration, reducing the risk of rear-end collisions. Note: This braking mode does not function when the light is set to 'Slow Flashing' mode.

Image 3.3: Depiction of the CL01's brake detection feature, showing the light automatically boosting brightness for 2 seconds upon sensing braking.
3.5 Battery Level Indicator (CL01)
To check the battery level of the CL01, single-click the power button when the light is off. The indicator light will show the current battery status:
- Zielony: Poziom naładowania baterii powyżej 40%
- Czerwony: Battery level between 5% and 40% (charge soon)
- Migające czerwone: Battery level below 5% (charge immediately)

Image 3.4: The CL01 light in hand, illustrating how to check the power level with a single click when off, and the corresponding indicator colors.
3.6 FR300 Front Light Operation
The FR300 front light operates similarly to the CL01. Press and hold the power button to turn it on or off. Short press the power button to cycle through its various light modes (e.g., High, Medium, Low, Flashing). Refer to the specific instructions provided with the FR300 for detailed mode specifications and runtimes.
4. Konserwacja
4.1 Ładowanie
Both the FR300 and CL01 lights are rechargeable via USB. Use the provided USB cables to connect the lights to a standard USB power source (e.g., computer, wall adapter). The indicator light will typically show red during charging and turn green when fully charged. Avoid overcharging by disconnecting once fully charged.
4.2 Czyszczenie
Clean the light bodies and lenses with a soft, damp cloth. Do not use abrasive cleaners or solvents, as these can damage the plastic components or lens coating. Ensure the charging port cover is securely closed to prevent water ingress.
4.3 Przechowywanie
When storing the lights for extended periods, ensure they are fully charged. Recharge them every 3-6 months to maintain battery health. Store in a cool, dry place away from direct sunlight.
5. Rozwiązywanie Problemów
- Światło się nie włącza: Ensure the battery is charged. Press and hold the power button for 1-2 seconds to power on.
- Światło się nie ładuje: Sprawdź kabel USB i źródło zasilania. Upewnij się, że port ładowania jest czysty i wolny od zanieczyszczeń.
- CL01 Automatyczne włączanie/wyłączanie nie działa: Ensure the light is in a mode that supports auto on/off. The feature relies on vibration detection; ensure the light is securely mounted.
- CL01 Wykrywanie hamulców nie działa: This feature is not active in 'Slow Flashing' mode. Ensure the light is in a compatible mode and securely mounted to detect deceleration accurately.
- Światło migocze lub niespodziewanie gaśnie: This may indicate a low battery. Recharge the light. If the issue persists, contact customer support.
6. Specyfikacje
6.1 CL01 Rear Light
| Funkcja | Szczegół |
|---|---|
| Maksymalna wydajność | 30 lumenów (migające ostrzeżenie) |
| Kąt wiązki | 300 stopnia |
| Tryby | High, Low, Warning Flashing, Rapid Flashing, Slow Flashing |
| Maksymalny czas pracy | 45 godzin (miganie powolne) |
| Waga | 22 g (0.78 uncji) |
| Cechy specjalne | Brake Detection, Smart Auto On/Off, Battery Indicator |
| Montowanie | Saddle Rail, Seatpost |

Image 6.1: The CL01 rear light mounted on a bicycle, highlighting its 300-degree wide-angle visibility for safety.
6.2 FR300 Front Light
| Funkcja | Szczegół |
|---|---|
| Wyjście | Typically 300 Lumens (specifics may vary by mode) |
| Tryby | Multiple steady and flashing modes |
| Montowanie | Uchwyt na kierownicę |
| Ładowanie | Ładowalny przez USB |
7. Informacje o gwarancji
RAVEMEN products are covered by a limited warranty against manufacturing defects. The warranty period typically begins from the date of purchase. Please retain your proof of purchase for warranty claims. For detailed warranty terms and conditions, please refer to the official RAVEMEN webodwiedź witrynę lub skontaktuj się z działem obsługi klienta.
8. Obsługa klienta
If you encounter any issues or have questions regarding your RAVEMEN FR300 and CL01 bike lights that are not covered in this manual, please contact RAVEMEN customer support. You can typically find contact information on the official RAVEMEN webna stronie internetowej lub u sprzedawcy.
Webstrona: www.ravemen.com (Byłyamplink, proszę sprawdzić oficjalny webteren)
E-mail: support@ravemen.com (Example email, please verify official support email)


