Wstęp
Thank you for choosing the WALI GSM001XLN Heavy Duty Single Monitor Arm. This adjustable gas spring desk mount is designed to enhance your workspace ergonomics and free up valuable desk space. It supports 17-49 inch flat, curved, and ultrawide monitors weighing up to 33 lbs, featuring VESA 75x75mm or 100x100mm mounting patterns. With its robust construction and versatile adjustments, this monitor arm provides a stable and comfortable viewing experience for both home office and gaming environments.
Informacje dotyczące bezpieczeństwa
OSTRZEŻENIE:
- Nie przekraczać maksymalnego udźwigu wynoszącego 15 kg (33 funtów).
- Ensure your monitor's VESA pattern is 75x75mm or 100x100mm.
- Verify your desk thickness is between 0.39"-1.96" (10-50mm) for C-clamp instalacja.
- For grommet base installation, ensure your desk is solid wood or composite with no crossbeams underneath.
- Always follow assembly instructions carefully. Improper installation may result in equipment damage or personal injury.
- Trzymaj małe części poza zasięgiem dzieci.
Zawartość opakowania
Please check that all components are present and undamaged before assembly. If any parts are missing or defective, contact WALI customer support.
- Monitor Arm (2 sections)
- Biurko Clamp Opierać
- Płyta VESA
- Hardware Kit (various screws, washers, spacers)
- Allen Wrenches (for assembly and adjustment)
- Instrukcja instalacji
Organizować coś
Follow these steps to install your WALI GSM001XLN monitor arm. Ensure your monitor is disconnected from its original stand before proceeding.
1. Zamontuj płytkę VESA do monitora
- Ostrożnie połóż monitor ekranem do dołu na miękkiej i czystej powierzchni.
- If your monitor has a recessed VESA area, use the provided spacers (risers) to ensure the VESA plate sits flush.
- Dopasuj płytkę VESA do otworów montażowych znajdujących się z tyłu monitora (75 x 75 mm lub 100 x 100 mm).
- Select the appropriate screws from the hardware kit and secure the VESA plate to the monitor. Do not overtighten.
2. Install Desk Clamp Opierać
Choose either the C-clamp or Grommet base method based on your desk type.
C-Clamp Instalacja:
- Dołącz C-klamp to the desk clamp opierać.
- Umieść klamp on the edge of your desk and tighten the screw until it is securely fastened. Ensure the desk thickness is within 0.39"-1.96" (10-50mm).
Montaż podstawy przelotki:
- Jeżeli Twoje biurko ma otwór na przelotkę, zdemontuj C-clamp and use the grommet base components.
- Insert the grommet bolt through the desk hole and secure it from underneath with the provided plate and nut.
3. Assemble Monitor Arm
- Slide the lower arm section onto the desk clamp base pole. Secure it with the provided set screw using an Allen wrench.
- Slide the upper arm section onto the lower arm section. Secure it with the provided set screw.
- Attach the VESA plate (with monitor attached) to the end of the upper arm. Slide it into the designated slot and secure it with the locking screw.

Figure 1: Universal Fit and Easy Setup components, showing C-clamp and grommet mount options, and VESA plate.
Przewodnik po konfiguracji wideo:
Video: Official WALI guide demonstrating the assembly and installation of the GSM001XLN monitor arm.
Instrukcja obsługi
The WALI GSM001XLN monitor arm offers a wide range of adjustments for optimal viewkomfort.
1. Regulacja położenia monitora
- Regulacja wysokości: Delikatnie pchnij lub pociągnij monitor w górę lub w dół do żądanej wysokości. Mechanizm sprężyny gazowej utrzyma go w miejscu.
- Przechylenie: The monitor can tilt ±75° (up/down). Loosen the tilting bolt on the VESA plate, adjust the angle, and then retighten the bolt.
- Obracać: Swivel the monitor ±90° (left/right) for collaborative viewing or to change orientation.
- Obrót: Rotate the monitor 360° to switch between landscape and portrait modes.

Figure 2: Full range of motion, including tilt, swivel, and 360° rotation for ergonomic viewing.

Figure 3: Easy screen positioning, illustrating vertical adjustment from 10.12" to 20.79" and horizontal reach from 4.33" to 21.14".
2. Adjusting for Large-Screen Monitors
For monitors over 30 inches, it is crucial to adjust the tilting bolt for stability. Loosen the tilting bolt, tilt the monitor to your desired angle, and then firmly retighten the tilting bolt.
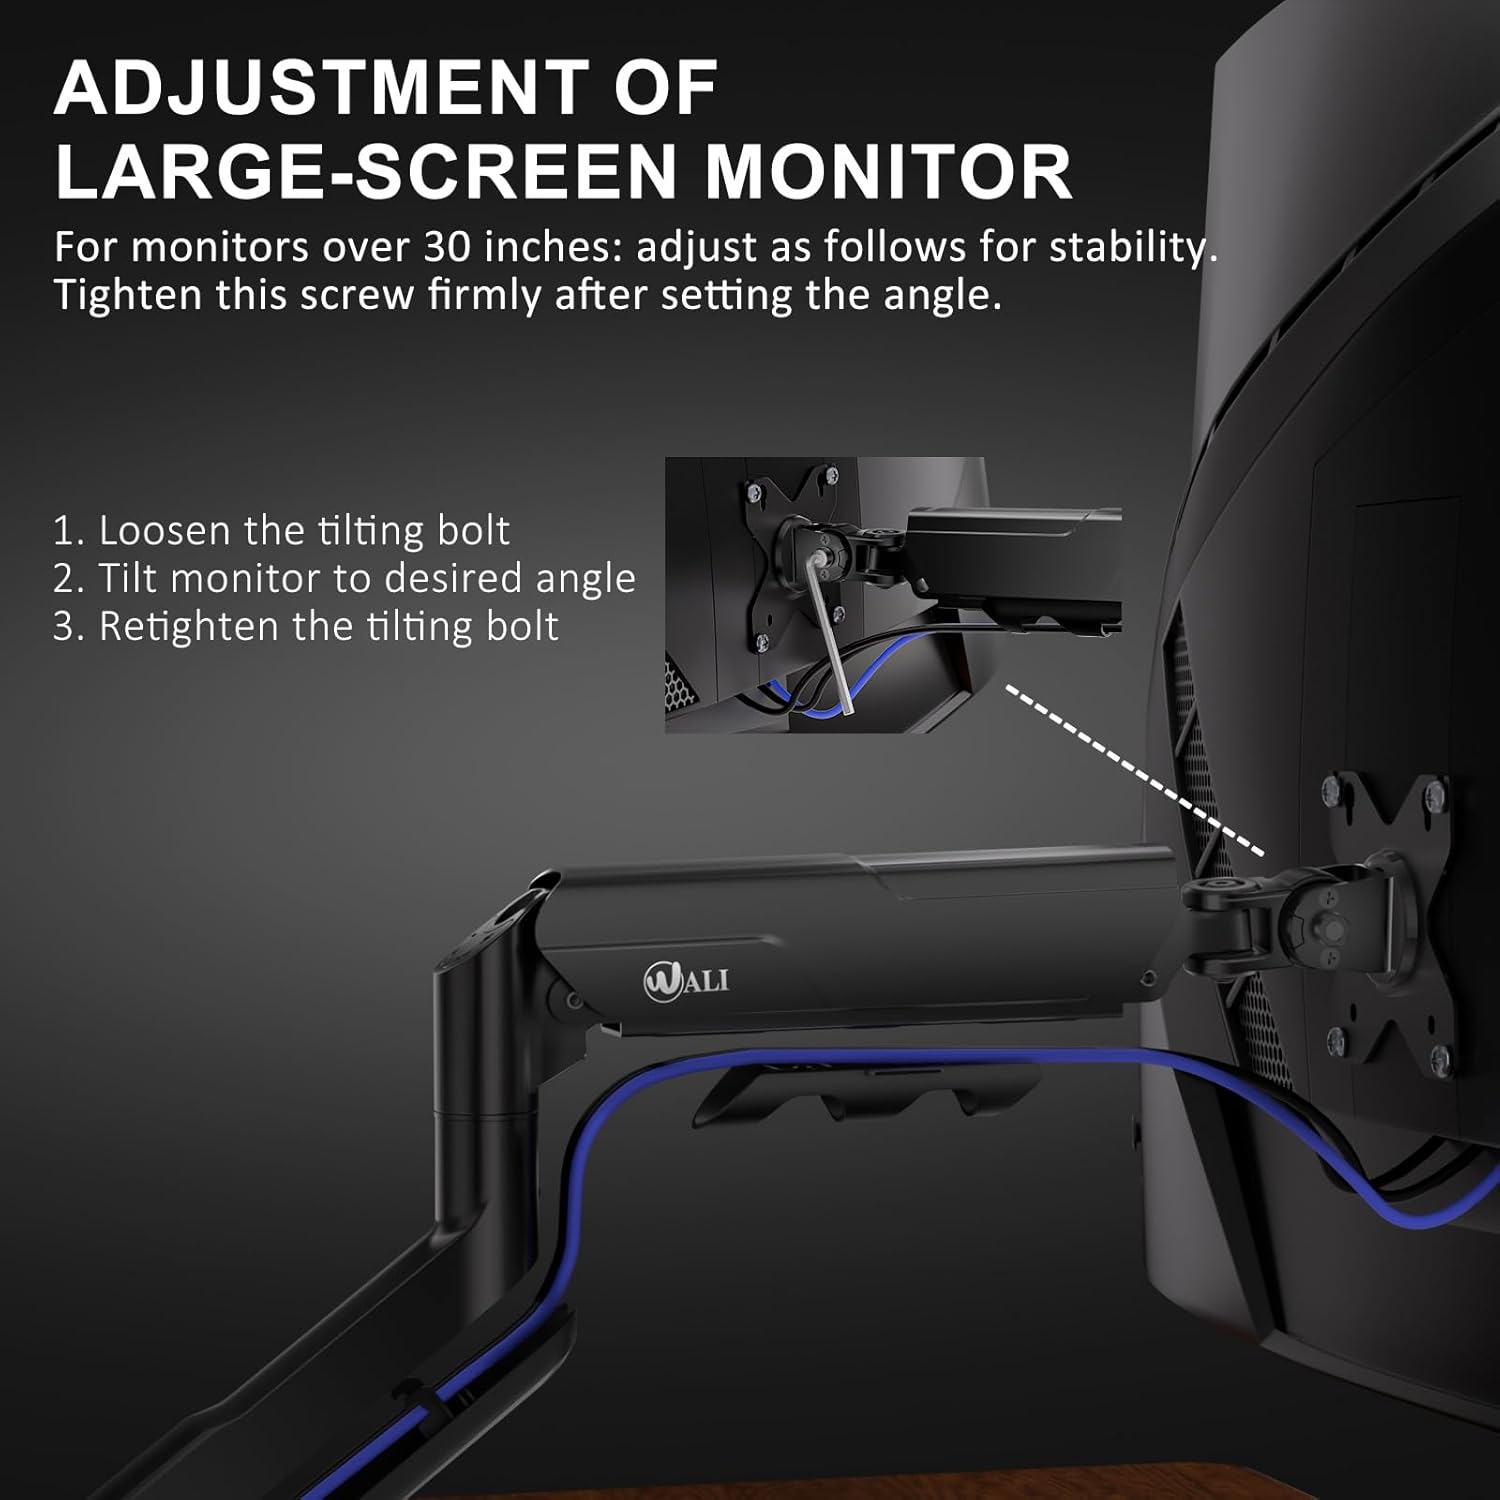
Figure 4: Step-by-step guide for adjusting the tilting bolt on large monitors to maintain stability.
3. Regulacja napięcia sprężyny gazowej
The gas spring tension needs to be adjusted according to your monitor's weight to ensure it holds its position without sagging or floating. Use the provided Allen wrench:
- Turn clockwise (towards '-') for lighter monitors.
- Turn counter-clockwise (towards '+') for heavier monitors.
You may need to turn it several times to find the optimal tension.

Figure 5: Gas spring tension adjustment points for fine-tuning the arm's hold based on monitor weight.
Zarządzanie kablami
To maintain a clean and organized workspace, utilize the integrated cable management system. Route your monitor cables through the designated clips or channels along the arm. This helps to reduce clutter and keeps your desk tidy.
Figure 6: Integrated cable management system for routing cables neatly along the monitor arm.
Specyfikacje
| Funkcja | Szczegół |
|---|---|
| Model | GSM001XLN |
| Kompatybilność z rozmiarem ekranu | 17-49 cala |
| Nośność | Do 33 funtów (15 kg) |
| Zgodność ze standardem VESA | 75x75mm, 100x100mm |
| Opcje montażu | C klamp, Podstawa przelotki |
| C klamp Grubość biurka | 0.39"-1.96" (10-50 mm) |
| Kąt nachylenia | ±75° |
| Kąt obrotu | ±90° |
| Obrót | 360° |
| Tworzywo | High-strength Steel, Aircraft-grade Aluminum |
| Kolor | Czarny |
Rozwiązywanie problemów
- Monitor Sags/Doesn't Hold Position: Adjust the gas spring tension. Turn the adjustment screw counter-clockwise (towards '+') to increase tension for heavier monitors.
- Monitor is Too Stiff to Move: Adjust the gas spring tension. Turn the adjustment screw clockwise (towards '-') to decrease tension for lighter monitors.
- Monitor Tilts Downward: For large or heavy monitors, ensure the tilting bolt on the VESA plate is securely tightened after adjusting the desired tilt angle.
- Arm is Loose on Desk: Ponownie dokręć C-clamp or grommet base screw to ensure a secure attachment to the desk.
- Brakujące części lub uszkodzone komponenty: Contact WALI customer support immediately for assistance.
Gwarancja i wsparcie
The WALI GSM001XLN Heavy Duty Single Monitor Arm is backed by US-based customer support and a 3-Year Warranty. For any questions, concerns, or warranty claims, please contact WALI customer support. Ensure you have your purchase information and model number (GSM001XLN) ready when contacting support.


