1. Wprowadzenie
This manual provides essential information for setting up, operating, and maintaining your GEEKOM GT2 Mega Ai Mini PC. This compact desktop computer features an Intel Core Ultra 9 285H processor with integrated Intel Arc 140T GPU, 32GB DDR5 RAM, and a 2TB SSD. It comes pre-installed with Windows 11 Pro and offers advanced connectivity options including Dual 2.5G LAN, WiFi 7, and USB4 ports.
Przed użyciem urządzenia należy dokładnie przeczytać instrukcję, aby zapewnić jego prawidłowe działanie i długą żywotność.
2. Co znajduje się w pudełku
Sprawdź, czy w opakowaniu znajdują się wszystkie elementy:
- 1 x GEEKOM GT2 MEGA Mini PC
- 1 x kabel HDMI
- 1 x mocowanie VESA
- 1 x zasilacz
- 1 x Instrukcja obsługi (ten dokument)
3. Koniec produktuview
3.1 Porty przednie i tylne
The GEEKOM GT2 Mega Mini PC is equipped with a variety of ports for versatile connectivity.

- Porty przednie: Power Button, 3x USB 3.2 Gen2 Type-A, 1x SD 4.0 Card Reader, 1x 3.5mm Headset Jack.
- Porty tylne: 1x Kensington Lock, 1x DC In, 2x HDMI 2.0 (4K@120Hz), 1x USB 3.2 Gen2 Type-A, 1x USB 2.0 Type-A, 2x 2.5G LAN RJ45, 2x USB4 Type-C (40Gbps, 8K video, 15W PD).
3.2 Internal Components and Expandability
The mini PC is designed for efficient performance and offers storage expansion options.

- BARAN: Dual-channel DDR5 5600MHz SODIMM, expandable up to 128GB.
- Dysk SSD: One M.2 2280 NVMe PCIe Gen4 x4 SSD slot (up to 4TB) and one M.2 2242 SATA III SSD slot (up to 2TB).
- Chłodzenie: IceBlast 2.0 cooling system with dual copper heat pipes and a large silent fan.
4. Instrukcje konfiguracji
4.1 Połączenie początkowe
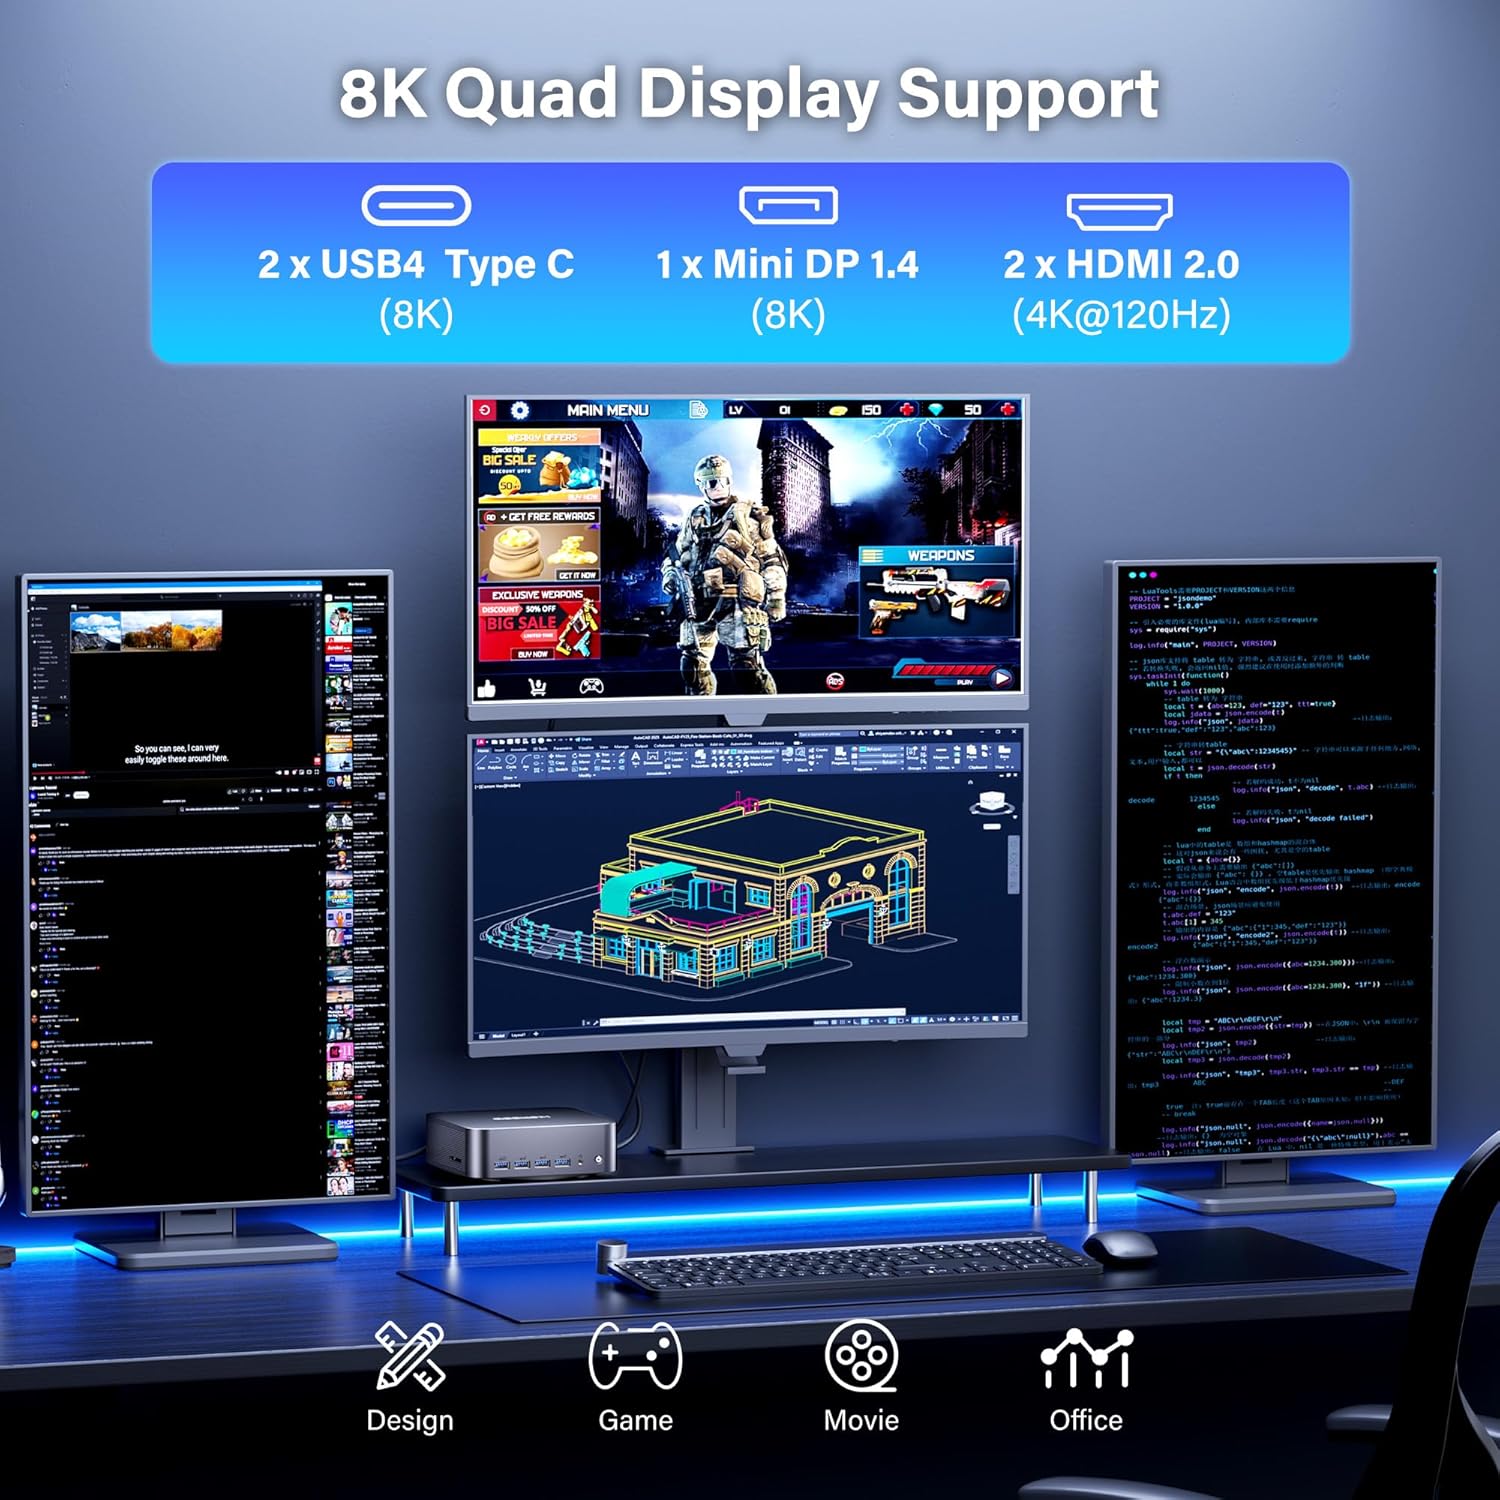
- Podłącz wyświetlacz: Use the provided HDMI cable or a Mini DP/USB4 cable to connect your monitor(s) to the mini PC. The device supports up to four displays simultaneously (2x 8K, 2x 4K).
- Podłącz urządzenia peryferyjne: Podłącz klawiaturę, mysz i inne urządzenia USB do dostępnych portów USB.
- Połącz sieć: For wired internet, connect an Ethernet cable to one of the 2.5G LAN ports. For wireless, ensure your WiFi network is available.
- Podłącz zasilanie: Plug the power adapter into the DC In port on the mini PC, then connect the adapter to a power outlet.
- Włączanie: Naciśnij przycisk zasilania znajdujący się z przodu mini komputera.

4.2 Montaż uchwytu VESA (opcjonalnie)
The GEEKOM GT2 Mega Mini PC can be mounted to the back of a VESA-compatible monitor to save desk space.
- Przymocuj uchwyt VESA z tyłu monitora za pomocą dołączonych śrub.
- Slide the mini PC onto the VESA mount until it clicks securely into place.

5. Instrukcja obsługi
5.1 Pierwsze uruchomienie i konfiguracja systemu Windows 11 Pro
Upon first boot, the system will guide you through the Windows 11 Pro setup process. Follow the on-screen instructions to configure your language, region, network, and user account.

5.2 Konfiguracja wielu wyświetlaczy
The GT2 Mega supports up to four displays. To configure multiple displays in Windows:
- Connect all desired monitors to the available HDMI, Mini DP, or USB4 ports.
- Kliknij prawym przyciskiem myszy na pulpicie i wybierz „Ustawienia wyświetlania”.
- In the Display settings, you can detect, arrange, and configure the resolution and orientation of each monitor.

6. Konserwacja
6.1 Czyszczenie
- Przed czyszczeniem upewnij się, że urządzenie jest wyłączone i odłączone od zasilania.
- Use a soft, dry cloth to wipe the exterior of the mini PC.
- For dust accumulation in vents, use compressed air carefully. Do not insert objects into the vents.
6.2 Aktualizacje oprogramowania
Regularnie aktualizuj system operacyjny Windows i sterowniki, aby zapewnić sobie optymalną wydajność i bezpieczeństwo.
- Aktualizacje systemu Windows: Go to Settings > Windows Update and check for updates.
- Aktualizacje sterowników: Odwiedź oficjalną stronę GEEKOM website or Intel's support page for the latest drivers for your processor and graphics.
6.3 Układ chłodzenia
The IceBlast 2.0 cooling system is designed for efficient heat dissipation. Ensure proper airflow around the device by not blocking the vents.

7. Rozwiązywanie Problemów
7.1 Kwestie ogólne
- Brak zasilania: Upewnij się, że zasilacz jest prawidłowo podłączony zarówno do minikomputera, jak i do sprawnego gniazdka elektrycznego.
- Brak wyświetlacza: Check all display cable connections. Ensure the monitor is powered on and set to the correct input source. Try a different cable or monitor if possible.
- Nie wykryto urządzenia peryferyjnego: Reconnect the peripheral to a different USB port. Ensure drivers are installed if required.
- Niska wydajność: Check for background applications consuming resources. Ensure sufficient free storage space. Consider updating drivers and Windows.
7.2 Windows 11 Pro Initial Setup Issue (PIN Creation)
If you encounter an issue during the initial Windows 11 Pro setup where the PIN creation screen does not appear or freezes, follow these steps:
- When the PIN screen appears to be stuck, press Zmiana + F10 simultaneously. A Command Prompt window should appear. Leave this window open.
- Naciskać Alt + Patka several times. This should bring the PIN input screen to the foreground.
- Enter your PIN and proceed with the setup.
- If the Windows 11 sign-in screen appears to be stuck after setup, press and hold the Zmiana key while clicking the Power icon (bottom right of screen) and selecting "Restart".
- From the blue "Choose an option" screen, select "Troubleshoot".
- Select "Reset this PC".
- Choose "Keep my files" (or "Remove everything" if you prefer a clean reset).
- Select "Local reinstall".
- Follow the prompts to complete the reset process. After the reset, the Windows setup should proceed normally.
8. Specyfikacje
| Funkcja | Szczegół |
|---|---|
| Edytor | Intel Core Ultra 9 285H (5.4 GHz, 16 rdzeni) |
| Grafika | Procesor graficzny Intel Arc 140T (zintegrowany) |
| BARAN | 32 GB DDR5 5600 MHz (z możliwością rozbudowy do 128 GB) |
| Składowanie | 2TB NVMe PCIe Gen4 x4 SSD (Supports up to 4TB), 1x M.2 2242 SATA III SSD slot (Supports up to 2TB) |
| System operacyjny | Windows 11 Pro |
| Wyświetl wyjście | 2x HDMI 2.0 (4K@120Hz), 1x Mini DP 1.4 (8K), 2x USB4 Type-C (8K) - Supports Quad Display |
| Łączność | WiFi 7, Bluetooth 5.4, Dual 2.5G LAN |
| Porty USB | 2x USB4 Type-C, 4x USB 3.2 Gen2 Type-A, 1x USB 2.0 Type-A |
| Inne porty | 1x SD 4.0 Card Reader, 1x 3.5mm Headset Jack, 1x Kensington Lock |
| Wymiary (dł. x szer. x wys.) | 8.94 x 6.92 x 5.27 cala |
| Waga | 3.65 funta |
| Układ chłodzenia | IceBlast 2.0 (Dual Copper Pipes, Silent Fan) |
9. Gwarancja i wsparcie
The GEEKOM GT2 Mega Mini PC comes with a 3-year warranty. For technical assistance or warranty claims, please contact GEEKOM customer support.

9.1 Kontakt z pomocą techniczną
You can reach GEEKOM support through the following methods:
- E-mail: Skontaktuj się z zespołem obsługi posprzedażowej pod adresem shirley.li@geekom.tw.
- Amazon Seller Page: If purchased on Amazon, log into your Amazon buyer's account, find your order, and click "Get help" to contact the seller.

To ensure authenticity and warranty coverage, always purchase GEEKOM products from the Official Amazon Store or GEEKOM's official webstrona.


