1. Wprowadzenie
This manual provides detailed instructions for the installation, operation, and maintenance of your Thermalright Grand Vision 240 ARGB CPU Liquid Cooler. Designed for high cooling performance, this AIO liquid cooler features a detachable magnetic IPS LCD screen with 480x480 resolution, allowing for customizable displays and system monitoring. It is compatible with a wide range of Intel and AMD platforms, including AM4, AM5, LGA1150, 1151, 1155, 1156, 1200, 2011, 2066, 1700, and 1851 sockets. Please read this manual thoroughly before installation and use to ensure optimal performance and longevity of your product.
2. Co znajduje się w pudełku
The Thermalright Grand Vision 240 ARGB CPU Liquid Cooler package includes the following components:
- CPU cooler (pre-assembled with radiator, fans, waterblock, and tubing)
- Mounting hardware for Intel (LGA115X/1200/1700/1851/2011/2066) and AMD (AM4/AM5) sockets
- Pasta termoprzewodząca
- LCD data and power cable

3. Specyfikacje
Key specifications for the Thermalright Grand Vision 240 ARGB CPU Liquid Cooler:
| Funkcja | Specyfikacja |
|---|---|
| Wymiary produktu | 11.14"L x 4.72"W x 2.17"H (283x120x55mm radiator) |
| Wymiary bloku wodnego | 70.5x77.5x72.5mm |
| Tomtage | Prąd stały 12 V |
| Prędkość pompy wodnej | 6400 obr/min ± 10% |
| Cold Head Interface | 4-pinowy PWM |
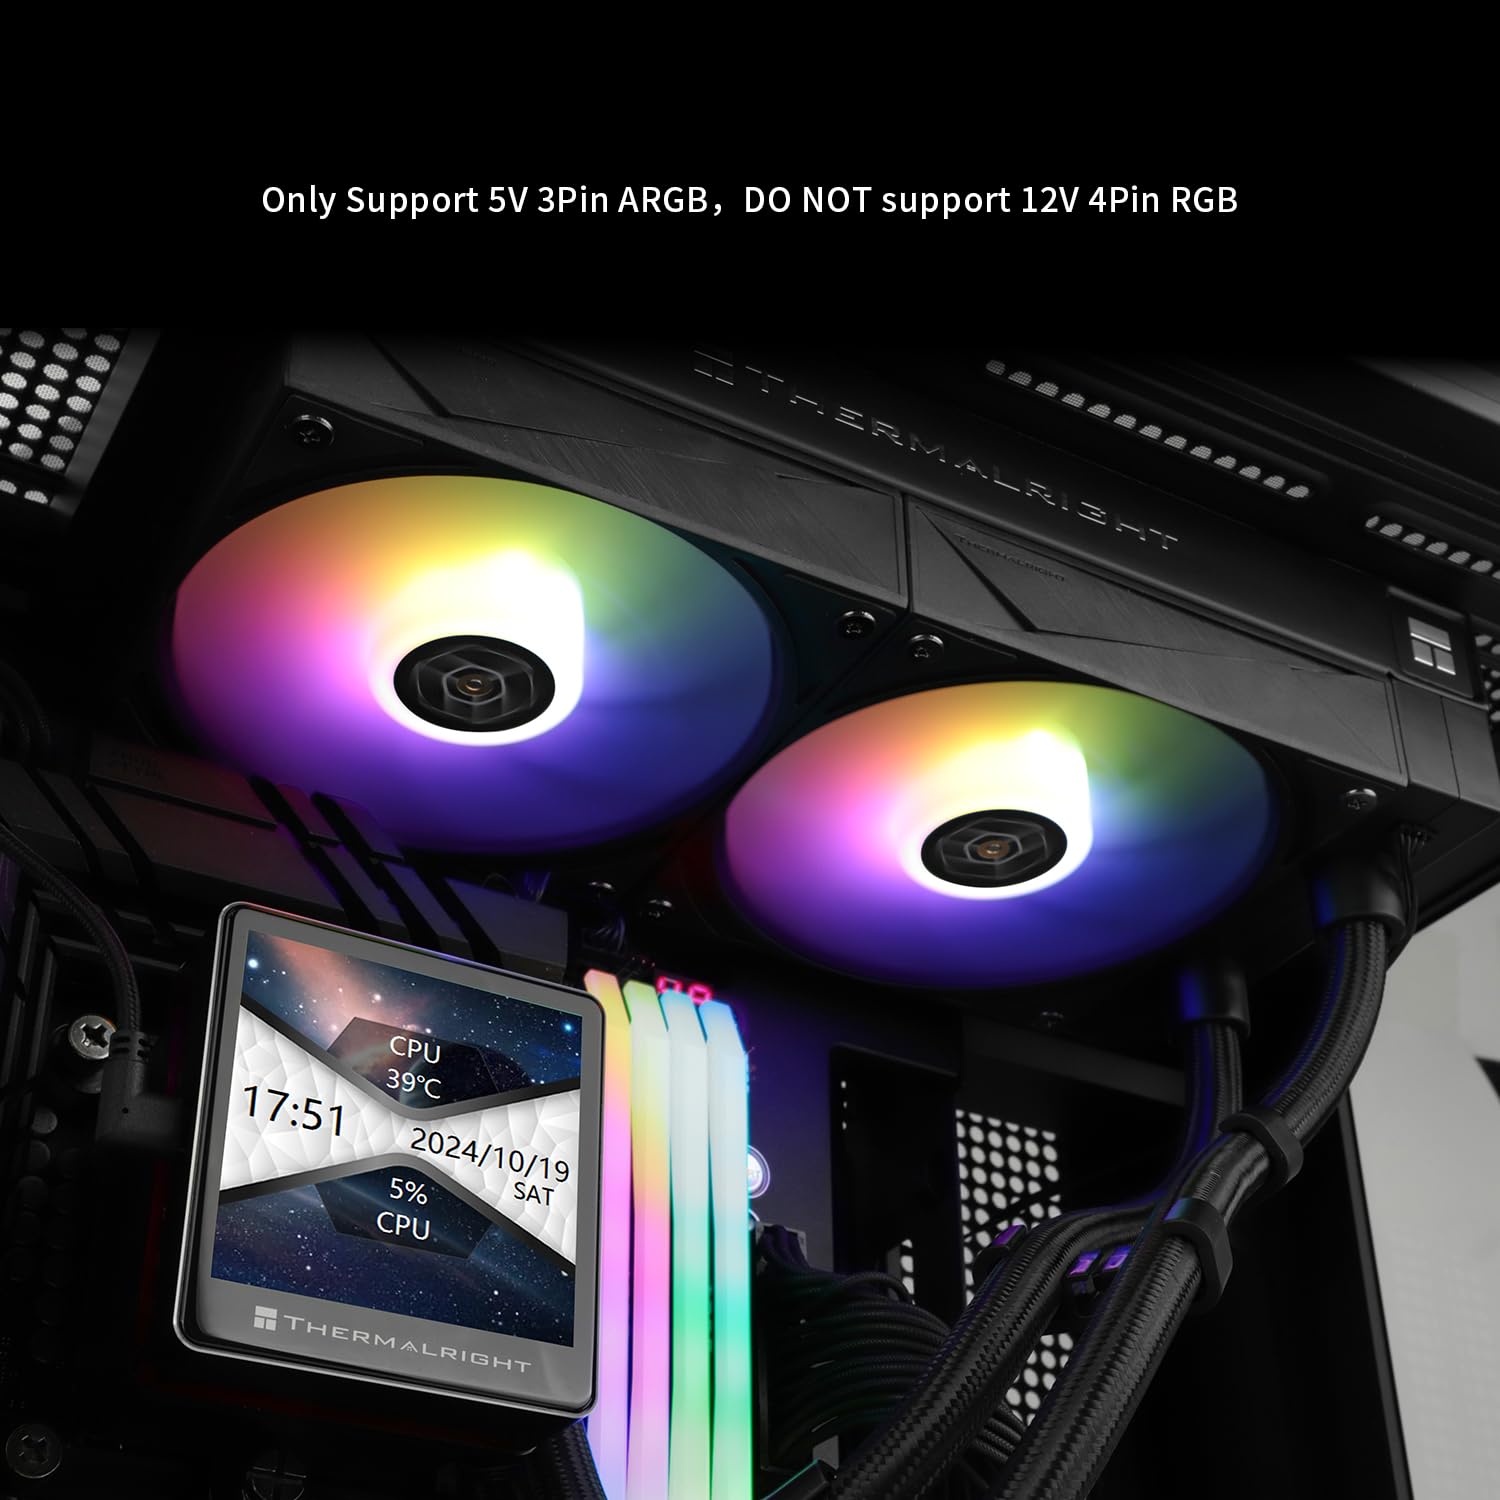
| Light Interface | 5V 3PIN ARGB |
| Rozmiar wentylatora | 120x120x28mm |
| Prędkość wentylatora | 2150 obr/min ± 10% |
| Wentylator przepływu powietrza | 80.45CFM |
| Hałas podczas pracy | ≤29.8dBA |
| Metoda chłodzenia | Woda |
| Tworzywo | Aluminium |
| Kompatybilne urządzenia | Pulpit |
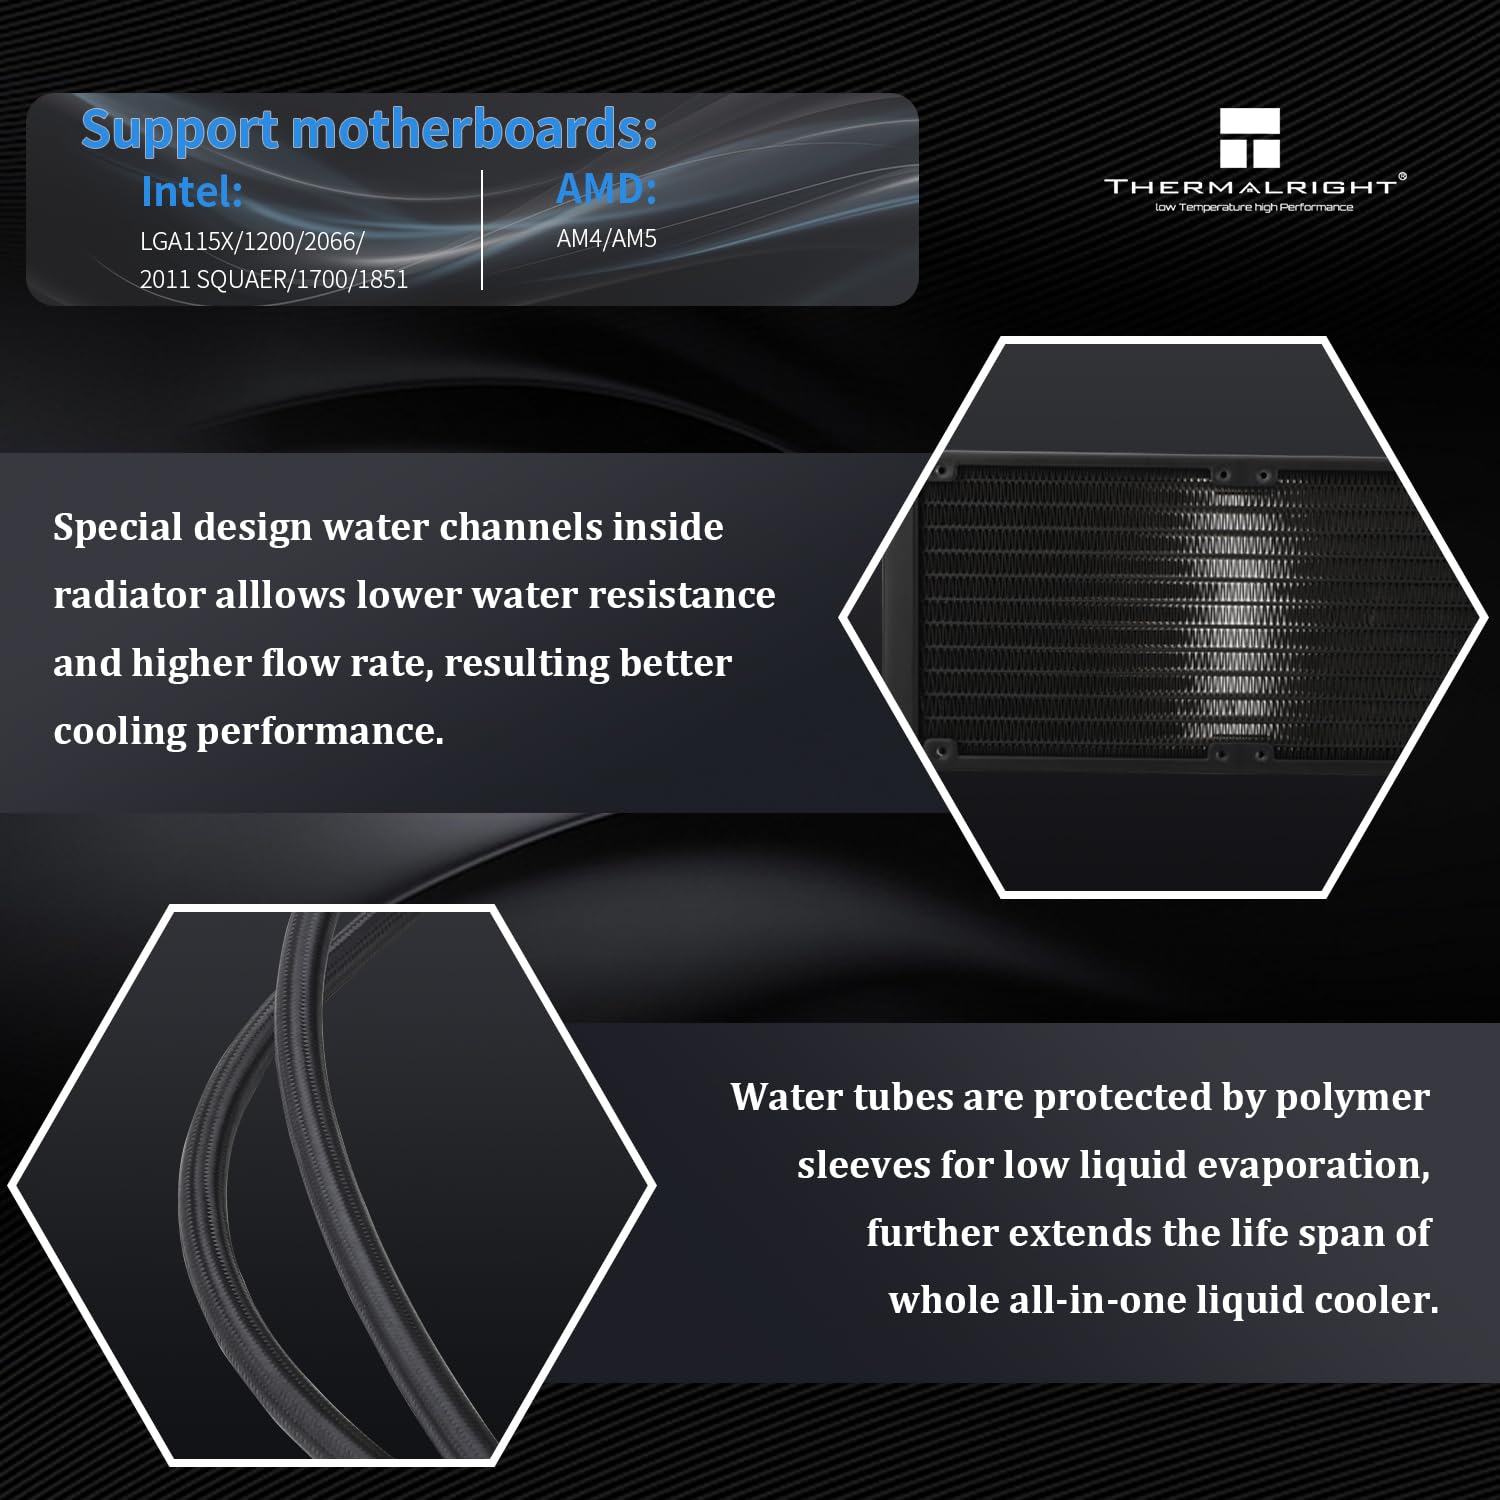
| Kompatybilne gniazda | AMD: AM4/AM5, Intel: LGA1150/1151/1155/1156/1200/2011/2066/1700/1851 |

4. Konfiguracja i instalacja
Proper installation is crucial for the performance of your liquid cooler. Please follow the steps carefully. For a visual guide, refer to the installation video below.
4.1. Intel LGA1700/1851 Installation
- Adjust the backplate screw positions for LGA1700/1851 compatibility.
- Install the backplate from the backside of the motherboard, ensuring the screws pass through the correct holes.
- Install the blue 1851/1700 spacers through the backplate screws from the front side of the motherboard.
- Place the Intel brackets onto the spacers, aligning the backplate screws with the LGA1700/1851 holes on the brackets.
- Secure the metal brackets with four Intel nuts, tightening them evenly with a screwdriver.
4.2. Instalacja procesora AMD AM5/AM4
- For AMD AM5 and AM4 motherboards, remove the existing motherboard brackets. Keep the original backplate as it will be used.
- Install the four red spacers onto the motherboard's CPU socket screw holes.
- Install the two metal brackets (marked AM4/AM5) onto the spacers, securing them with the provided screws. Tighten evenly with a screwdriver.
4.3. Nakładanie pasty termoprzewodzącej
Apply a small amount of thermal compound onto the center of the CPU's Integrated Heat Spreader (IHS). A pea-sized or X-pattern application is generally recommended for even spread when the waterblock is mounted.
4.4. Mounting the Waterblock
- Remove the protective sticker from the coldplate of the waterblock.
- Carefully place the waterblock onto the CPU, ensuring the waterblock bracket nuts align with the screws on the installed mounting brackets.
- Tighten both nuts on the waterblock evenly to apply mounting pressure. Do not overtighten.
4.5. Połączenia okablowania
The PWM and lighting sync cables for the fans are pre-connected to the radiator. Connect the following cables to your motherboard:
- Connect the fan PWM cable to the motherboard's CPU_FAN header.
- Connect the pump power cable to the CPU_OPT or AIO_PUMP header on the motherboard.
- Connect the 3-pin ARGB lighting cable to the motherboard's +5V 3PIN ARGB header for lighting synchronization.
- For the LCD display, connect the Type-C data cable to the waterblock LCD.
- Connect the USB cable from the LCD to a USB 2.0 header on the motherboard.
- Connect the LCD power connector to a SATA power cable from your power supply.

5. Instrukcja obsługi
The Thermalright Grand Vision 240 ARGB features an IPS LCD screen for system monitoring and customization.
5.1. LCD Screen Functionality
The 3.4-inch IPS LCD screen can display various static and dynamic images, system projection, and real-time system performance figures such as CPU clock frequencies, temperatures, and usage. The modular design with magnet suction allows for easy adjustment and removal.

5.2. Kontrola oprogramowania
To fully utilize the LCD screen's customization features, including dynamic picture switching, GIF playback, video playback, and system monitoring, install the dedicated Thermalright TRCC software. This software allows you to select various themes, animations, and monitor critical system parameters.


6. Konserwacja
Regularna konserwacja pomaga zapewnić długowieczność i optymalną wydajność chłodnicy cieczy.
- Usuwanie kurzu: Periodically clean the radiator fins and fan blades with compressed air to prevent dust buildup, which can impede airflow and cooling efficiency.
- Inspekcja rur: Check the coolant tubes for any signs of kinks, leaks, or damage. Ensure connections are secure.
- Działanie wentylatora: Listen for unusual noises from the fans or pump. If any component sounds abnormal, investigate the cause.
- Pasta termoprzewodząca: While not frequently required, if you remount the waterblock, clean off old thermal paste and apply new thermal compound.
7. Rozwiązywanie Problemów
If you encounter issues with your Thermalright Grand Vision 240 ARGB, refer to the following common troubleshooting steps:
- Brak zasilania/brak świateł:
- Ensure all power cables (SATA for LCD, PWM for pump/fans) are securely connected to the power supply and motherboard.
- Verify that the motherboard headers are correctly configured in the BIOS/UEFI.
- Wysokie temperatury procesora:
- Check if the waterblock is properly seated and tightened on the CPU.
- Confirm that thermal compound was applied correctly and evenly.
- Ensure fans are spinning and the pump is operating (listen for a faint hum or check software monitoring).
- Wyczyść kurz nagromadzony na żebrach chłodnicy.
- Nietypowy hałas:
- Zidentyfikuj źródło hałasu (wentylatory lub pompa).
- Check for any cables obstructing fan blades.
- If the pump is noisy, ensure there are no air bubbles trapped in the loop. Gently tilt the PC case to help dislodge bubbles.
- LCD Display Not Working/Incorrect Display:
- Verify the Type-C data cable and USB 2.0 header connection.
- Ensure the SATA power cable for the LCD is connected.
- Check the Thermalright TRCC software for display settings and updates.
8. Gwarancja i wsparcie
Thermalright products are manufactured to high-quality standards and are covered by a manufacturer's warranty. For specific warranty terms, duration, and conditions, please refer to the warranty card included with your product or visit the official Thermalright website. For technical support, troubleshooting assistance, or replacement parts, please contact Thermalright customer service through their official support channels.


