1. Wprowadzenie
This manual provides essential information for the safe and efficient operation, maintenance, and care of your Miele Guard L1 Cat & Dog Bagged Canister Vacuum Cleaner. Designed specifically for pet owners, this vacuum features powerful suction, specialized floorheads, and an odor-reducing filter system to maintain a clean and fresh home environment. Please read these instructions thoroughly before first use and keep them for future reference.

Image 1.1: The Miele Guard L1 Cat & Dog Bagged Canister Vacuum, showcasinze względu na elegancki design i główne komponenty.
2. Informacje dotyczące bezpieczeństwa
Aby zapobiec obrażeniom ciała lub uszkodzeniu urządzenia, należy zawsze przestrzegać następujących środków ostrożności:
- Upewnij się, że objętośćtage rating on the vacuum matches your local power supply before plugging in.
- Do not use the vacuum cleaner without the dustbag and filters correctly installed.
- Do not vacuum liquids, damp dirt, or hot ashes.
- Trzymaj włosy, luźne ubrania, palce i inne części ciała z dala od otworów i ruchomych części.
- Unplug the appliance from the outlet when not in use and before servicing.
- Do not use the vacuum cleaner if the power cord is damaged. Contact authorized service personnel.
3. Zawartość opakowania
Sprawdź, czy w opakowaniu znajdują się wszystkie elementy:
- Miele Guard L1 Cat & Dog Bagged Canister Vacuum Cleaner
- TurboTeQ Floorhead
- AllTeQ Universal Floorhead
- Integrated Active AirClean Filter (pre-installed)
- HyClean Air TU Vacuum Bag (pre-installed)
- 2-in-1 Upholstery and Crevice Nozzle
- Dusting Brush (integrated into comfort handle)
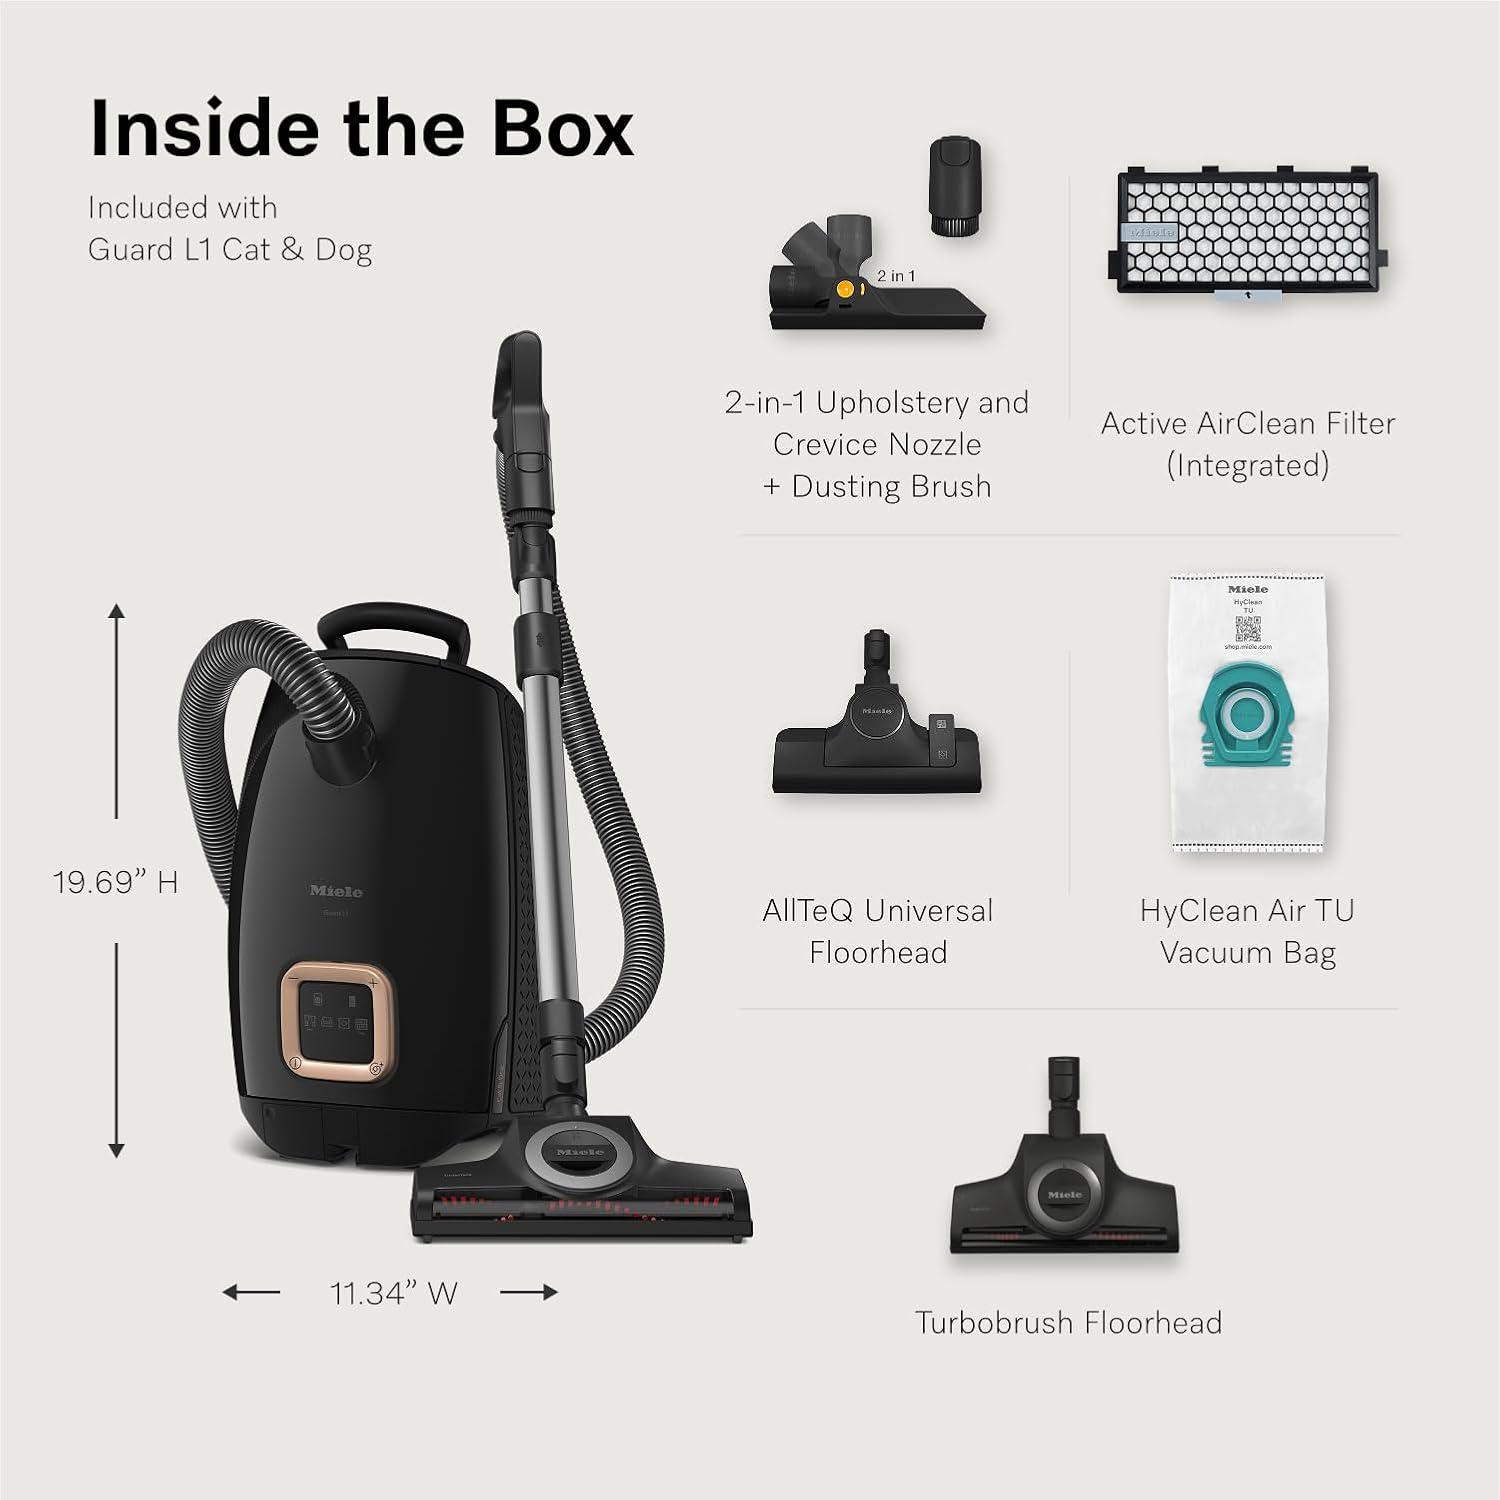
Obraz 3.1: Ponadview of the Miele Guard L1 Cat & Dog vacuum and its included accessories, such as the two floorheads, 2-in-1 nozzle, dusting brush, filter, and vacuum bag.
4. Konfiguracja
- Podłącz wąż: Insert the hose connector into the suction inlet on the vacuum cleaner body until it clicks securely into place.
- Złóż teleskopową różdżkę: Connect the comfort handle of the hose to the telescopic wand. Then, attach your desired floorhead (TurboTeQ or AllTeQ) to the other end of the telescopic wand. Ensure all connections are firm.
- Check Dustbag and Filter: Open the dustbag compartment and ensure a HyClean Air TU vacuum bag and the Active AirClean Filter are correctly seated. Refer to Section 6 for details on replacement.
- Podłączenie zasilania: Extend the power cord by pulling it out. Plug the power cord into a suitable electrical outlet.
5. Instrukcja obsługi
5.1 Włączanie/wyłączanie zasilania
Naciśnij przełącznik nożny z symbolem zasilania (Wejście/Wyjście) on the vacuum cleaner body to turn the appliance on or off.
5.2 Regulacja siły ssania
The Miele Guard L1 features foot-controlled suction power settings. Use the plus (+) i minus (-) foot switches on the vacuum cleaner body to adjust the suction power according to the surface being cleaned. There are four power levels, indicated by illuminated symbols:
- Min: For light textiles, curtains, or delicate items.
- Meble: For upholstery and cushions.
- Wykładzina podłogowa: For low to medium pile carpets and rugs.
- Maksymalnie: For hard floors and heavily soiled carpets.

Image 5.1: The foot switches on the vacuum cleaner allow for easy adjustment of suction power without bending down.
5.3 Używanie głowic podłogowych
Your Miele Guard L1 comes with two specialized floorheads:
- TurboTeQ Floorhead: This floorhead is ideal for thoroughly cleaning pet hair and dirt from low to medium pile carpets. Its rotating brush bar is powered by the vacuum's airflow.

Image 5.2: The TurboTeQ Floorhead effectively removes pet hair from carpeted surfaces.
- AllTeQ Universal Floorhead: This versatile floorhead allows for seamless transitions between hard floors and low-pile carpets. Use the footswitch on the floorhead to retract the bristles for hard floors or extend them for carpets.

Image 5.3: The AllTeQ Universal Floorhead is suitable for both hard floors and low-pile carpets, with an adjustable brush.
5.4 Korzystanie z akcesoriów
- 2-in-1 Upholstery and Crevice Nozzle: This tool is stored conveniently on the comfort handle. It combines a narrow crevice tool for tight spaces and an upholstery tool for cleaning fabric surfaces.
- Pędzel do kurzu: Integrated into the comfort handle, this brush is ideal for gently cleaning delicate surfaces, shelves, and intricate items.

Image 5.4: The versatile 2-in-1 Upholstery and Crevice Nozzle is stored on the handle for easy access and use.
5.5 Parking System
For convenient breaks during vacuuming or for storage, the floorhead can be hooked onto the rear or underside of the vacuum cleaner. This secures the suction wand in an upright position.

Image 5.5: The parking system allows for easy temporary storage of the floorhead and wand.
5.6 Komfortowe zwijanie przewodu
To rewind the power cord, gently tap the foot switch with the cord symbol (⌫) on the vacuum cleaner body. The cord will automatically retract.

Image 5.6: The comfort cord rewind feature allows for quick and easy storage of the power cord with a single touch.
6. Konserwacja
6.1 Changing the Vacuum Bag
The HyClean Air TU vacuum bag should be changed when the dustbag indicator fills up, or when suction power noticeably decreases. These bags are crafted with 80% recycled material and feature ComfortFit technology for dust-free disposal.
- Odłącz odkurzacz od gniazdka elektrycznego.
- Open the dustbag compartment lid.
- The full dustbag will automatically seal when removed. Carefully pull the collar of the dustbag upwards to fully seal it, then lift it out.
- Insert a new HyClean Air TU vacuum bag into the holder until it clicks into place.
- Close the dustbag compartment lid securely.

Image 6.1: Replacing the HyClean Air TU vacuum bag ensures optimal performance and hygienic disposal of collected dust and debris.
6.2 Replacing the Active AirClean Filter
The Active AirClean Filter, featuring active charcoal, helps neutralize persistent pet odors and should be replaced approximately once a year, or when odors become noticeable. This filter is integrated into the vacuum cleaner.
- Odłącz odkurzacz.
- Locate the filter compartment, typically near the dustbag compartment or at the exhaust.
- Wyjmij stary filtr i zutylizuj go w sposób odpowiedzialny.
- Insert a new Active AirClean Filter, ensuring it is seated correctly.
- Zamknij pokrywę komory filtra.

Image 6.2: The Active AirClean Filter system, designed to capture dust and neutralize odors during vacuuming.
6.3 Cleaning Floorheads
Regularly check the floorheads for tangled hair, threads, or debris. Use scissors to carefully cut away any tangled material from the brush rollers (especially on the TurboTeQ floorhead) and remove it. Ensure the air intake openings are clear.
7. Rozwiązywanie Problemów
| Problem | Możliwa przyczyna | Rozwiązanie |
|---|---|---|
| No suction or reduced suction power | Full dustbag, clogged hose/floorhead, blocked filter, incorrect suction setting. | Replace dustbag, clear blockages, check/replace filters, adjust suction power. |
| Vacuum cleaner does not switch on | No power supply, power cord not fully plugged in, thermal cut-out activated. | Check power outlet, ensure cord is fully plugged in, allow appliance to cool down. |
| Unpleasant odors during operation | Full dustbag, saturated Active AirClean Filter. | Replace dustbag, replace Active AirClean Filter. |
| Floorhead not picking up pet hair effectively | Tangled brush bar (TurboTeQ), incorrect floorhead for surface, low suction power. | Clean brush bar, ensure correct floorhead is used, increase suction power. |
8. Specyfikacje
- Nazwa modelu: Miele Guard L1 Cat & Dog Bagged Canister Vacuum Cleaner
- Numer modelu przedmiotu: 12704570
- Marka: Miele
- Moc: 1200 watów
- Typ filtra: Active AirClean Filter
- Dustbag Capacity: 4.5 litrów
- Promień działania: 36 stóp.
- Poziom hałasu: 75dB
- Wymiary produktu: 19.69" dł. x 11.34" szer. x 9.41" wys.
- Waga przedmiotu: 15.7 funta
- Metoda sterowania: Push Button (Foot Switches)
- Cechy szczególne: Bagged, Corded, High Power, Low Noise, Odor-Reducing, Multi-Surface Cleaning
9. Gwarancja i wsparcie
Miele products are known for their quality and durability. For specific warranty details, please refer to the warranty card included with your purchase or visit the official Miele website. For technical support, spare parts, or service inquiries, please contact Miele customer service directly. Keep your proof of purchase and model number (12704570) handy when contacting support.
Obsługa klienta Miele: Refer to your regional Miele website or documentation for contact information.


