Wstęp
Thank you for choosing the suptek Single Monitor Wall Mount. This manual provides detailed instructions for the safe and efficient installation, operation, and maintenance of your new monitor arm. Please read this manual thoroughly before installation and keep it for future reference.
This wall mount is designed to securely hold a single monitor, freeing up desk space and allowing for ergonomic adjustments to enhance your viewkomfort i produktywność.
Informacje dotyczące bezpieczeństwa
OSTRZEŻENIE: Improper installation may result in property damage or personal injury. If you do not understand these instructions, or have doubts about the safety of the installation, please contact a qualified installer.
- Nie przekraczać maksymalnego udźwigu wynoszącego 9 kg (19.8 funtów).
- Ensure the mounting surface (wall) can safely support the combined weight of the mount and the monitor.
- Always use a stud finder to locate wood studs for secure mounting. For concrete or brick walls, use appropriate anchors (included). Do not mount into drywall alone.
- Trzymaj dzieci z dala od ruchomych części.
- Check all connections regularly to ensure they remain secure.
- Produkt przeznaczony jest wyłącznie do użytku wewnątrz pomieszczeń.
Zawartość opakowania
Please verify that all components are present and undamaged before installation. If any parts are missing or defective, contact customer support.
- Zespół ramienia monitora
- Płyta ścienna
- Płyta VESA
- Hardware Kit (screws, washers, spacers, wall anchors)
- Klucze sześciokątne
- Instrukcja obsługi
Specyfikacje
| Funkcja | Szczegół |
|---|---|
| Marka | suptek |
| Model | B0FHVH6PLY |
| Kompatybilny rozmiar ekranu | 17 do 32 cala |
| Nośność | 4.4 - 19.8 funta (2 - 9 kg) |
| Zgodność ze standardem VESA | 75x75mm, 100x100mm |
| Kąt nachylenia | ±80° |
| Kąt obrotu | ±90° |
| Obrót | 360° |
| Maksymalne rozszerzenie | 20.47 cali (52 cm) |
| Zakres regulacji wysokości | 12.59 cali (32 cm) |
| Tworzywo | Stal stopowa |
| Kolor | Biały |

Image: Compatibility details including VESA 75x75mm and 100x100mm, max load 19.8 lbs, monitor size 13-32 inches, and compatible wall types (Wood Stud, Concrete Wall, Brick Wall).
Konfiguracja i instalacja
Follow these steps carefully to install your monitor wall mount.
Step 1: Choose Mounting Location and Wall Type
Select a location on your wall that is structurally sound and can support the weight of the mount and your monitor. Use a stud finder to locate a wood stud for optimal security. For concrete or brick walls, ensure you use the appropriate wall anchors provided.

Image: Wall mount installation compatibility with Wood Stud (requires specific method), Concrete Wall, and Brick Wall.
Krok 2: Zamontuj płytkę VESA do monitora
- Aby zapobiec porysowaniu, ostrożnie połóż monitor ekranem do dołu na miękkiej i czystej powierzchni.
- Identify the VESA mounting holes on the back of your monitor (75x75mm or 100x100mm).
- Select the correct screws (M4 or M5) and washers from the hardware kit that fit your monitor's VESA holes. If the screws are too long, use the provided spacers.
- Attach the VESA plate to the back of your monitor using the selected screws and washers. Do not overtighten.
Krok 3: Zamontuj płytę ścienną na ścianie
- Hold the wall plate against the wall at your desired mounting height. Use a level to ensure it is straight.
- Zaznacz miejsca wierceń otworów w płycie ściennej.
- W przypadku kołków drewnianych: Drill pilot holes (recommended size in manual) into the center of the stud. Secure the wall plate using the lag bolts provided.
- Do ścian betonowych/ceglanych: Drill pilot holes (recommended size in manual) and insert the plastic wall anchors. Then secure the wall plate using the lag bolts.
- Upewnij się, że płyta ścienna jest solidnie i stabilnie przymocowana do ściany.
Step 4: Attach Monitor Arm to Wall Plate
Slide the monitor arm assembly onto the wall plate. Ensure it clicks securely into place. There may be a locking screw or mechanism to further secure it; refer to the detailed diagram in the included printed manual.
Step 5: Attach Monitor to Arm
Carefully slide the monitor (with the attached VESA plate) onto the VESA head of the monitor arm. Secure it with the locking screw or mechanism, typically located on the top or side of the VESA head.
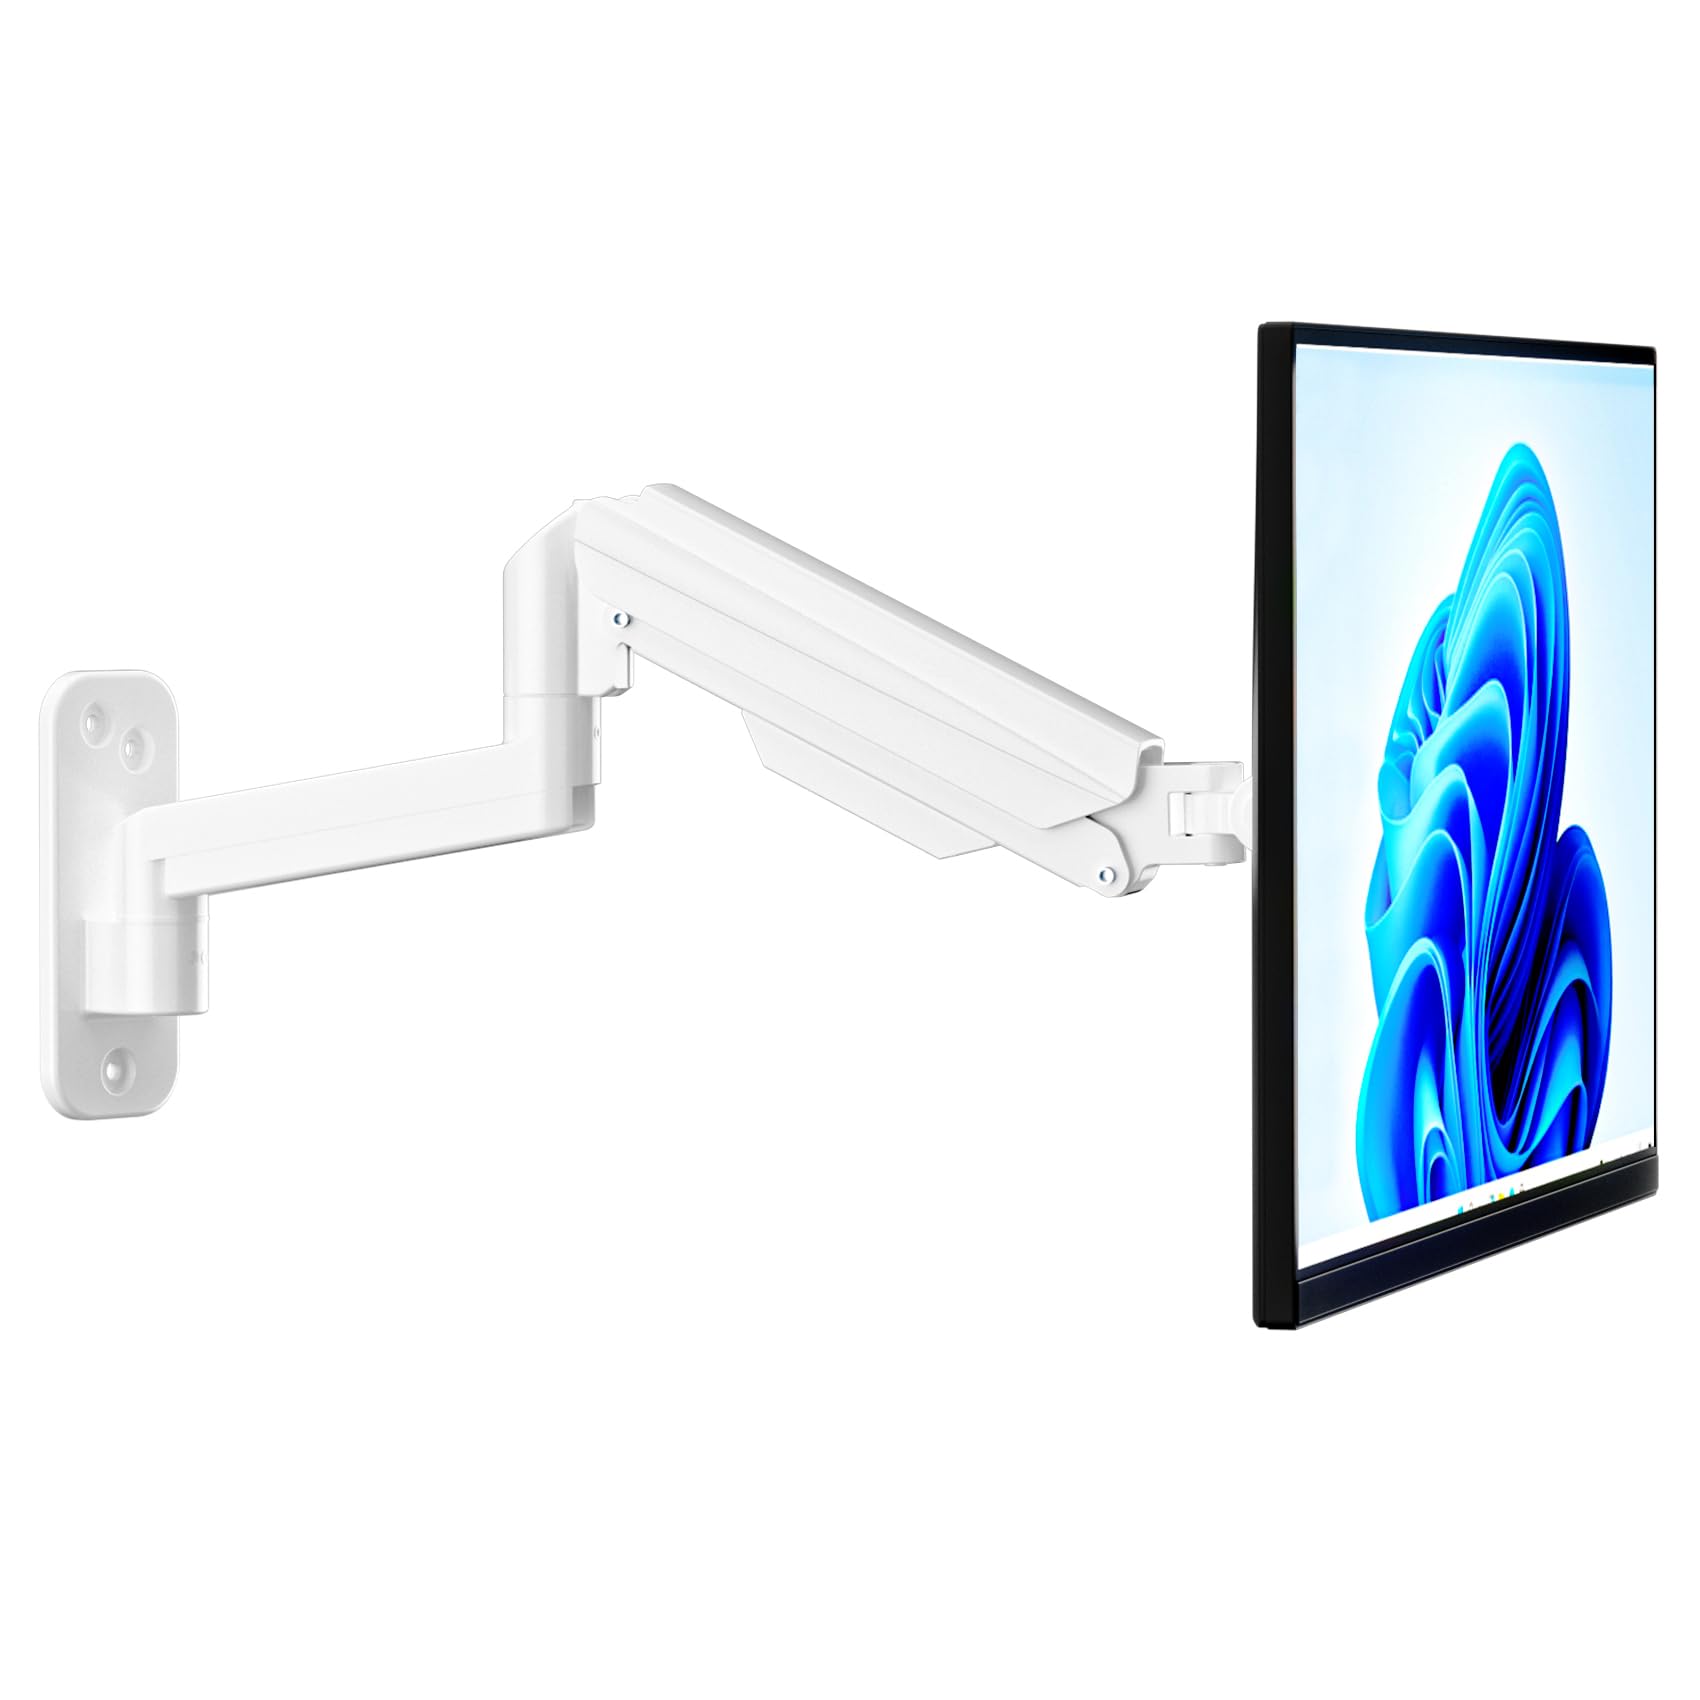
Image: Fully installed suptek Single Monitor Wall Mount with a monitor attached.
Instrukcja obsługi
Regulacja napięcia sprężyny gazowej
The gas spring mechanism allows for smooth height adjustment. The tension needs to be adjusted to match your monitor's weight for optimal performance. Use the provided hex key to adjust the tension screw located on the arm.
- Turn Clockwise (+): For lighter monitors, to increase tension and prevent the monitor from dropping.
- Turn Counter-Clockwise (-): For heavier monitors, to decrease tension and allow the monitor to move down easily.
Adjust until the monitor stays at any desired height when released.

Image: Gas spring tension adjustment points and directions for lighter/heavier monitors.
Full Motion Adjustments
The monitor arm offers a wide range of motion for ergonomic positioning:
- Przechylenie: Adjust the monitor screen ±80° up or down to reduce glare and optimize viewkąty.
- Obracać: Rotate the monitor ±90° left or right to share your screen or change viewkierunku.
- Obrót: Rotate the monitor 360° from landscape to portrait orientation.
- Wydłużenie/Cofnięcie: The arm extends up to 20.47 inches (52 cm) and retracts to save space.
- Regulacja wysokości: The gas spring allows for smooth vertical movement within a 12.59-inch (32 cm) range.
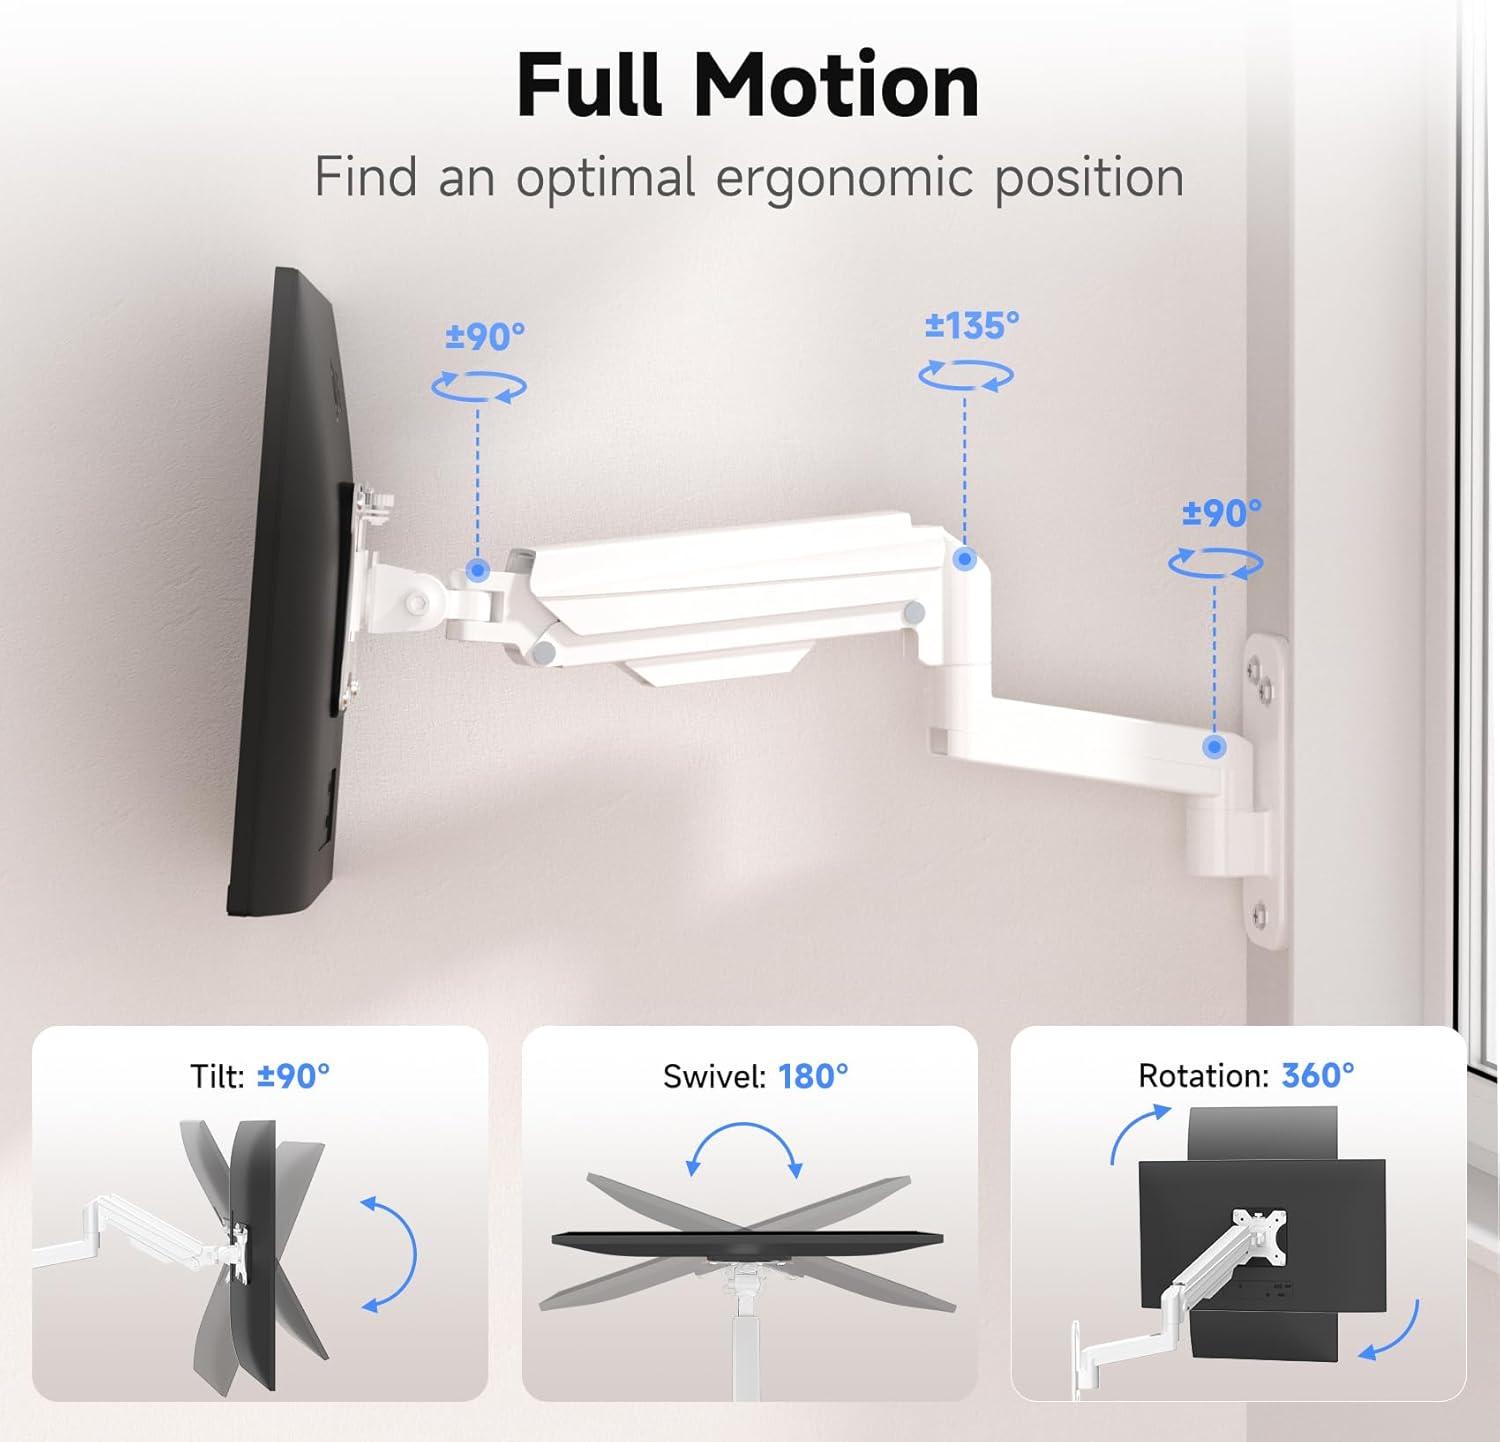
Image: Full motion capabilities including tilt, swivel, and 360° rotation.
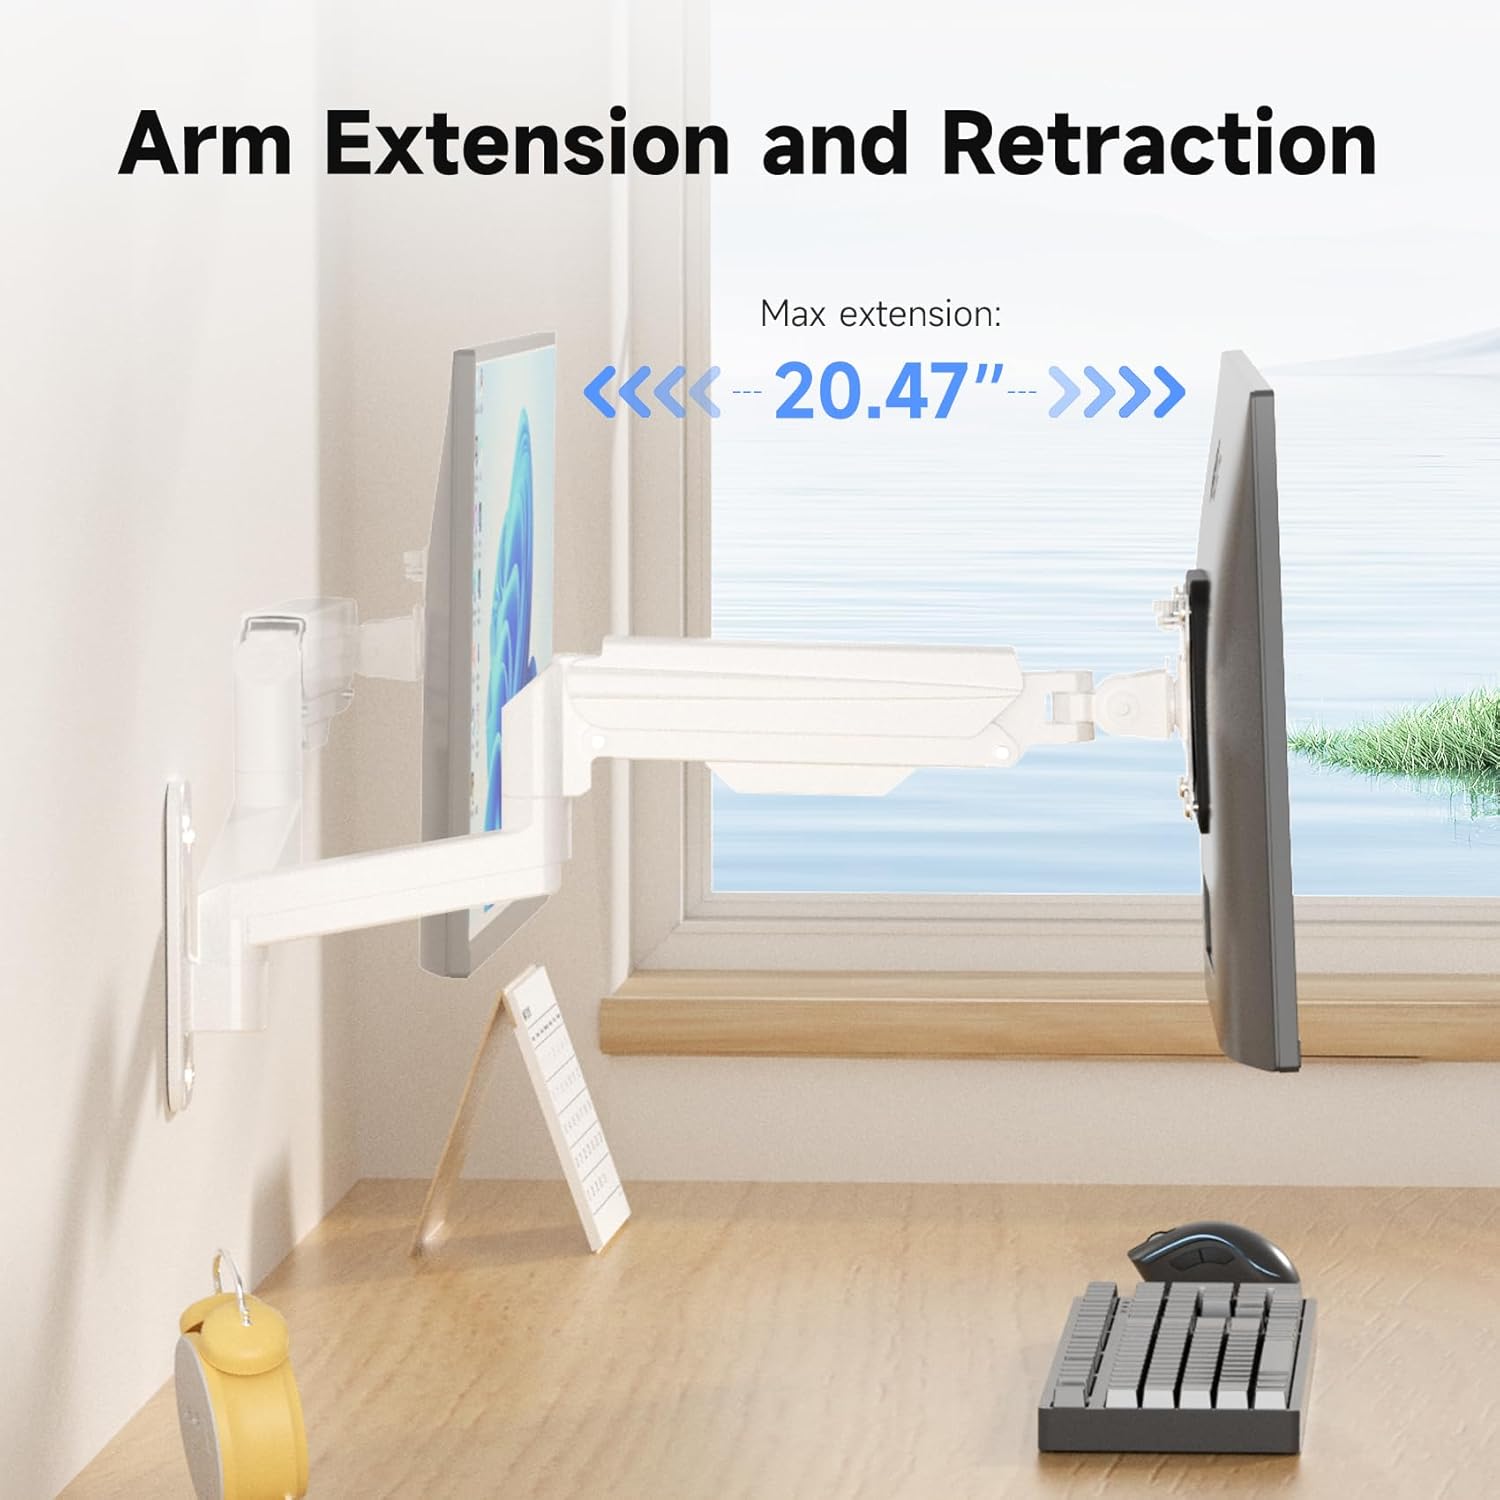
Image: Arm extension and retraction, showing a maximum extension of 20.47 inches.

Image: Height adjustment range of 12.59 inches for eye-level comfort.
Zarządzanie kablami
The monitor arm features integrated cable management clips or channels to keep your cables organized and out of sight. Route your monitor's power and video cables through these channels for a clean and tidy workspace.
Konserwacja
- Okresowo sprawdzaj wszystkie śruby i połączenia, aby mieć pewność, że są dobrze dokręcone i bezpieczne.
- Wyczyść uchwyt miękką ściereczką.amp szmatką. Unikaj środków czyszczących o działaniu ściernym i rozpuszczalników.
- Do not attempt to disassemble the gas spring mechanism.
Rozwiązywanie problemów
| Problem | Możliwa przyczyna | Rozwiązanie |
|---|---|---|
| Monitoruj ugięcia lub spadki | Napięcie sprężyny gazowej jest zbyt słabe w stosunku do ciężaru monitora. | Zwiększ napięcie sprężyny gazowej, obracając śrubę regulacyjną zgodnie z ruchem wskazówek zegara. |
| Monitor is difficult to push down or stays too high | Napięcie sprężyny gazowej jest zbyt duże w stosunku do ciężaru monitora. | Zmniejsz napięcie sprężyny gazowej, obracając śrubę regulacyjną w kierunku przeciwnym do ruchu wskazówek zegara. |
| Góra wydaje się niestabilna | Wall plate not securely fastened; screws loose. | Re-check all mounting screws on the wall plate and tighten them. Ensure proper wall type and anchors were used. |
| Monitor nie pasuje do płyty VESA | Nieprawidłowy wzór VESA lub rozmiar śrub. | Verify your monitor's VESA pattern (75x75mm or 100x100mm). Ensure you are using the correct M4 or M5 screws and spacers. |
Gwarancja i wsparcie
For warranty information or technical support, please refer to the warranty card included with your product or visit the official suptek website. If you have any questions or require assistance, do not hesitate to contact suptek customer service.
Informacje kontaktowe: Please refer to the packaging or suptek's official webna naszej stronie znajdziesz najnowsze dane kontaktowe.


