1. Ważne informacje dotyczące bezpieczeństwa
Before operating your ANIIOKI AQ177 PRO MAX Electric Bike, please read this manual thoroughly and retain it for future reference. Adherence to safety guidelines is crucial for preventing accidents and ensuring proper function.
- Podczas jazdy należy zawsze nosić kask i odpowiedni sprzęt ochronny.
- Zapoznaj się z lokalnymi przepisami ruchu drogowego i regulacjami dotyczącymi rowerów elektrycznych.
- Przed każdym użyciem należy przeprowadzić kontrolę pojazdu, sprawdzając hamulce, ciśnienie w oponach i poziom naładowania akumulatora.
- Nie używaj roweru elektrycznego pod wpływem alkoholu lub narkotyków.
- Unikaj jazdy w niesprzyjających warunkach pogodowych, takich jak ulewny deszcz, śnieg lub lód.
- Przed jazdą sprawdź, czy akumulator jest bezpiecznie zamocowany.
- The ANIIOKI AQ177 PRO MAX is certified to UL2849 and UL2271 standards, ensuring top-tier safety for electrical systems and battery components.
2. Zawartość opakowania
Your ANIIOKI AQ177 PRO MAX Electric Bike package includes the following components:
- ANIIOKI AQ177 PRO MAX Electric Bike (85% pre-assembled)
- 48V 60Ah Detachable Battery
- Ładowarka baterii
- Pedały
- Tool Kit (for final assembly)
- Instrukcja obsługi (ten dokument)
- Klucze do zamka akumulatora
3. Instalacja i montaż
The ANIIOKI AQ177 PRO MAX Electric Bike arrives 85% pre-assembled. Follow these steps for final assembly:
- Rozpakowywanie: Ostrożnie wyjmij wszystkie elementy z opakowania. Zachowaj opakowanie na wypadek ewentualnego transportu lub zwrotu.
- Montaż kierownicy: Attach the handlebars to the stem, ensuring all bolts are tightened securely. Adjust the angle for comfortable riding.
- Mocowanie pedału: Zidentyfikuj lewy (L) i prawy (R) pedał. Lewy pedał dokręca się przeciwnie do ruchu wskazówek zegara, a prawy zgodnie z ruchem wskazówek zegara. Upewnij się, że są one całkowicie nakręcone i dokręcone.
- Instalacja przedniego koła: If not already installed, attach the front wheel, ensuring it is centered and the quick-release or axle nuts are securely fastened.
- Regulacja sztycy siodełka: Włóż sztycę siodełka do ramy i dostosuj jej wysokość do wygodnej pozycji jazdy. Zabezpiecz dźwignią szybkozamykacza.
- Wkładanie baterii: Insert the 48V 60Ah battery into its compartment and lock it using the provided keys.
- Kontrole przed jazdą: Before your first ride, perform all safety checks outlined in Section 1.
For detailed visual guidance, step-by-step assembly and tuning videos are available from the manufacturer.

The ANIIOKI AQ177 PRO MAX Electric Bike, showcasindzięki solidnej ramie i szerokim oponom.

Illustration of the removable 48V 60Ah battery being inserted into the bike frame.
4. Koniec komponentówview
Understanding the key components of your e-bike will enhance your riding experience and maintenance efforts.
- Silnik: Equipped with a Peak 1200W High-Speed Brushless Motor, delivering 110 N·m of torque for powerful acceleration and climbing capabilities.
- Bateria: A 48V 60Ah (2880Wh) Automotive-Grade Detachable Battery provides an impressive range of 100-200 miles per charge, featuring an integrated BMS for safety.
- Układ zawieszenia: Features an upgraded dual-shoulder front fork (80–120mm travel) and a fully adjustable rear suspension for superior comfort on varied terrains.
- Układ hamulcowy: Advanced Dual Hydraulic Disc Brakes offer exceptional stopping power and faster response compared to traditional mechanical brakes.
- Wyświetlacz: A Full-Color LCD display provides essential riding information, including speed, pedal-assist level, battery life, and trip distance.
- Opony: 20"x4.0" CST All-Terrain Tires with reflective sidewalls ensure superior grip and visibility.
- Oświetlenie: A 2000-Lumen Dual-Mode LED Headlight (adjustable up to 90° beam angle) and Integrated Brake & Turn Signal Tail Light enhance visibility and safety.
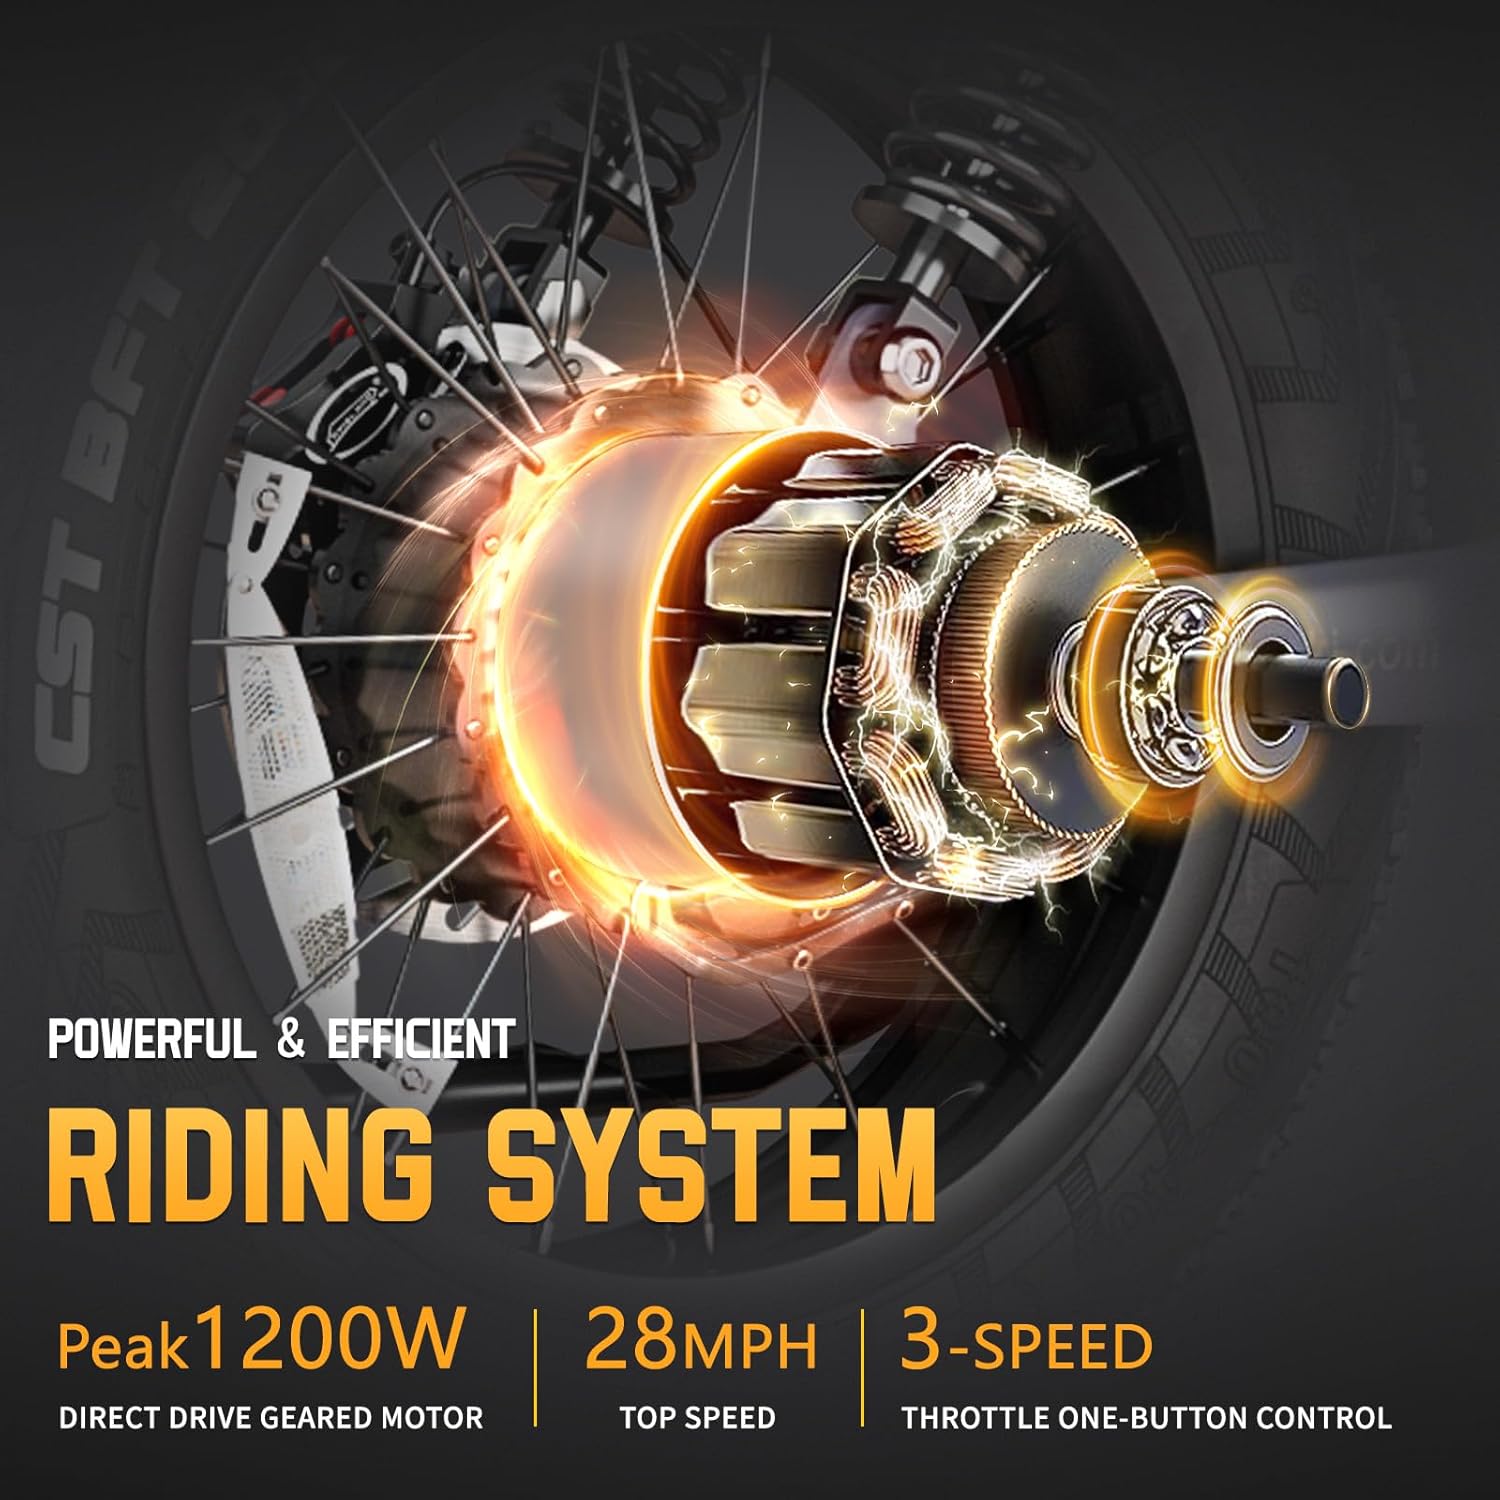
Szczegółowy view of the powerful 1200W peak motor and riding system.

The 5.2-inch full-color LCD display showing bike mode, pedal-assist mode, and throttle mode.

Comparison illustrating the superior stopping power of hydraulic disc brakes over mechanical.
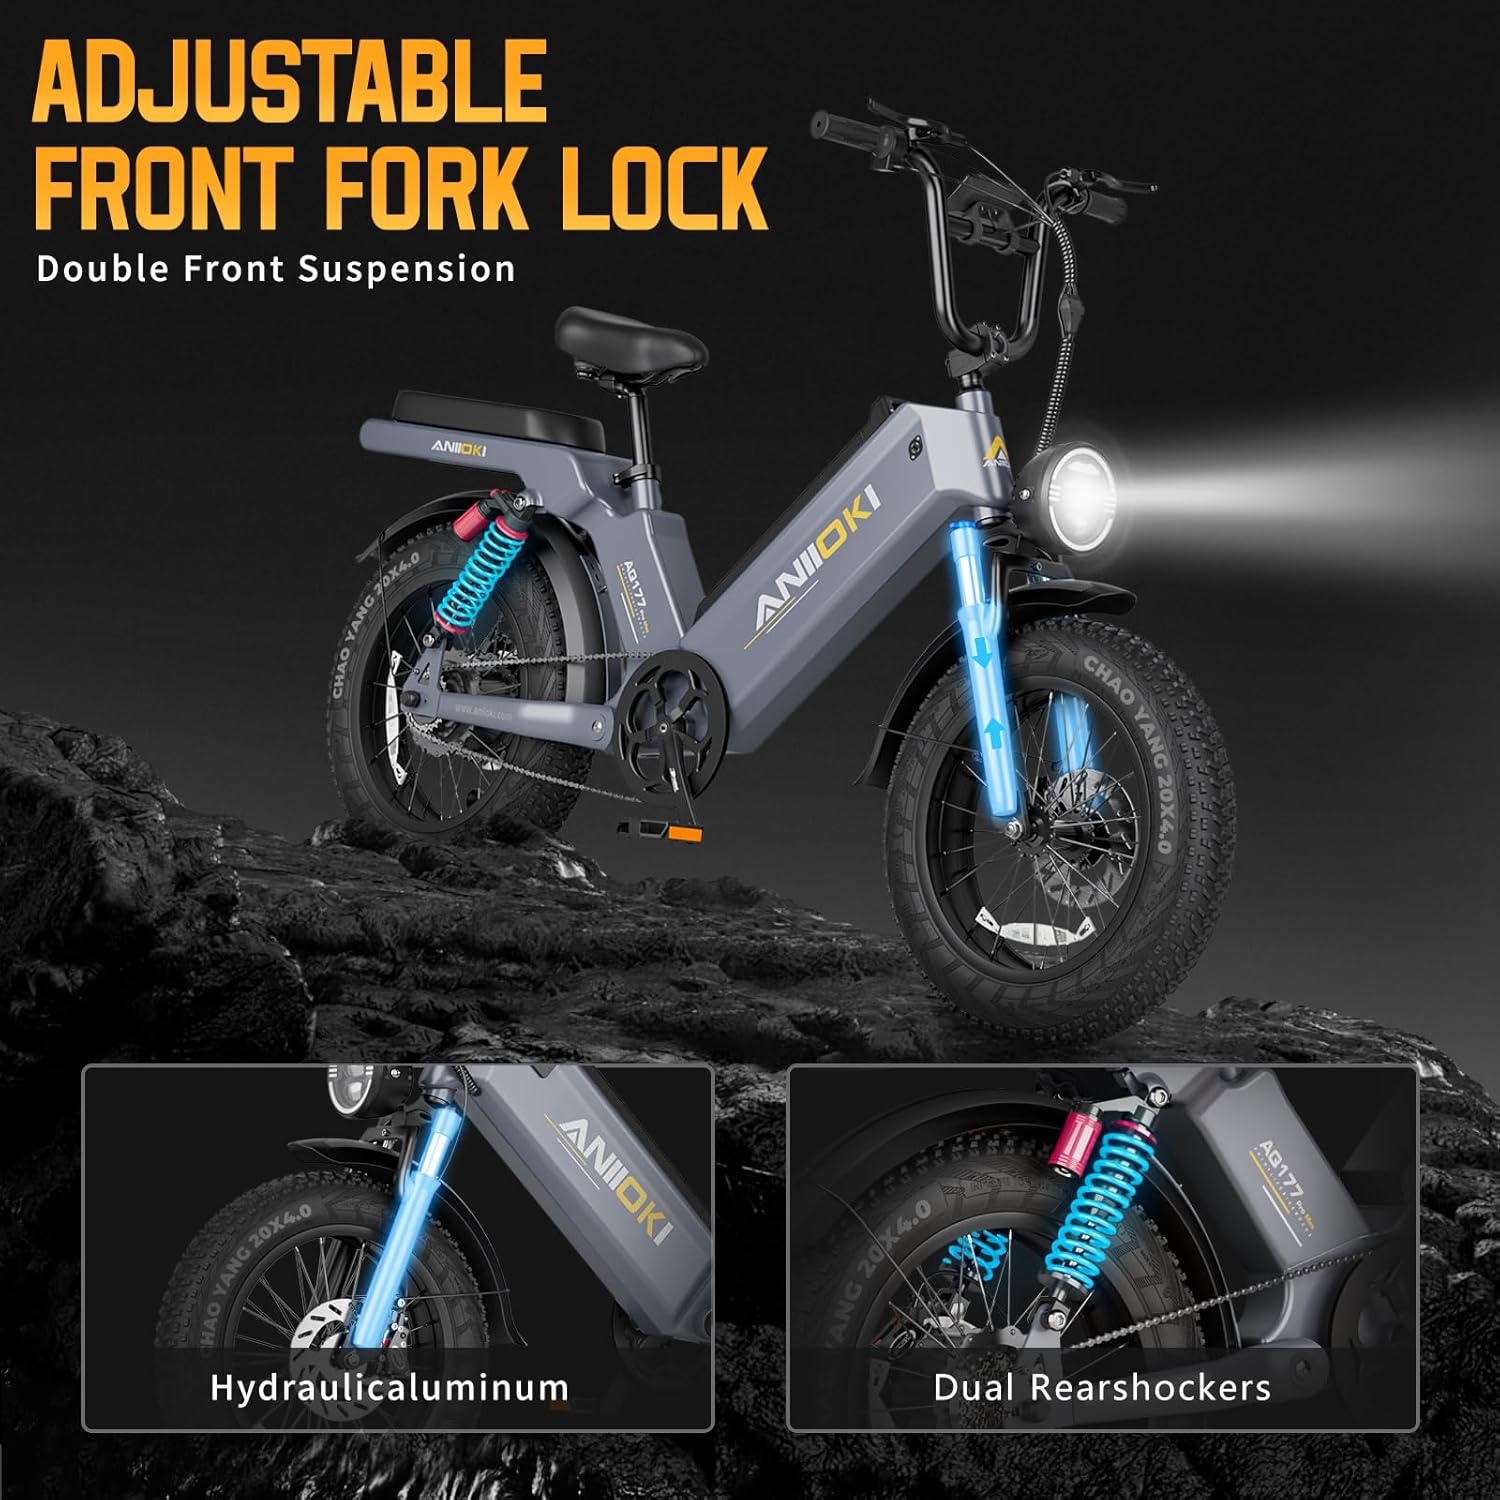
The adjustable front fork and dual rear shock absorbers for enhanced riding comfort.
5. Instrukcja obsługi
Your ANIIOKI AQ177 PRO MAX offers multiple riding modes for versatile use.
5.1 Włączanie/wyłączanie
- To power on the e-bike, ensure the battery is inserted and locked, then press and hold the power button on the LCD display.
- Aby wyłączyć zasilanie, naciśnij i przytrzymaj przycisk zasilania, aż wyświetlacz się wyłączy.
5.2 Tryby jazdy
The bike supports three primary riding modes:
- Tryb rowerowy (tylko pedałowanie): The motor provides no assistance. Ride the bike like a traditional bicycle using pedal power.
- Tryb wspomagania pedałowania (PAS): The motor provides assistance as you pedal. You can adjust the level of assistance (typically 1-3) via the display controls. Higher levels provide more motor power.
- Tryb przepustnicy: Engage the throttle (usually on the handlebar) to propel the bike without pedaling. This mode provides instant power up to the maximum speed.
5.3 Korzystanie z wyświetlacza
The full-color LCD display provides real-time information:
- Prędkość: Aktualna prędkość jazdy.
- Poziom naładowania baterii: Wskazuje pozostały poziom naładowania baterii.
- Pedal-Assist Level (PAS): Shows the current assistance level (1-3).
- Dystans podróży: Displays the distance covered during the current ride.
- Całkowity przebieg: Shows the total distance the bike has traveled.
5.4 System oświetlenia
Activate the 2000-Lumen LED headlight for night riding. The integrated brake and turn signal tail light automatically activates with braking and can be manually controlled for turn signals, enhancing your visibility to others.
6. Zarządzanie baterią
Prawidłowa pielęgnacja akumulatora jest niezbędna do zapewnienia maksymalnego zasięgu i żywotności.
6.1 Ładowanie akumulatora
- Podłącz ładowarkę do portu ładowania akumulatora (na rowerze lub bezpośrednio do wyjętego akumulatora).
- Podłącz ładowarkę do standardowego gniazdka ściennego.
- Podczas ładowania kontrolka ładowarki zazwyczaj świeci na czerwono, a po pełnym naładowaniu na zielono.
- Nie przeładowuj akumulatora. Odłącz ładowarkę po zakończeniu ładowania.
- Ładuj akumulator w dobrze wentylowanym pomieszczeniu, z dala od materiałów łatwopalnych.
6.2 Battery Range
The 48V 60Ah battery provides an impressive range of 100-200 miles on a single charge, depending on factors such as terrain, rider weight, pedal-assist level, and riding speed.
7. Konserwacja
Regularna konserwacja gwarantuje długowieczność i bezpieczną eksploatację Twojego roweru elektrycznego.
7.1 Ogólna opieka
- Utrzymuj rower w czystości. Przecieraj ramę i komponenty miękką szmatką.amp szmatką. Unikaj mycia elementów elektrycznych pod wysokim ciśnieniem.
- Przechowuj rower w chłodnym i suchym miejscu, z dala od bezpośredniego światła słonecznego i ekstremalnych temperatur.
- Lubricate the chain regularly (every 100-200 miles or as needed) to ensure smooth operation and prevent rust.
7.2 hamulców
- Regularnie sprawdzaj stan klocków hamulcowych i w razie potrzeby wymień je.
- Ensure brake levers are firm and responsive. If they feel spongy, the hydraulic system may need bleeding or adjustment by a qualified technician.
7.3 Opony
- Maintain recommended tire pressure (indicated on the tire sidewall) for optimal performance and safety.
- Przed każdą jazdą sprawdź, czy opony nie mają przecięć, dziur lub nadmiernego zużycia.
7.4 Zawieszenie
- Periodically check the front fork and rear suspension for proper function and adjust as needed for your riding style and terrain.
- Keep suspension components clean to prevent dirt ingress.
8. Rozwiązywanie Problemów
This section addresses common issues you might encounter with your ANIIOKI AQ177 PRO MAX Electric Bike.
| Problem | Możliwa przyczyna | Rozwiązanie |
|---|---|---|
| Rower nie włącza się | Battery not charged or not properly inserted/locked. Loose electrical connection. | Charge battery. Ensure battery is fully inserted and locked. Check all visible cable connections. |
| Silnik nie wspomaga | PAS level set to 0. Battery low. Brake levers engaged. | Increase PAS level on display. Charge battery. Ensure brake levers are fully released. |
| Hamulce są słabe | Worn brake pads. Air in hydraulic line. | Inspect and replace brake pads. Consult a bike mechanic for hydraulic system bleeding. |
| Unusual noises from bike | Luźne elementy. Suchy łańcuch. | Inspect all bolts and tighten as necessary. Lubricate the chain. |
If you encounter issues not listed here or if solutions do not resolve the problem, please contact ANIIOKI customer support.
9. Specyfikacje
| Funkcja | Specyfikacja |
|---|---|
| Nazwa modelu | AQ177 PRO MAX |
| Typ roweru | Rower elektryczny |
| Silnik | Peak 1200W High-Speed Brushless Motor |
| Moment obrotowy | 110 N·m |
| Maksymalna prędkość | 27–30 MPH |
| Bateria | 48V 60Ah (2880Wh) Automotive-Grade Detachable Battery |
| Zasięg na jednym ładowaniu | 100–200 Miles |
| Materiał ramy | Aluminium |
| Typ zawieszenia | Dual (Dual-shoulder front fork, adjustable rear suspension) |
| Styl hamulca | Podwójny hydrauliczny układ hamulcowy tarczowy |
| Opony | 20"x4.0" CST All-Terrain Tires |
| Wyświetlacz | Kolorowy wyświetlacz LCD |
| Ładowność | Maksymalnie 350 funtów |
| Zalecany wzrost jeźdźca | 163 cm - 203 cm |
| Certyfikaty | UL2849 i UL2271 |

Detailed dimensions of the ANIIOKI AQ177 PRO MAX and recommended rider height range.
10. Gwarancja i wsparcie
ANIIOKI is committed to providing reliable products and excellent customer service.
10.1 Informacje o gwarancji
Your ANIIOKI AQ177 PRO MAX Electric Bike comes with a 1-letnia gwarancja covering the motor, battery, and charger from the date of purchase. This warranty covers manufacturing defects and malfunctions under normal use. It does not cover damage caused by misuse, accidents, unauthorized modifications, or normal wear and tear.
10.2 Obsługa klienta
Should you have any questions, require technical assistance, or need to claim warranty service, please contact our Professional Support Team. Contact information can typically be found on the ANIIOKI official website or your purchase documentation. Please have your model number and purchase date ready when contacting support.


