1. Wprowadzenie
The FLASHFORGE AD5X is an advanced multi-color FDM 3D printer designed for both hobbyists and professionals. It features an innovative Intelligent Filament System (IFS) for seamless multi-color printing, high-speed capabilities up to 600mm/s, and a robust Core XY structure for precise and stable operation. This manual provides essential information for setting up, operating, maintaining, and troubleshooting your AD5X 3D printer.
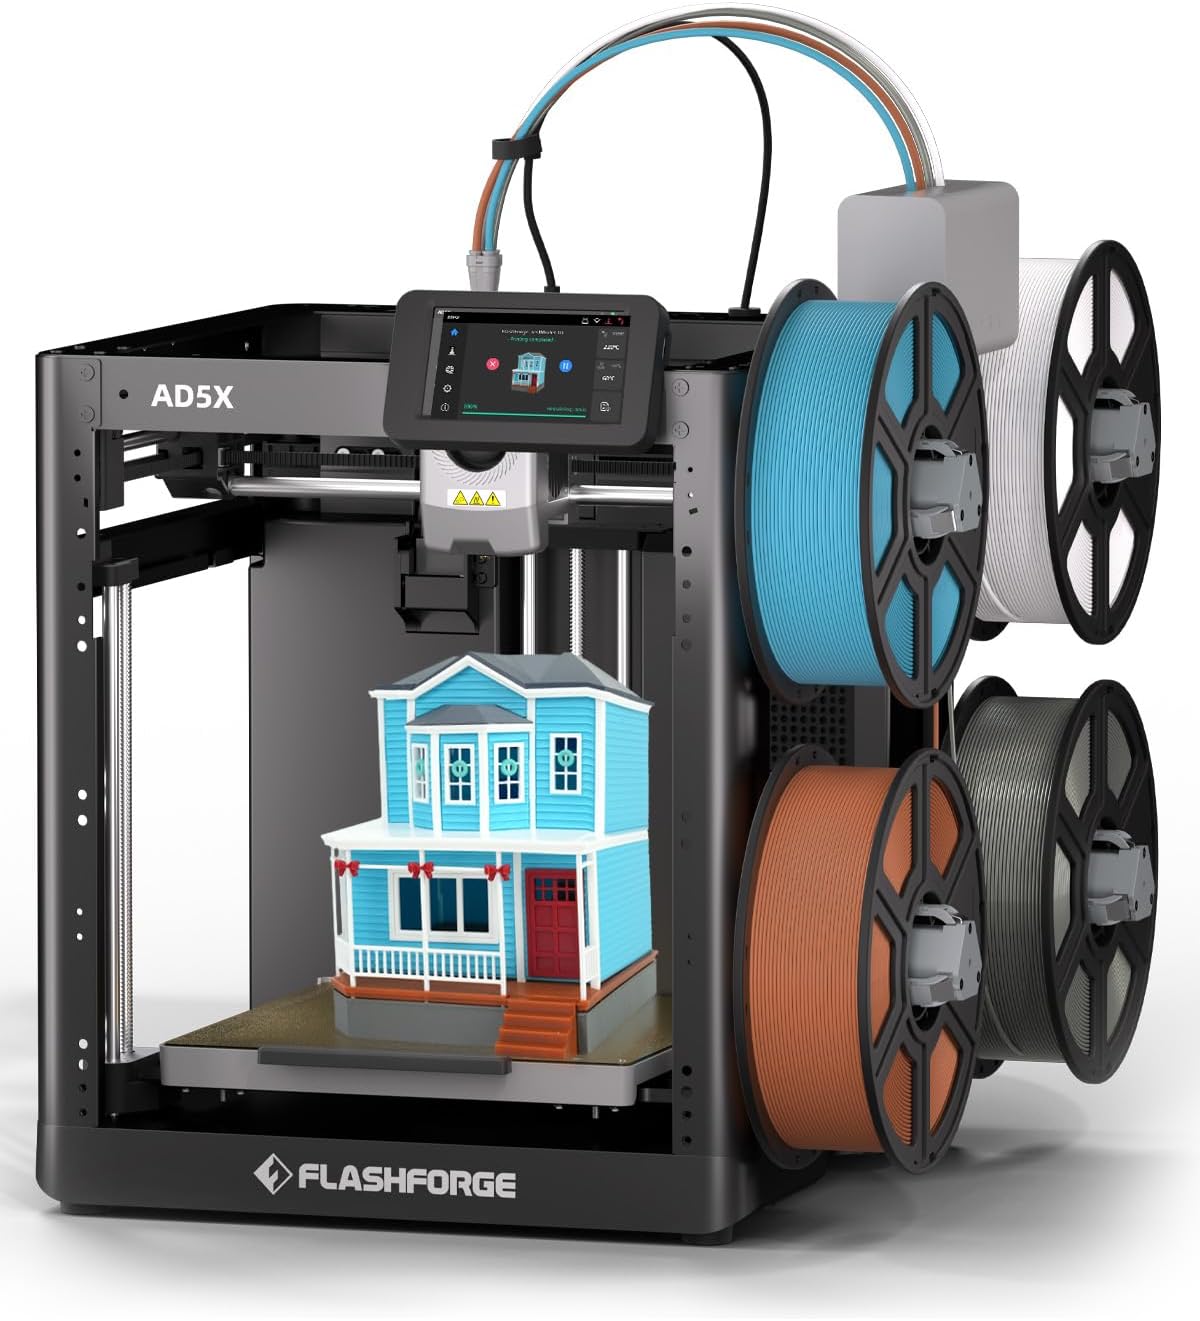
Figure 1.1: The FLASHFORGE AD5X 3D Printer with its multi-color printing setup.
2. Informacje dotyczące bezpieczeństwa
Please read all safety warnings and instructions carefully before operating the printer to prevent injury or damage to the device.
- Bezpieczeństwo elektryczne: Upewnij się, że drukarka jest podłączona do uziemionego gniazdka elektrycznego. Nie obsługuj jej mokrymi rękami ani wamp warunki.
- Gorące powierzchnie: The nozzle and build plate reach high temperatures during operation. Avoid direct contact to prevent burns. Allow components to cool before handling.
- Ruchome części: Keep hands, hair, and loose clothing clear of moving parts during operation to prevent entanglement.
- Wentylacja: Używaj drukarki w dobrze wentylowanym pomieszczeniu, zwłaszcza podczas drukowania na materiałach mogących wydzielać opary.
- Obsługa filamentu: Use caution when loading and unloading filament, as the extruder can be hot.
- Dzieci i zwierzęta: Keep the printer out of reach of children and pets. Adult supervision is required if children are present.
3. Zawartość opakowania
Sprawdź, czy w przesyłce znajdują się wszystkie elementy wymienione poniżej:
- AD5X 3D Printer (x1)
- Filament 10g (x4)
- Przewód zasilający (x1)
- IFS Connection Cable (x1)
- 4-Color Module (IFS) (x1)
- Spool Holder (x4)
- 4-in-1 Guide Tube (x1)
- Płyta montażowa (x1)
- Śruba M3x6 (x4)
- After-sales Service Card (x1)
- Skrócona instrukcja obsługi (x1)
- Display Screen (x1)
- Smar (x1)
- Zacisk kablowy (x1)
- Klej (x1)
- Klucz imbusowy (x3)
- Szczypce boczne (x1)
- Unclogging Pin Tool (x1)
- Phillips Screwdriver (x1)

Figure 3.1: Visual representation of the AD5X packing list.
4. Przewodnik konfiguracji
4.1 Rozpakowywanie i umieszczanie
Carefully remove the printer from its packaging. Place the printer on a stable, level surface in a well-ventilated area, away from direct sunlight, heat sources, or excessive dust.
4.2 Initial Power-On and Screen Setup
Connect the power cord to the printer and a suitable power outlet. Turn on the printer using the power switch. Follow the on-screen instructions on the 4.3-inch touch LCD screen for initial setup, including language selection and network connection (Wi-Fi/Ethernet).
4.3 Intelligent Filament System (IFS) Installation
Attach the four spool holders to the designated mounting points on the printer. Connect the 4-Color Module (IFS) to the printer using the IFS Connection Cable. Guide the filament from each spool through the 4-in-1 Guide Tube to the IFS module.
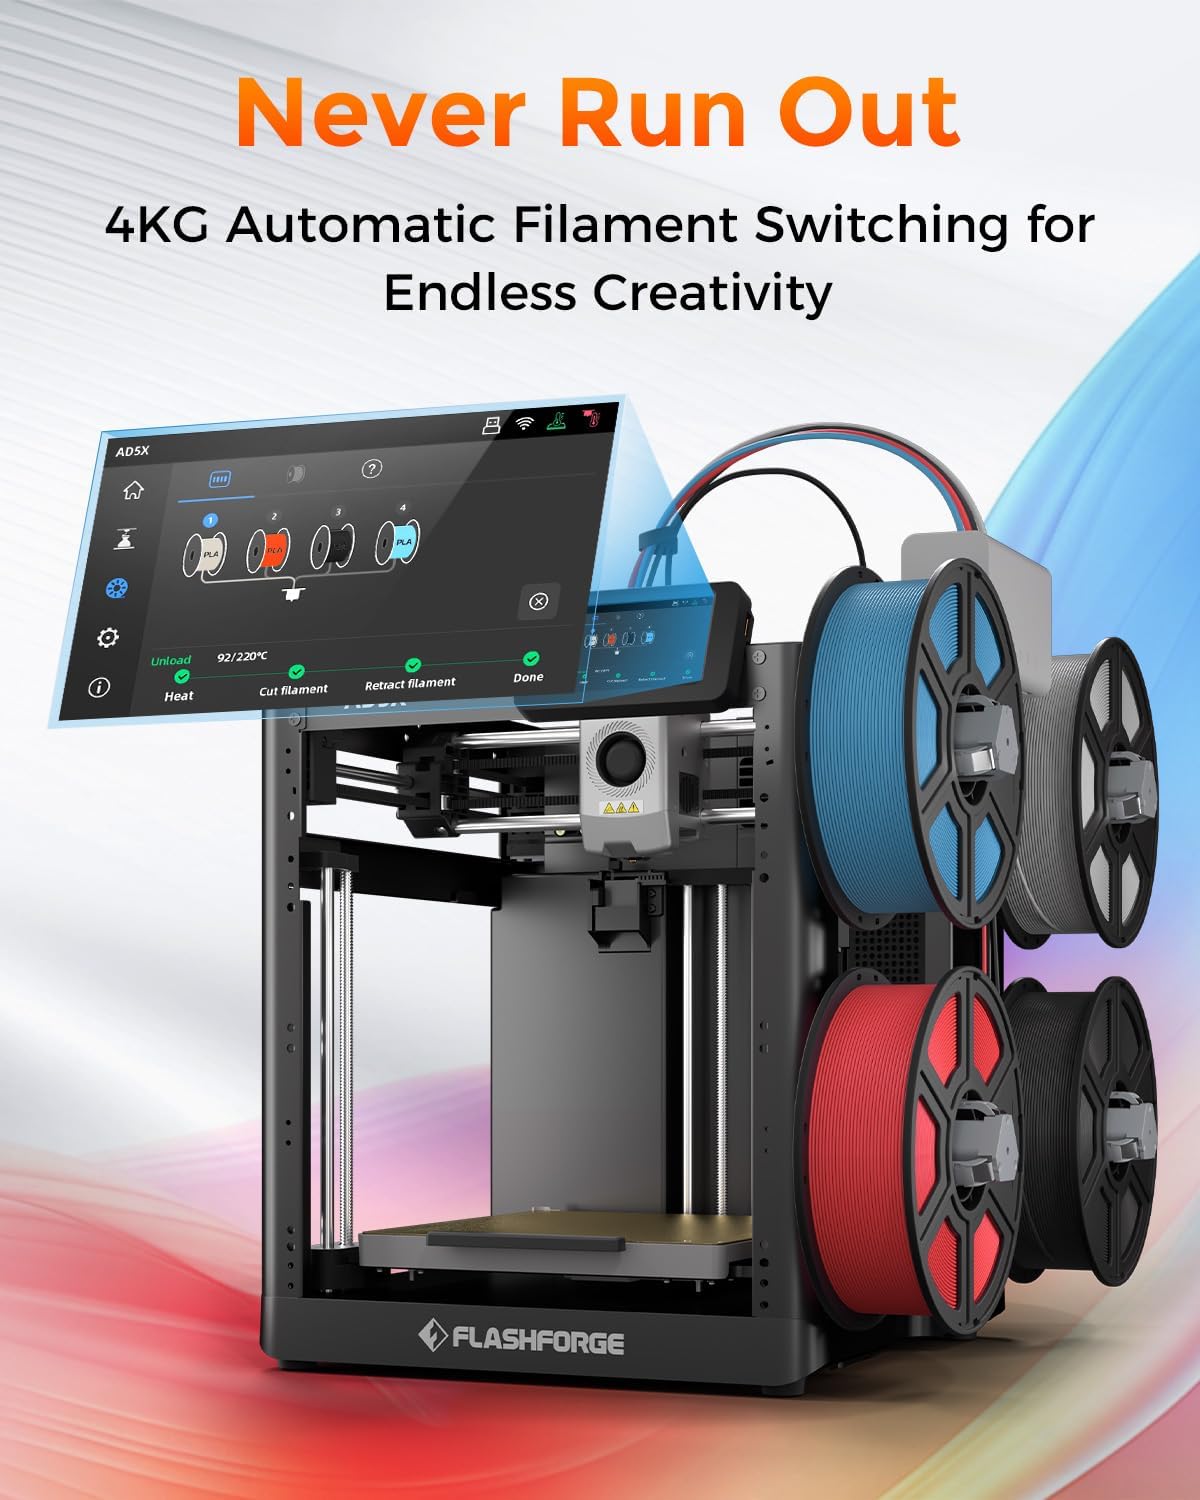
Figure 4.1: The AD5X's 4KG Automatic Filament Switching system.
4.4 Ładowanie filamentu
Ensure the printer is powered on. Select the filament loading option on the touch screen. Insert the end of the filament into the designated input port on the IFS module. The system will automatically detect and feed the filament into the extruder.
4.5 Automatyczne poziomowanie
The AD5X features a fully automatic leveling system. From the printer's touch screen, initiate the auto-leveling process. The printer will automatically probe the build plate at multiple points to ensure optimal bed adhesion and print quality. No manual adjustments are typically required.

Figure 4.2: Automatic leveling and Core XY structure for stable printing.
5. Instrukcja obsługi
5.1 Oprogramowanie ponadview (FlashPrint5)
The FLASHFORGE AD5X is compatible with FlashPrint5 slicing software (also compatible with Orca Slicer). Install FlashPrint5 on your computer. This software allows you to import 3D models, adjust print settings (layer height, infill, supports), and prepare the model for printing (slicing).
5.2 Rozpoczęcie drukowania
After slicing your model in FlashPrint5, you can transfer the print file to the printer via USB disk, Wi-Fi, or Ethernet. Select the desired file on the printer's touch screen and initiate the print. The printer will preheat the nozzle and build plate to the required temperatures before starting the print.
5.3 Drukowanie wielokolorowe
The AD5X's multi-color printing capability allows for up to four colors simultaneously. In FlashPrint5, assign different colors to various parts of your model. The Intelligent Filament System will automatically manage filament switching during the print process, ensuring vibrant and intricate designs.

Figure 5.1: Key features: Precision, Speed, and Reliability of the AD5X.
5.4 Drukowanie z dużą prędkością
The AD5X boasts a maximum printing speed of 600mm/s and an acceleration of 20,000mm/s². This allows for significantly faster print times compared to conventional 3D printers, without compromising print quality. Ensure your model and slicing settings are optimized for high-speed printing.
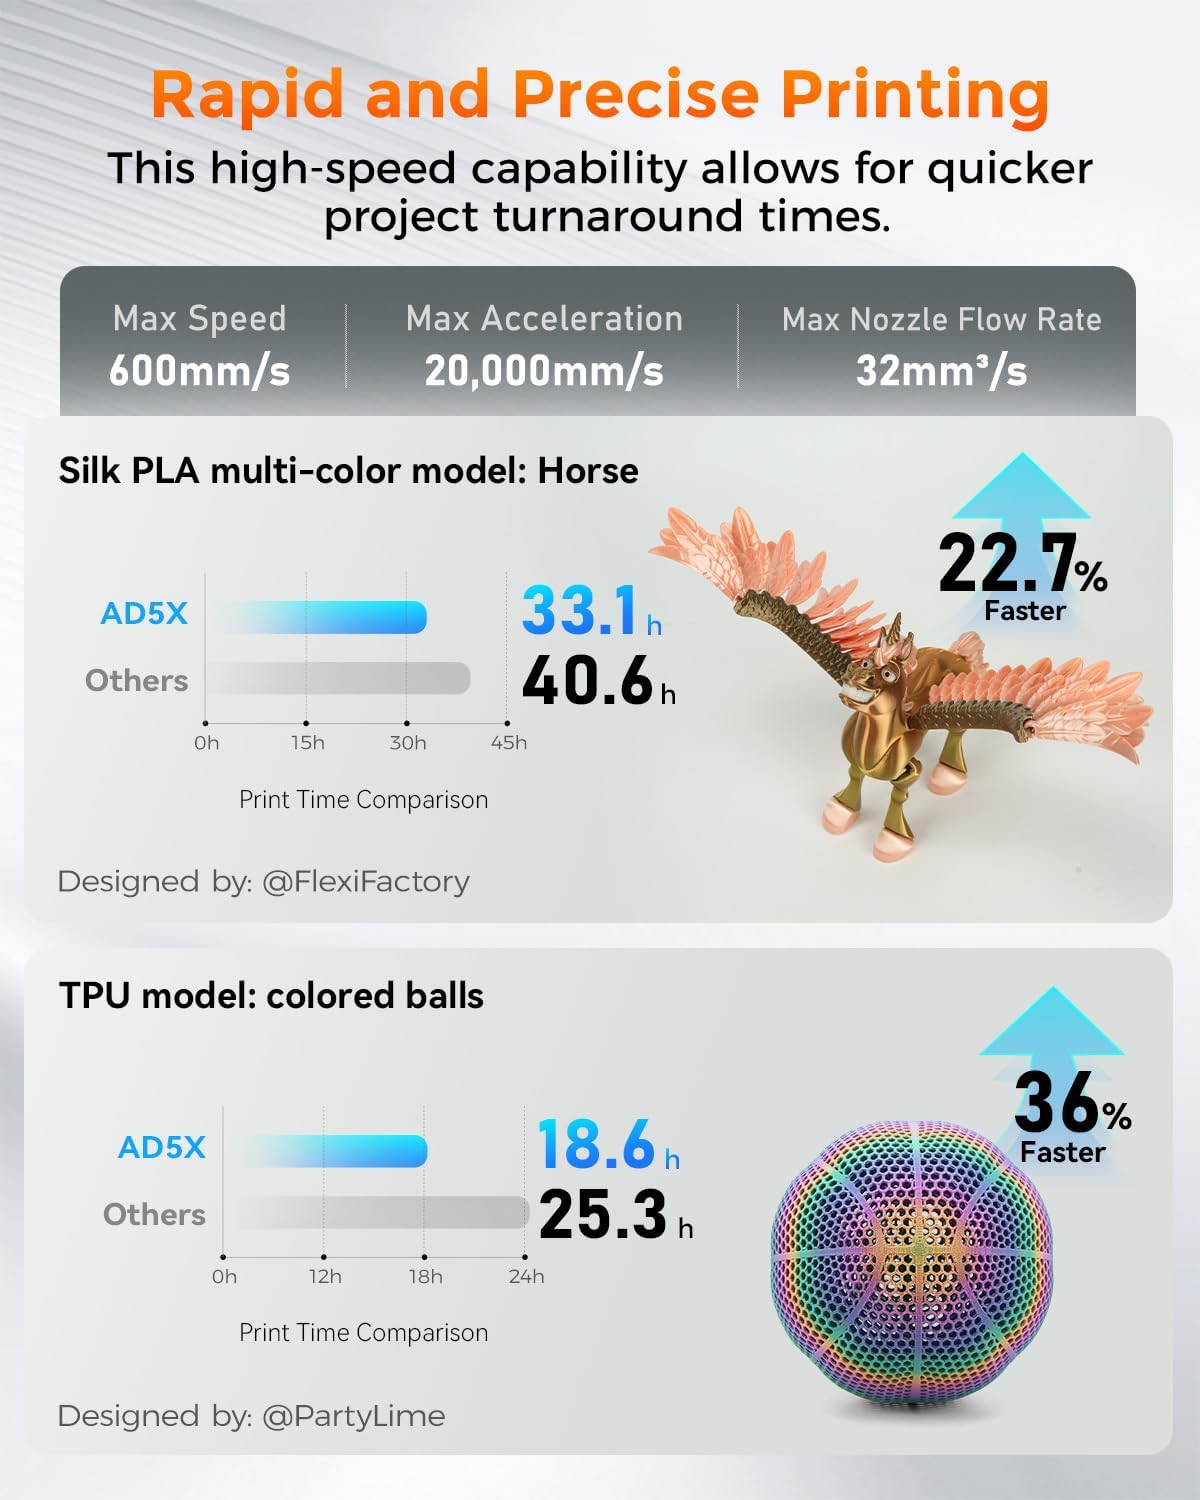
Figure 5.2: Print speed comparison demonstrating the AD5X's rapid printing capabilities.
5.5 Wymiana dyszy
The AD5X features a quick-release nozzle design, allowing for easy and rapid nozzle changes. To replace the nozzle, ensure the printer is off and the nozzle has cooled. Gently press the release mechanism and pull the nozzle assembly out. Insert the new nozzle until it clicks into place. The printer comes with a 0.4mm nozzle (default) and supports optional 0.25mm, 0.6mm, and 0.8mm nozzles.

Figure 5.3: Quick-release nozzle system and available nozzle diameters.
5.6 Obsługiwane materiały
The AD5X supports a wide range of filament types, including:
- PLA (kwas polimlekowy)
- PETG (politereftalan etylenu, glikol)
- TPU (termoplastyczny poliuretan)
- PLA-CF (włókno węglowe PLA)
- PETG-CF (włókno węglowe PETG)
Always refer to the filament manufacturer's recommendations for optimal printing temperatures and settings.

Rysunek 5.4: Examples of prints using various supported filament types.
6. Konserwacja
6.1 Procedury czyszczenia
- Zewnętrzny: Wipe the exterior surfaces of the printer with a soft, dry cloth. Avoid using abrasive cleaners or solvents.
- Płyta konstrukcyjna: After each print, remove any residual filament from the build plate. For stubborn residue, use a plastic scraper. The PEI flexible steel sheet provides strong adhesion and is easy to clean.
- Dysza: Periodically clean any filament residue from the exterior of the nozzle using a brass brush (when cold) or a soft cloth (when warm, with caution).
6.2 Pielęgnacja dyszy
To prevent clogs, ensure proper filament loading and unloading. If a clog occurs, use the provided unclogging pin tool to clear the nozzle. For severe clogs, the quick-release design allows for easy replacement of the nozzle assembly.
6.3 Ogólna opieka
- Smarowanie: Apply a small amount of the provided grease to the Z-axis lead screws and smooth rods periodically to ensure smooth movement.
- Aktualizacje oprogramowania układowego: Check the FLASHFORGE official webodwiedź tę witrynę, aby uzyskać dostęp do aktualizacji oprogramowania sprzętowego, które zapewnią optymalną wydajność i nowe funkcje.
- Składowanie: When not in use for extended periods, store the printer in a clean, dry environment.
7. Rozwiązywanie Problemów
This section addresses common issues you might encounter. For more detailed troubleshooting, refer to the official FLASHFORGE support resources.
| Problem | Możliwa przyczyna | Rozwiązanie |
|---|---|---|
| Wydruk nie przykleja się do płyty roboczej | Improper bed leveling, dirty build plate, incorrect bed temperature, first layer too high. | Run automatic leveling. Clean the build plate with isopropyl alcohol. Adjust bed temperature in slicing software. Ensure first layer height is correct. Use glue stick if necessary. |
| Filament nie wytłacza się / Zatkana dysza | Nozzle clog, tangled filament, incorrect temperature, worn nozzle. | Use unclogging pin tool. Check filament path for tangles. Verify nozzle temperature. Replace nozzle if worn. |
| Grinding noise from extruder | Filament slipping, partial clog, foreign debris in gears. | Check for clogs. Ensure proper filament tension. Inspect extruder gears for debris. |
| Skipping layers / Poor print quality | Partial clog, inconsistent filament diameter, mechanical issues, incorrect slicing settings. | Clear any partial clogs. Use high-quality filament. Check for loose belts or screws. Review slicing settings (e.g., flow rate, retraction). |
| Drukarka nie łączy się z siecią Wi-Fi | Nieprawidłowe hasło, poza zasięgiem, problemy z siecią. | Sprawdź ponownie hasło Wi-Fi. Przesuń drukarkę bliżej routera. Uruchom ponownie router i drukarkę. |
8. Specyfikacje
| Funkcja | Szczegół |
|---|---|
| Numer modelu | AD5X |
| Wymiary produktu | 14.3 x 16.3 x 14.8 cala (363 x 413 x 376 mm) |
| Waga przedmiotu | 24.3 funtów (11 kg) |
| Objętość kompilacji | Wymiary: 220 x 220 x 220 mm |
| Technologia druku | FDM (modelowanie osadzania stopionego materiału) |
| Średnica dyszy | 0.4mm (Default), Optional: 0.25mm, 0.6mm, 0.8mm |
| Maksymalna temperatura dyszy | 300°C |
| Max Bed Temperature | 110°C |
| Maksymalna prędkość drukowania | 600 mm/s |
| Maksymalne przyspieszenie | 20,000mm/s² |
| Filament System | Intelligent Filament System (IFS) for 4-color printing |
| Niwelacja | Fully Automatic Leveling |
| Materiał płyty roboczej | PEI Flexible Steel Sheet |
| Łączność | USB Disk, Wi-Fi, Ethernet |
| Oprogramowanie do krojenia | FlashPrint5, Orca Slicer |
| Kompatybilne systemy operacyjne | Win XP/Vista/7/8/10, Mac OS, Linux |
| Tworzywo | All Metal Structure |
9. Gwarancja i wsparcie
For warranty information and technical support, please refer to the After-sales Service Card included in your package or visit the official FLASHFORGE webZachowaj paragon jako dowód zakupu na wypadek reklamacji.


