1. Wprowadzenie
Dziękujemy za zakupasing the DEERC F-16 Style RC Airplane (X-62A Vista). This remote-controlled aircraft is designed for enthusiasts of all skill levels, featuring a 4-channel control system and a 6-axis gyro stabilizer for enhanced flight stability. This manual provides essential information for safe operation, assembly, maintenance, and troubleshooting to ensure an enjoyable flying experience.
2. Wytyczne bezpieczeństwa
- Środowisko lotu: Always operate the aircraft in open, clear areas away from people, buildings, trees, power lines, and water. Avoid flying in strong winds or adverse weather conditions.
- Bezpieczeństwo baterii: Use only the provided batteries and charger. Do not overcharge or short-circuit batteries. Store batteries in a cool, dry place away from flammable materials. Discontinue use if batteries show signs of damage or swelling.
- Bezpieczeństwo śmigła: Keep hands, face, and loose clothing away from the rotating propeller. Ensure the propeller is securely attached before flight.
- Nadzór osoby dorosłej: For younger users, adult supervision is recommended during assembly, charging, and flight.
- Kontrola przed lotem: Before each flight, ensure all components are securely attached, batteries are charged, and the remote control is properly paired.
3. Zawartość opakowania
Sprawdź, czy w przesyłce znajdują się wszystkie elementy:
- DEERC F-16 Style RC Airplane (X-62A Vista)
- Nadajnik zdalnego sterowania
- LiPo Battery (400mAh) x 2
- Kabel ładujący USB
- Zapasowe śmigło x 2
- Podwozie przednie
- Podwozie tylne
- Silicone Nose Cone x 2
- Śrubokręt
- Instrukcja obsługi (ten dokument)
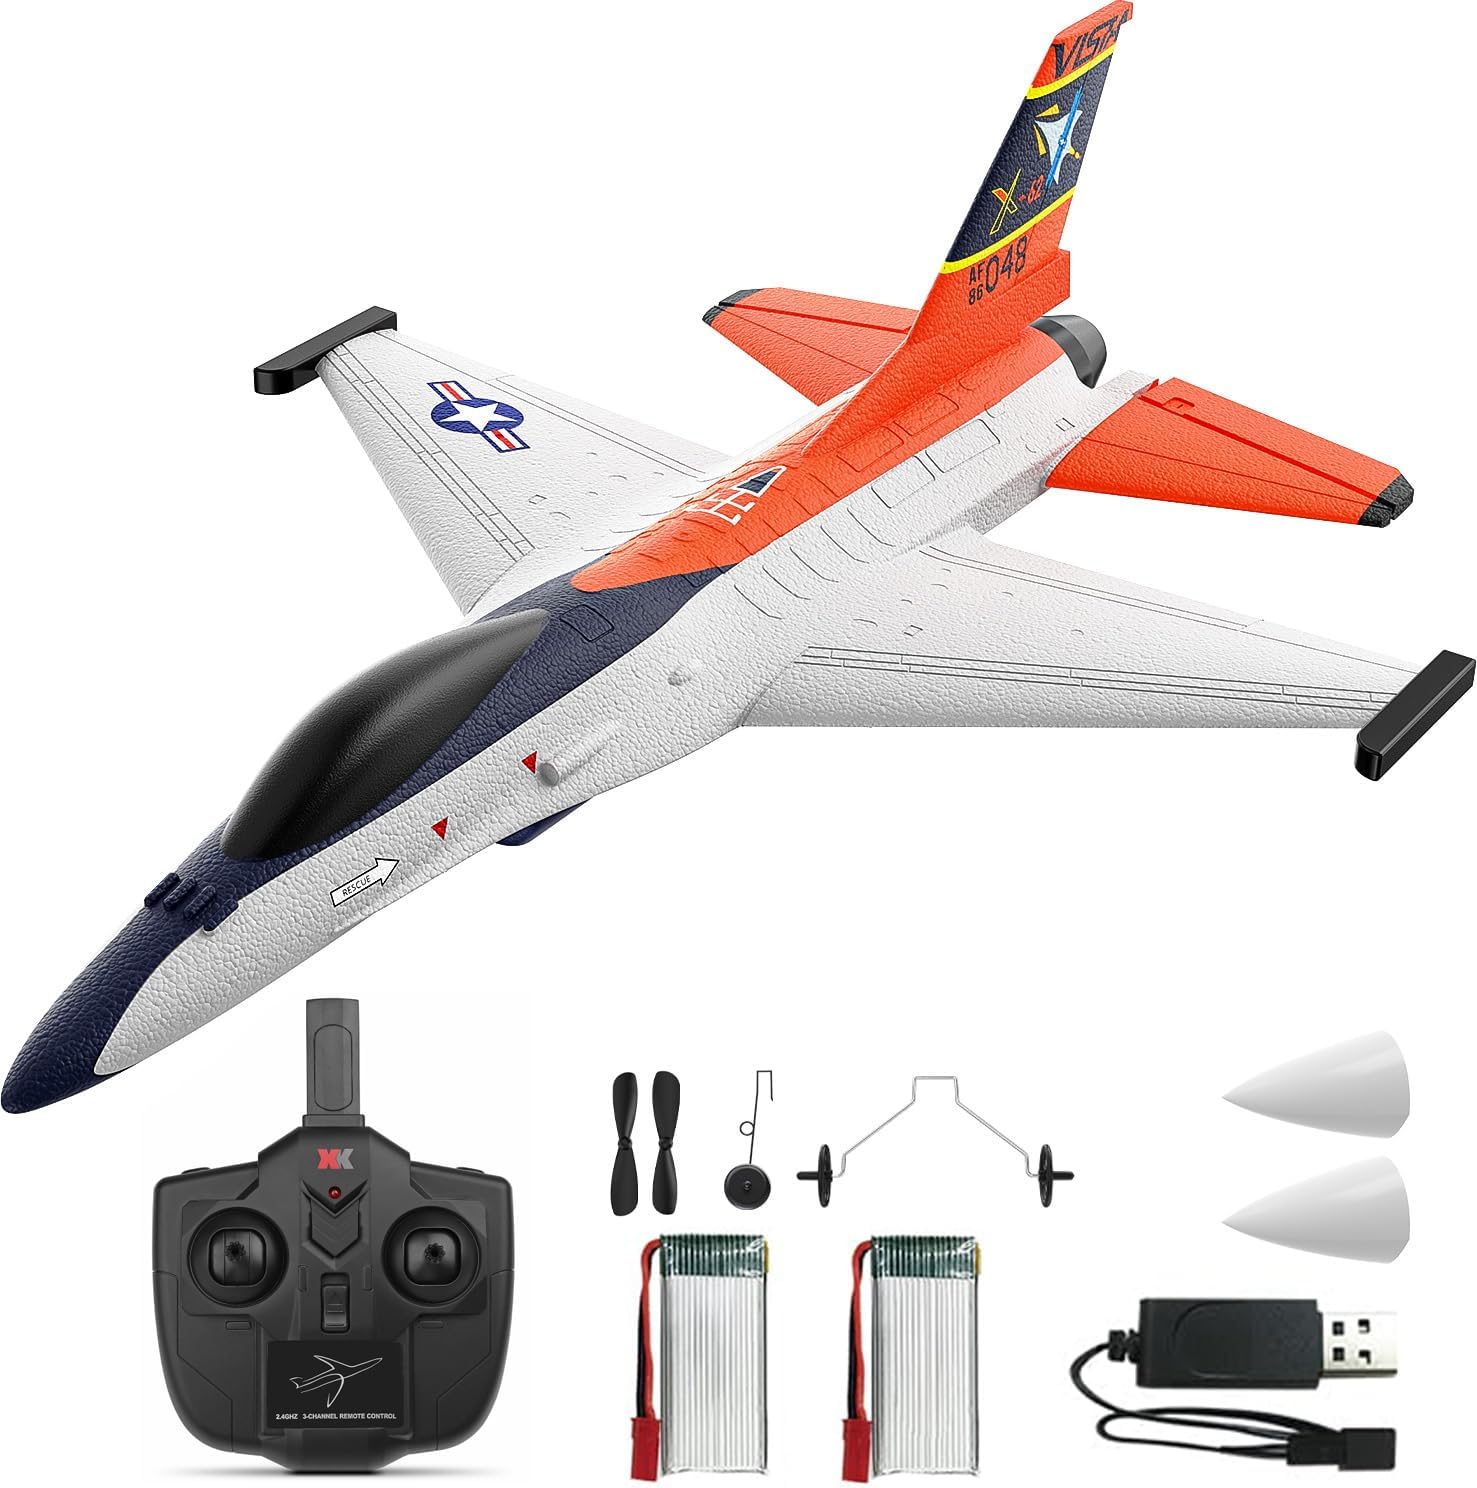
Image: Complete package contents including the DEERC F-16 Style RC Airplane, remote control, batteries, charger, and spare parts.

Image: Visual representation of the package contents, highlighting each component.
4. Montaż
The DEERC F-16 Style RC Airplane requires minimal assembly. Follow these steps:
- Install Tail Fin: Gently slide the vertical tail fin into the designated slot at the rear of the aircraft body until it is securely in place. Some users may choose to apply a small amount of foam-safe glue for permanent attachment, but it is designed to hold without it.
- Attach Landing Gear: Insert the front landing gear into the slot on the underside of the fuselage near the nose. Push until it clicks into place. Repeat for the rear landing gear, inserting it into the slots under the wings.
- Install Nose Cone: Place one of the silicone nose cones over the front tip of the aircraft. This provides protection during minor impacts.

Image: Close-up of the aircraft's tail fin and nose, showing the areas for component attachment.
5. Ładowanie baterii
The aircraft uses 400mAh LiPo batteries. Follow these charging instructions:
- Podłącz akumulator LiPo do kabla ładującego USB.
- Plug the USB charging cable into any standard USB port (e.g., computer, USB wall adapter, power bank).
- The indicator light on the USB charger will illuminate during charging and turn off or change color when charging is complete.
- Ładowanie trwa zazwyczaj około 60–90 minut. Nie pozostawiaj baterii bez nadzoru podczas ładowania.
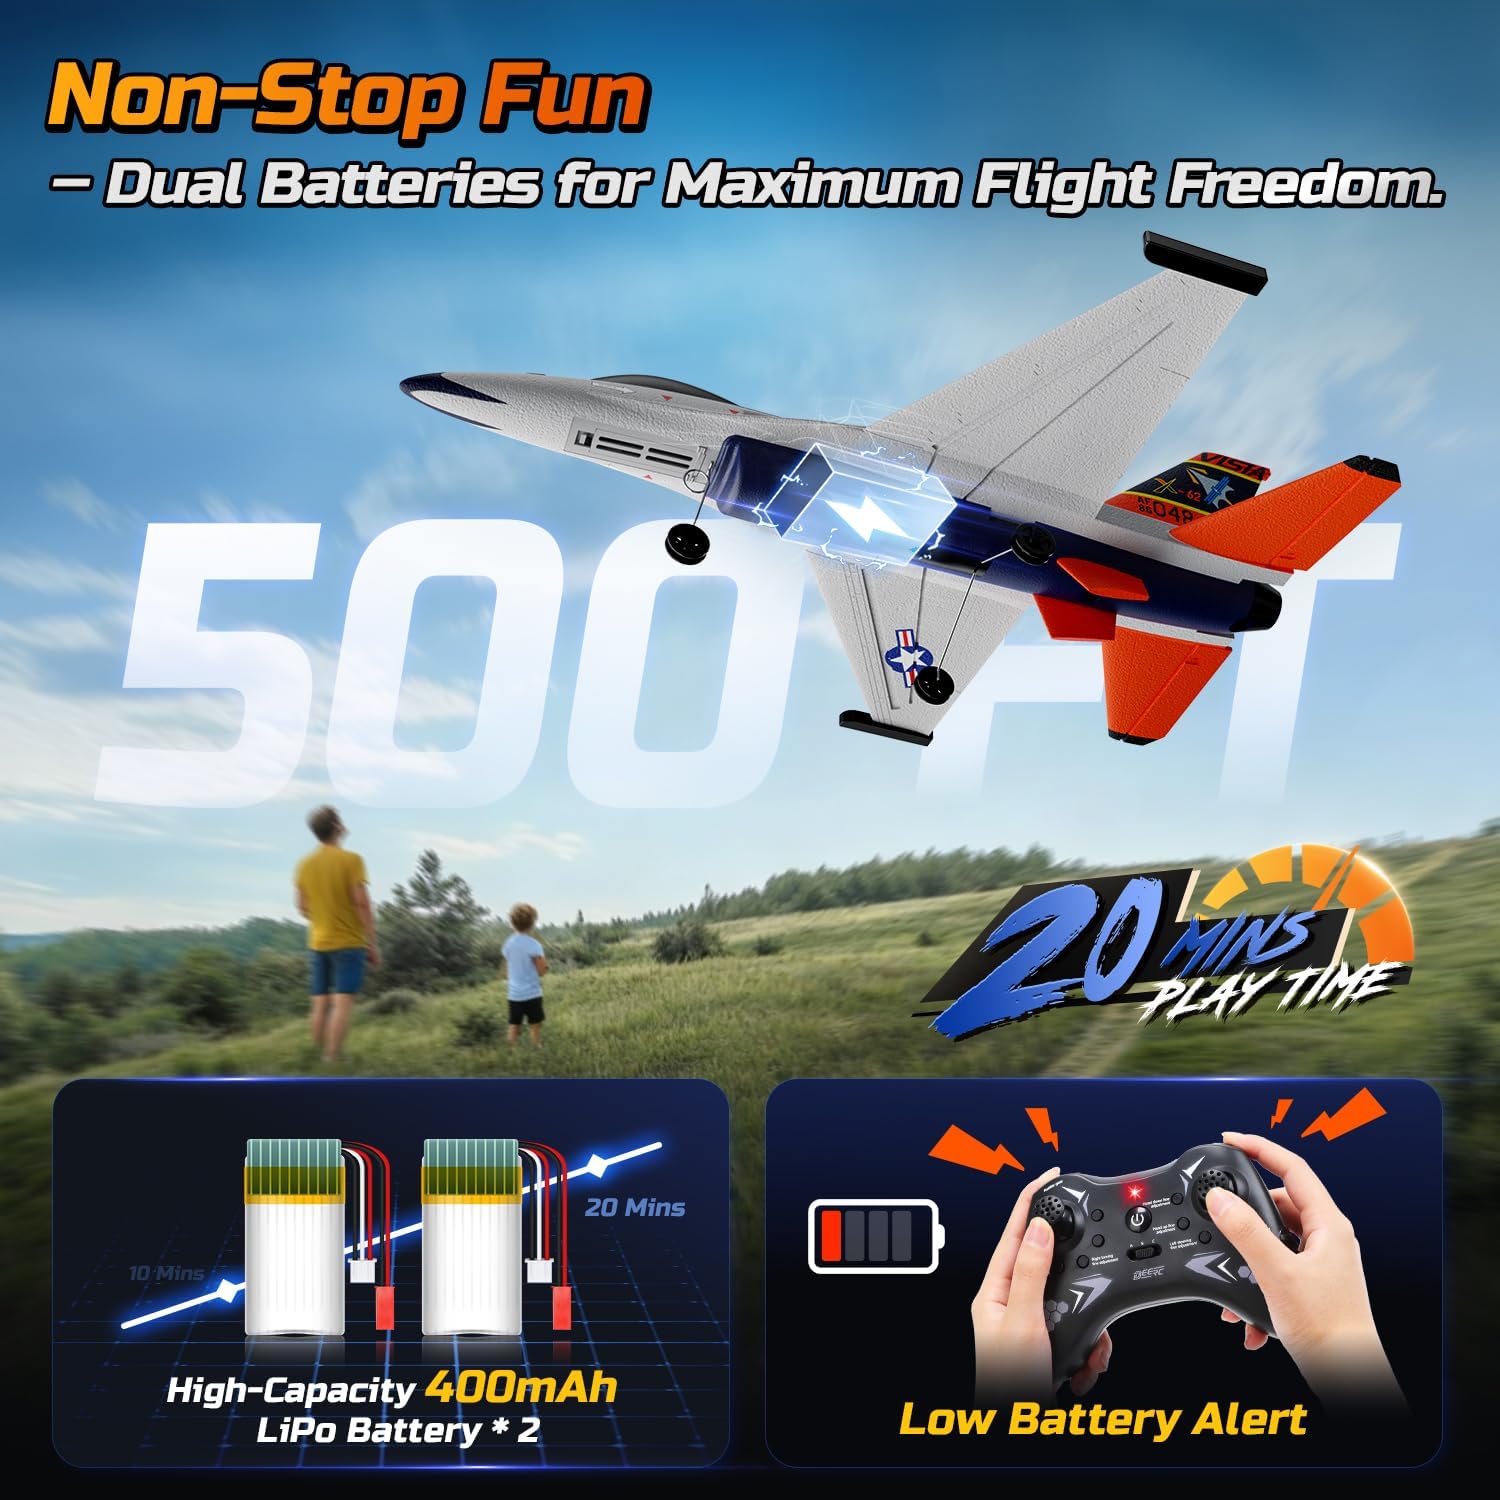
Image: Illustration showing the dual battery setup and the low battery alert on the remote control.
6. Konfiguracja pilota
- Zainstaluj baterie: Open the battery compartment on the back of the remote control and insert 4 AA batteries (not included), ensuring correct polarity. Close the compartment.
- Włączanie: Włącz pilota. Kontrolka zacznie migać.
- Connect Aircraft Battery: Insert a charged LiPo battery into the battery compartment of the aircraft and connect it. The aircraft's indicator light will flash.
- Łączenie w pary: On the remote control, push the throttle stick (left stick) all the way up, then all the way down. The remote control and aircraft indicator lights will become solid, indicating successful pairing.
7. Instrukcja obsługi
7.1 Kontrole przed lotem
- Upewnij się, że wszystkie części są prawidłowo i bezpiecznie zmontowane.
- Verify batteries are fully charged for both aircraft and remote control.
- Confirm successful pairing between the aircraft and remote control.
- Check control surfaces (ailerons, rudder) respond correctly to remote input.
7.2 Take-Off Modes
The X-62A Vista supports two take-off methods:
- Hand-Thrown Take-Off: Hold the aircraft firmly with one hand, apply full throttle, and gently toss it forward into the wind. The 6-axis gyro will assist in stabilizing the flight.
- Ground Take-Off: Place the aircraft on a smooth, flat surface. Apply full throttle, and the aircraft will accelerate and take off.

Image: Visual guide demonstrating both hand-thrown and ground take-off procedures.
7.3 Sterowanie lotem
The 4-channel remote control allows for precise maneuvers:
- Lewy drążek (przepustnica/ster kierunku): Up/Down for throttle (speed), Left/Right for rudder (yaw/turning).
- Prawy drążek (ster wysokości/lotka): Up/Down for elevator (pitch/climb/descend), Left/Right for aileron (roll/bank).
The 6-axis gyro stabilizer provides automatic stability correction, making it easier to control, especially for beginners.

Image: Diagram illustrating the aircraft's gyro stabilizer and responsive control surfaces.
7.4 Aerobatics
Perform exciting stunts with ease:
- Obrót o 360°: Press the dedicated flip button on the remote control, then quickly move the right stick in the desired direction (forward, backward, left, or right) to execute a full flip.
- Aerobatic Roll: With sufficient altitude, move the right stick sharply left or right to perform a smooth barrel roll.

Image: The RC airplane executing various aerial stunts, including 360-degree flips and rolls.

Image: Detailed illustration of the aircraft performing various aerobatic maneuvers.
7.5 Panic/Hover Mode
In situations where you lose orientation or need immediate stabilization, activate the Panic/Hover mode. This mode will automatically level the aircraft and maintain its current altitude, allowing you to regain control. Refer to your remote control's specific button for this function.
7.6 Lądowanie
To land the aircraft, reduce throttle gradually while maintaining a slight nose-up attitude. Guide the aircraft towards a clear, open area. Allow it to gently descend and touch down. For hand-thrown flights, you can also catch the aircraft by hand after reducing throttle.
8. Konserwacja
- Czyszczenie: Wipe the aircraft gently with a soft, dry cloth after each use. Avoid using water or chemical cleaners.
- EPP Foam Repair: The aircraft is constructed from durable EPP foam. In case of minor damage or cracks, use foam-safe glue (not included) to repair. Ensure the glue is fully dry before flying.
- Wymiana śmigła: If the propeller is damaged, replace it with a spare using the provided screwdriver. Ensure the new propeller is installed in the correct orientation.
- Składowanie: When not in use, store the aircraft and remote control in a cool, dry place, away from direct sunlight. Disconnect batteries from the aircraft and remove batteries from the remote control for long-term storage.

Image: Close-up of the aircraft's durable silicone nose, designed to absorb impacts.

Image: Illustration emphasizing the lightweight and crash-resistant EPP foam construction.

Image: Depiction of the aircraft's robust foam body and protective silicone tip.
9. Rozwiązywanie Problemów
| Problem | Możliwa przyczyna | Rozwiązanie |
|---|---|---|
| Samolot nie reaguje na zdalne sterowanie. | Nie sparowano, słaba bateria, zakłócenia. | Re-pair the aircraft and remote. Charge batteries. Move to an area with less interference. |
| Samolot lata niestabilnie lub jest niestabilny. | Damaged propeller, unbalanced, strong wind, gyro calibration issue. | Check/replace propeller. Fly in calm conditions. Re-calibrate gyro (refer to remote control instructions). |
| Krótki czas lotu. | Akumulator nie jest w pełni naładowany, jest stary, latanie jest agresywne. | Upewnij się, że bateria jest w pełni naładowana. Rozważ wymianę starych baterii. Lataj ostrożniej. |
| Śmigło się nie obraca. | Motor issue, loose connection, damaged propeller. | Check battery connection. Replace propeller. Contact customer support if motor is faulty. |
10. Specyfikacje
- Marka: DEERC
- Model: X-62A Vista (DEERC-4CH-F16)
- Kanały sterowania: 4-kanałowy
- Stabilizacja: 6-osiowy stabilizator żyroskopowy
- Silnik: 4400KV 1020 Coreless Motor
- Tworzywo: Trwała pianka EPP
- Bateria: 400mAh LiPo (x2 included)
- Czas lotu: Około 10+ minut na baterię (łącznie 20+ minut)
- Częstotliwość zdalnego sterowania: 2.4 GHz
- Wymiary produktu: 17.8 x 5.2 x 12.6 cala
- Waga przedmiotu: 1.65 funta
11. Gwarancja i wsparcie
For warranty information, technical support, or replacement parts, please contact DEERC customer service. Refer to the contact details provided on the product packaging or the official DEERC webstrona.
12. Oficjalne filmy o produktach
DEERC F-16 Style 4CH RC Airplane (X-62A VISTA)
Video: An official product video from DEERC US showcasing the F-16 Style 4CH RC Airplane (X-62A VISTA) in flight, demonstrating its features and capabilities.


