Wstęp
This manual provides essential instructions for the proper setup, operation, maintenance, and troubleshooting of your Futaba T6PV RC Transmitter and R404SBS-E Receiver combo. The T6PV is a 6-channel radio control system designed for various RC applications, featuring advanced F-4G technology for fast response and high precision. It supports multiple communication modes, including F-4G, T-FHSS, S-FHSS, and MINI-Z systems.

Obraz 1: The Futaba T6PV RC Transmitter and the compact R404SBS-E Receiver. This image displays the primary components included in the combo, highlighting their design and relative sizes.
1. Konfiguracja
1.1 Rozpakowywanie i sprawdzanie komponentów
Carefully unpack all components. Verify that the package contains the Futaba T6PV Transmitter, the R404SBS-E Receiver, and any other accessories as listed in your product documentation.
1.2 Instalacja baterii nadajnika
Open the battery compartment on the underside of the T6PV transmitter. Insert the recommended batteries (refer to your product's specific battery requirements) ensuring correct polarity. Close the compartment securely.
1.3 Receiver Installation (R404SBS-E)
Install the R404SBS-E receiver in your RC model. Ensure it is mounted securely, away from sources of vibration, heat, and electrical interference. Connect the servos and other components to the appropriate channels on the receiver. The R404SBS-E is designed for F-4G compatibility.
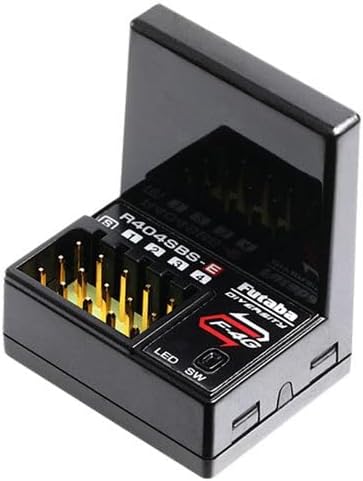
Obraz 2: Zbliżenie view of the Futaba R404SBS-E Receiver, showing its compact design and connection ports for servos and other components. This receiver is compatible with the F-4G system.
1.4 Powiązanie nadajnika i odbiornika
- Upewnij się, że nadajnik i odbiornik są wyłączone.
- Power on the receiver while holding the binding button (if applicable, refer to receiver manual for exact procedure). The LED on the receiver will indicate binding mode.
- Power on the T6PV transmitter. Navigate to the system menu and select the binding function.
- Confirm the binding process on the transmitter. The receiver's LED will change to a solid light, indicating successful binding.
- Power cycle both the transmitter and receiver to confirm the connection.
2. Instrukcja obsługi
2.1 Transmitter Controls Overview
The T6PV features a steering wheel, throttle trigger, and various buttons for control. The high-resolution color LCD and jog button are central to navigating the system menus and making adjustments.
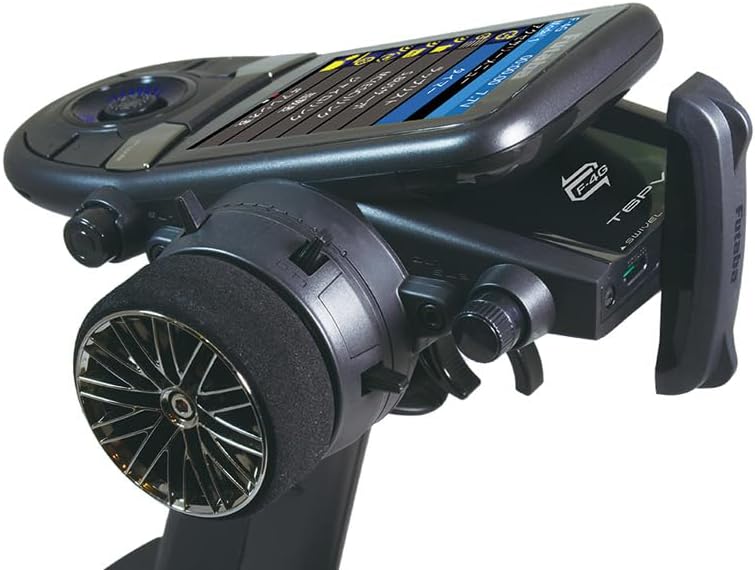
Obraz 3: Strona view of the Futaba T6PV Transmitter, showcasing the ergonomic grip, steering wheel, and the swivel antenna. This angle highlights the physical layout of the primary controls.
2.2 Display Navigation and System Menu
The T6PV's color LCD provides a clear interface for accessing all functions. Use the jog button to scroll through menu options and press to select. The main system menu allows access to display settings, information, buzzer, battery status, total time, LED settings, and calibration.

Obraz 4: The Futaba T6PV Transmitter's color LCD displaying the 'System menu'. Options visible include Display, Information, Buzzer, Battery, Total time, LED setting, and Calibration, demonstrating the user interface.
2.3 Selecting Communication Systems
The T6PV supports multiple communication protocols. Navigate to the 'Receiver System' menu to select between F-4G, T-FHSS, S-FHSS, MINI-Z EVO, MINI-Z EVO2, and MINI-Z FHSS modes. Ensure the selected mode matches your receiver's capabilities.
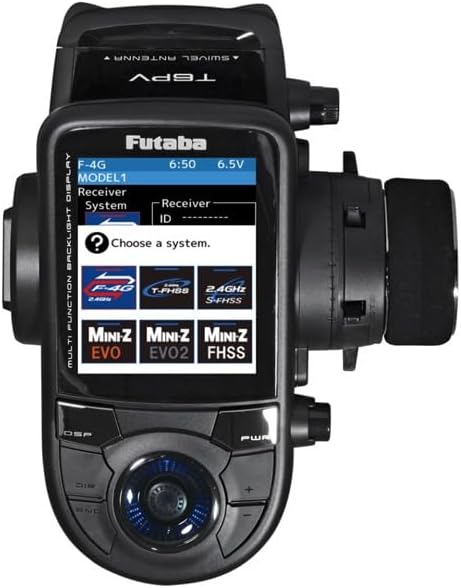
Obraz 5: The Futaba T6PV Transmitter's display showing the 'Receiver System' selection screen. Various compatible systems like F-4G, T-FHSS, S-FHSS, MINI-Z EVO, MINI-Z EVO2, and MINI-Z FHSS are presented as selectable options.
2.4 Advanced Adjustments
- Response/Feeling System: This feature allows you to fine-tune the control sensitivity to match your driving style and conditions. Adjustments can be made to soften or intensify the control response.
- Servo Calibration: In high-precision operation modes, servos can be calibrated for optimal performance.
- Crawler Settings: The T6PV includes dedicated settings for crawler models, allowing for specialized control configurations.
- Pamięć modelu: The transmitter supports multiple model memories, allowing you to save and recall settings for different RC vehicles.

Obraz 6: The Futaba T6PV Transmitter's display showing a 'Racing menu' with 'Drag Racing' selected. This illustrates the specialized menus available for different RC disciplines and advanced tuning options.
3. Konserwacja
3.1 Czyszczenie
Regularly clean the transmitter and receiver with a soft, dry cloth. Avoid using harsh chemicals or solvents, which can damage the plastic and electronic components. Keep the display screen free of dust and smudges for optimal visibility.
3.2 Przechowywanie
Store the T6PV transmitter and R404SBS-E receiver in a cool, dry place, away from direct sunlight, extreme temperatures, and high humidity. Remove batteries from the transmitter if storing for extended periods to prevent leakage.
3.3 Pielęgnacja baterii
Always use the recommended battery types and follow manufacturer guidelines for charging and discharging. Avoid overcharging or completely draining batteries, as this can reduce their lifespan. Dispose of old batteries responsibly.
3.4 aktualizacji oprogramowania sprzętowego
Periodically check the official Futaba website for any available firmware updates for your T6PV transmitter. Firmware updates can provide new features, performance enhancements, or bug fixes. Follow the instructions provided by Futaba for safe updating procedures.
4. Rozwiązywanie Problemów
4.1 Brak zasilania
- Nadajnik: Sprawdź instalację baterii i upewnij się, że są naładowane.
- Odbiornik: Verify power connection from the model's power source (e.g., ESC or separate battery) and ensure it is providing sufficient voltage.
4.2 No Signal or Erratic Control
- Wiążący: Re-perform the binding procedure between the transmitter and receiver.
- Antena: Ensure the transmitter and receiver antennas are properly positioned and not damaged.
- Ingerencja: Działaj w obszarze wolnym od silnych zakłóceń radiowych.
- Zakres: Check if you are operating within the effective range of the system.
4.3 Servos Not Responding
- Znajomości: Verify all servo connections to the receiver are secure and correctly plugged into the designated channels.
- Moc: Ensure the receiver and servos are receiving adequate power.
- Servo Functionality: Test servos individually if possible to rule out a faulty servo.
5. Specyfikacje
| Model | Futaba T6PV Transmitter, Futaba R404SBS-E Receiver |
| Kanały | 6 Channels (T6PV) |
| Systemy komunikacyjne | F-4G, T-FHSS, S-FHSS, MINI-Z (EVO, EVO2, FHSS) |
| Wyświetlacz | High-resolution Color LCD |
| Cechy specjalne | Micro SD card slot, Crawler settings, Response/Feeling adjustment system |
| Numer referencyjny producenta | P-CB6PV-E |
6. Gwarancja i wsparcie
Futaba products are manufactured to high standards and are backed by a limited warranty against defects in materials and workmanship. For specific warranty terms and conditions, please refer to the documentation included with your product or visit the official Futaba website. For technical support, troubleshooting assistance beyond this manual, or warranty claims, please contact Futaba customer service directly.
Official Futaba Webstrona: www.futabarc.com (Please verify the current official web(strona dla Twojego regionu)


