Wstęp
The RadioMaster GX12 is a state-of-the-art radio controller designed for advanced remote control applications, featuring ExpressLRS Gemini-XROSSBAND (GEM-X) technology. This manual provides essential information for the safe and effective operation, setup, and maintenance of your GX12 radio controller.

Obraz: Przód view of the RadioMaster GX12 radio controller, showcasing its dual antennas, central display, gimbals, and various control switches and buttons.

Image: A promotional graphic for the GX12, emphasizing its advanced features such as dual 1W RF output, dual-band antenna, Gemini Xrossband technology, and high-precision gimbals.
Informacje dotyczące bezpieczeństwa
Please read the user instructions carefully before operating the device.
- Always ensure the radio controller is fully charged before use.
- Operate the device in a safe environment, away from obstacles and other radio interference sources.
- Nie wystawiaj urządzenia na działanie ekstremalnych temperatur, wilgoci ani bezpośredniego światła słonecznego.
- Przechowywać w miejscu niedostępnym dla dzieci.
- Only use approved batteries and charging methods.
Co jest w pudełku
Upon opening the package, verify that all components listed below are present:
- GX12 Radio Controller
- Etui transportowe
- Battery Tray (Battery Cells Not Included)
- Replacement Switch Panels
- Kabel typu C
- Akcesoria
- User Instructions (Quick Start Guide)

Image: All items included in the GX12 Radio Controller package, neatly laid out, showing the controller, its grey carry case, battery tray, USB-C cable, and other small accessories.
Organizować coś
1. Instalacja baterii
The GX12 Radio Controller requires a 7.4V 2-cell Lithium-Polymer battery, two 3.7V 18650 Lithium-Ion cells, or a 21700 5000mAh battery (batteries not included). Locate the battery compartment on the back of the controller.

Obraz: Tył view of the GX12 radio controller, highlighting the battery compartment cover with a "PUSH" indicator and the RadioMaster strap.
- Otwórz pokrywę komory baterii.
- Insert the compatible battery into the tray, ensuring correct polarity.
- Dokładnie zamknij pokrywę komory baterii.
2. Ładowanie
The GX12 supports 2S Smart Balance Charging via its USB-C port.
- Connect the supplied Type-C cable to the USB-C port on the controller and to a suitable USB power source.
- The OLED display will indicate charging status.
3. Konfiguracja anteny
The GX12 features dual folding 2.4GHz/Sub-G 900MHz omnidirectional antennas.
- For optimal performance, unfold the antennas to an upright position before operation.
- Fold them down for compact storage and transport.

Obraz: Przód view of the GX12 radio controller with its dual antennas folded down, demonstrating its compact form factor for storage.
4. Gimbal Sticks
The GX01 gimbals feature folding sticks for easy transport.
- To fold, gently push the stick downwards and then fold it into the gimbal housing.
- To unfold, pull the stick out until it locks into the upright position.

Obraz: Wybuch view diagram showing how the gimbal sticks on the GX12 can be folded for transport, highlighting the mechanism for compact storage.
Instrukcja obsługi
1. Włączanie/wyłączanie zasilania
- To power on, press and hold the power button until the OLED display illuminates.
- Aby wyłączyć urządzenie, naciśnij i przytrzymaj przycisk zasilania, aż wyświetlacz się wyłączy.
2. Koniec kontroliview
The GX12 features a comprehensive set of controls for precise operation:

Obraz: Profesjonalista z bokufile of the GX12 radio controller, illustrating its ergonomic design and the placement of additional switches and controls on the side.
- GX01 1000Hz, 3D Digital CNC Hall Effect Gimbals: Provide precise control inputs.
- Switches (SA, SD, T1-T6): Configurable for various functions.
- Buttons (SYS, RTN, PAGE, TELE): For navigating the EdgeTX firmware menu.
- Pots (P1, P2): Rotary potentiometers for fine adjustments.
- 128*64 Monochrome OLED Display: Shows telemetry data, menu options, and settings.

Zdjęcie: szczegółowy przekrój view of the GX01 Digital 1000Hz 12-bit Gimbal, highlighting its CNC aluminum construction, quad ball bearings, and 3D Digital Hall Effect Sensors for exceptional precision.
3. ExpressLRS Gemini-XROSSBAND (GEM-X)
The GX12 is the first radio to feature ExpressLRS Gemini-XROSSBAND (GEM-X), allowing for simultaneous transmission on both 2.4GHz and 915MHz. This ensures unmatched interference rejection and extended range.
- The internal RF module supports ELRS 2.4GHz / Sub-G 900MHz.
- It is compatible with all current 2.4GHz and 900MHz ExpressLRS receivers, as well as the new generation of Gemini Xrossband (Gem-X) receivers.
4. EdgeTX Firmware
The radio operates on EdgeTX firmware, providing a highly customizable and powerful user interface. Refer to the official EdgeTX documentation for detailed instructions on model setup, binding, and advanced configurations.
- Channels: Max 16 channels (Receiver dependent).
- Upgrade Method: USB / EdgeTX Companion PC software.
Konserwacja
- Czyszczenie: Do czyszczenia obudowy radia używaj miękkiej, suchej ściereczki. Unikaj stosowania silnych środków chemicznych i materiałów ściernych.
- Wentylator chłodzący: The GX12 includes a cooling fan to manage heat during operation. Ensure the fan vents are clear of obstructions.
- Składowanie: When not in use, store the radio controller in its carry case in a cool, dry place, away from direct sunlight and extreme temperatures.
- Pielęgnacja gimbala: The GX01 gimbals are precision components. Avoid applying excessive force or exposing them to dust and debris.
Rozwiązywanie problemów
- Radio się nie włącza:
- Sprawdź poziom naładowania baterii.
- Ensure battery is correctly installed with proper polarity.
- Brak sygnału/problemy z połączeniem:
- Verify that the receiver is compatible with ExpressLRS.
- Ensure both radio and receiver are in binding mode.
- Check antenna orientation on both devices.
- Wyświetlacz nie działa:
- Sprawdź, czy radio jest włączone.
- Jeśli problem nadal występuje, skontaktuj się z pomocą techniczną.
- Problemy z aktualizacją oprogramowania sprzętowego:
- Upewnij się, że kabel USB jest prawidłowo podłączony.
- Use the official EdgeTX Companion PC software for updates.
- Refer to EdgeTX documentation for detailed update procedures.
Specyfikacje
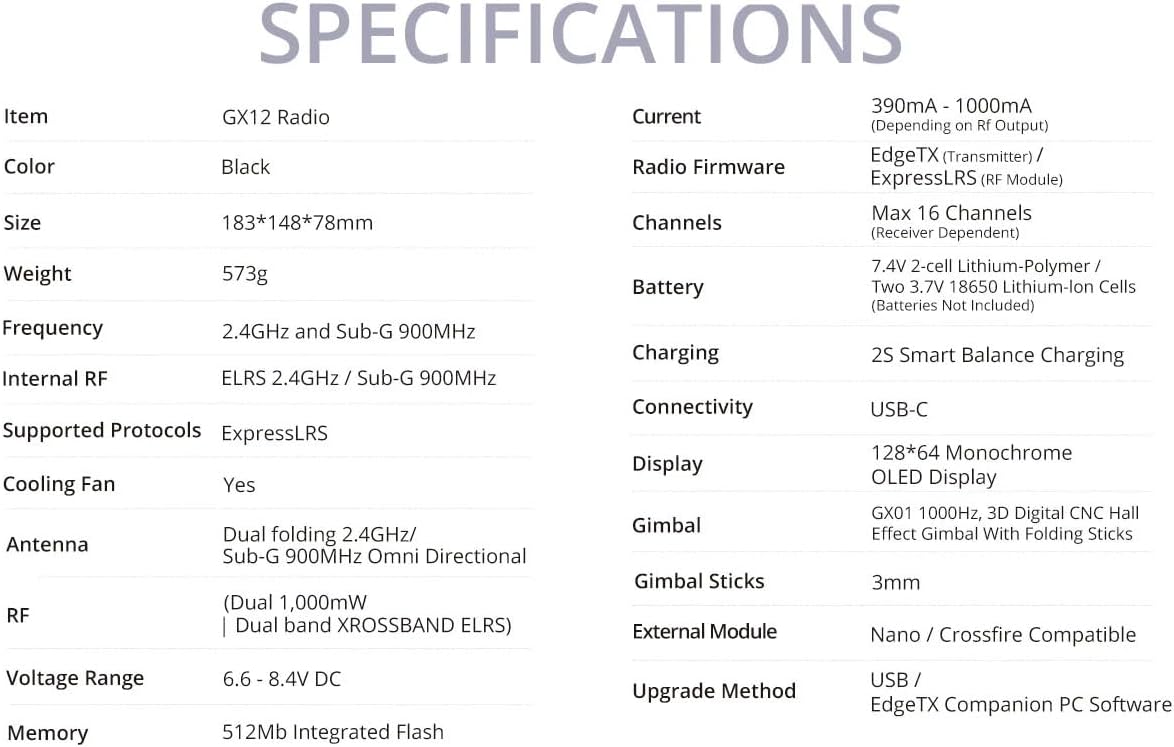
Image: A comprehensive table detailing the specifications of the GX12 Radio, including dimensions, weight, frequency, internal RF, battery, and display type.
| Funkcja | Szczegół |
|---|---|
| Częstotliwość | 2.400 GHz i Sub-G 900 MHz |
| Wewnętrzny RF | ELRS 2.4 GHz / Sub-G 900 MHz |
| Obsługiwane protokoły | Express-LRS |
| Wentylator chłodzący | Tak |
| Antena | Dual folding 2.4GHz/ Sub-G 900MHz Omni directional |
| RF | Dual 1,000mW | Dual band XROSSBAND ELRS |
| Tomtage Zakres | 6.6 - 8.4 V prądu stałego |
| Aktualny | 390mA - 1000mA (Depending on Rf output) |
| Oprogramowanie radiowe | EdgeTX (nadajnik) / ELRS (moduł RF) |
| Kanały | Maks. 16 kanałów (w zależności od odbiornika) |
| Bateria | 7.4 V 2-ogniwowy akumulator litowo-polimerowy / Dwa ogniwa litowo-jonowe 3.7 V 18650 / Akumulator 21700 5000 mAh (akumulatory nie są dołączone) |
| Ładowanie | 2S Smart Balance Charging |
| Łączność | USB-C |
| Wyświetlacz | 128*64 monochromatyczny wyświetlacz OLED |
| Gimbal | GX01 1000Hz, 3D cyfrowy CNC Hall Effect Gimbal ze składanymi drążkami |
| Kije gimbala | 3mm |
| Moduł zewnętrzny | Kompatybilny z Nano / Crossfire |
| Metoda aktualizacji | USB / EdgeTX Companion PC software |
| Pamięć | Zintegrowana pamięć Flash 512Mb |
| Wymiary produktu | 7.2 x 5.8 x 3 cala |
| Waga przedmiotu | 1.26 funta |
| Kraj pochodzenia | Chiny |
| Producent | RadioMaster |


