1. Wprowadzenie
This manual provides detailed instructions for the safe and proper installation, operation, and maintenance of your WALI CM3460-2 Dual Screen Ceiling TV Mount. Please read this manual thoroughly before installation and retain it for future reference. This mount is designed to securely hold two flat-screen televisions, ranging from 34 to 60 inches, with a maximum weight capacity of 88 lbs per screen, totaling 176 lbs. It supports VESA mounting patterns from 200x200mm to 600x400mm.
2. Informacje dotyczące bezpieczeństwa
WARNING: Failure to read and follow these instructions may result in serious personal injury, property damage, or voiding your warranty.
- Ensure the mounting surface can safely support the combined weight of the mount and two televisions.
- Do not install on drywall alone. Always mount into a solid wood joist, concrete, or brick ceiling.
- Używaj całego dostarczonego sprzętu. Nie stosuj zamienników.
- Jeśli masz jakiekolwiek wątpliwości dotyczące instalacji, skonsultuj się z wykwalifikowanym specjalistą.
- Podczas instalacji należy trzymać dzieci i zwierzęta z daleka.
- Do not exceed the maximum weight capacity of 88 lbs per screen (176 lbs total).
- Regularly check that the mount is secure and all fasteners are tight.
3. Zawartość opakowania
Verify that all components are present and undamaged before beginning installation. If any parts are missing or defective, contact WALI customer support.
- Ceiling Mount Assembly (Main Pole, Crossbar, TV Brackets)
- Mounting Hardware Kit (Bolts, Washers, Spacers, Anchors for various ceiling types)
- Tools (Hex Keys, Wrench)
- Instrukcja obsługi
4. Zgodność
This WALI CM3460-2 mount is compatible with:
- Rozmiar ekranu: Most 34 to 60 inch LCD, LED, OLED flat screen TVs.
- Nośność: Up to 88 lbs (40 kg) for each screen, with a total maximum capacity of 176 lbs (80 kg).
- Wzory montażu VESA: 200x200mm, 300x200mm, 300x300mm, 400x200mm, 400x300mm, 400x400mm, and 600x400mm.

Figure 4.1: Display compatibility for screen size and weight.

Figure 4.2: Wide VESA compatibility ranging from 200x200mm to 600x400mm.
5. Instalacja/Konfiguracja
Follow these steps carefully to install your WALI CM3460-2 Ceiling TV Mount. It is recommended to have at least two people for installation due to the size and weight of the components and televisions.
5.1 Choose Your Ceiling Type
This mount can be installed on wood joist, concrete, or brick ceilings. NIE montuj wyłącznie na płycie gipsowo-kartonowej.

Figure 5.1: Supported ceiling types for installation.
5.2 Mount the Ceiling Plate
Locate the desired mounting position on your ceiling. Use a stud finder for wood joists or appropriate tools for concrete/brick. Mark the drilling points accurately.
- For wood joist ceilings, drill pilot holes (Ø6.0mm / 1/4") to a depth of 90mm (3.5").
- For concrete ceilings, drill pilot holes (Ø12mm / 1/2") to a depth of 95mm (3.7"). Insert concrete anchors.
- Secure the ceiling plate using the appropriate lag bolts/anchors and washers. Ensure it is firmly attached.
Wideo 5.1: Instalacjaview for WALI Dual Screen Ceiling TV Mount (CM3460-2). This video demonstrates the general installation process, including mounting the ceiling plate and attaching the main pole.
5.3 Assemble the Main Pole and Crossbar
Attach the main pole to the ceiling plate. Then, connect the crossbar to the main pole. Adjust the height of the main pole as needed (41.9" to 65.6" from ceiling to center of mounting plate) and secure it with the provided pins and screws.
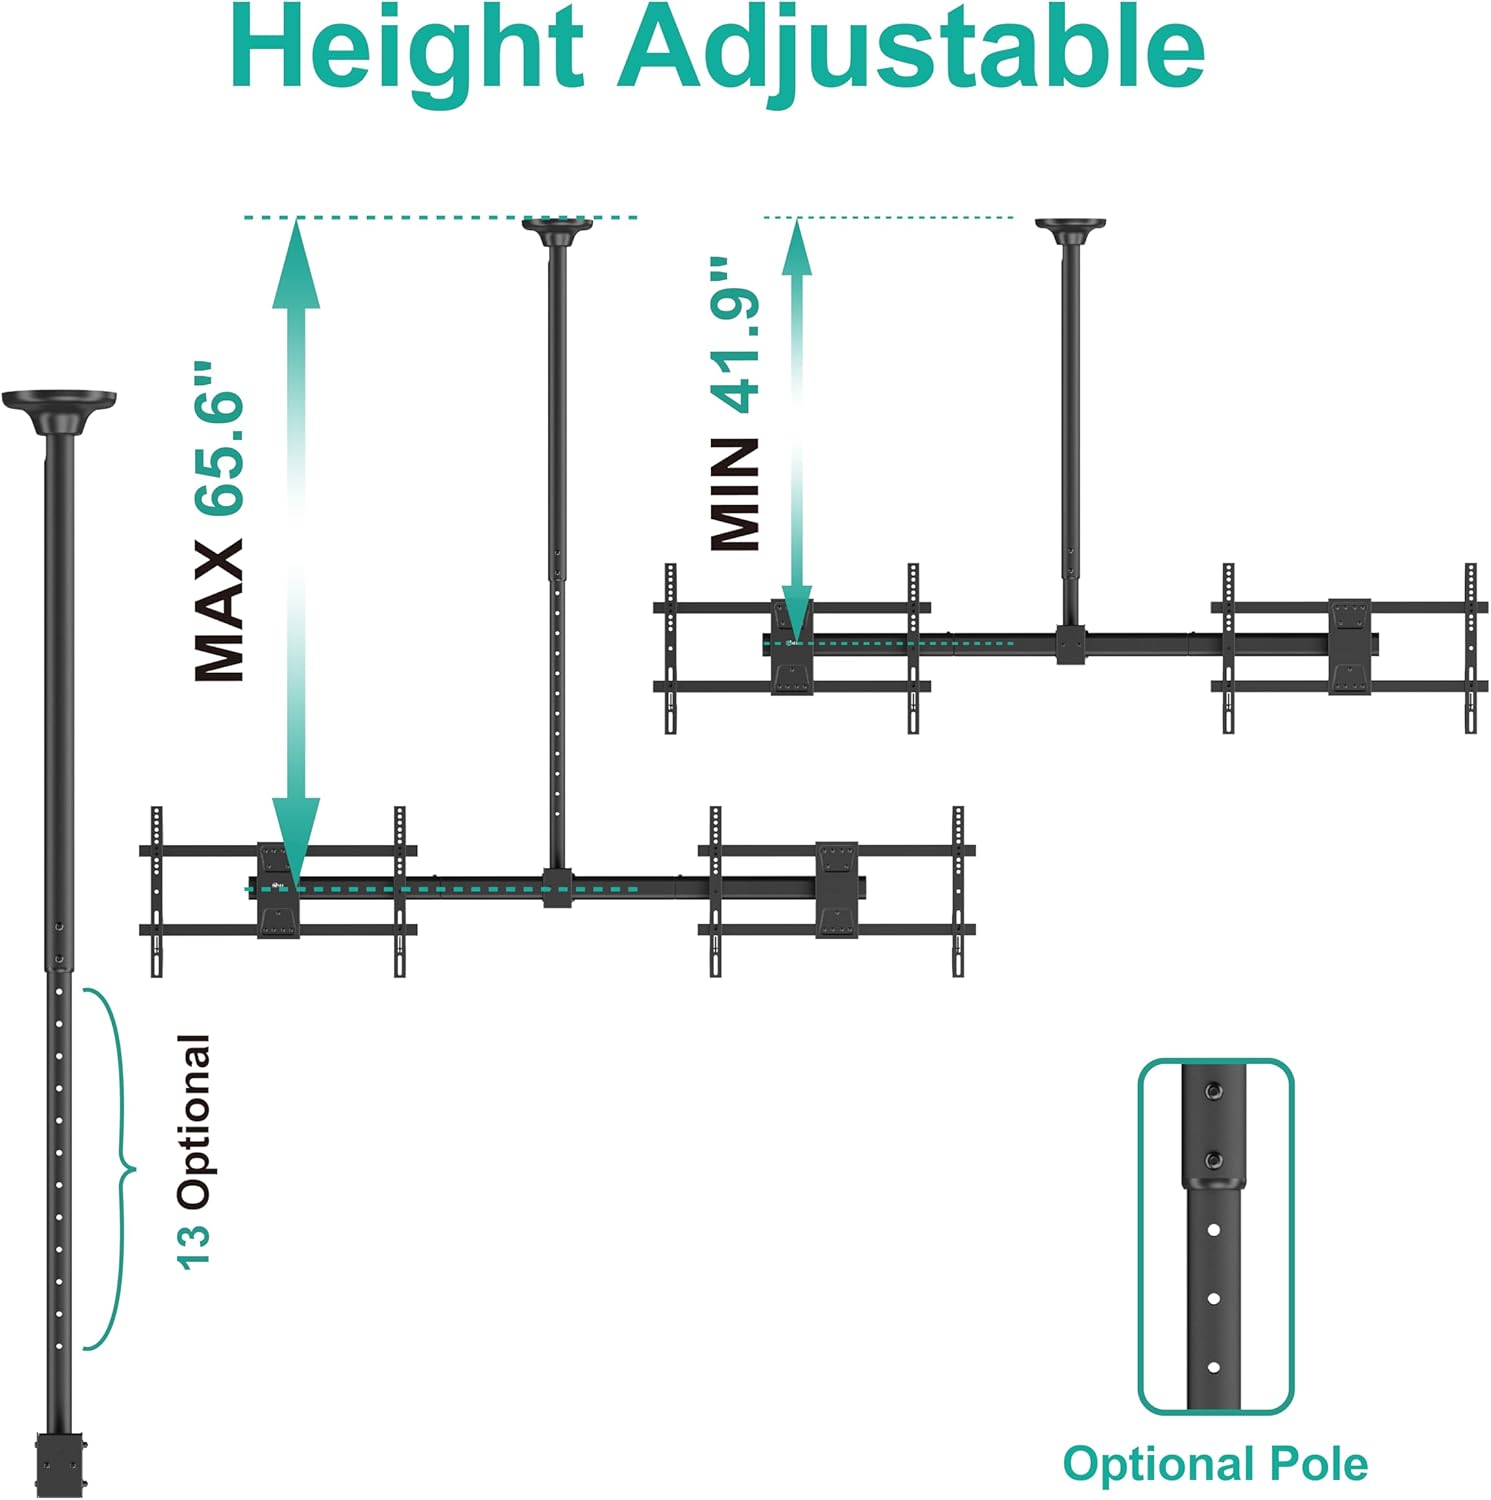
Figure 5.2: Height adjustment range of the main pole.
5.4 Attach TV Brackets to Televisions
Attach the TV brackets to the back of each television using the appropriate screws, washers, and spacers from the hardware kit. Ensure the brackets are centered and securely fastened to the VESA mounting holes on your TV.

Rysunek 5.3: Koniecview of the three main installation steps.
5.5 Hang Televisions on the Mount
Carefully lift each television and hook the attached brackets onto the crossbar. Secure the televisions to the mount using the safety screws or locking mechanisms provided. Ensure both TVs are level and stable.
5.6 Zarządzanie kablami
Route TV cables through the main pole and crossbar for a clean and organized appearance. Use cable ties or clips if necessary to keep cables tidy.

Figure 5.4: Integrated cable management for a neat installation.
6. Operating / Adjustments
The WALI CM3460-2 mount offers various adjustments for optimal viewkąty.
- Regulacja nachylenia: Each screen can be individually tilted down by up to 25 degrees. Loosen the tilt knobs, adjust to the desired angle, and re-tighten.
- Regulacja obrotu: The entire ceiling mount can swivel 360 degrees around the pole. This allows for flexible positioning of both screens.
- Regulacja poziomu ekranu: Each screen can be rotated ±3 degrees to ensure perfect horizontal alignment after installation.
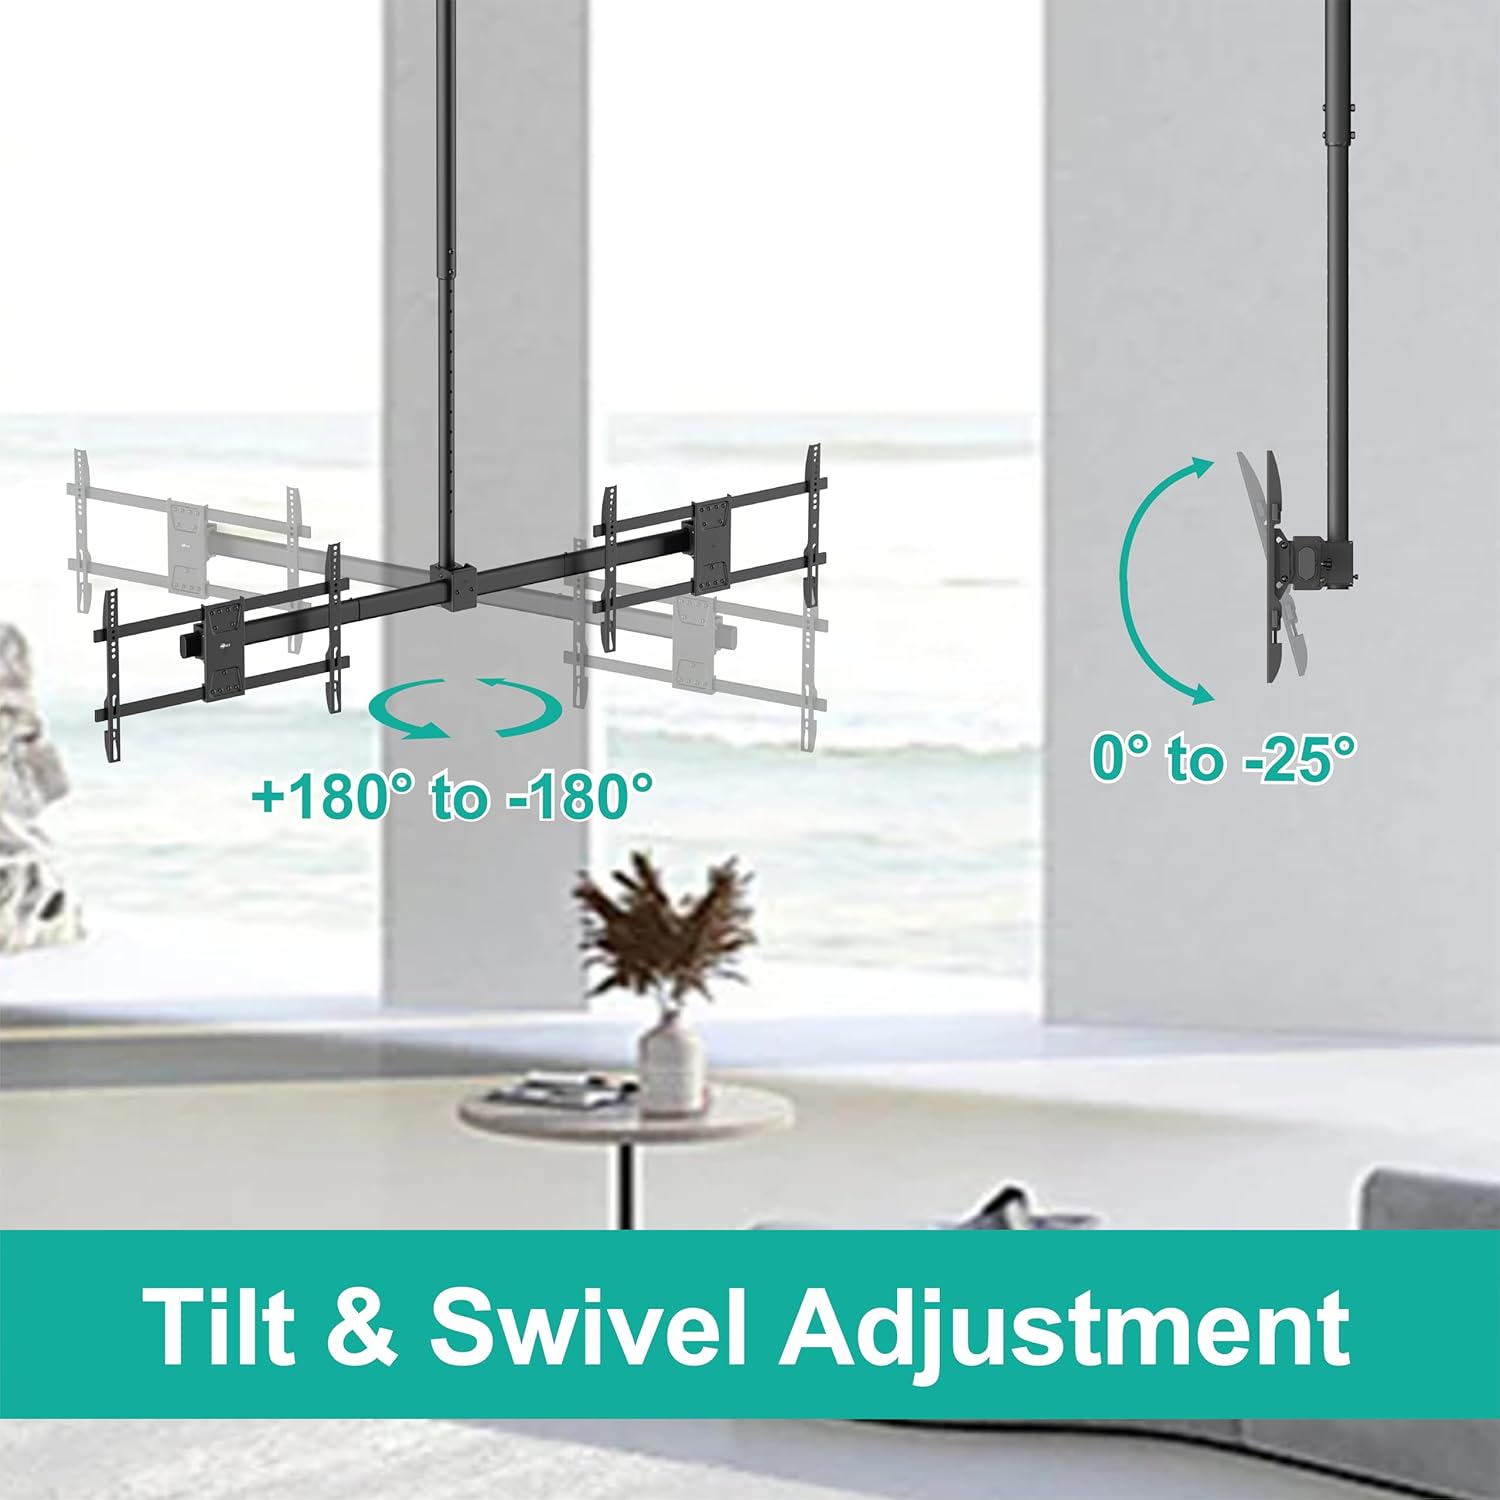
Figure 6.1: Tilt and swivel adjustment capabilities.

Figure 6.2: Screen level adjustment for fine-tuning alignment.
7. Konserwacja
Regular maintenance ensures the longevity and safety of your TV mount.
- Kontrole okresowe: Every few months, inspect all mounting hardware and connections to ensure they are secure. Tighten any loose screws or bolts.
- Czyszczenie: Przetrzyj uchwyt miękką, suchą ściereczką. Unikaj środków czyszczących o właściwościach ściernych i rozpuszczalników, które mogłyby uszkodzić wykończenie.
- Smarowanie: Moving parts generally do not require lubrication. If any movement becomes stiff, contact customer support for advice.
8. Rozwiązywanie Problemów
| Problem | Możliwa przyczyna | Rozwiązanie |
|---|---|---|
| Mocowanie wydaje się niestabilne i chwiejne. | Loose mounting bolts or incorrect installation. | Re-check all ceiling and TV attachment bolts. Ensure they are tightened according to instructions. Verify installation on a suitable ceiling type. |
| TVs are not level. | Improper screen level adjustment. | Use the screen level adjustment feature (±3 degrees rotation) to fine-tune the horizontal alignment of each TV. |
| Trudności z regulacją nachylenia lub obrotu. | Pokrętła/śruby regulacyjne są zbyt ciasne. | Loosen the relevant adjustment knobs or screws slightly before attempting to move the screens. Re-tighten once the desired position is achieved. |
| Brakujące części. | Błąd w opakowaniu. | Contact WALI customer support immediately for replacement parts. |
9. Specyfikacje
- Model: CM3460-2
- Marka: WALI
- Tworzywo: Metal
- Kolor: Czarny
- Kompatybilne rozmiary telewizorów: 34 do 60 cala
- Nośność: 88 lbs (40 kg) per screen, 176 lbs (80 kg) total
- Zgodność z VESA: 200x200mm do 600x400mm
- Regulacja wysokości: 41.9" to 65.6" (from ceiling to center of mounting plate)
- Zakres przechyłu: 0° to -25° (individual screen)
- Zakres obrotu: 360° (entire mount around pole)
- Regulacja poziomu ekranu: ±3°
- Typ montażu: Montaż sufitowy
- Waga przedmiotu: 28.4 funta
- Kod UPC: 811278026827
10. Gwarancja i wsparcie
WALI provides a limited warranty for this product. For specific warranty terms and conditions, please refer to the warranty card included in your package or visit the official WALI website. For technical assistance, missing parts, or any questions regarding your WALI CM3460-2 mount, please contact WALI customer support. Experienced and friendly US-based customer support is available to assist 7 days a week.
Informacje kontaktowe:
- Webstrona: Visit the WALI Store on Amazon
- E-mail: (Refer to product packaging or WALI webteren)
- Telefon: (Refer to product packaging or WALI webteren)
11. Filmy produktowe
Watch these official product videos for visual guidance on installation and features.
Video 11.1: WALI Dual Screen Ceiling TV Mount for 34-60" TVs (CM3460-2). This video provides a comprehensive overview and installation guide for the dual screen ceiling TV mount.
Video 11.2: WALI Heavy-Duty Ceiling TV Mount holds up to 176lbs (CM3460-2). This video highlights the heavy-duty construction and weight capacity of the CM3460-2 mount.


