1. Wprowadzenie
This manual provides detailed instructions for the safe and effective operation, maintenance, and troubleshooting of your Nitecore MH40S rechargeable flashlight and NB10000 power bank. Please read this manual thoroughly before use to ensure optimal performance and longevity of your devices.
2. Zawartość opakowania
Sprawdź, czy w przesyłce znajdują się wszystkie wymienione poniżej elementy:
- Nitecore MH40S Flashlight
- 2 x Nitecore NL2150 5,000mAh Li-ion Batteries
- Nitecore NB10000 10,000mAh Power Bank
- Bezprzewodowy przełącznik zdalny
- Adapter QC
- Kabel ładujący USB-C
- Zapasowy o-ring
- Falrep
- Zapięcie na rzep
- 2 x Hook-and-loop Straps
- Kabura

3. Funkcje produktu
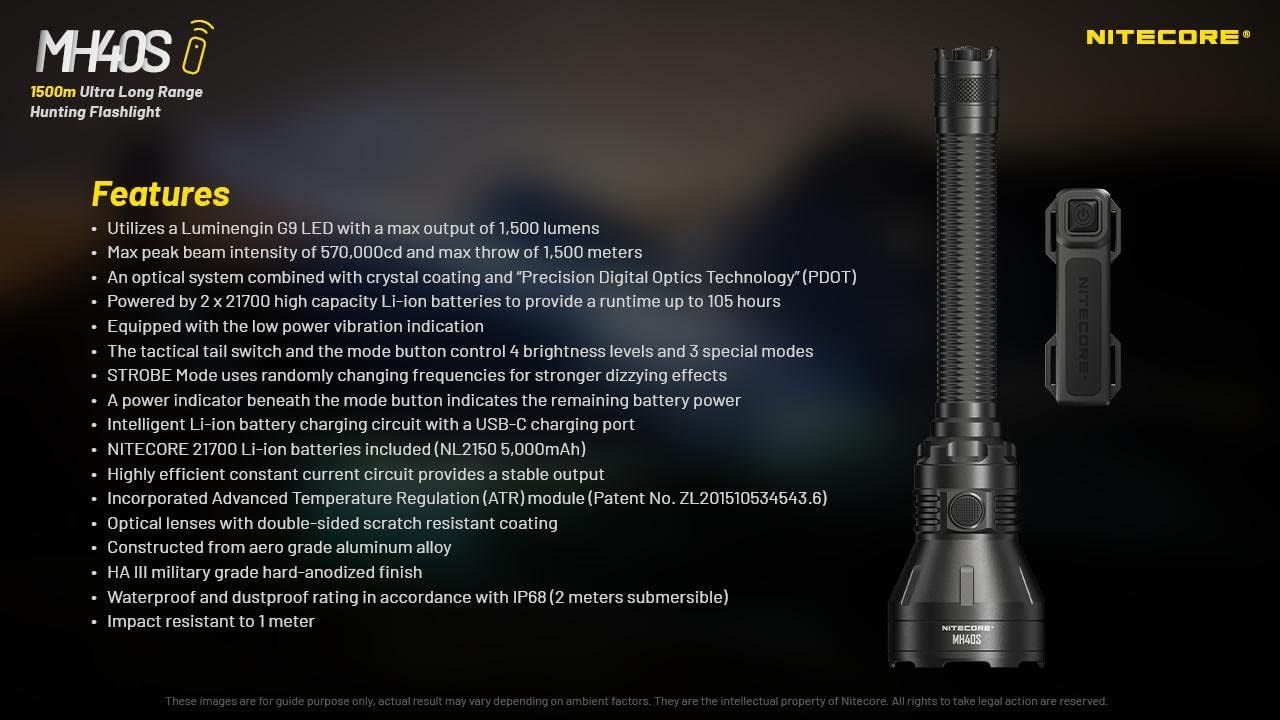
- Utilizes a Luminengin G9 LED with a maximum output of 1,500 lumens.
- Maximum peak beam intensity of 570,000cd and a maximum throw of 1,500 meters.
- Optical system combines crystal coating and "Precis Digital Optics Technology" (PDOT).
- Powered by 2x high-capacity Li-ion batteries, providing a runtime of up to 105 hours.
- Equipped with a low power vibration indicator.
- Tactical tail switch and mode button control 4 brightness levels and 3 special modes.
- STROBE mode uses randomly changing frequencies for enhanced disorienting effects.
- Power indicator beneath the mode button displays remaining battery power.
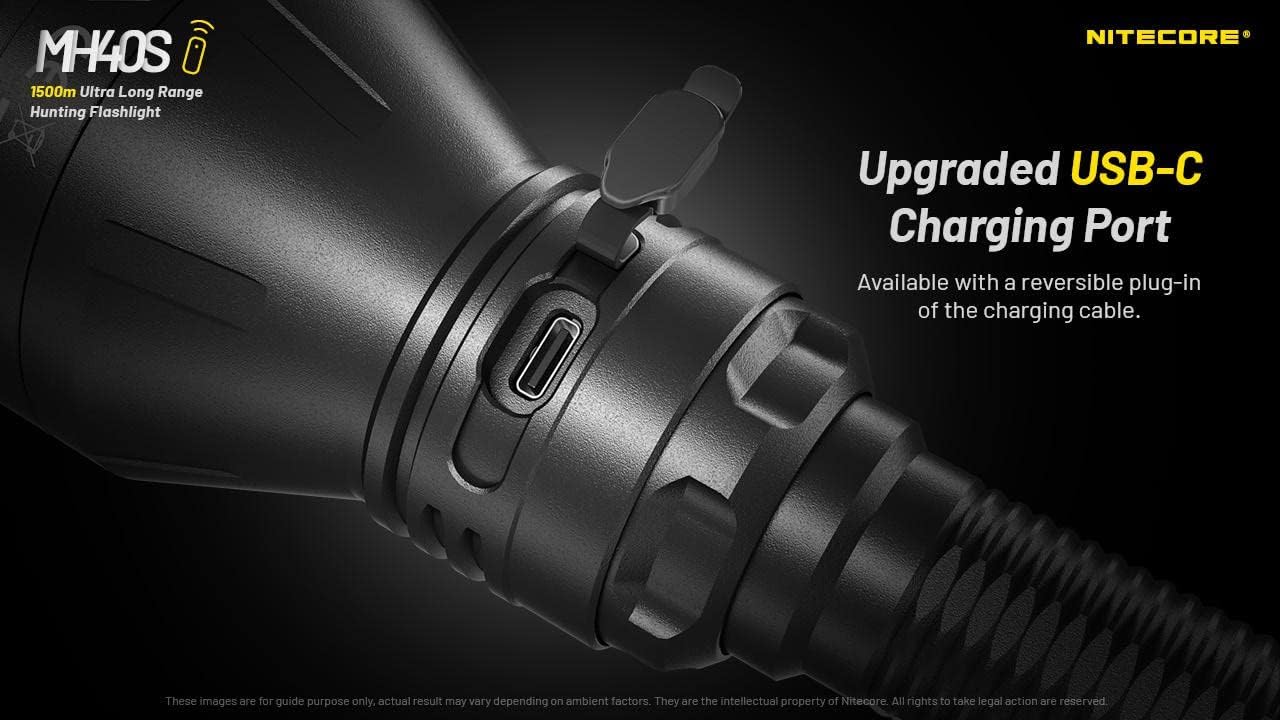
- Intelligent Li-ion battery charging circuit with a USB-C charging port.
- Includes Nitecore NL2150 5,000mAh Li-ion batteries.
- Highly efficient constant current circuit ensures stable output.
- Incorporates Advanced Temperature Regulation (ATR) module.
- Optical lenses feature double-sided scratch-resistant coating.
- Wykonane ze stopu aluminium lotniczego z wykończeniem anodowanym na twardo w klasie wojskowej HA III.
- Waterproof and dustproof rating in accordance with IP68 (2 meters submersible).
- Odporny na uderzenia do 1 metra.

4. Specyfikacje
4.1 MH40S Flashlight Technical Data
| Norma FL1 | TURBINA | WYSOKI | ŚREDNI | NISKI | Stroboskop | LATARNIA MORSKA | SOS |
|---|---|---|---|---|---|---|---|
| Wyjście | 1,500 lumenów | 500 lumenów | 150 lumenów | 18 lumenów | 1,500 lumenów | 1,500 lumenów | 1,500 lumenów |
| Czas wykonania | 3 godziny 15 minut | 7 godziny 15 minut | 25 godz. | 105 godz. | — | — | — |
| Odległość wiązki | 1,500m | 860m | 450m | 150m | — | — | — |
| Intensywność wiązki | 570,000cd | 186,000cd | 51,000cd | 5,800cd | — | — | — |
Note: The stated data is measured in accordance with international flashlight testing standards ANSI/PLATO FL 1-2019, using 2x 21700 Li-ion batteries (5,000mAh) under laboratory conditions. Actual data may vary due to different battery types or environmental conditions.

4.2 Specyfikacje ogólne
- PROWADZONY: Luminengin G9 LED
- Reflektor: SMO
- Bateria: 2 x 21700 Li-ion (NL2150 5,000mAh included)
- Tryby specjalne: Location Beacon, SOS, Strobe
- Beam Color: Białe światło
- Długość: 256 mm (10.08 cala)
- Rozmiar głowy: 65 mm (2.56 cala)
- Waga: 245.8 g (8.67 uncji) (bez baterii)
- Tworzywo: Stop aluminium lotniczego
- Skończyć: HA III military-grade hard-anodized
- Stopień wodoodporności: IP68 (2 metry zanurzeniowe)
- Odporność na uderzenia: 1 metr
4.3 NB10000 Power Bank Specifications
- Pojemność: 10,000mAh 3.85V
- Energia znamionowa: 6,400mAh 5V
- Wejście (USB-C): 5V - 2.4A / 9V - 2A
- Wyjście (USB-C): 5V - 3A / 9V - 2A / 12V - 1.5A
- Dual Ports Output: 5V - 3A (MAX)
- Tworzywo: Carbon fiber frame and panels
- Wymiary: 4.8" x 2.32" x 0.42"
- Waga: 5.29 uncji
- Cechy: Dual output channels (USB and USB-C), LED remaining power level indicator, one-touch low current mode.
5. Konfiguracja
5.1 Instalacja baterii
- Unscrew the tail cap of the MH40S flashlight.
- Insert the two Nitecore NL2150 21700 Li-ion batteries with the positive (+) terminals facing the head of the flashlight.
- Dokładnie zakręć nakrętkę, aby zapewnić odpowiedni kontakt i wodoodporność.
Ostrzeżenie: Upewnij się, że baterie są włożone z zachowaniem prawidłowej polaryzacji. Nieprawidłowe włożenie może spowodować uszkodzenie urządzenia.
5.2 Pierwsze ładowanie
Before first use, fully charge the MH40S flashlight and the NB10000 power bank.
5.2.1 Charging the MH40S Flashlight
- Znajdź port ładowania USB-C na obudowie latarki.
- Open the rubber cover protecting the port.
- Connect the USB-C charging cable to the flashlight and the QC Adapter.
- Plug the QC Adapter into a power outlet.
- The power indicator beneath the mode button will flash during charging and remain solid when fully charged.
- Close the rubber cover after charging to maintain water and dust resistance.
5.2.2 Charging the NB10000 Power Bank
- Connect the USB-C charging cable to the USB-C input port on the NB10000.
- Connect the other end of the cable to a USB power source (e.g., QC Adapter, computer USB port).
- The LED indicators on the power bank will show the charging status.
6. Instrukcja obsługi
6.1 Basic Flashlight Operation
The MH40S features a tactical tail switch and a mode button for control.

6.1.1 Włączanie/wyłączanie
- Chwilowe włączone: Naciśnij i przytrzymaj przełącznik taktyczny na ogonie do połowy. Puść, aby wyłączyć.
- Stałe włączanie/wyłączanie: Fully press the tactical tail switch until a click is heard to turn on. Fully press again to turn off.
6.1.2 Brightness Level Adjustment
- With the flashlight on, press the mode button to cycle through brightness levels: LOW - MID - HIGH - TURBO.
- The flashlight will memorize the last used brightness level (except for special modes) when turned off and on again.
6.1.3 Special Modes (STROBE, BEACON, SOS)
- With the flashlight on, press and hold the mode button to activate STROBE mode.
- While in STROBE mode, press the mode button again to cycle through BEACON and SOS modes.
- To exit special modes, short press the mode button or turn off the flashlight.
6.2 Wireless Remote Switch Operation
The included wireless remote switch allows for convenient control of the MH40S from a distance of up to 1 meter (3.28 feet).

- Chwilowe włączone: Press and hold the designated button on the remote switch. Release to turn off.
- Stałe włączanie/wyłączanie: Press the designated button on the remote switch to turn on. Press again to turn off.
- Stroboskop: Press the designated STROBE button on the remote switch to activate. Press again to turn off.
The remote switch is powered by a 3V CR1632 button cell battery and features advanced power cut-off (APC) technology for extended standby time.
6.3 NB10000 Power Bank Usage
- Urządzenia ładujące: Connect your device to the USB-A or USB-C output port of the NB10000 using an appropriate charging cable.
- Wskaźnik poziomu mocy: Press the power button on the NB10000 to check the remaining battery level via the LED indicators.
- Tryb niskiego prądu: For charging delicate electronics (e.g., Bluetooth earphones, smartwatches), activate the low current mode by pressing and holding the power button until a specific indicator lights up.
7. Konserwacja
- Czyszczenie: Wyczyść korpus latarki miękką,amp ściereczka. Nie należy używać środków czyszczących o właściwościach ściernych ani rozpuszczalników.
- Gwinty i pierścienie uszczelniające: Lubricate the threads and O-rings regularly with silicone grease to maintain water resistance. Replace worn O-rings as needed.
- Pielęgnacja baterii: Wyjmij baterie, jeśli latarka nie będzie używana przez dłuższy czas. Przechowuj baterie w chłodnym i suchym miejscu.
- Port ładowania: Keep the USB-C charging port clean and free of debris. Ensure the rubber cover is securely closed when not charging.
8. Rozwiązywanie Problemów
- Latarka się nie włącza:
- Sprawdź biegunowość baterii.
- Upewnij się, że akumulatory są w pełni naładowane.
- Dokładnie dokręć nakrętkę tylną.
- Clean battery contacts with an alcohol swab.
- Zmniejszona jasność lub krótki czas pracy:
- Batteries may be low; recharge them.
- Batteries may be aging; consider replacement.
- Ensure the flashlight head and tail cap are tightly screwed on.
- Remote switch not responding:
- Check the distance between the remote and the flashlight (max 1 meter).
- Replace the CR1632 battery in the remote switch.
- Upewnij się, że żadne przeszkody nie blokują sygnału.
- Problemy z ładowaniem:
- Verify the USB-C cable is properly connected.
- Ensure the power source (QC Adapter) is functioning.
- Wyczyść port ładowania, usuwając wszelkie zanieczyszczenia.
9. Informacje dotyczące bezpieczeństwa
- Nie należy świecić latarką bezpośrednio w oczy.
- Przechowywać w miejscu niedostępnym dla dzieci.
- Do not disassemble or modify the flashlight or power bank, as this voids the warranty and may cause damage.
- Unikaj wystawiania urządzeń na działanie ekstremalnych temperatur lub bezpośredniego światła słonecznego przez dłuższy czas.
- Use only recommended batteries and charging accessories.
- Zutylizuj baterie zgodnie z lokalnymi przepisami.
10. Gwarancja i wsparcie
Nitecore products are covered by a warranty. For detailed warranty information and support, please refer to the official Nitecore webOdwiedź witrynę lub skontaktuj się z lokalnym dystrybutorem. Zachowaj paragon zakupu na wypadek reklamacji.
Aby uzyskać dalszą pomoc, odwiedź stronę Sklep Nitecore na Amazon or the official Nitecore webstrona.


