1. Wprowadzenie
This manual provides comprehensive instructions for the installation, operation, and maintenance of your GRIFEMA GA1003-2 Key Lock Box. This key lock box is designed to securely store keys and small valuables, featuring a durable construction and a customizable 4-digit combination lock.
2. Informacje dotyczące bezpieczeństwa
Please read all safety information before assembly and use.
- Use caution when assembling and using the key lock box.
- Do not exceed the allowed weight capacity of 558 grams.
- Be careful to avoid pinching fingers when closing or opening the lock box.
- Only use tools and mounting methods that comply with safety requirements.
3. Koniec produktuview
The GRIFEMA GA1003-2 Key Lock Box is constructed primarily from a durable zinc alloy and steel, ensuring maximum durability and security. It features a 4-digit combination padlock, offering 9999 possible combinations for enhanced security. The design includes a dust cover to protect the combination dials from rain, dust, and snow, making it weather-resistant and robust for outdoor use.
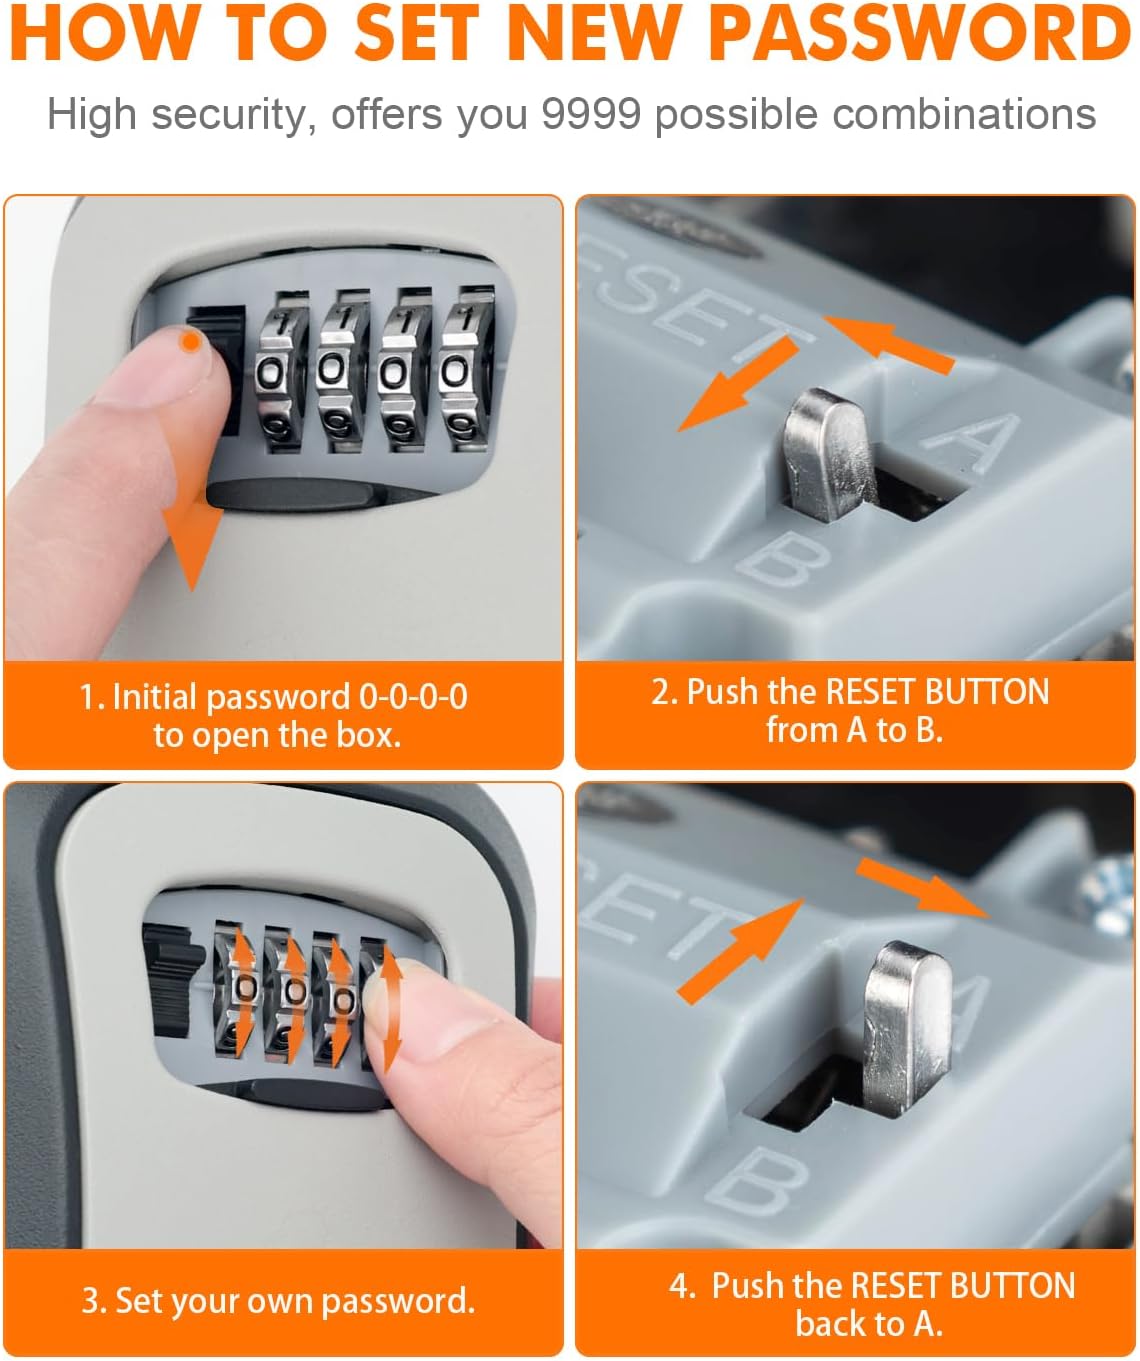
Image: Key Lock Box features including durable construction and weather protection.

Image: Detailed dimensions of the key lock box, external and internal.
4. Konfiguracja i instalacja
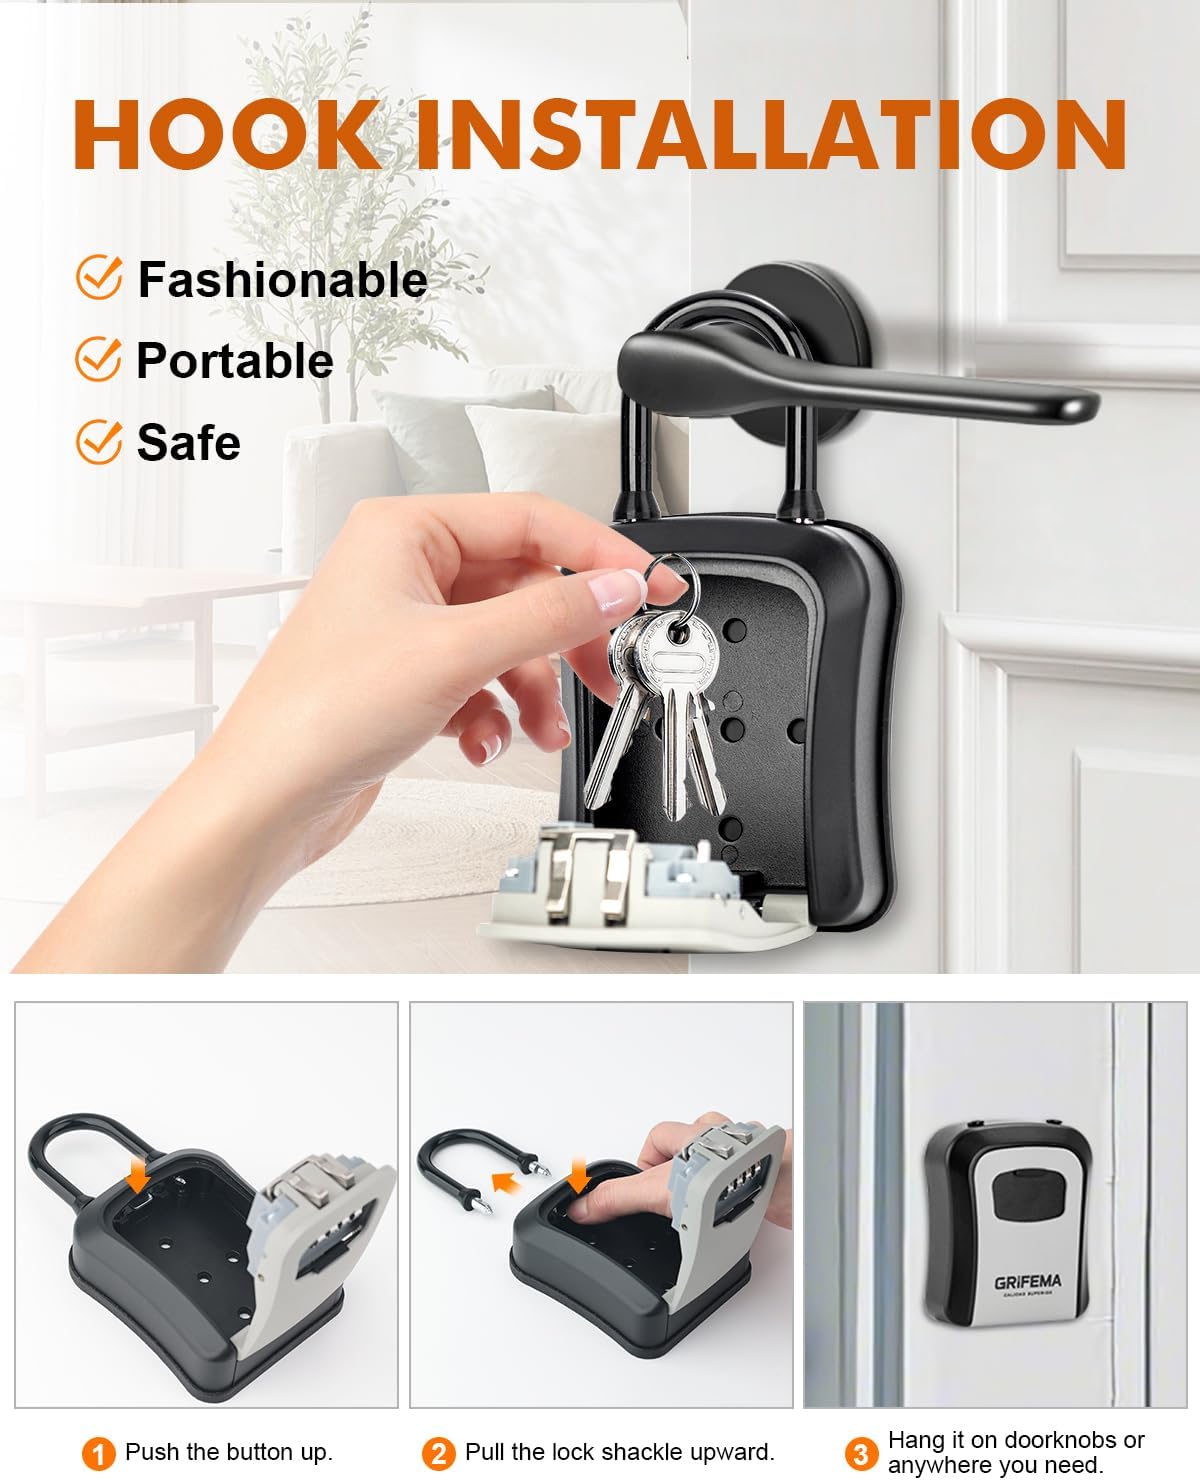
The GRIFEMA GA1003-2 Key Lock Box offers two primary installation methods: Hook Installation and Wall-mounted Installation.
4.1. Hook Installation
This method allows for portable and flexible placement, ideal for hanging on doorknobs or other suitable fixtures. It helps prevent rain from entering the lock box when hung correctly.

Image: Visual guide for hook installation.
- Push the button up: Locate the release button on the side of the lock box and push it upwards.
- Pull the lock shackle upward: While holding the button, pull the shackle (the U-shaped hook) upwards to open it.
- Hang the lock box: Place the open shackle over a doorknob, gate handle, or other secure fixture. Close the shackle by pushing it down until it locks into place.
4.2. Montaż na ścianie
This method provides a permanent and secure attachment to a wall, preventing the lock box from scratching doors and offering a fixed storage solution.
Obraz: Przewodnik wizualny dotyczący montażu na ścianie.
- Open the lock box: Open the lock box and remove the shackle if it's in place. The back of the box has pre-drilled holes.
- Zaznacz punkty wiercenia: Hold the lock box against the desired wall surface and mark the positions for the drilling holes using a pencil.
- Wywierć otwory: Use an appropriate drill bit to drill holes at the marked positions.
- Insert wall anchors: Włóż dostarczone kołki rozporowe do wywierconych otworów.
- Secure the lock box: Align the lock box with the anchors and secure it to the wall using the provided screws. Ensure it is firmly attached.

Obraz: Ponadview of the two installation methods.
5. Operating Instructions: Setting Your Combination
The GRIFEMA GA1003-2 Key Lock Box comes with an initial password of 0-0-0-0. You can easily set your own personalized 4-digit combination.

Image: Steps for setting a new combination password.
- Otwórz pudełko: Rotate the dials to the initial password 0-0-0-0 and pull the latch to open the lock box.
- Znajdź przycisk resetowania: Inside the lock box, find the reset button (usually a small lever or pin).
- Push the reset button: Push the reset button from position 'A' to position 'B'.
- Set your new password: While the reset button is in position 'B', rotate the combination dials to your desired 4-digit code. Make sure to remember this code.
- Return the reset button: Push the reset button back from position 'B' to position 'A'. Your new combination is now set.
- Przetestuj nową kombinację: Close the lock box, scramble the dials, and then try opening it with your new combination to ensure it works correctly.
Important: Do not forget your new combination. There is no master key or override to reset the code if it is forgotten.
6. Konserwacja
To ensure the longevity and proper functioning of your GRIFEMA GA1003-2 Key Lock Box, follow these maintenance guidelines:
- Czyszczenie: Przetrzyj powierzchnię zewnętrzną miękką,amp szmatką. Unikaj środków czyszczących o działaniu ściernym i rozpuszczalników, które mogą uszkodzić wykończenie.
- Smarowanie: Periodically apply a small amount of silicone-based lubricant to the moving parts of the shackle and the combination dials to ensure smooth operation.
- Kontrola: Regularly check for any signs of wear, damage, or corrosion. Ensure the dust cover is intact and properly sealing the combination dials.
- Ochrona środowiska: While the lock box is weather-resistant, prolonged exposure to extreme conditions may affect its lifespan. Consider placing it in a sheltered location if possible.
7. Rozwiązywanie Problemów
If you encounter issues with your key lock box, refer to the following common troubleshooting tips:
- Lock box won't open:
- Upewnij się, że wprowadzono prawidłową 4-cyfrową kombinację.
- Check that each dial is precisely aligned with the indicator marks.
- Apply slight pressure to the latch while entering the code, then release.
- Dials are stiff:
- Apply a small amount of silicone lubricant to the dials and rotate them several times.
- Clean any dirt or debris from around the dials.
- Shackle is difficult to open/close:
- Ensure the combination is correctly set and the latch is fully disengaged.
- Lubricate the shackle mechanism.
- Przycisk resetowania zablokowany:
- Ensure the dials are set to the current correct combination before attempting to move the reset button.
- Gently try to move the button with a small, non-sharp object.
8. Specyfikacje
| Funkcja | Specyfikacja |
|---|---|
| Numer modelu | GA1003-2 |
| Producent | Ibergrif Griferias,S.L |
| Wymiary produktu | Wymiary 11.5 x 9.5 x 9.5 cm |
| Waga produktu | 380 gramów |
| Tworzywo | Zinc Alloy, Steel |
| Kolor | Szary |
| Maksymalna obsługiwana waga | 558 gram |
| Metoda instalacji | Freestanding (Hook) / Surface Mount (Wall) |
| Cechy specjalne | Weather-resistant, Frost-resistant, Robust |
| Liczba sztuk | 1 |
9. Gwarancja i wsparcie
For warranty information or if you require further assistance with your GRIFEMA GA1003-2 Key Lock Box, please contact GRIFEMA customer support through their official channels. Keep your purchase receipt as proof of purchase.


