1. Koniec produktuview
The Peakeep MHP6060 Digital Alarm Clock features a large, easy-to-read display, showing time, date, and day of the week. It includes adjustable brightness, multiple alarm volume settings, automatic Daylight Saving Time (DST) adjustment, a USB charging port, and battery backup for power outagt.j.

Obraz 1.1: Przód view of the Peakeep MHP6060 Digital Alarm Clock, displaying time, day, and date.
2. Zawartość opakowania
- Peakeep MHP6060 Digital Alarm Clock
- Type-C Power Adapter (included)
- Instrukcja obsługi
Video 2.1: Unboxing the Peakeep Digital Alarm Clock, showing the clock, user manual, and power adapter.
3. Konfiguracja
3.1 Włączanie zegara
The clock operates via a corded electric connection using the included Type-C adapter. For continuous operation and to retain settings during power outages, install 4 AAA batteries (not included) as a backup.
- Connect the Type-C power adapter to the 'Type C 5V IN' port on the back of the clock.
- Plug the adapter into a standard 120V AC power outlet.
- Open the battery compartment on the back and insert 4 AAA batteries (not included), observing polarity. These batteries will save your settings and trigger the alarm during a power interruption.

Image 3.1: Illustration of connecting the Type-C power adapter and the battery backup feature.
3.2 Początkowe ustawienie czasu i daty
Upon first power-up or after a full power loss without battery backup, you may need to set the time and date.
- Ustaw godzinę: Hold the 'TIME SET' button for 2 seconds until the hour digits blink. Release the button, then use the '+' or '-' buttons to adjust the hour.
- Ustaw minutę: Press 'TIME SET' again. The minute digits will blink. Use the '+' or '-' buttons to adjust the minutes.
- Ustaw rok: Press 'TIME SET' again. The year digits will blink. Use the '+' or '-' buttons to set the current year (e.g., 2025).
- Set Month: Press 'TIME SET' again. The month digits will blink. Use the '+' or '-' buttons to set the current month.
- Ustaw dzień: Press 'TIME SET' again. The day digits will blink. Use the '+' or '-' buttons to set the current day.
- Press 'TIME SET' one last time to confirm all settings and exit time setting mode. The day of the week will synchronize automatically once the year, month, and day are set.
Video 3.2: Demonstrates setting the time, year, month, and day on the Peakeep Digital Alarm Clock.
4. Instrukcja obsługi
4.1 Display Modes (Day/Temperature)
The clock can display either the day of the week or the indoor temperature. Press the 'DAY/TEMP' button on the back to toggle between these two display modes.
4.2 Regulacja jasności
The display brightness can be adjusted to 5 levels or turned completely off. Press the 'DIMMER' button on the back repeatedly to cycle through the brightness levels (L5 to L1) and off.

Image 4.1: Visual representation of the 6 customizable brightness settings for the clock display.
4.3 Alarm Setting and Volume
The alarm features 5 adjustable volume levels and a 9-minute snooze function.
- Ustaw godzinę alarmu: Hold the 'ALARM SET' button for 2 seconds until the alarm hour digits blink. Use the '+' or '-' buttons to set the desired alarm hour. Press 'ALARM SET' again to set the minutes.
- Dostosuj głośność alarmu: While in alarm setting mode, or when the alarm is sounding, press the 'VOLUME' button to cycle through 5 volume levels (U01 to U05).
- Włączanie/wyłączanie alarmu: Press the 'ON/OFF' button to activate or deactivate the alarm. An alarm icon will appear on the display when active.
- Funkcja drzemki: When the alarm sounds, press the 'SNOOZE/LIGHT' button on top to activate a 9-minute snooze.
- Zatrzymaj alarm: To stop the alarm for the day, press any button on the back of the clock. The alarm will reset for the next day.

Image 4.2: Depicts the 5 adjustable volume levels for the alarm, catering to different sleep preferences.
4.4 Automatic Daylight Saving Time (DST)
The clock features an automatic DST function, eliminating the need for manual adjustments.
- Press the 'DST ON/OFF' button on the back to toggle the automatic DST feature. When active, 'AUTO DST' will be displayed.
- When 'AUTO DST' is enabled, the clock will automatically adjust for Spring Forward and Fall Back time changes.
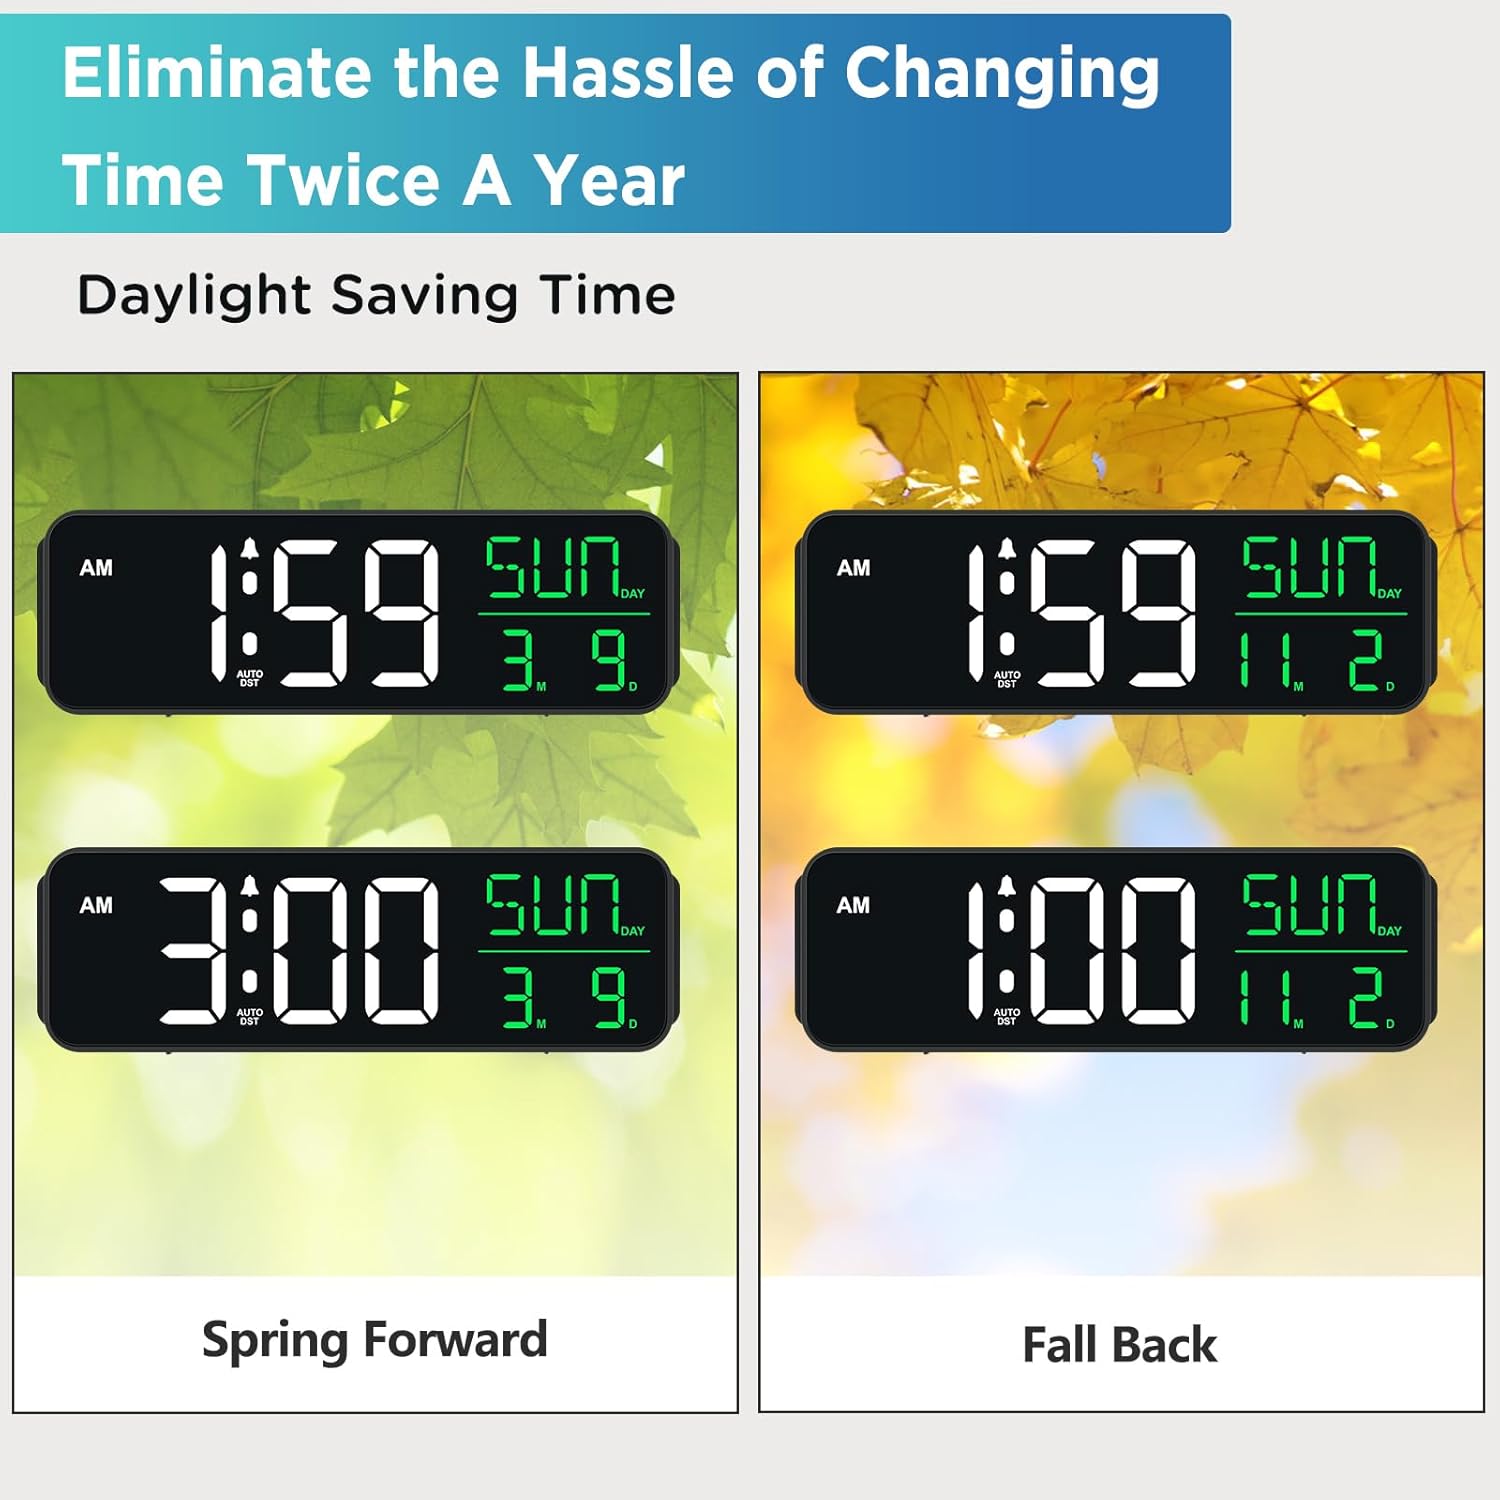
Image 4.3: Shows how the clock automatically adjusts for Daylight Saving Time changes.
4.5 porty USB do ładowania
A USB-A output port is located on the back of the clock, allowing you to charge small electronic devices like smartphones or smartwatches.
- Connect your device's USB charging cable to the 'USB OUT' port on the back of the clock.
- Ensure the clock is powered via the Type-C adapter for the USB charging port to function.
5. Konserwacja
- Clean the clock with a soft, dry cloth. Avoid abrasive cleaners or solvents.
- Trzymaj zegar z dala od bezpośredniego światła słonecznego, ekstremalnych temperatur i wysokiej wilgotności.
- Ensure proper ventilation around the clock to prevent overheating.
6. Rozwiązywanie Problemów
| Problem | Możliwa przyczyna | Rozwiązanie |
|---|---|---|
| Wyświetlacz zegara jest pusty lub przyciemniony. | Brak zasilania, brak zasilaniatage, or brightness set to OFF. | Check power connection. Ensure batteries are installed for backup. Press 'DIMMER' button to adjust brightness. |
| Alarm nie włącza się. | Alarm nie jest włączony lub głośność jest zbyt niska. | Press 'ON/OFF' to activate alarm. Adjust 'VOLUME' to a higher setting. |
| Clock does not adjust for DST automatically. | Auto DST feature is turned off. | Press 'DST ON/OFF' to enable the automatic DST feature. Ensure the year, month, and day are correctly set. |
| Port ładowania USB nie działa. | Clock is not powered by the Type-C adapter. | Ensure the clock is properly connected to the power outlet via the Type-C adapter. |
7. Specyfikacje
- Marka: Szczyt
- Numer modelu: MHP6060
- Typ wyświetlacza: Cyfrowa dioda LED
- Źródło zasilania: Corded Electric (Type-C adapter included)
- Zapas baterii: 4 baterie AAA (brak w zestawie)
- Wymiary produktu: 9" szer. x 2.6" wys.
- Cechy szczególne: Large Display with Date Day of Week, Auto DST, 6 Dimmer levels (including OFF), 5 Alarm Volume levels, 1 USB-A Charging Port
- Tworzywo: Plastikowy
- Wejście Voltage: 120 V (AC)
8. Gwarancja i wsparcie
For product support or warranty inquiries, please contact Peakeep customer service at: sales@us-myhome.com.


