1. Wprowadzenie
Thank you for choosing the TobenONE USB C Docking Station. This device is designed to expand the connectivity and display capabilities of your MacBook Pro/Air, providing dual 4K monitor support, high-speed data transfer, and 100W power delivery through a single USB-C connection. This manual provides detailed instructions for setup, operation, maintenance, and troubleshooting to ensure optimal performance.
2. Zawartość opakowania
Sprawdź, czy w przesyłce znajdują się wszystkie elementy:
- TobenONE USB C Docking Station
- Zasilacz 100 W.
- USB-C to USB-C Cable (for host connection)
- Instrukcja obsługi

Image 1: TobenONE USB C Docking Station with included power adapter and a MacBook in the stand.
3. Koniec produktuview i układ portu
The TobenONE docking station features a comprehensive array of ports to enhance your workstation. Familiarize yourself with the port layout for proper connection.
- Host 1 / Host 2 USB-C Ports: Connect to your MacBook Pro/Air.
- USB-C PD 3.0 Input: Connect the 100W power adapter for charging the docking station and your laptop.
- HDMI 1 (4K@60Hz/30Hz): Connect to an external monitor.
- HDMI 2 (4K@30Hz): Connect to a second external monitor.
- VGA: Connect to a third external monitor (HDMI 2 and VGA will display the same content).
- Gigabitowy Ethernet RJ45: For wired network connection (10/100/1000Mbps).
- Porty USB 3.0 (2x): Do szybkiego przesyłu danych do 5 Gbps.
- Porty USB 2.0 (2x): For connecting wireless devices like mouse/keyboard.
- Port danych USB-C: For data transfer up to 5Gbps.
- Gniazda kart SD/Micro SD: Supports simultaneous reading and writing (480Mbps).
- Gniazdo audio 3.5 mm: Do słuchawek lub głośników.

Obraz 2: Koniecview of the docking station ports with examples of connected peripherals.
4. Zgodność
This docking station is specifically designed for MacBook Pro/Air models. Please review informacje o zgodności poniżej:
4.1 Supported Dual Monitor Models (MacBook Pro/Air)
- MacBook Pro (14-inch, 2023) M3 Pro or M3 Max chip
- MacBook Pro (16-inch, 2023) M3 Pro or M3 Max chip
- MacBook Pro (14-inch, 2023) Apple M2 Pro chip
- MacBook Pro (16-inch, 2023) Apple M2 Pro chip
- MacBook Pro (14-inch, 2021) Apple M1 Pro chip
- MacBook Pro (16-inch, 2021) Apple M1 Pro chip
- MacBook Pro (13-calowy, 2020, dwa porty Thunderbolt 3)
- MacBook Pro (13-calowy, 2019, dwa porty Thunderbolt 3)
- MacBook Pro (13-calowy, 2018, cztery porty Thunderbolt 3)
- MacBook Pro (15-calowy, 2019, cztery porty Thunderbolt 3)
- MacBook Pro (15-calowy, 2018)
- MacBook Pro (15-calowy, 2017)
- MacBook Pro (15-calowy, 2016)
- MacBook Air (Retina, 13 cali, 2020)
- MacBook Air (Retina, 13 cali, 2019)
- MacBook Air (Retina, 13 cali, 2018)
4.2 Single Monitor Support Models (MacBook Pro/Air with M1/M2/M3 Chip)
MacBook models equipped with the standard M1, M2, or M3 chip (not Pro or Max variants) will only support one external monitor. If the lid is closed on your MacBook Air with an M3 chip, you can connect up to two external displays.
- MacBook Pro (14-calowy, M3, 2023)
- MacBook Pro (13-calowy, M2, 2022)
- MacBook Pro (13-calowy, M1, 2020)
- MacBook Air (13-inch, M3)
- MacBook Air (15-inch, M3)
- MacBook Air (15-calowy, M2, 2023)
- MacBook Air (M2, 2022 r.)
- MacBook Air (M1, 2020 r.)
4.3 Niezgodne urządzenia
This docking station is not compatible with:
- All Mac mini models
- All iMac models
- All Mac Studio models
- All Mac Pro models
- Wszystkie laptopy z systemem Windows
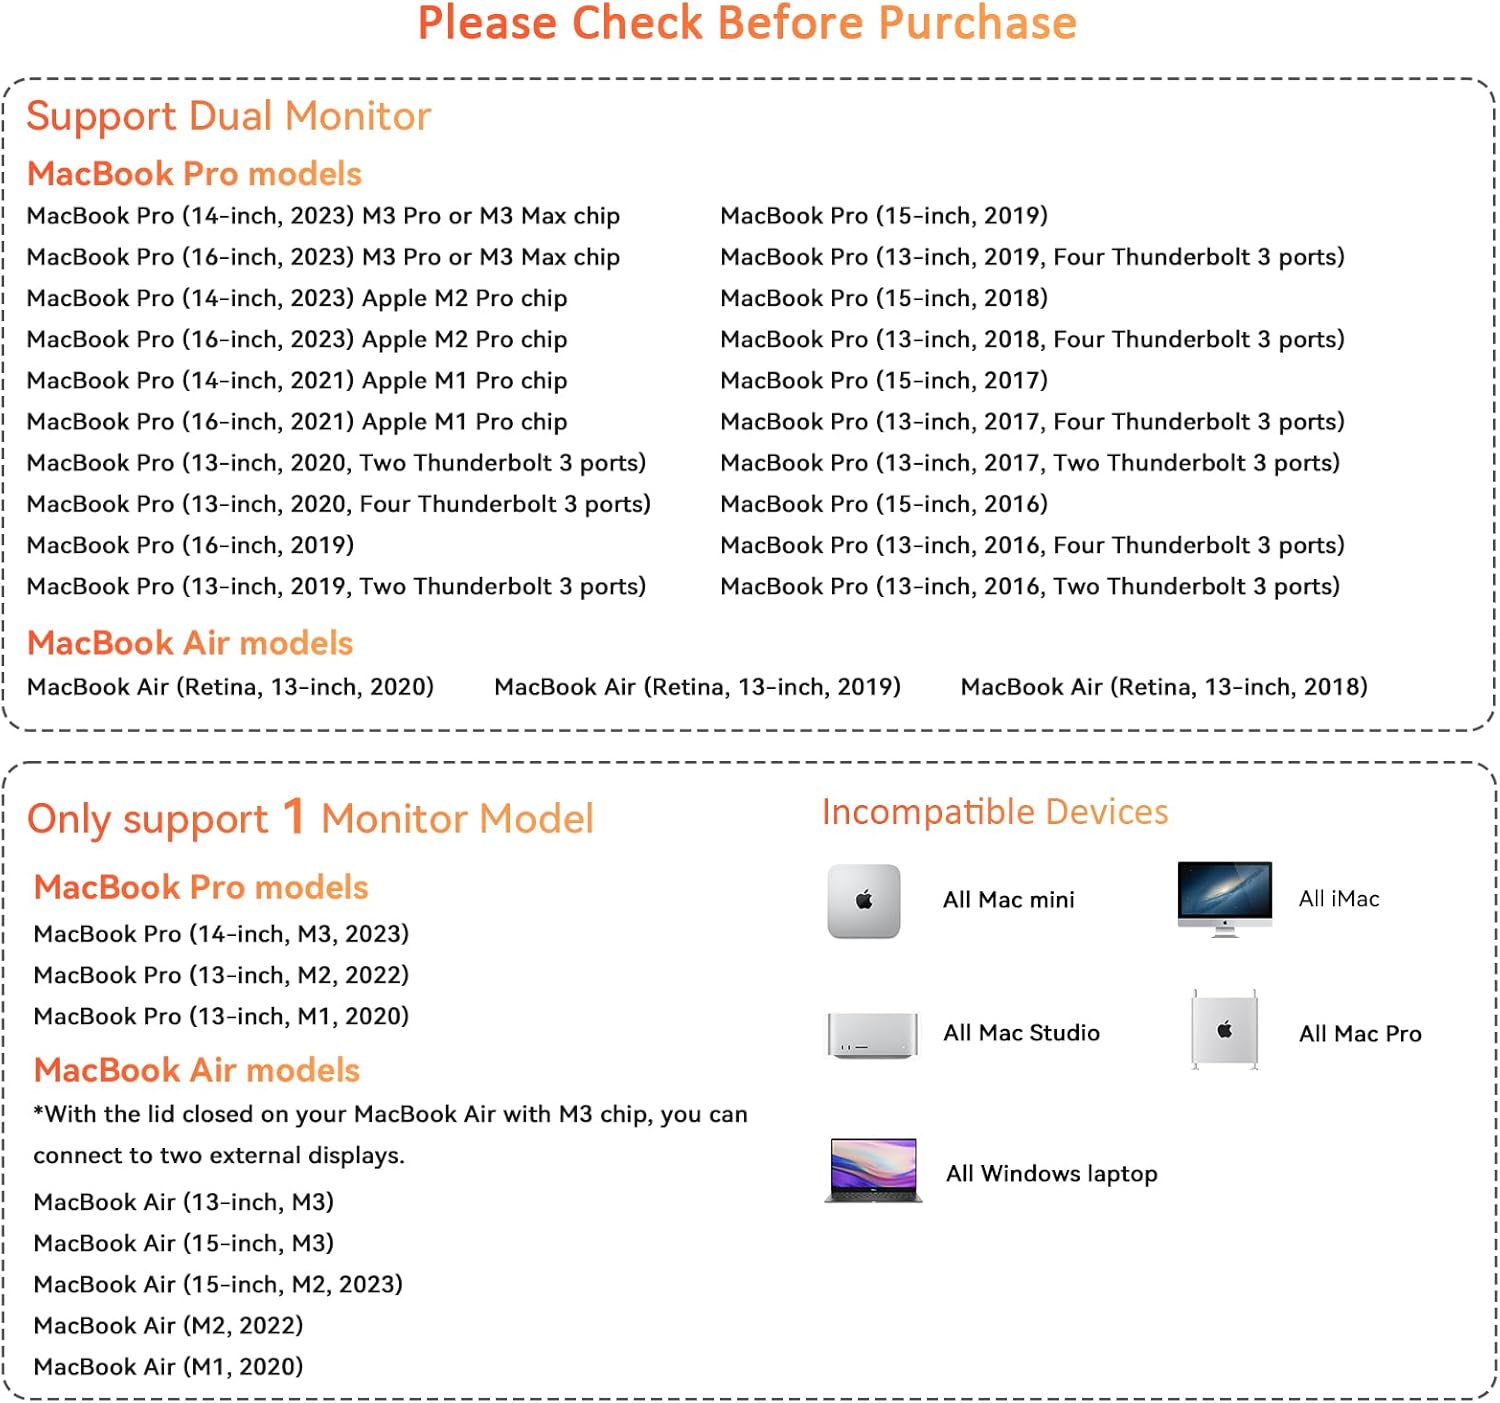
Image 3: Detailed compatibility chart for MacBook Pro/Air models.
5. Instrukcje konfiguracji
Follow these steps to set up your TobenONE USB C Docking Station:
- Podłącz zasilanie: Plug the 100W power adapter into the USB-C PD 3.0 input port on the docking station, then connect the adapter to a wall outlet.
- Połącz z MacBookiem: Use the provided USB-C to USB-C cable to connect the docking station's Host 1 and/or Host 2 ports to the Thunderbolt/USB-C ports on your MacBook Pro/Air. For optimal performance and dual display support, ensure both host cables are connected if your MacBook model supports it.
- Podłącz monitory:
- For a single external monitor, connect it to either HDMI 1 or HDMI 2.
- For dual external monitors, connect the first monitor to HDMI 1 and the second to HDMI 2.
- If using a third monitor via VGA, note that it will mirror the display of HDMI 2.
- Podłącz urządzenia peryferyjne: Plug in your USB devices (keyboard, mouse, external hard drives), Ethernet cable, SD/Micro SD cards, and audio devices into the corresponding ports on the docking station.
- Rozpoznawanie systemu: Your MacBook should automatically detect the docking station and connected devices. No additional drivers are typically required for macOS.

Obraz 4: Example setup showing a MacBook connected to the docking station with dual external monitors.
6. Instrukcja obsługi
6.1 Konfiguracja wyświetlacza
After connecting your monitors, you can configure their arrangement and display mode in macOS System Settings:
- Idź do Ustawienia systemowe (or System Preferences on older macOS versions).
- Wybierać Wyświetla.
- Tutaj możesz:
- Arrange Displays: Drag and drop the display icons to match your physical setup.
- Wyświetlacze lustrzane: Check this option to duplicate your MacBook's screen on external monitors.
- Extend Displays: Uncheck "Mirror Displays" to use external monitors as separate workspaces.
- Rezolucja: Adjust the resolution for each monitor. The docking station supports up to 4K@60Hz on HDMI 1 and 4K@30Hz on HDMI 2.
Note on M1/M2/M3 Chip MacBooks: Standard M1, M2, or M3 chip MacBooks (non-Pro/Max) only support one external display in extended mode. If you connect two monitors, they will mirror each other or one will remain inactive. M1/M2/M3 Pro/Max chip MacBooks support dual extended displays.
6.2 Power Delivery (100W Charging)
The docking station's 100W power adapter provides efficient charging for your connected MacBook. Ensure the power adapter is connected to the docking station's PD input port and a wall outlet. Your MacBook will begin charging automatically.

Image 5: The 100W USB C power adapter connected to a MacBook for high-speed charging.
6.3 Przesyłanie danych
- USB 3.0 & USB-C Data Ports: Connect external hard drives, USB flash drives, or other high-speed peripherals for data transfer up to 5Gbps.
- 2.0 USB Porty: Ideal for connecting wireless mouse/keyboard receivers or other low-bandwidth devices without lag.
- Gniazda kart SD/Micro SD: Insert your memory cards for quick file transfers. Both slots can be used simultaneously.
6.4 Połączenie Ethernet
Plug an Ethernet cable into the RJ45 port for a stable and fast wired network connection up to 1000Mbps (Gigabit Ethernet).
6.5 Wyjście audio
Connect headphones or speakers to the 3.5mm audio jack for audio output. You may need to select the docking station as the audio output device in macOS Sound Settings.
7. Konserwacja
Aby zapewnić długą żywotność i optymalną wydajność stacji dokującej:
- Utrzymuj urządzenie w czystości i zapobiegaj jego zakurzaniu. Do czyszczenia używaj miękkiej, suchej ściereczki.
- Unikaj wystawiania stacji dokującej na działanie ekstremalnych temperatur, wilgoci lub bezpośredniego światła słonecznego.
- Nie próbuj samodzielnie demontować ani naprawiać urządzenia. Spowoduje to unieważnienie gwarancji.
- Disconnect the power adapter and all cables when not in use for extended periods.
8. Rozwiązywanie Problemów
Jeśli masz problemy ze stacją dokującą, zapoznaj się z poniższymi typowymi rozwiązaniami:
8.1 Brak wyjścia wyświetlacza
- Ensure all HDMI/VGA cables are securely connected to both the docking station and the monitors.
- Verify that the docking station is properly connected to your MacBook via the host USB-C cables.
- Check your MacBook's display settings (System Settings > Displays) to ensure external monitors are detected and configured correctly (extended or mirrored).
- Confirm your MacBook model's display compatibility, especially for M1/M2/M3 chip models (refer to Section 4).
- Try restarting your MacBook.
- Jeżeli to możliwe, przetestuj różne kable HDMI/VGA lub monitory.
8.2 MacBook Not Charging
- Ensure the 100W power adapter is firmly connected to the docking station's PD input and a working wall outlet.
- Verify that the host USB-C cable(s) connecting the docking station to your MacBook are secure.
- Check your MacBook's battery status to confirm it's not charging.
8.3 Urządzenia peryferyjne nie są rozpoznawane
- Ensure the peripheral is properly plugged into the correct USB port on the docking station.
- Try connecting the peripheral to a different USB port on the docking station or directly to your MacBook to isolate the issue.
- For SD/Micro SD cards, ensure they are fully inserted into the correct slot.
8.4 Network (Ethernet) Issues
- Sprawdź, czy kabel Ethernet jest prawidłowo podłączony do stacji dokującej i routera/modemu.
- Check your MacBook's Network settings to ensure the Ethernet connection is active.
- Jeżeli to możliwe, przetestuj kabel Ethernet za pomocą innego urządzenia.
8.5 Przegrzanie
The docking station is designed with multiple safety protections, including overcharge, over-voltage, over-heating, and short-circuit protection. If the device feels warm during heavy use, this is normal. However, if it becomes excessively hot, disconnect it immediately and contact support.
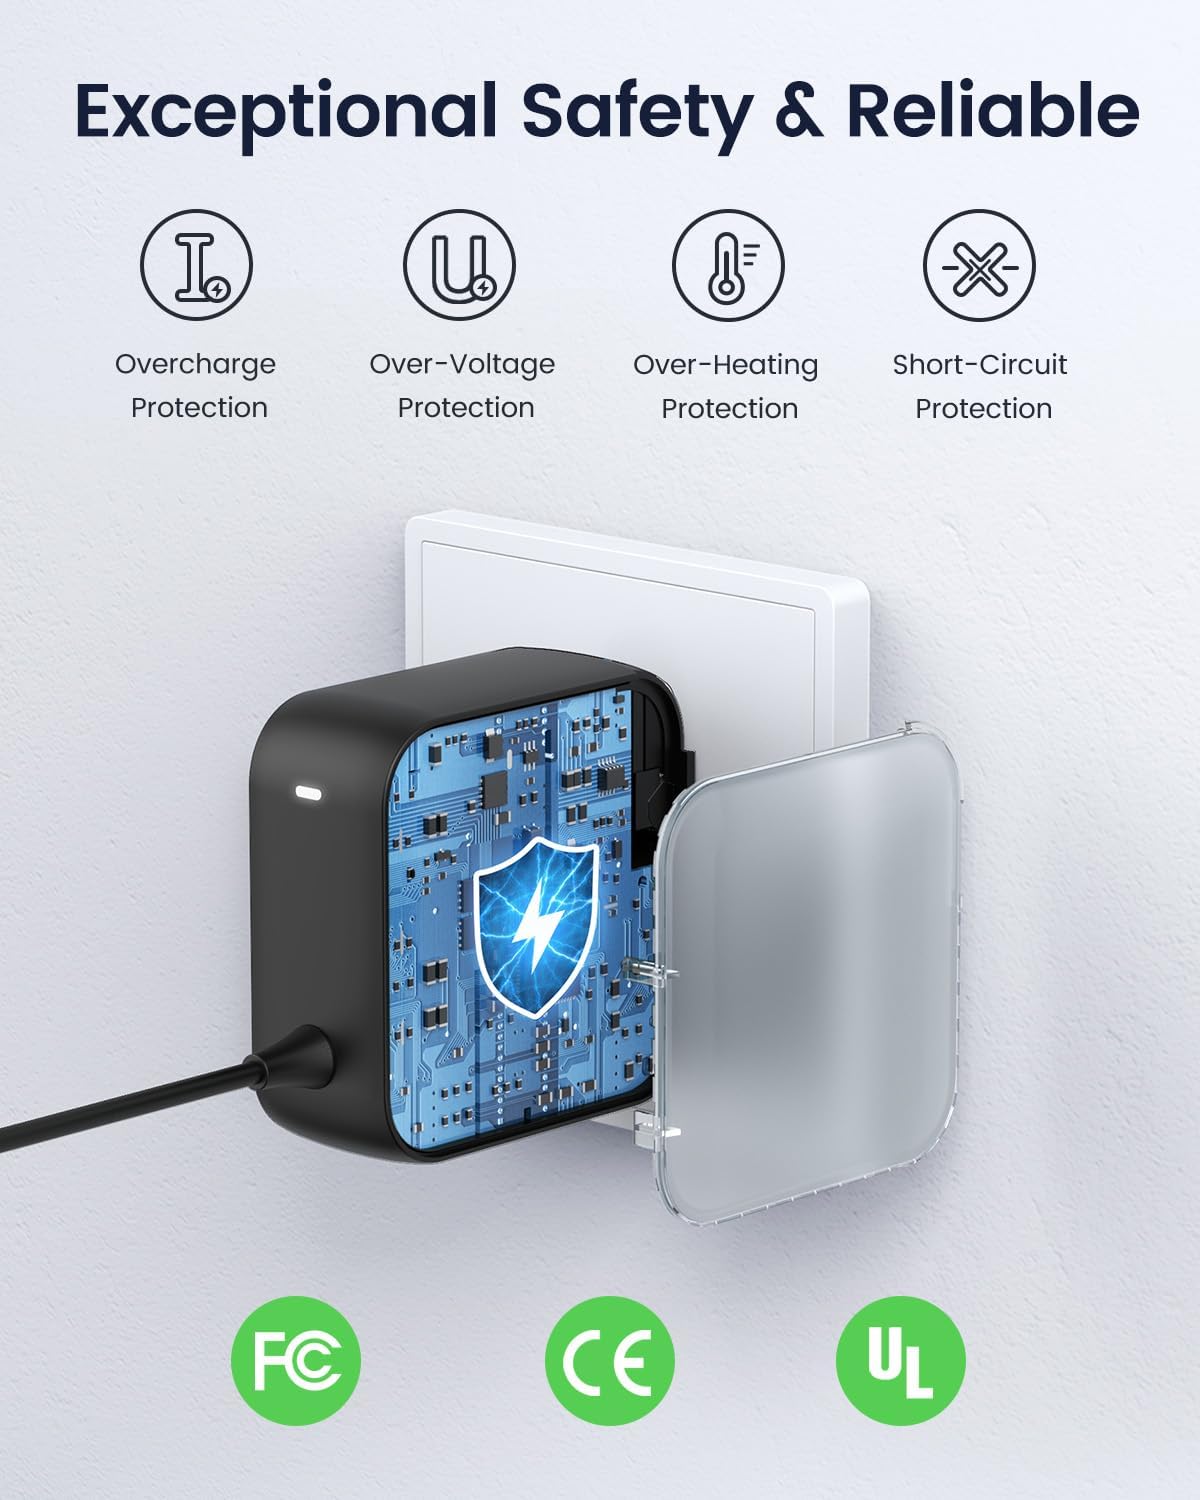
Image 6: Safety features of the TobenONE power adapter.
9. Specyfikacje
| Funkcja | Specyfikacja |
|---|---|
| Model | B0D9433D55 |
| Połączenie hosta | 2 x USB-C (connects to MacBook) |
| Wyjście wideo | 2 x HDMI (HDMI1: 4K@60Hz/30Hz, HDMI2: 4K@30Hz), 1 x VGA (mirrors HDMI2) |
| Wejście zasilania | USB-C PD 3.0 (supports max 100W input) |
| Porty danych USB | 1 x USB-C (5Gbps), 2 x USB 3.0 (5Gbps), 2 x USB 2.0 |
| Czytnik kart | SD/Micro SD (simultaneous read/write, 480Mbps) |
| Sieć Ethernetowa | RJ45 Gigabit Ethernet (10/100/1000 Mb/s) |
| Audio | Gniazdo audio 3.5mm |
| Kompatybilne urządzenia | MacBook Pro 2016-2021, MacBook Air 2018-2020 (refer to Section 4 for M1/M2/M3 chip specifics) |
| Cechy specjalne | High-Speed Charging, Superspeed Data Transfer, Ergonomic Design |
10. Gwarancja i wsparcie
TobenONE products come with a limited warranty. For detailed warranty information, please refer to the warranty card included in your package or visit our official website. If you require technical assistance or have any questions, please contact our customer support team:
- Webstrona: TobenONE Official Store
- E-mail: [Wpisz tutaj adres e-mail działu obsługi klienta, jeśli jest dostępny]
- Telefon: [Wpisz tutaj numer telefonu pomocy technicznej, jeśli jest dostępny]
Please have your product model number (B0D9433D55) and purchase information ready when contacting support.