Wstęp
This manual provides detailed instructions for the Kanlux LOGI Two-Gang Chandelier Switch with LED, Model 33623. It covers product features, safety guidelines, installation procedures, operation, maintenance, troubleshooting, and technical specifications. Please read this manual thoroughly before installation and use to ensure safe and efficient operation of the device.
The Kanlux LOGI switch is designed to independently control two separate lighting circuits, making it suitable for managing multiple lamps or chandeliers from a single location. Its integrated LED backlight enhances visibility in dark environments. This product is intended for indoor use and complies with IP20 protection standards, capable of handling a load of 10AX at 250V AC.
Informacje dotyczące bezpieczeństwa
OSTRZEŻENIE: Ryzyko porażenia prądem. Always disconnect power at the circuit breaker or fuse box before installing, servicing, or removing the switch. Failure to do so can result in serious injury or death.
- Installation should only be performed by a qualified electrician or trained personnel in accordance with all local and national electrical codes.
- Do not install this device in wet locations or outdoors. It is rated IP20 for indoor use only.
- Upewnij się, że objętośćtage and current ratings of your electrical system are compatible with the switch's specifications (250V AC, 10AX).
- Nie należy przekraczać maksymalnego obciążenia znamionowego przełącznika.
- Inspect the switch for any damage before installation. Do not install a damaged device.
- Trzymaj dzieci z dala od instalacji elektrycznych.
Produkt ponadview
The Kanlux LOGI Two-Gang Chandelier Switch is designed for reliable control of two independent lighting circuits. Its minimalist design integrates seamlessly into various interior styles.
- Two Levers: Allows independent control of two separate lighting circuits.
- Podświetlenie LED: Facilitates easy identification and operation of the switch in low-light conditions.
- Trwała konstrukcja: Designed for interior use with an IP20 protection rating.
- Standardowa kompatybilność: Operates at 250V AC with a 10AX current capacity.
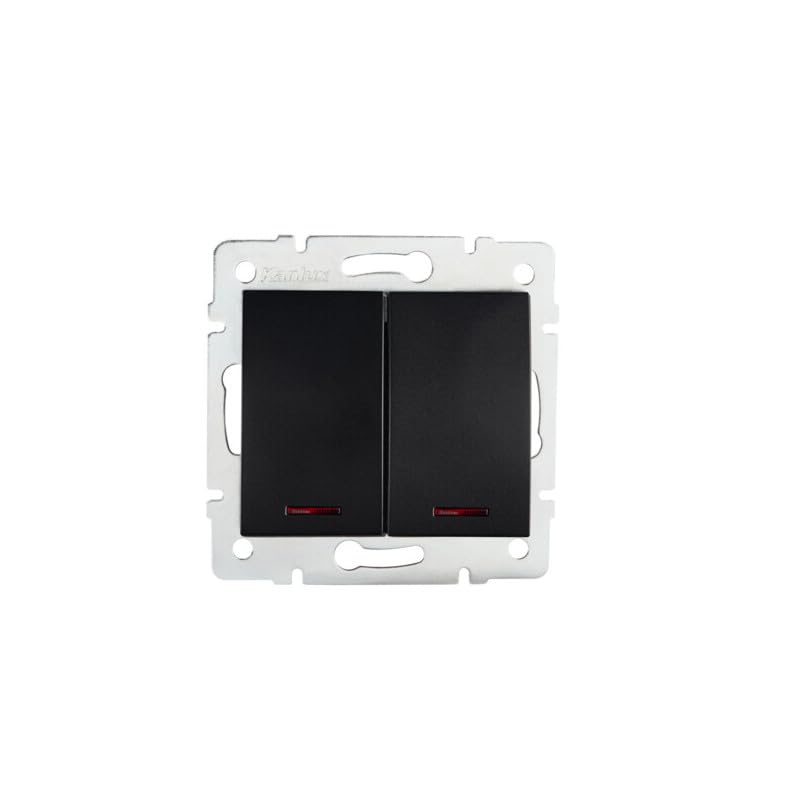
Rysunek 1: Technical drawing of the Kanlux LOGI Two-Gang Chandelier Switch. This diagram illustrates the front view of the switch module, indicating its square form factor with dimensions of 71mm by 71mm. The two independent switch levers are visible, along with the Kanlux brand logo and mounting points. This image helps in understanding the physical size and layout for installation planning.
Konfiguracja i instalacja
WAŻNY: Instalacja musi być wykonana przez wykwalifikowanego elektryka.
- Odłączenie zasilania: Before starting any electrical work, ensure the main power supply to the circuit is turned off at the circuit breaker or fuse box. Verify with a voltagtester.
- Przygotuj okablowanie: Carefully strip the insulation from the ends of the electrical wires (live, neutral, and load wires for each circuit) according to local electrical codes and the switch's terminal requirements.
- Podłącz przewody:
- Connect the incoming live wire (L) to the common terminal of the switch.
- Connect the load wire for the first lighting circuit to the first output terminal (e.g., L1).
- Connect the load wire for the second lighting circuit to the second output terminal (e.g., L2).
- Upewnij się, że wszystkie połączenia są bezpieczne i szczelne.
- Zamontuj przełącznik: Gently push the wired switch module into the wall box. Secure it using the provided screws. Ensure the switch is level and flush with the wall surface.
- Zamontuj płytę czołową: Install the decorative faceplate over the switch module.
- Przywróć zasilanie: Po zakończeniu instalacji i zabezpieczeniu wszystkich połączeń należy przywrócić zasilanie za pomocą wyłącznika automatycznego.
- Operacja testowa: Test both switch levers to ensure they correctly control their respective lighting circuits.
Instrukcja obsługi
The Kanlux LOGI Two-Gang Chandelier Switch provides straightforward control for two lighting circuits.
- Turning Lights ON/OFF: Press the upper or lower part of each switch lever to toggle the connected lighting circuit on or off. Each lever operates independently.
- Podświetlenie LED: The integrated LED backlight will illuminate when the switch is in the 'off' position (or 'on' depending on wiring configuration and local standards) to help locate it in the dark.
Konserwacja
The Kanlux LOGI switch requires minimal maintenance.
- Czyszczenie: To clean the switch, first ensure power is disconnected at the circuit breaker. Use a soft, dry cloth to wipe the surface. Do not use abrasive cleaners, solvents, or excessive moisture, as these can damage the finish or internal components.
- Kontrola: Periodically check the switch for any signs of damage, loose connections, or unusual operation. If any issues are observed, disconnect power and consult a qualified electrician.
Rozwiązywanie problemów
| Problem | Możliwa przyczyna | Rozwiązanie |
|---|---|---|
| Światło nie włącza się/wyłącza. |
|
|
| Podświetlenie LED nie działa. |
|
|
| Switch feels loose or wobbly. |
|
|
If you encounter problems not listed here or if the suggested solutions do not resolve the issue, please contact a qualified electrician or Kanlux customer support.
Specyfikacje
| Marka | Kanlux |
| Numer modelu | 33623 |
| Typ | Two-Gang Chandelier Switch with LED |
| Wejście Voltage | 250 V prądu zmiennego |
| Obecna ocena | 10AX |
| Stopień ochrony IP | IP20 (Suitable for indoor use) |
| Number of Levers | 2 (Independent control of two circuits) |
| Cechy specjalne | LED Backlight |
| Waga przedmiotu | 90 gramów |
| Wymiary | 71 x 71 mm (as per technical drawing) |
Gwarancja i wsparcie
Specific warranty information for the Kanlux LOGI Two-Gang Chandelier Switch (Model 33623) was not provided in the product details. For warranty terms and conditions, please refer to the documentation included with your purchase or visit the official Kanlux webstrona.
For technical support, product inquiries, or assistance with installation, please contact Kanlux customer service or your local distributor. Contact information can typically be found on the manufacturer's webmiejscu lub na opakowaniu produktu.
Producent: Kanlux


