1. Wprowadzenie
This manual provides comprehensive instructions for the installation, operation, and maintenance of your MTX S6512-44 S65-Series Square 12-inch Subwoofers and MTX JH10001 Jackhammer Series 1100W Mono Block Amplifier. Please read this manual thoroughly before attempting installation or operation to ensure proper use and to maximize the performance and longevity of your audio system components.

Image 1.1: The MTX S6512-44 Subwoofers and JH10001 AmpSystem lifier.
2. Informacje dotyczące bezpieczeństwa
Improper installation or use of car audio components can lead to serious injury or damage to your vehicle. Always follow these safety guidelines:
- Zalecana profesjonalna instalacja: Due to the complexity of car audio systems, professional installation by a qualified technician is highly recommended.
- Odłącz akumulator: Przed rozpoczęciem jakiejkolwiek instalacji należy zawsze odłączyć ujemny zacisk akumulatora pojazdu.
- Bezpieczne okablowanie: Ensure all wiring is properly routed and secured to prevent pinching, chafing, or short circuits. Use appropriate gauge wire for power and ground connections.
- Wentylacja: Zapewnij amplifier is installed in a location with adequate ventilation to prevent overheating.
- Poziomy głośności: Długotrwałe narażenie na wysoki poziom głośności może spowodować trwałe uszkodzenie słuchu. Zachowaj ostrożność podczas regulacji głośności.
- Dopasowanie impedancji: Correctly match the subwoofer impedance to the amplifier's stable operating impedance to prevent damage to both components.
3. Zawartość opakowania
Sprawdź, czy w przesyłce znajdują się wszystkie elementy:
- 1x MTX JH10001 Jackhammer Series 1100W x 1 @ 1-Ohm Class D Mono Block Ampżywsze
- 2x MTX S6512-44 S65-Series Square 12" 500W RMS Dual 4-Ohm Subwoofers
- Instrukcja obsługi (ten dokument)
4. Koniec produktuview
4.1 MTX JH10001 Jackhammer Series Mono Block Ampżywsze
The MTX JH10001 amplifier is a Class D mono block amplifier designed to deliver powerful and efficient performance for your subwoofer system. It features easy-access controls for fine-tuning your audio output.
- 1100W x 1 Channel output at 1-Ohm.
- Easy access controls for Gain, Low Pass Filter (LPF), Subsonic Filter, and Bass Boost.
- High-quality power and speaker connections.
- Compact design for versatile installation.

Obraz 4.1.1: Pod kątem view of the MTX JH10001 Ampliyfikator.

Obraz 4.1.2: Góra view of the MTX JH10001 Amplifier showing control panel.
4.2 MTX S6512-44 S65-Series Square Subwoofer
The MTX S6512-44 subwoofers are 12-inch square subwoofers designed for powerful bass reproduction. They feature advanced technologies for enhanced performance and durability.
- Patented surround geometry for increased excursion (Xmax) and higher Sound Pressure Level (SPL).
- Spider Plateau Venting for efficient voice coil cooling, improving reliability.
- Radial Ribbed T-Yoke design for lower distortion during extended use.
- Dual 4-Ohm voice coils for flexible wiring options.
- 500 Watt RMS power handling per subwoofer.

Obraz 4.2.1: Pod kątem view of the MTX S6512-44 Square Subwoofer.

Obraz 4.2.2: Przód view of the MTX S6512-44 Square Subwoofer.

Obraz 4.2.3: Tył view of the MTX S6512-44 Square Subwoofer.
5. Konfiguracja i instalacja
5.1 Zanim zaczniesz
Gather all necessary tools and materials, including appropriate gauge wiring (1/0-gauge power wire recommended for the amplifier), fuses, connectors, and mounting hardware. Plan your installation carefully, considering wire routing, amplifier placement for ventilation, and subwoofer enclosure requirements.
5.2 Amplifier Mounting (JH10001)
Zamontuj amplifier securely to a solid surface in your vehicle. Ensure the mounting location allows for adequate airflow around the amplifier to prevent overheating. Avoid mounting in enclosed spaces without ventilation. Use appropriate screws and washers to prevent vibration.
5.3 Power and Ground Wiring (JH10001)
- Przewód zasilający (+12V): Run a 1/0-gauge power wire directly from the positive terminal of your vehicle's battery to the amplifier's +12V terminal. Install an appropriate fuse holder (e.g., ANL or Mini-ANL) within 18 inches (45 cm) of the battery.
- Przewód uziemiający (GND): Connect a 1/0-gauge ground wire from the amplifier's GND terminal to a clean, unpainted metal surface on the vehicle's chassis. Ensure a solid, low-resistance connection. The ground wire should be as short as possible, ideally less than 3 feet (1 meter).
- Przewód zdalnego włączania (REM): Connect a smaller gauge wire (e.g., 18-gauge) from your head unit's remote turn-on output to the ampZacisk REM filtru. Ten przewód sygnalizuje amplifier do włączania i wyłączania za pomocą jednostki głównej.
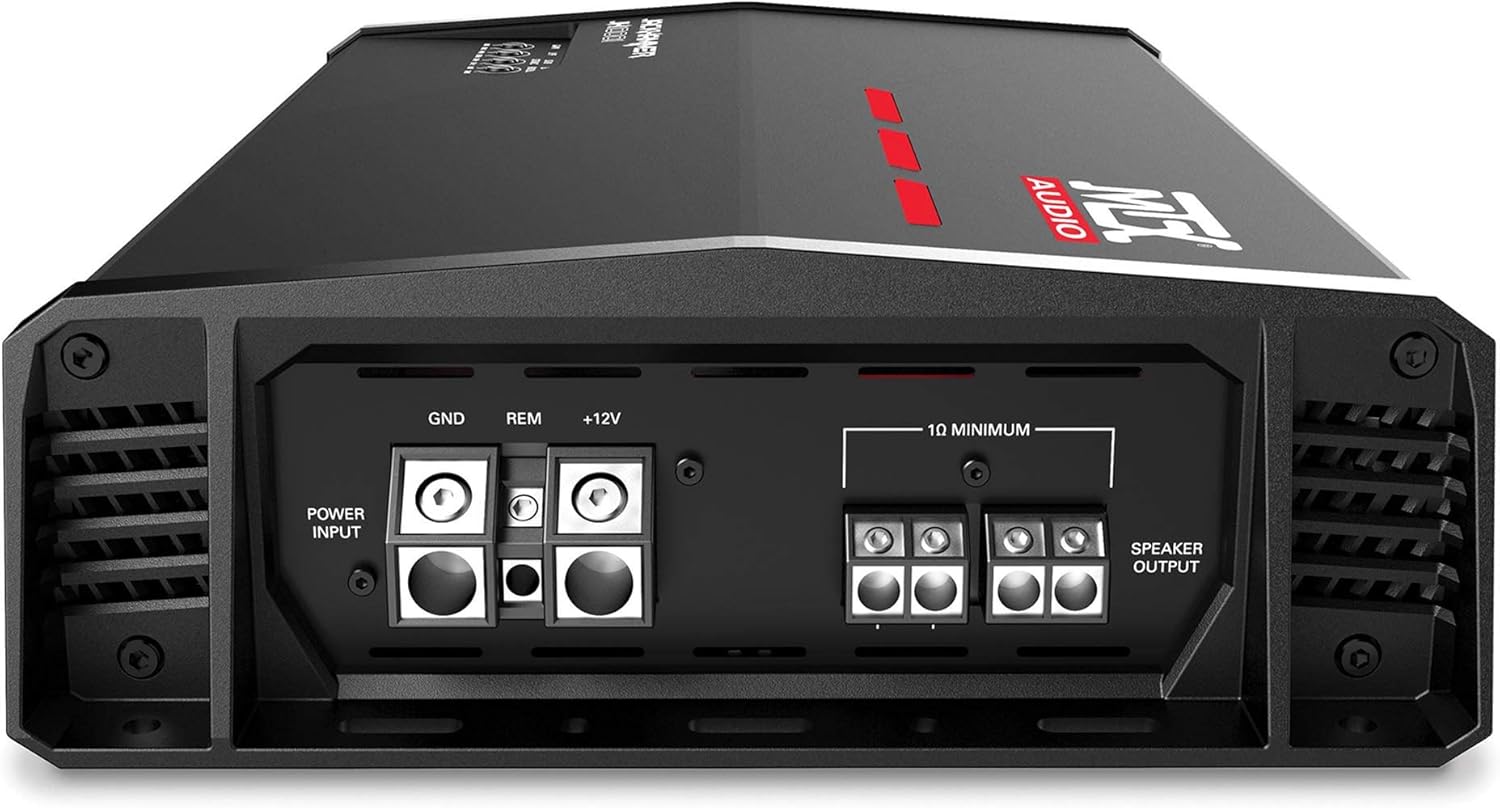
Image 5.3.1: Rear connections of the MTX JH10001 Ampliyfikator.
5.4 Signal Input (JH10001)
Connect RCA cables from your head unit's subwoofer or full-range pre-outs to the RCA input jacks on the JH10001 amplifier. Ensure the cables are routed away from power wires to minimize noise.
5.5 Subwoofer Wiring (S6512-44)
Each S6512-44 subwoofer features dual 4-ohm voice coils. The JH10001 amplifier is stable down to 1-ohm. To achieve a 1-ohm final load with two dual 4-ohm subwoofers, wire each subwoofer's voice coils in parallel (resulting in 2 ohms per subwoofer), then wire the two subwoofers in parallel to the ampliyfikator.
- Step 1 (Per Subwoofer): Connect the positive terminal of Voice Coil 1 to the positive terminal of Voice Coil 2. Connect the negative terminal of Voice Coil 1 to the negative terminal of Voice Coil 2. This creates a 2-ohm load for each subwoofer.
- Step 2 (To Ampliyfikator): Connect the positive output from Subwoofer 1 (from Step 1) to the positive output from Subwoofer 2 (from Step 1). Connect this combined positive to the amplifier's positive speaker output terminal. Do the same for the negative terminals, connecting the combined negative to the amplifier's negative speaker output terminal. This results in a 1-ohm final load.
Odnieś się do amplifier's manual for specific speaker terminal connections. Always double-check your wiring with a multimeter before applying power to ensure correct impedance and polarity.
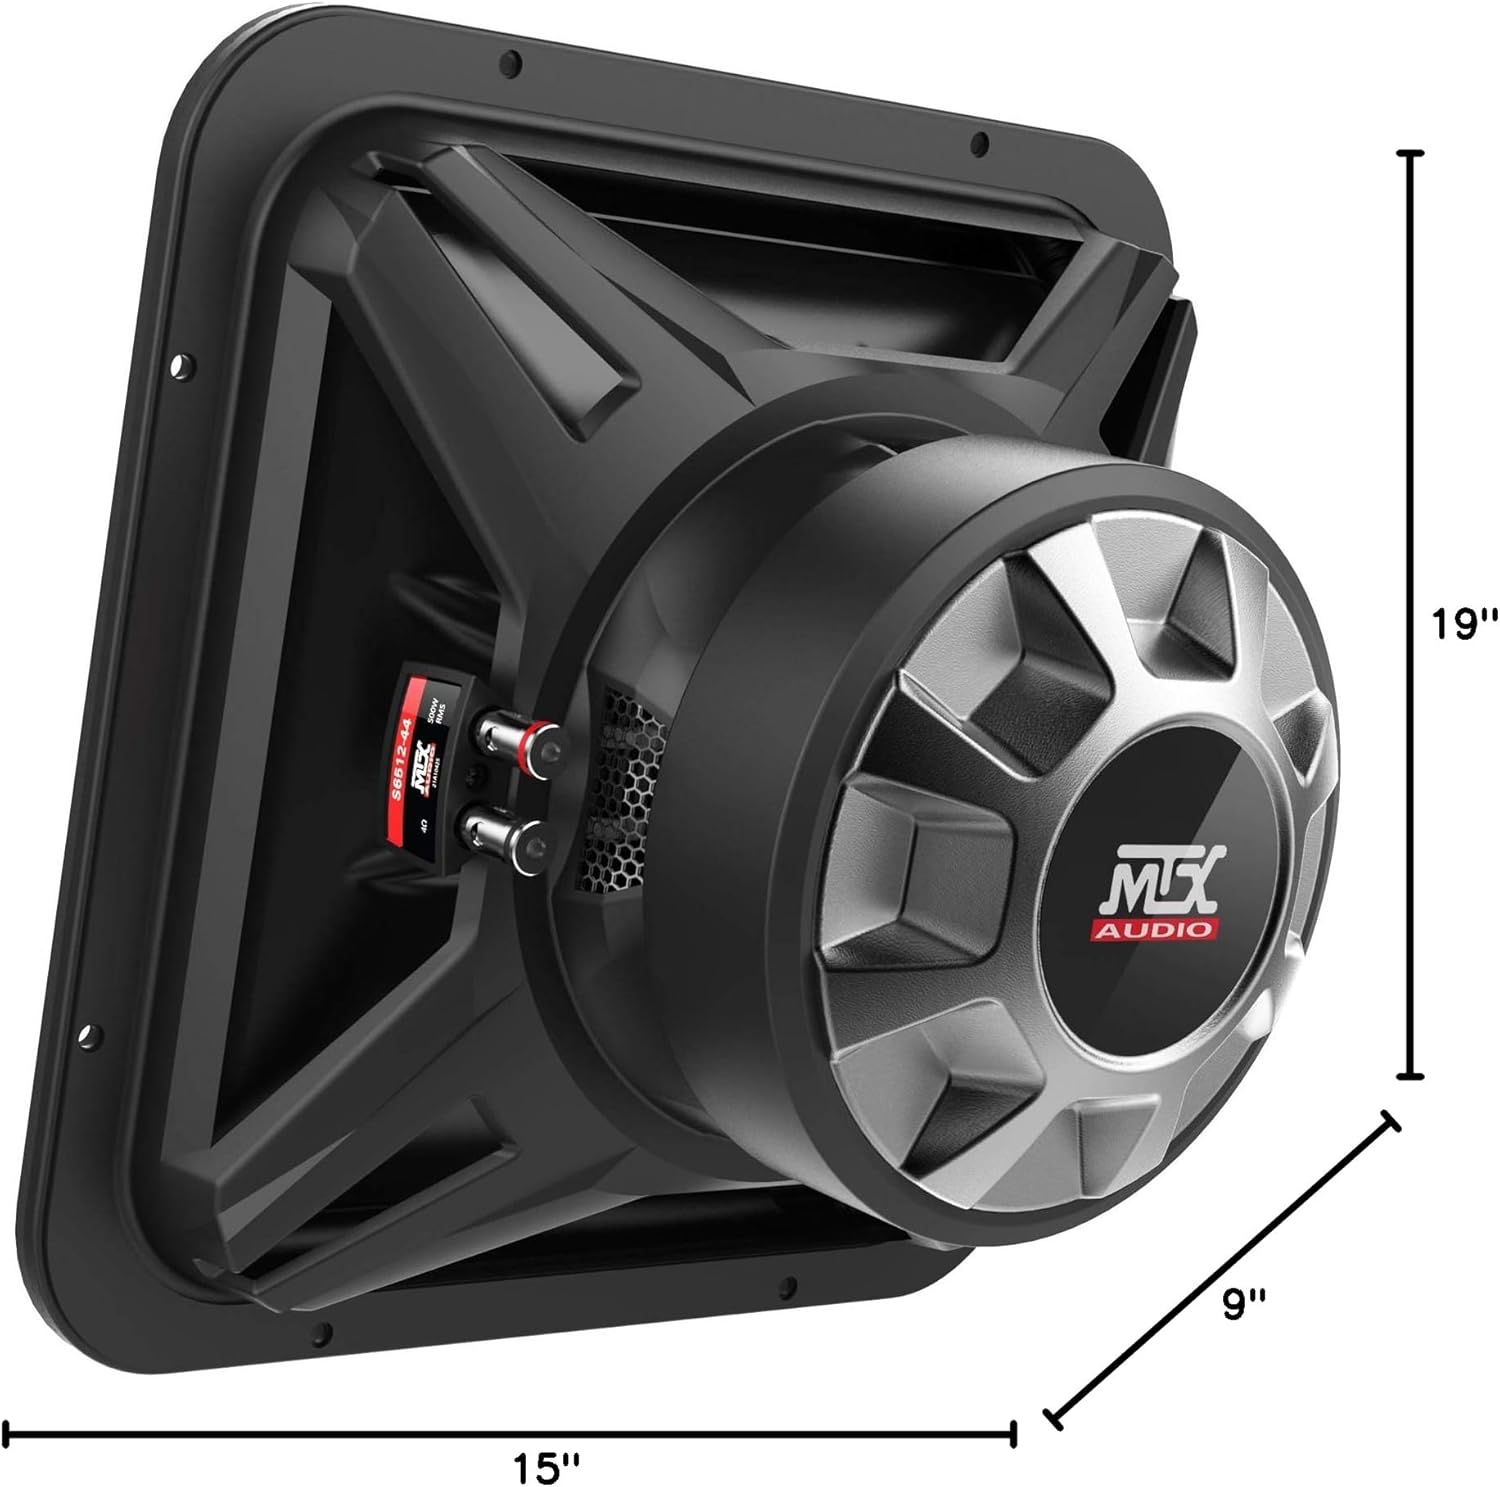
Image 5.5.1: MTX S6512-44 Subwoofer dimensions for enclosure planning.
5.6 Initial System Configuration (JH10001)
After all connections are made and verified, proceed with initial setup:
- Gain Control: Start with the gain control set to minimum. Play a familiar track at a moderate volume on your head unit. Slowly increase the amplifier's gain until you hear distortion, then back off slightly. The gain control is not a volume knob; it matches the ampczułość wejściowa przetwornika na wyjście jednostki głównej.
- Filtr dolnoprzepustowy (LPF): Adjust the LPF to filter out frequencies above your desired subwoofer range, typically between 80Hz and 120Hz. This ensures the subwoofer only reproduces bass frequencies.
- Filtr poddźwiękowy: Set the subsonic filter to protect your subwoofers from playing frequencies below their resonant frequency, which can cause damage. A common setting is around 25Hz to 30Hz.
- Wzmocnienie basów: Use the bass boost sparingly, if at all. Excessive bass boost can lead to distortion and potential damage to your subwoofers. Adjust in small increments if desired.
6. Działanie
Once installed and configured, your MTX audio system is ready for use. The amplifier will turn on automatically when your head unit is powered on via the remote turn-on wire. Adjust the volume from your head unit. If a remote bass knob is connected to the JH10001 amplifier, it provides convenient control over the subwoofer output level from the driver's seat.
7. Konserwacja
Regular maintenance helps ensure the longevity and optimal performance of your audio system:
- Czyszczenie: Okresowo czyść amplifier and subwoofer surfaces with a soft, dry cloth. Avoid using harsh chemicals or abrasive cleaners.
- Kontrola połączenia: Annually inspect all wiring connections (power, ground, remote, speaker, RCA) to ensure they are secure and free from corrosion.
- Wentylacja: Zapewnij ampŻebra chłodzące urządzenia Lifier pozostają wolne od kurzu i zanieczyszczeń, co pozwala na właściwe odprowadzanie ciepła.
8. Rozwiązywanie Problemów
If you encounter issues with your MTX audio system, refer to the following troubleshooting guide:
| Problem | Możliwa przyczyna | Rozwiązanie |
|---|---|---|
| Brak zasilania / Amplifier nie włącza się | Przepalony bezpiecznik, luźny przewód zasilania/uziemienia/zdalnego sterowania, wadliwy sygnał zdalnego włączania. | Check fuse near battery and on amplifier. Verify all power, ground, and remote connections are secure and receiving voltage. |
| No Sound from Subwoofers | Luźne kable RCA, nieprawidłowe ustawienie wzmocnienia, odłączone przewody głośnikowe, amplifier w trybie ochrony. | Check RCA connections. Ensure gain is set correctly. Verify speaker wire connections. Check amplifier status indicator light. |
| Zniekształcony dźwięk | Gain set too high, incorrect LPF/subsonic settings, damaged subwoofer, improper impedance. | Reduce gain. Adjust LPF and subsonic filter settings. Inspect subwoofers for physical damage. Re-verify wiring impedance. |
| Ampprzegrzanie lifiera | Insufficient ventilation, impedance too low, prolonged high volume. | Zapewnij odpowiedni przepływ powietrza wokół amplifier. Verify correct impedance wiring. Reduce volume or allow ampchłodzić. |
9. Specyfikacje
9.1 MTX JH10001 Amplifier Specyfikacje
| Funkcja | Specyfikacja |
|---|---|
| Moc wyjściowa | 1100W x 1 @ 1-Ohm |
| Klasa | Klasa D |
| Metoda kontroli | Zdalny |
| Technologia łączności | Przewodowy |
| Tryb wyjścia audio | Mononukleoza |
9.2 MTX S6512-44 Subwoofer Specifications
| Funkcja | Specyfikacja |
|---|---|
| Rozmiar głośnika | 12 cali |
| Średnica głośnika niskotonowego | 12 cali |
| Impedancja | Podwójny 4 Ohm |
| Maksymalna moc wyjściowa głośnika | 500 W RMS |
| Odpowiedź częstotliwościowa | 23Hz - 130Hz |
| Wrażliwość | 86.7dB |
| Wymiary produktu | 19"D x 9"W x 15"H (overall for the bundle, individual subwoofer dimensions are implied by the image) |
| Technologia łączności z subwooferem | Przewodowy |
10. Gwarancja i wsparcie
Your MTX S6512-44 Subwoofers and JH10001 Amplifier System comes with a limited warranty. Please refer to the warranty card included with your product or visit the official MTX webna stronie szczegółowe warunki.
For technical support, troubleshooting assistance, or warranty claims, please contact MTX customer service:
- Webstrona: www.mtx.com
- Obsługa klienta: Refer to the MTX website for current contact information (phone, email, or support portal).


