1. Wprowadzenie
This manual provides detailed instructions for the setup, operation, and maintenance of your AVerMedia Live Gamer Extreme 3 (GC551G2) 4K HDMI Capture Card. This device is designed to capture and stream high-quality video content from gaming consoles and other HDMI sources to your computer or streaming platform.
The Live Gamer Extreme 3 supports 4K60 HDR pass-through, 4K30 uncompressed video recording, ultra-low latency, and Variable Refresh Rate (VRR) for a smooth and responsive experience. It is compatible with Windows, macOS, and iPadOS, and integrates seamlessly with popular streaming software like OBS Studio and Twitch.
2. Zawartość opakowania
- Live Gamer EXTREME 3 (GC551G2)
- Kabel typu C do typu A
- Kabel HDMI 2.0
- Szybki przewodnik
3. Koniec produktuview
The AVerMedia Live Gamer Extreme 3 is a compact and powerful capture device. Below is a diagram illustrating its various ports and their functions.

Obraz 3.1: Przód i tył view of the AVerMedia Live Gamer Extreme 3, highlighting its input and output ports. The device is shown alongside its included cables.
Opisy portów:
- Wejście HDMI 2.0: Connects to your gaming console or video source.
- HDMI 2.0 OUT: Connects to your display (TV/monitor) for pass-through gameplay.
- USB 3.2 (Gen 1) Type-C: Łączy się z komputerem w celu przesyłu danych i zasilania.
- 3.5 mm Line Input (3-Pole): Connects to an external audio source, such as a microphone or headset, for commentary.
- 3.5 mm Output (3-Pole): Umożliwia podłączenie słuchawek lub głośników w celu monitorowania dźwięku.
4. Konfiguracja
4.1. Połączenie sprzętowe
- Connect your gaming console (e.g., PS5, Xbox Series X/S, Nintendo Switch 2) to the HDMI IN port on the Live Gamer Extreme 3 using the provided HDMI 2.0 cable.
- Połącz Wyjście HDMI port on the Live Gamer Extreme 3 to your TV or monitor using another HDMI cable. This allows you to play your game on your primary display with zero-lag pass-through.
- Połącz USB 3.2 (Gen 1) Typ-C port on the Live Gamer Extreme 3 to a Port USB 3.0 lub nowszy on your computer using the provided Type-C to Type-A cable. Ensure you use a USB 3.0 port for optimal performance, as USB 2.0 may limit recording to 1080p 30fps.
- Optionally, connect a headset or microphone to the Wejście liniowe 3.5 mm for game chat and commentary. Connect headphones or speakers to the 3.5 mm Output do monitorowania dźwięku.

Obraz 4.1: The Live Gamer Extreme 3 connected to a gaming console and a computer, demonstrating its plug-and-play setup.
4.2. Instalacja oprogramowania
No extra drivers are typically needed for basic functionality, as the device is plug-and-play. However, for advanced features and customization, AVerMedia recommends using their RECentral software. The device is also fully compatible with third-party streaming platforms.
- Download and install AVerMedia RECentral 4 from the official AVerMedia website for enhanced control and features.
- For streaming, ensure you have OBS Studio, Twitch Studio, or your preferred streaming software installed.
5. Obsługa karty przechwytującej
5.1. Nagrywanie i przesyłanie strumieniowe
Once connected, your Live Gamer Extreme 3 will be recognized by your computer and compatible software. Open your preferred streaming or recording application (e.g., OBS Studio, RECentral) and add the capture card as a video source.
Wideo 5.1: An official AVerMedia video showcasing the features and ease of use of the Live Gamer Extreme 3 for console gaming and streaming.
5.2. Główne cechy
- 4K60 HDR Pass-Through: Enjoy your gameplay in stunning 4K resolution at 60 frames per second with High Dynamic Range (HDR) on your connected display, while simultaneously recording at 4K30. The device also supports high refresh rate pass-through up to 1080p240.
- Ultra-niska latencja: The Live Gamer Extreme 3 is engineered for near-instant responsiveness, ensuring perfectly synced audio and video for both your gameplay and stream. This minimizes delay between your console and your streaming output.
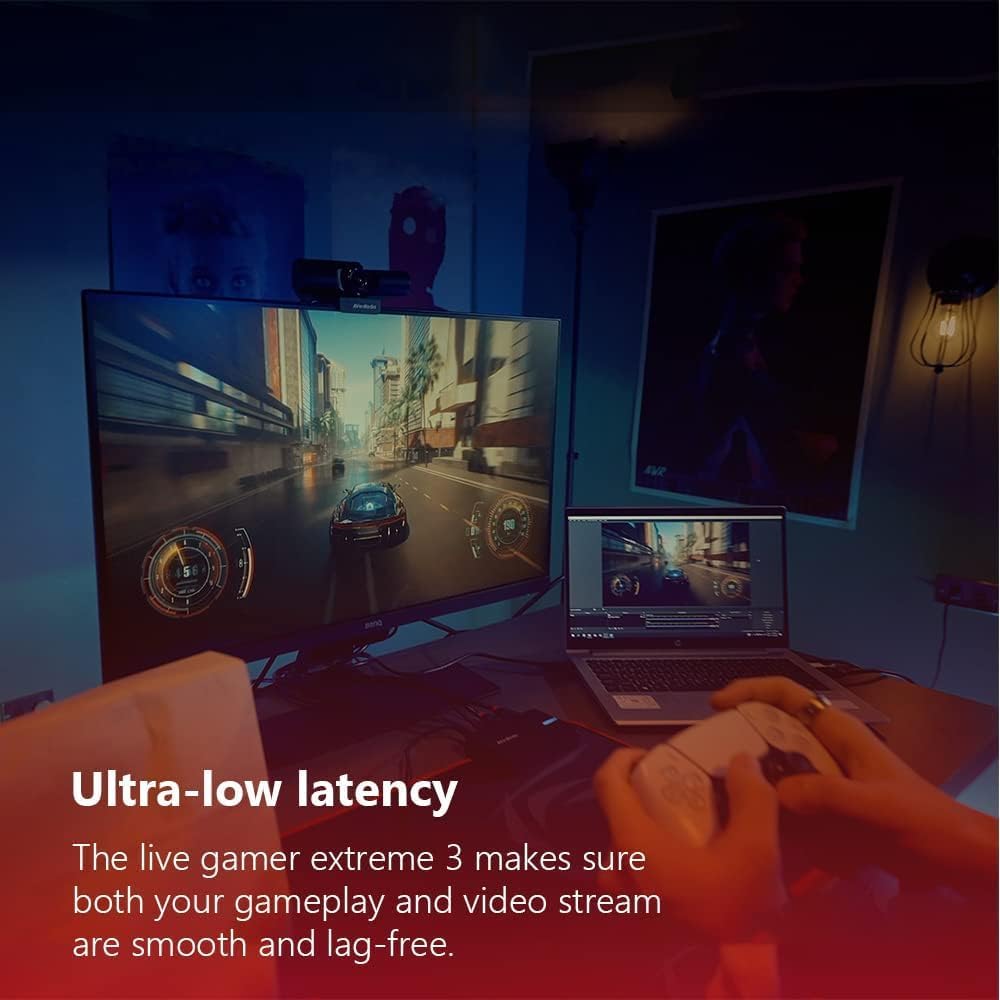
Obraz 5.2: A gaming setup demonstrating the ultra-low latency performance of the Live Gamer Extreme 3, ensuring smooth gameplay and streaming.
- Wsparcie VRR: Variable Refresh Rate (VRR) pass-through is supported at resolutions like 1440p120 or 1080p120. This feature synchronizes the refresh rate of your display with the frame rate of your game, eliminating screen tearing and stuttering for a smoother gaming experience.
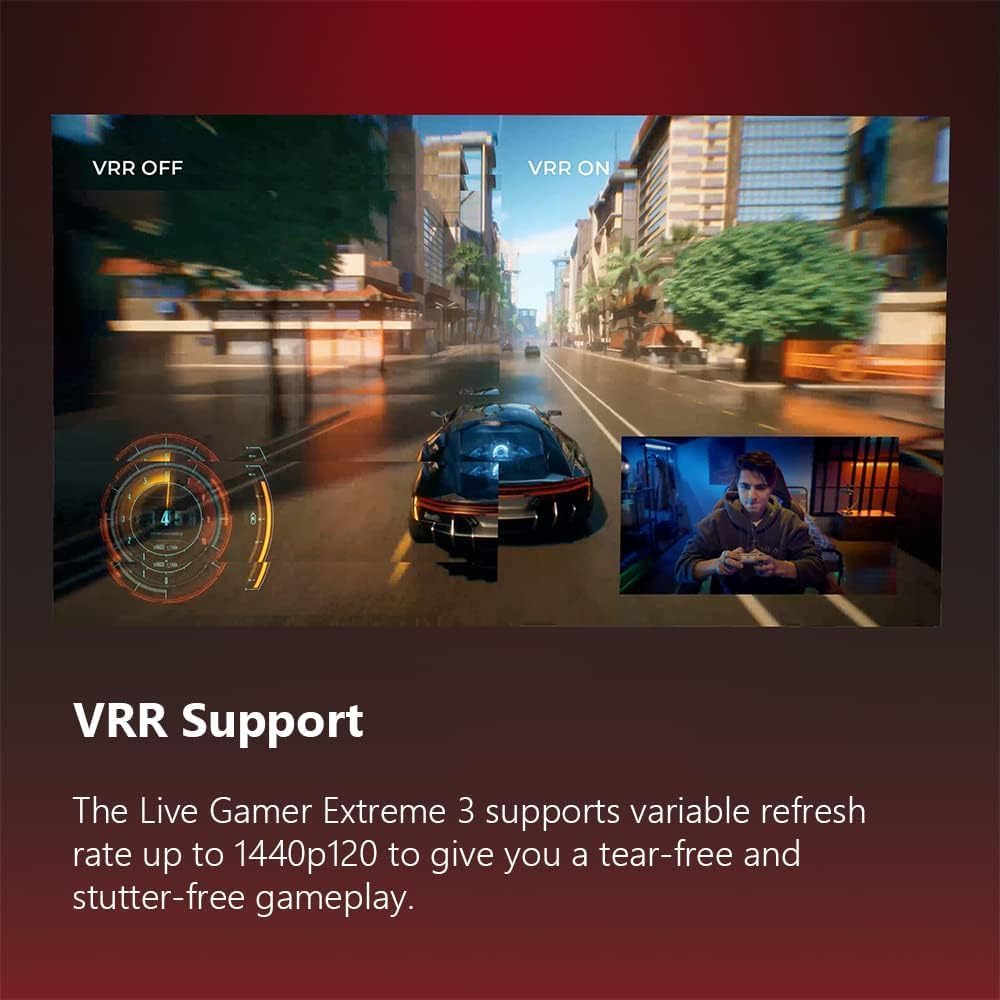
Obraz 5.3: A visual comparison showing the difference between VRR off and VRR on, highlighting the smoother visual experience with VRR enabled.
- 4Kp30 Uncompressed Capture: Record gameplay in exquisite detail up to 4K30. For fast-paced action, you can play at up to 120Hz while recording at FHD60p. Uncompressed capture ensures high fidelity.

Obraz 5.4: A screen capture illustrating the clarity and detail achieved with 4Kp30 uncompressed video capture.
- 3.5mm Audio In & Out: Connect your headset or microphone directly to the capture card to easily capture game chat and commentary without additional software. The output allows for direct audio monitoring.
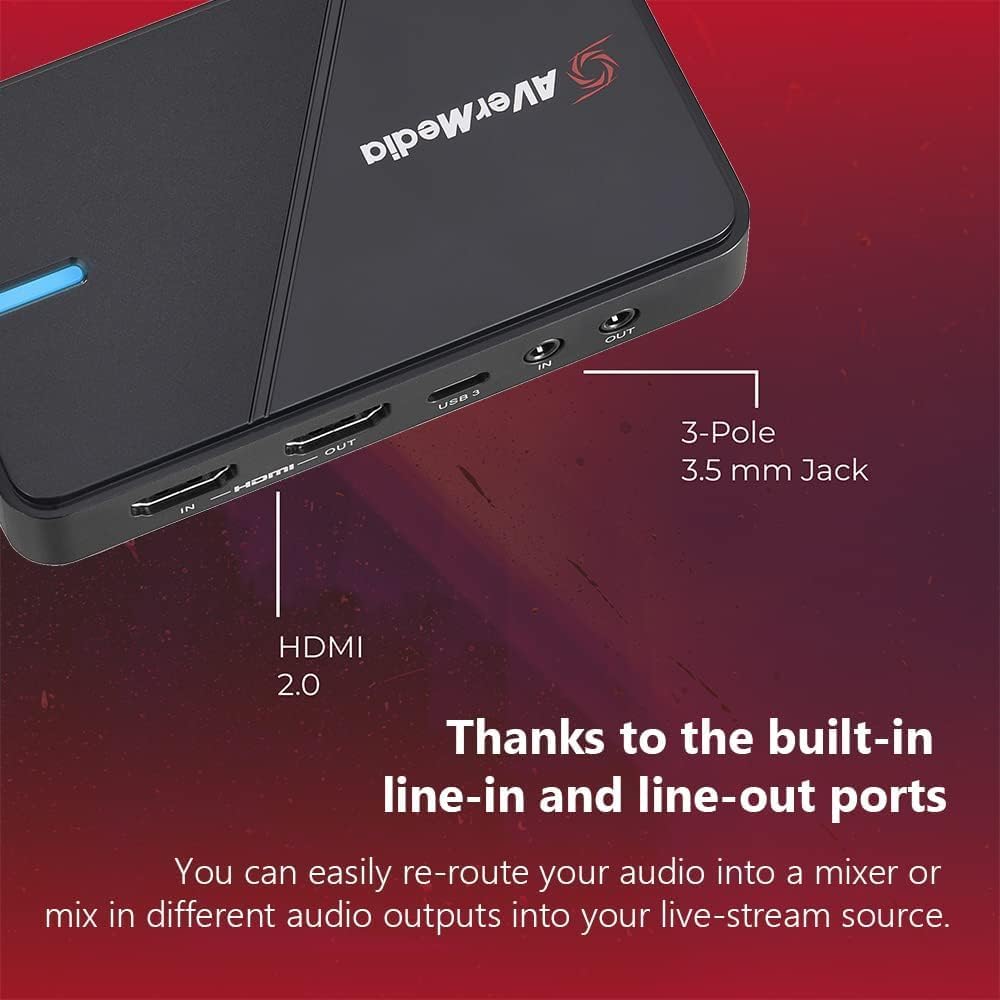
Obraz 5.5: Szczegółowy view of the 3.5mm line-in and line-out ports, indicating their function for audio integration.
- Transmisja strumieniowa: Utilize AVerMedia RECentral 4 to push your content to multiple platforms such as YouTube, Twitch, and Facebook simultaneously.
6. Konserwacja
To ensure the longevity and optimal performance of your Live Gamer Extreme 3, follow these maintenance guidelines:
- Przechowuj urządzenie w czystym i suchym miejscu, z dala od bezpośredniego światła słonecznego i ekstremalnych temperatur.
- Czyść zewnętrzną część miękką, suchą ściereczką. Unikaj stosowania silnych środków chemicznych i materiałów ściernych.
- Zapewnij odpowiednią wentylację wokół urządzenia, aby zapobiec przegrzaniu.
- Należy obchodzić się z kablami ostrożnie, aby zapobiec uszkodzeniu złączy i portów.
7. Rozwiązywanie Problemów
If you encounter issues with your Live Gamer Extreme 3, refer to the following common solutions:
7.1. No Video or Low Resolution/Framerate
- Port USB: Ensure the capture card is connected to a Port USB 3.0 lub nowszy on your computer. Connecting to a USB 2.0 port will limit video capture to 1080p 30fps.
- Kontrola kabla: Verify that all HDMI and USB cables are securely connected and not damaged.
- HDCP: Some consoles or devices may have High-bandwidth Digital Content Protection (HDCP) enabled, which can prevent capture. Disable HDCP in your console's settings if possible.
- Ustawienia oprogramowania: Check the video input settings within your streaming software (e.g., OBS Studio, RECentral) to ensure the correct resolution and frame rate are selected.
7.2. No Audio or Audio Issues
- Źródło dźwięku: Confirm that the audio source (console, microphone) is correctly configured and outputting sound.
- Software Mixer: In your streaming software, check the audio mixer settings. Ensure the capture card's audio input is enabled and not muted. Adjust volume levels as needed.
- 3.5mm Ports: If using the 3.5mm audio ports, ensure your cables are 3-pole and correctly inserted.
7.3. OBS Studio Specific Setup Tips
Setting up the capture card in OBS Studio can sometimes be challenging for first-time users. Here are some recommended steps:
- In OBS, add a new source: Urządzenie przechwytujące wideo. Name it appropriately (e.g., 'AVerMedia Capture').
- In the properties window, select your AVerMedia device from the 'Device' dropdown. A preview of your console's output should appear.
- Adjust brightness and contrast settings in this preview window if necessary.
- For audio, set the 'Audio Output Mode' to 'Output desktop audio (DirectSound)' or 'Monitor and Output'. In the Audio Mixer, click the gear icon next to your capture card source and select 'Advanced Audio Properties'. Set 'Audio Monitoring' to 'Monitor and Output' for the capture card source.
- To play games directly from the OBS preview without input lag, right-click the stream preview in OBS and select 'Full Screen Projector (Source)' or 'Windowed Projector (Source)' for your capture card. This allows you to use your PC monitor as a display for your console with minimal latency, provided you are using a USB 3.0 port.
7.4. Compatibility with AVRs
Some users have reported compatibility issues when connecting the capture card through an Audio/Video Receiver (AVR). If you experience problems, try connecting your console directly to the capture card's HDMI IN port and the capture card's HDMI OUT port directly to your display, bypassing the AVR.
8. Specyfikacje
| Marka | AVerMedia |
| Szereg | Na żywo Gracz Extreme 3 |
| Numer modelu | GC551G2W |
| Interfejs sprzętowy | USB 3.0 |
| Rozdzielczość przechwytywania wideo | 4K30 |
| Rozdzielczość Pass-Through | 4K60 HDR, 1080p240, 1440p120 (with VRR) |
| Zgodność z systemem operacyjnym | Windows 10x64/11x64 or later, iPadOS 17 or later, macOS 13/14 or later |
| Waga przedmiotu | 12 uncji |
| Wymiary produktu (dł. x szer. x wys.) | 6.8 x 4.65 x 2.68 cala |
| Kolor | Biały |
9. Gwarancja i wsparcie
The AVerMedia Live Gamer Extreme 3 (GC551G2) is designed for reliability and performance. This video capture card is NDAA & TAA Compliant, adhering to regulatory and procurement standards for government entities and organizations.
For detailed warranty information, technical support, and driver updates, please visit the official AVerMedia weblub skontaktuj się z działem obsługi klienta. Zachowaj paragon zakupu na potrzeby roszczeń gwarancyjnych.


