1. Wprowadzenie
Thank you for choosing the Zapco ST-4XP-SQ-III 4-Channel Class AB 800W RMS Sound Quality Amplifier. Niniejsza instrukcja zawiera podstawowe informacje dotyczące prawidłowej instalacji, obsługi i konserwacji urządzenia. amplifier. Please read this manual thoroughly before attempting to install or operate the unit to ensure optimal performance and safety.
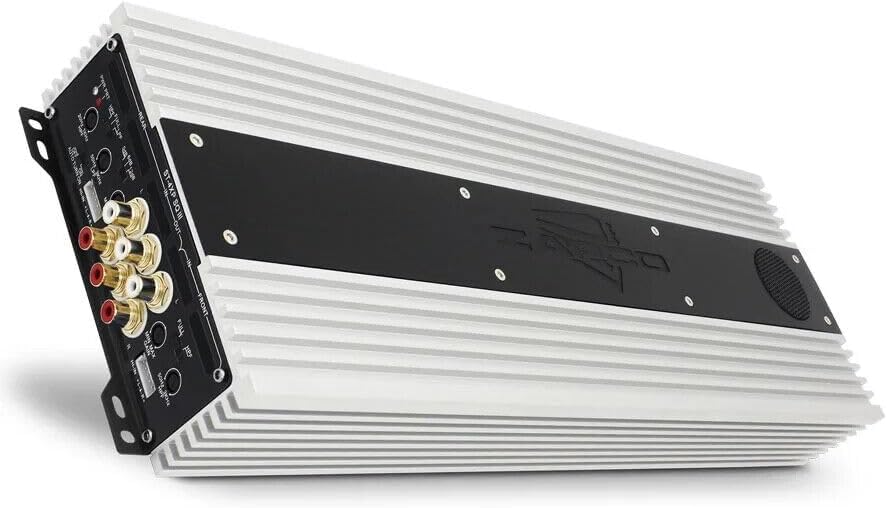
This image displays the Zapco ST-4XP-SQ-III amplifier, showcasing its sleek design and heat sink fins. The main body is silver with a black central panel featuring the Zapco logo.
2. Informacje dotyczące bezpieczeństwa
Podczas instalacji i obsługi należy zawsze przestrzegać następujących środków ostrożności:
- Disconnect the vehicle's negative battery terminal before any wiring.
- Upewnij się, że wszystkie przewody są prawidłowo poprowadzone i zabezpieczone, aby zapobiec ich uszkodzeniom lub zwarciom.
- Do podłączenia zasilania, uziemienia i głośników należy stosować przewody o odpowiednim przekroju, zgodnie ze specyfikacją.
- Zamontuj ampPrzechowywać w bezpiecznym miejscu, które zapewnia odpowiednią wentylację i jest chronione przed wilgocią i nadmiernym ciepłem.
- Nie uruchamiaj ampJeśli jest uszkodzony lub działa nieprawidłowo, skontaktuj się z działem pomocy technicznej. Zapoznaj się z sekcją rozwiązywania problemów lub skontaktuj się z działem pomocy technicznej.
3. Koniec produktuview
The Zapco ST-4XP-SQ-III is a high-performance 4-channel Class AB amplifier designed for superior sound quality in automotive applications. Key features include:
- 4-Channel, Full Range, Class A/B operation
- Tiffany style Panel Mount RCA connectors
- Speaker Level Inputs with Auto-on functionality
- Zmienna kontrola wzmocnienia wejściowego
- Variable electronic crossover (HPF/LPF)
- Zmienna kontrola wzmocnienia basów
- Robust new aluminum chassis for efficient heat dissipation
Układ panelu sterowania

This image shows the input and control panel of the Zapco ST-4XP-SQ-III amplifier. Visible controls include gain adjustments, high-pass filter (HPF), low-pass filter (LPF), bass boost, and RCA input jacks for front and rear channels. Speaker level inputs and an auto-on switch are also present.
The control panel provides access to input connections and sound tuning adjustments. This includes RCA inputs, speaker level inputs, gain controls, and crossover frequency adjustments for both front and rear channels.
Power and Speaker Output Terminals

This image details the power and speaker output terminals of the Zapco ST-4XP-SQ-III amplifier. It includes connections for Ground (GND), Remote (REM), +12V Battery (Bat), and speaker outputs for front and rear channels, with bridging options indicated.
The power and speaker output panel features robust terminals for secure connections. These include connections for the main power supply (+12V Bat), ground (GND), remote turn-on (REM), and speaker outputs for the front and rear channels, with clear markings for bridging configurations.
4. Konfiguracja i instalacja
Prawidłowa instalacja ma kluczowe znaczenie dla wydajności i trwałości Twojego urządzenia. amplifier. Jeśli nie masz pewności co do któregokolwiek kroku, skonsultuj się z profesjonalnym instalatorem.
4.1 Montaż
- Choose a mounting location that is dry, well-ventilated, and away from direct sunlight or heat sources.
- Zapewnij wystarczającą ilość miejsca wokół ampfiltr zapewniający cyrkulację powietrza.
- Zabezpiecz ampMocno dokręcić za pomocą odpowiedniego sprzętu, aby zapobiec przemieszczaniu się pojazdu podczas jazdy.
4.2 połączeń przewodów
Refer to the 'Power and Speaker Output Terminals' image for visual guidance.
- Power (BAT +12V): Connect a fused power cable directly from the vehicle's positive battery terminal to the +12V terminal on the ampBezpiecznik powinien znajdować się w odległości 18 cali od akumulatora.
- Masa (GND): Connect a ground cable of the same gauge as the power cable to a clean, unpainted metal surface on the vehicle chassis. Ensure a solid electrical connection.
- Zdalny (REM): Podłącz przewód zdalnego włączania z wyjścia zdalnego jednostki głównej do zacisku REM na amplifier. This turns the amplifier on and off with your head unit. If using speaker level inputs, the amplifier features an auto-on function.
- Sygnał wejściowy:
- Wejścia RCA: Podłącz kable RCA do urządzenia głównego.amp outputs to the corresponding RCA input jacks (Front IN, Rear IN) on the ampliyfikator.
- Wejścia poziomu głośników: If your head unit does not have RCA outputs, connect the speaker wires from the head unit to the amplifier's speaker level input terminals. Ensure correct polarity. The amplifier's auto-on feature will activate when a signal is detected.
- Wyjścia głośnikowe: Podłącz głośniki do amplifier's speaker output terminals (Front L/R, Rear L/R). Observe correct polarity (+ to + and - to -). For bridged operation, refer to the markings on the amplifier for the correct terminals.
5. Instrukcja obsługi
Po zainstalowaniu dostosuj ampustawienia filtra zapewniające optymalną jakość dźwięku.
5.1 Kontrola wzmocnienia
The variable input gain control (MIN MAX GAIN) matches the ampCzułość wejściowa urządzenia Lifier zależy od poziomu wyjściowego jednostki głównej. Zacznij od wzmocnienia ustawionego na minimum. Odtwórz znany utwór z głośnością około 75% maksymalnej głośności jednostki głównej. Powoli zwiększaj głośność. amplifier's gain until you hear slight distortion, then back off slightly. This ensures maximum clean output.
5.2 Ustawienia zwrotnicy
The ST-4XP-SQ-III features variable electronic crossovers for both High-Pass Filter (HPF) and Low-Pass Filter (LPF).
- HPF (filtr górnoprzepustowy): Umożliwia częstotliwości powyżej the set point to pass through. Use this for full-range speakers to prevent them from playing low bass, which can cause distortion and damage.
- LPF (filtr dolnoprzepustowy): Umożliwia częstotliwości poniżej the set point to pass through. Use this for subwoofers to ensure they only reproduce bass frequencies.
- PEŁNY: Omija zwrotnicę, pozwalając na przejście wszystkich częstotliwości.
Adjust the HPF and LPF settings according to your speaker types and desired sound. Typical settings for full-range speakers might be an HPF between 80Hz-120Hz. For subwoofers, an LPF between 80Hz-100Hz is common.
5.3 Wzmocnienie basów
The variable bass boost control allows you to enhance low-frequency output. Use this feature sparingly, as excessive bass boost can lead to distortion and potential speaker damage. Adjust to taste, ensuring the sound remains clear.
5.4 Auto-on with Speaker Level Inputs
When using speaker level inputs, the amplifier can automatically detect an audio signal and power on. Ensure the 'AUTO TURN ON' switch is set to 'ON' if you wish to utilize this feature. If using a remote turn-on wire, set this switch to 'OFF'.
6. Konserwacja
Zapco ST-4XP-SQ-III amplifier wymaga minimalnej konserwacji, aby zapewnić długotrwałą wydajność.
- Czyszczenie: Okresowo wycieraj amplifier's exterior with a soft, dry cloth to remove dust and dirt. Do not use harsh chemicals or abrasive cleaners.
- Kontrola: Regularnie sprawdzaj wszystkie połączenia przewodów pod kątem szczelności i oznak korozji lub uszkodzeń. Upewnij się, że amplifier's mounting remains secure.
- Wentylacja: Upewnij się, że amplifier's heat sink fins are not obstructed, allowing for proper airflow and cooling.
7. Rozwiązywanie Problemów
Jeśli masz problemy z urządzeniem amplifier, przed skontaktowaniem się z pomocą techniczną zapoznaj się z poniższą tabelą.
| Problem | Możliwa przyczyna | Rozwiązanie |
|---|---|---|
| Brak zasilania / Amplifier nie włącza się |
|
|
| Brak wyjścia dźwięku |
|
|
| Zniekształcony dźwięk |
|
|
| Ampprzegrzanie lifiera |
|
|
8. Specyfikacje
The following are the technical specifications for the Zapco ST-4XP-SQ-III ampLiyfikator:
- Moc @ 4Ω: 4 x 150 W RMS
- Moc @ 2Ω: 4 x 250 W RMS
- Moc zmostkowana przy 4 Ω: 2 x 500W RMS
- THD @ Moc znamionowa: < 0.1% THD
- Stosunek sygnału do szumu: > 95dB
- Separacja kanałów: >60dB
- Pasmo przenoszenia: 15Hz do 30KHz ±1dB
- Czułość wejściowa: 0.25v do 5v
- Net Dimensions (W x H x L): 160mm x 58mm x 450mm (6.3 x 2.28 x 17.72 cale)
- Overall Dimensions (W x H x L): 160mm x 58mm x 475mm (6.3 x 2.28 x 18.7 cale)
- Waga przedmiotu: Około 10 funtów
9. Gwarancja i wsparcie
9.1 Informacje o gwarancji
Zapco ST-4XP-SQ-III amplifier jest dostarczany z 1-letnia gwarancja from the date of purchase. This warranty covers defects in materials and workmanship under normal use. It does not cover damage caused by improper installation, accident, misuse, abuse, neglect, unauthorized modification, or normal wear and tear. Please retain your proof of purchase for warranty claims.
9.2 Obsługa klienta
For technical assistance, warranty service, or general inquiries, please visit the official Zapco website or contact your authorized Zapco dealer. You can often find detailed FAQs, additional resources, and contact information on the manufacturer's webstrona.
Zapco Official Webstrona: Odwiedź sklep Zapco na Amazon


