1. Wprowadzenie
Thank you for choosing the HORLAT Mini Projector Tripod. This compact and portable tripod is designed to provide stable support for mini projectors, cameras, and other compatible devices. Its lightweight yet robust construction makes it ideal for various settings, from home entertainment to professional presentations.
Please read this manual carefully before using the product to ensure proper setup, operation, and maintenance. Keep this manual for future reference.
2. Informacje dotyczące bezpieczeństwa
- Do not overload the tripod beyond its stated weight capacity. Overloading can cause instability and damage to the tripod or attached device.
- Ensure the tripod is placed on a stable, level surface to prevent tipping.
- Always secure your device firmly to the tripod's mounting screw before use.
- Avoid exposing the tripod to extreme temperatures, direct sunlight for prolonged periods, or corrosive substances.
- Przechowywać poza zasięgiem dzieci, aby zapobiec wypadkom.
- Do not force any adjustments. If a part feels stiff, check for obstructions or consult the troubleshooting section.
3. Zawartość opakowania
Sprawdź, czy w przesyłce znajdują się wszystkie elementy:
- HORLAT Mini Projector Tripod
- HDMI Cable (included as an accessory, though not directly part of the tripod)

Image: The HORLAT Mini Projector Tripod, showing its compact design.
4. Koniec produktuview
The HORLAT Mini Projector Tripod features a stable three-leg design with a ball head for flexible positioning. It includes a standard 1/4-inch screw for universal compatibility with various devices.

Image: Close-up of the tripod's ball head and adjustment knob, indicating rotational movement.
The adjustment knob allows you to loosen or tighten the ball head, enabling 360-degree rotation and tilt for precise angle adjustments.
5. Konfiguracja
- Rozłóż nogi: Gently spread the three legs of the tripod outwards until they are fully extended and stable.
- Ustawienie statywu: Place the tripod on a flat, stable surface where you intend to use your device.
- Podłącz swoje urządzenie: Locate the 1/4-inch screw on the top of the tripod's ball head. Carefully screw your mini projector, camera, or other compatible device onto this screw until it is securely fastened. Ensure it is tight enough to prevent wobbling but do not overtighten.

Image: A mini projector securely mounted on the HORLAT tripod, demonstrating a typical setup.

Image: The HORLAT tripod positioned next to a mini projector, illustrating its compact size. Note: The mini projector is not included with the tripod.
6. Obsługa
- Regulacja kąta: Loosen the adjustment knob on the side of the ball head. This will allow you to freely tilt and rotate your attached device to the desired angle.
- Securing Angle: Once the desired angle is achieved, tighten the adjustment knob firmly to lock the ball head in place. Ensure the device is stable before releasing to.
- Wszechstronne zastosowanie: The tripod is suitable for various devices with a 1/4-inch screw mount, including mini projectors, digital cameras, and webkrzywki.

Image: Diagram showing the tripod's compatibility with both cameras and projectors. Note: Camera and projector are not included.
7. Konserwacja
- Czyszczenie: Przetrzyj statyw miękką, suchą ściereczką, aby usunąć kurz i brud. W przypadku uporczywych zabrudzeń, delikatnie przetrzyj.amp Można użyć ściereczki i natychmiast wysuszyć.
- Składowanie: When not in use, fold the tripod legs and store it in a cool, dry place away from direct sunlight and excessive moisture.
- Kontrola: Periodically check all screws and joints to ensure they are secure. Tighten any loose parts as needed.
8. Rozwiązywanie Problemów
- Device wobbles on tripod: Ensure the device is screwed on tightly to the 1/4-inch mount. Check that the tripod legs are fully extended and placed on a stable, level surface.
- Głowica kulowa nie utrzymuje pozycji: Tighten the adjustment knob firmly. If it still slips, check for any debris or damage around the ball head mechanism.
- Legs are stiff to unfold/fold: Check for any obstructions. Do not force the legs. A small amount of silicone lubricant can be applied to the pivot points if necessary, but avoid getting it on the mounting screw.
9. Specyfikacje
| Funkcja | Szczegół |
|---|---|
| Marka | HORLAT |
| Numer modelu (ASIN) | B0CYNZKB9G |
| Wymiary (złożony) | 18.3 x 5 x 4 cm (ok. 7.2 x 2 x 1.6 cala) |
| Waga | 88 gramów (ok. 0.19 funta) |
| Minimalna wysokość | 8 cali (ok. 20.3 cm) |
| Support Height | 5.5 cali (ok. 14 cm) |
| Śruba montażowa | Standard 1/4-inch |
| Kolor | Cobalt Blue Grey |
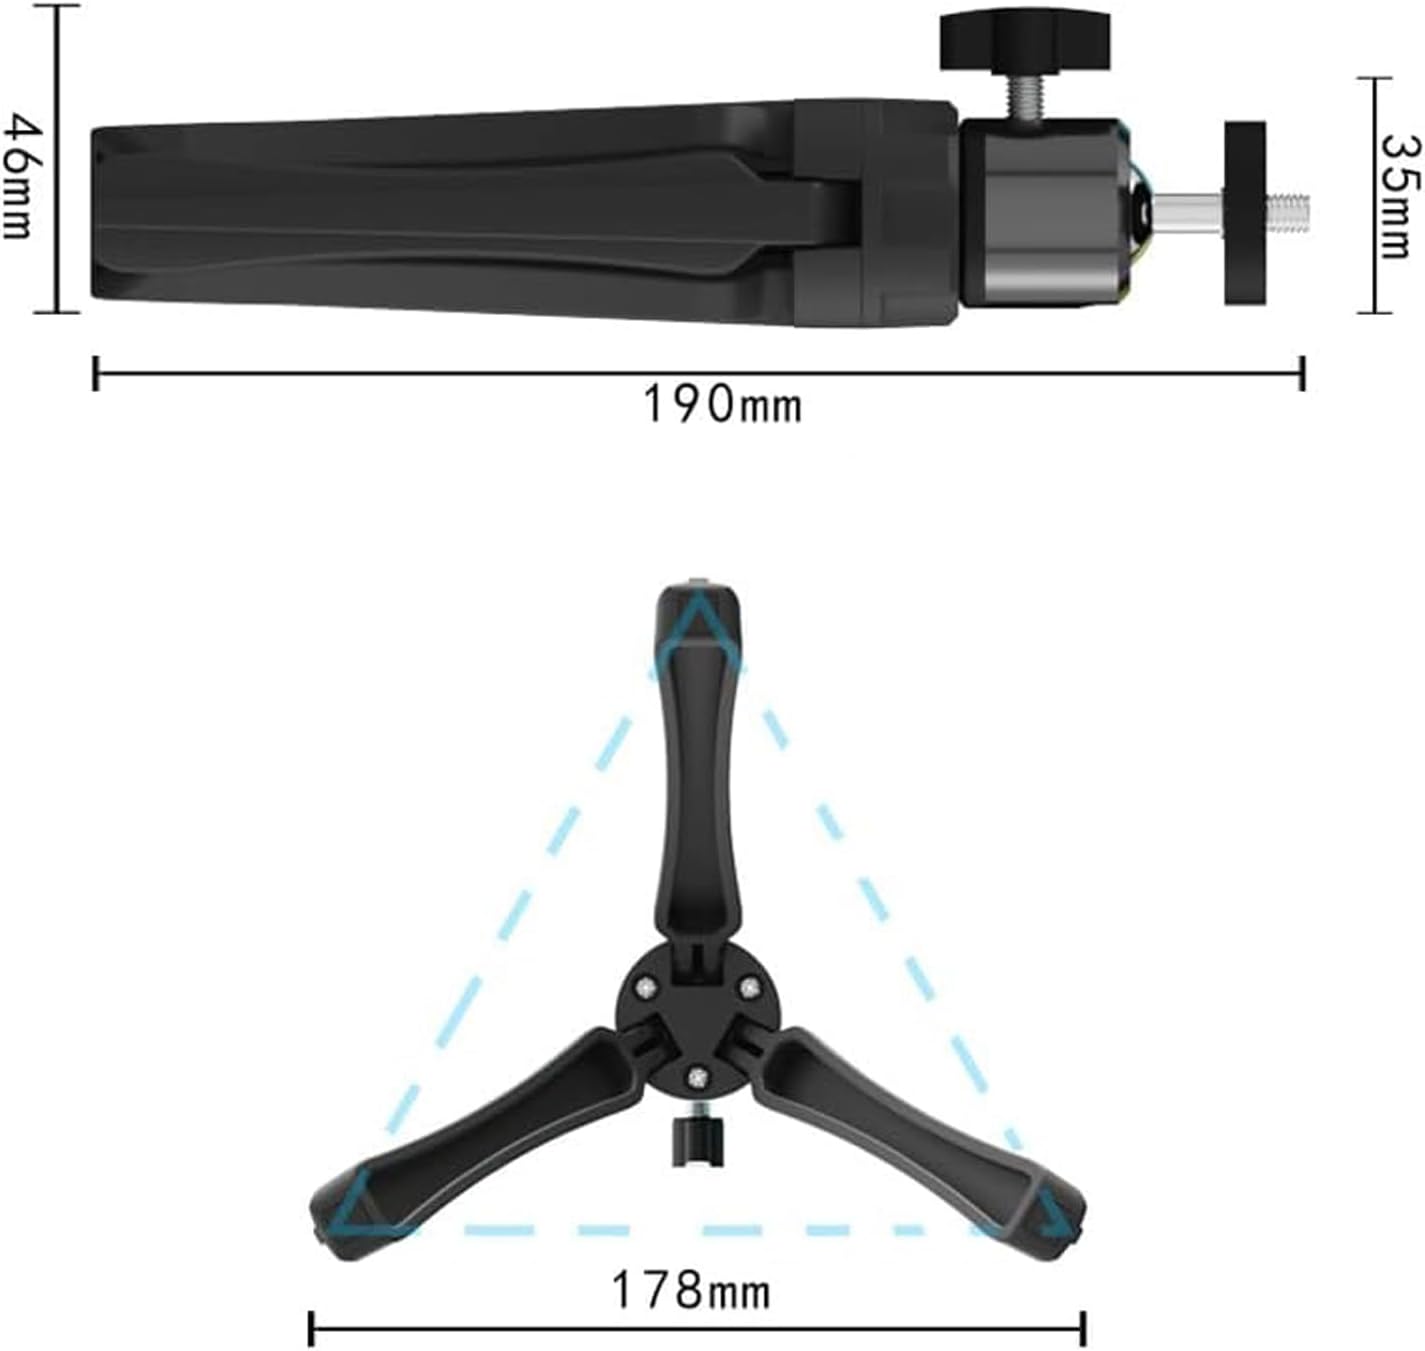
Image: Technical drawing illustrating the dimensions of the HORLAT Mini Projector Tripod.
10. Gwarancja i wsparcie
For warranty information or technical support, please refer to the product packaging or contact HORLAT customer service through the retailer's platform where the product was purchased. Please have your model number (B0CYNZKB9G) ready when contacting support.
For more information about HORLAT products, you may visit the official HORLAT store page on Amazon: HORLAT Store


