1. Wprowadzenie
This manual provides detailed instructions for the installation, operation, and maintenance of your Stinger Audio MT-1000.1M 1-Channel Monoblock Marine Audio Subwoofer Amplifier. Please read this manual thoroughly before attempting installation or operation to ensure proper use and to prevent damage to the unit or your audio system. Keep this manual for future reference.
2. Koniec produktuview
The Stinger Audio MT-1000.1M is a high-efficiency Class-D monoblock amplifier designed for marine environments. It delivers 1000 Watts RMS of power, optimized for subwoofer applications. Its robust, water-resistant design ensures reliable performance in challenging conditions.
Główne cechy:
- Digital Class-D Monoblock AmpLiyfikator: High efficiency and compact form factor.
- Kompaktowa i solidna konstrukcja: Built for lasting reliability.
- Robust Unregulated Power Supplies: Designed for superior performance and efficiency.
- Advanced HEXFET Power MOSFET: Features reduced on-resistance, faster switching speeds, and enhanced reliability.
- Bezpośrednie złącza zasilania i głośników: Decreased resistance for higher power transfer and efficiency.
- Wodoodporna konstrukcja: Chroni amplifier against weather elements for uninterrupted performance.
- Bass Boost Q: Adjustable bass boost from 0dB to 12dB at a selected frequency.
- Remote Bass Knob Included: Flush-mount design for effortless bass level adjustment.

3. Informacje dotyczące bezpieczeństwa
Zawsze przestrzegaj następujących środków ostrożności:
- Przed przystąpieniem do montażu należy odłączyć ujemny zacisk akumulatora pojazdu.
- Należy zapewnić prawidłowe uziemienie podwozia pojazdu.
- Do podłączenia zasilania, uziemienia i głośników należy stosować przewody o odpowiednim przekroju.
- Zainstaluj amplifier in a well-ventilated area, away from direct heat sources.
- Unikaj montowania tzw amplifier in locations where it may be submerged in water, despite its water-resistant rating.
- Jeśli masz wątpliwości co do jakiegokolwiek etapu procesu instalacji, skonsultuj się z profesjonalnym instalatorem.
4. Co znajduje się w pudełku
Przed rozpoczęciem instalacji sprawdź, czy wszystkie elementy są obecne:
- Monoblok o mocy 1000 W Amplifier (MT-1000.1M)
- Remote Level Control (Bass Knob)
- Sprzęt montażowy
- Instrukcja obsługi
5. Identyfikacja komponentów
Zapoznaj się z amplifier's controls and connections.

5.1 Control Panel (Input Side)

- POWER/PRT/CLIP Indicators: LEDs indicating power status, protection mode, and signal clipping.
- REMOTE Port: RJ11 connection for the included remote bass level control.
- WEJŚCIE (RCA): Audio input from your head unit or source.
- BRIDGE IN/OUT (RCA): For linking multiple ampwężownice.
- Zyskać kontrolę: Dostosowuje czułość wejściową do sygnału wyjściowego urządzenia źródłowego.
- LPF (Low-Pass Filter) Control: Adjusts the upper frequency limit for the subwoofer. Range: 40Hz - 180Hz.
- Filtr poddźwiękowy: Removes ultra-low frequencies below the audible range to protect the subwoofer. Range: OFF - 50Hz.
- FREQ (Bass Boost Frequency) Control: Selects the center frequency for the bass boost. Range: 30Hz - 80Hz.
- BOOST (Bass Boost Level) Control: Adjusts the level of bass boost. Range: 0dB - 12dB.
5.2 Terminal Panel (Output Side)

- Zacisk GND (masa): Łączy się z masą podwozia pojazdu.
- Terminal REM (zdalny): Connects to the remote turn-on lead from your source unit.
- +12V (Power) Terminal: Connects to the positive terminal of the vehicle's battery via an inline fuse.
- MONO OUTPUT (Speaker Terminals): Connects to your subwoofer(s). Minimum impedance 1 Ohm.
6. Instalacja
Proper installation is crucial for optimal performance and safety. Ensure all connections are secure and correctly polarized.
6.1 Miejsce montażu
Choose a mounting location that is secure, provides adequate ventilation, and is protected from excessive moisture. While the amplifier is water-resistant, direct exposure to heavy water spray or submersion should be avoided.

6.2 połączeń przewodów
- Moc (B+): Connect a 4-gauge power cable from the +12V terminal of the amplifier directly to the positive terminal of the vehicle's battery. Install an appropriate inline fuse (100A recommended) within 18 inches of the battery.
- Masa (GND): Connect a 4-gauge ground cable from the GND terminal of the amplifier to a clean, bare metal point on the vehicle's chassis. Ensure a solid, low-resistance connection.
- Zdalny (REM): Connect a 18-gauge remote turn-on wire from the REM terminal of the amplifier to the remote output of your head unit.
- Wejście RCA: Connect RCA cables from the subwoofer output of your head unit to the INPUT RCA jacks on the ampliyfikator.
- Wyjście głośnika: Connect your subwoofer(s) to the MONO OUTPUT terminals. Ensure the total impedance is not below 1 Ohm. Observe correct polarity (+ to + and - to -).
- Zdalne pokrętło basowe: Connect the remote bass knob to the REMOTE port on the amplifier za pomocą dołączonego kabla.
7. Działanie
Po instalacji wykonaj poniższe kroki, aby skonfigurować i obsługiwać urządzenie. ampliyfikator.
7.1 Konfiguracja początkowa i regulacja wzmocnienia
- Włącz regulator GAIN na ampobróć pokrętło do pozycji minimalnej (przeciwnie do ruchu wskazówek zegara).
- Ustaw głośność jednostki głównej na około 75% maksymalnego poziomu.
- Odtwórz dynamiczny utwór muzyczny z mocnym basem.
- Powoli zwiększaj wzmocnienie regulatora GAIN amplifier until you hear distortion, then back it off slightly until the sound is clear. The CLIP indicator should not illuminate continuously.
7.2 Crossover and Filter Settings
- LPF (filtr dolnoprzepustowy): Adjust the LPF control to set the upper frequency limit for your subwoofer. A common starting point is 80Hz-100Hz, but this may vary depending on your subwoofer and other speakers in your system.
- Filtr poddźwiękowy: Set the SUBSONIC filter to protect your subwoofer from playing frequencies below its resonant frequency. A common setting is 25Hz-30Hz, or slightly below your subwoofer's tuning frequency if it's in a ported enclosure. If you have a sealed enclosure, you may set it to OFF or a very low frequency.
7.3 Wzmocnienie basów
- FREQ (częstotliwość podbicia basów): Select the frequency at which you want the bass boost to be centered. This is typically between 30Hz and 80Hz, depending on the desired effect.
- BOOST (Bass Boost Level): Adjust the level of boost from 0dB to 12dB. Use this sparingly to avoid distortion and potential damage to your subwoofer.
7.4 Zdalne pokrętło basowe
The remote bass knob allows for convenient adjustment of the subwoofer output level from your listening position. It acts as a master volume for the subwoofer channel, allowing you to increase or decrease the bass intensity without affecting other ampUstawienia lifiera.
8. Konserwacja
Regularna konserwacja pomaga zapewnić długowieczność i wydajność Twojego ampliyfikator.
- Czyszczenie: Okresowo wycieraj ampZewnętrzną powierzchnię filtra czyścić miękką, suchą ściereczką. Unikać stosowania silnych środków chemicznych i ściernych środków czyszczących.
- Kontrola połączenia: Annually inspect all power, ground, remote, and speaker connections for corrosion or looseness. Tighten as necessary.
- Wentylacja: Upewnij się, że ampŻebra chłodzące urządzenia Lifier są pozbawione przeszkód, co pozwala na właściwe odprowadzanie ciepła.
9. Rozwiązywanie Problemów
Jeśli masz problemy z urządzeniem amplifier, zapoznaj się z poniższymi typowymi problemami i rozwiązaniami.
| Problem | Możliwa przyczyna | Rozwiązanie |
|---|---|---|
| Brak zasilania / Dioda LED zasilania wyłączona | Przepalony bezpiecznik, luźny przewód zasilania/uziemienia/zdalnego, brak sygnału zdalnego. | Check inline fuse, verify all power connections, ensure head unit remote output is active. |
| Dioda LED ochrony włączona | Zwarcie głośnika, zbyt niska impedancja, przegrzanie, przesunięcie prądu stałego. | Check speaker wiring for shorts, verify speaker impedance, ensure adequate ventilation, disconnect speakers and test. |
| Brak wyjścia audio | Brak sygnału wejściowego, nieprawidłowe ustawienie wzmocnienia, odłączone przewody głośnikowe. | Sprawdź połączenia RCA, wyreguluj wzmocnienie, zweryfikuj połączenia głośników. |
| Zniekształcony dźwięk | Gain set too high, improper crossover settings, poor ground connection. | Reduce gain, adjust LPF/Subsonic filters, check ground wire for secure connection. |
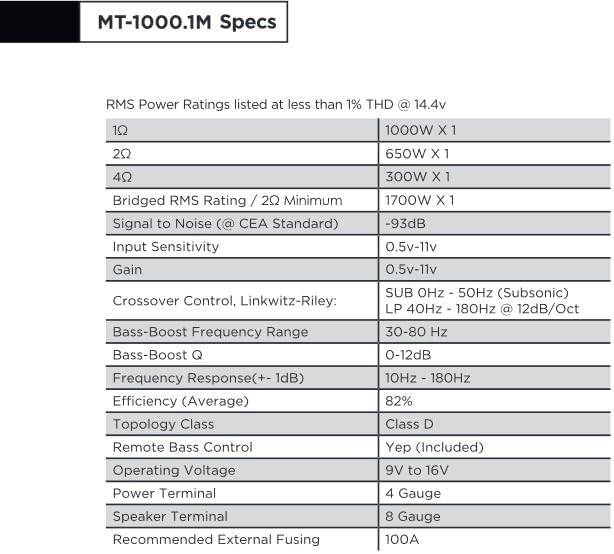
10. Specyfikacje
Detailed technical specifications for the Stinger Audio MT-1000.1M ampliyfikator.
| Funkcja | Specyfikacja |
|---|---|
| Moc skuteczna (1Ω) | 1000W x 1 |
| Moc skuteczna (2Ω) | 650W x 1 |
| Moc skuteczna (4Ω) | 300W x 1 |
| Bridged RMS Rating (2Ω Minimum) | 1700W x 1 |
| Signal to Noise (CEA Standard) | -93dB |
| Czułość wejściowa | 0.5 V - 11 V |
| Osiągać | 0.5 V - 11 V |
| Crossover Control (Linkwitz-Riley) | SUB 0Hz - 50Hz (Subsonic), LP 40Hz - 180Hz @ 12dB/Oct |
| Zakres częstotliwości wzmocnienia basów | 30Hz - 80Hz |
| Wzmocnienie basów Q | 0 - 12 dB |
| Pasmo przenoszenia (+/- 1dB) | 10Hz - 180Hz |
| Wydajność (średnia) | 82% |
| Zajęcia z topologii | Klasa D |
| Zdalne sterowanie basem | Tak (w zestawie) |
| Objętość operacyjnatage | 9V do 16V |
| Terminal zasilania | Gauge 4 |
| Terminal głośnikowy | Gauge 8 |
| Zalecane utrwalanie zewnętrzne | 100A |
| Waga przedmiotu | 6.14 funta |
| Wymiary opakowania | 14.5 x 7.8 x 3.2 cala |
| Data pierwszej dostępności | 13 marca 2024 r. |
| Producent | STINGER |
11. Gwarancja i wsparcie
11.1 Informacje o gwarancji
The Stinger Audio MT-1000.1M amplifier jest dostarczany z 1 rok gwarancji from the date of purchase. Please retain your proof of purchase for warranty claims. The warranty covers manufacturing defects and workmanship under normal use. It does not cover damage caused by improper installation, accident, misuse, abuse, neglect, or unauthorized modification.
11.2 Obsługa klienta
For technical assistance, troubleshooting, or warranty inquiries, please contact Stinger Audio customer support. You can find more information and contact details by visiting the official STINGER brand store:


