Instrukcja obsługi miniprojektora BlitzWolf BW-VT2
Your comprehensive guide to setting up, operating, and maintaining your BlitzWolf BW-VT2 Mini Projector.
1. Koniec produktuview
1.1 Zawartość opakowania
Sprawdź, czy w przesyłce znajdują się wszystkie elementy:
- Mini projektor BlitzWolf BW-VT2
- Zdalne sterowanie
- Zasilacz
- Kabel HDMI
- Instrukcja obsługi (ten dokument)
1.2 Układ urządzenia
Familiarize yourself with the various parts and ports of your projector.
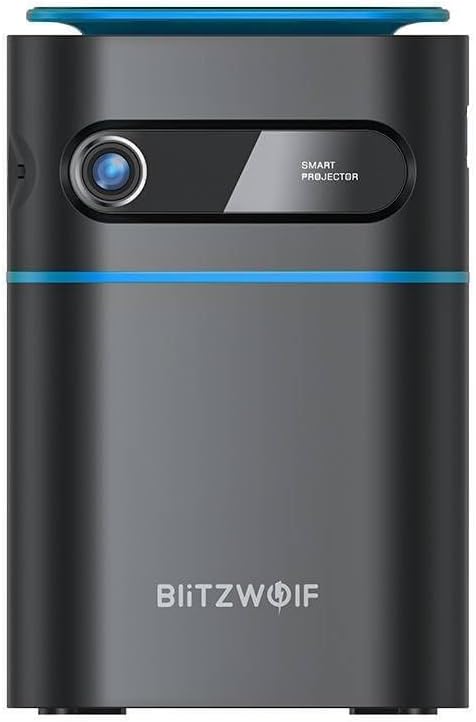
Rycina 1.1: Przód View. This image displays the front of the BlitzWolf BW-VT2 Mini Projector, highlighting the projection lens and the 'SMART PROJECTOR' branding.

Figure 1.2: Projector with Remote Control. This image shows the BlitzWolf BW-VT2 Mini Projector alongside its dedicated remote control, illustrating the compact size of both devices.
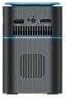
Rysunek 1.3: Tył View. The rear of the projector is shown, featuring ventilation grilles and various input/output ports.

Rysunek 1.4: Strona View. This image highlights the side of the projector where additional connectivity options such as USB and HDMI ports are located.

Rysunek 1.5: Góra View. The top surface of the projector is visible, featuring the integrated touch control panel for direct interaction.
1.3 Porty i elementy sterujące
- Port HDMI: Connect to laptops, game consoles, Blu-ray players, etc.
- Port USB: Podłącz dyski flash USB w celu odtwarzania multimediów.
- Audio Out (3.5mm) Port: Podłącz zewnętrzne głośniki lub słuchawki.
- Port DC IN: Podłącz zasilacz.
- Przycisk zasilania: Włącza/wyłącza projektor.
- Koło ostrości: Dostosowuje klarowność obrazu.
- Dotykowy panel sterowania: Navigate menus and control playback directly on the device.
2. Przewodnik konfiguracji
2.1 Włączanie
- Podłącz zasilacz do portu DC IN w projektorze.
- Podłącz zasilacz do gniazdka ściennego.
- Press and hold the Power Button on the projector or the remote control until the device powers on.
2.2 Początkowe umiejscowienie
Dla optymalnego viewing experience, consider the following:
- Ustaw projektor na stabilnej, płaskiej powierzchni.
- Ensure there is adequate ventilation around the projector to prevent overheating.
- Position the projector perpendicular to the projection surface (wall or screen) for a rectangular image.
- Dostosuj odległość, aby uzyskać pożądany rozmiar ekranu.
2.3 Regulacja ostrości
After powering on, adjust the focus to ensure a clear image:
- Obróć pokrętło ostrości znajdujące się obok obiektywu, aż wyświetlany obraz będzie ostry i wyraźny.
2.4 Konfiguracja zdalnego sterowania
Insert batteries into the remote control before first use:
- Otwórz pokrywę komory baterii z tyłu pilota.
- Włóż dwie baterie AAA (nie ma ich w zestawie), zwracając uwagę na prawidłową biegunowość (+/-).
- Zamknij pokrywę komory baterii.
3. Instrukcja obsługi
3.1 Nawigacja
You can navigate the projector's interface using either the remote control or the touch control panel on top of the device.
- Zdalne sterowanie: Use the directional buttons (up, down, left, right) to move through menus and the 'OK' button to select.
- Dotykowy panel sterowania: Swipe and tap on the touch-sensitive surface to navigate.
3.2 Podłączanie urządzeń
The BW-VT2 supports various input sources:
- Wejście HDMI: Connect your laptop, game console, or other HDMI-enabled devices using an HDMI cable. Select the HDMI input source from the projector's menu.
- Wejście USB: Insert a USB flash drive into the USB port. The projector's media player will typically detect the drive automatically, allowing you to browse and play supported media files (filmy, zdjęcia, muzyka).
- Łączność Wi-Fi: Navigate to the 'Settings' menu, then 'Network' or 'Wi-Fi'. Select your Wi-Fi network and enter the password to connect the projector to the internet. This enables access to online streaming apps and updates.
3.3 Funkcje systemu operacyjnego Android
As an Android-powered projector, the BW-VT2 offers smart functionalities:
- Dostęp do aplikacji: Download and install various streaming apps (e.g., Netflix, YouTube) directly from the pre-installed app store or by sideloading APKs.
- Ustawienia: Customize display settings, audio output, network configurations, and system preferences through the Android settings menu.
- Dublowanie ekranu: Utilize built-in screen mirroring features (e.g., Miracast, AirPlay compatible apps) to project content from your smartphone or tablet wirelessly.
3.4 Wyjście audio
The projector has built-in speakers, but you can also connect external audio devices:
- Wyjście audio 3.5 mm: Connect headphones or external speakers via the 3.5mm audio jack for enhanced sound.
4. Konserwacja
Właściwa konserwacja gwarantuje długowieczność i optymalną wydajność projektora.
4.1 Czyszczenie soczewek
To maintain clear image quality, clean the projector lens regularly:
- Użyj miękkiej, niepozostawiającej włókien ściereczki przeznaczonej specjalnie do soczewek optycznych.
- Delikatnie przetrzyj soczewkę ruchami okrężnymi.
- Avoid using abrasive cleaners or excessive force, which can scratch the lens.
4.2 Wentylacja
Ensure proper airflow to prevent overheating:
- Do not block the ventilation vents on the projector.
- Używaj projektora w dobrze wentylowanym pomieszczeniu.
- Periodically clean dust from the vents using a soft brush or compressed air.
4.3 Przechowywanie
When not in use, store your projector properly:
- Store the projector in a cool, dry place, away from direct sunlight and extreme temperatures.
- Use the original packaging or a protective case to prevent dust accumulation and physical damage.
5. Rozwiązywanie Problemów
W tej sekcji znajdziesz informacje o typowych problemach i ich rozwiązaniach.
| Problem | Możliwa przyczyna | Rozwiązanie |
|---|---|---|
| Projektor się nie włącza. | Brak połączenia elektrycznego; uszkodzony zasilacz. | Ensure power adapter is securely connected to both projector and outlet. Try a different outlet. |
| Brak projekcji obrazu. | Incorrect input source selected; loose HDMI/USB cable. | Verify the correct input source is selected in the menu. Check cable connections. |
| Obraz jest rozmazany. | Focus not adjusted; projector too close/far. | Rotate the focus wheel until the image is clear. Adjust projection distance if necessary. |
| Brak dźwięku. | Zbyt niski poziom głośności; zewnętrzne urządzenie audio nie jest prawidłowo podłączone. | Increase volume. Check connections to external speakers/headphones. Ensure audio output is set correctly in settings. |
| Problemy z połączeniem Wi-Fi. | Nieprawidłowe hasło; problemy z routerem; zakłócenia sygnału. | Re-enter Wi-Fi password. Restart router. Move projector closer to router. |
| Pilot nie działa. | Wyczerpane baterie; przeszkoda; pilot nie jest sparowany. | Replace batteries. Ensure no obstruction between remote and projector. |
6. Specyfikacje techniczne
Key specifications of the BlitzWolf BW-VT2 Mini Projector:
| Funkcja | Specyfikacja |
|---|---|
| Marka | BlitzWolf |
| Numer modelu | BW-VT2EU |
| Kolor | Czarny |
| Technologia łączności | HDMI, USB, VGA, Wi-Fi |
| Rozdzielczość wyświetlacza | 1920 x 1080 (Pełna rozdzielczość HD) |
| Typ wyświetlacza | LCD, LED |
| Współczynnik kształtu | Przenośny |
| Cechy specjalne | Portable, Android OS, Wi-Fi, HDMI, USB, VGA |
| Kompatybilne urządzenia | Laptops, Smartphones, Game Consoles, Blu-ray Players, Media Players, Wi-Fi enabled devices |
| Zalecane zastosowania | Kino domowe |
7. Gwarancja i wsparcie
7.1 Gwarancja producenta
The BlitzWolf BW-VT2 Mini Projector comes with a 2-letnia gwarancja producentaNiniejsza gwarancja obejmuje wady materiałowe i wykonawcze powstałe w wyniku normalnego użytkowania. Prosimy zachować dowód zakupu na potrzeby roszczeń gwarancyjnych.
7.2 Obsługa klienta
If you encounter issues not covered in the troubleshooting section or require further assistance, please contact BlitzWolf customer support. Refer to the product packaging or the official BlitzWolf webna tej stronie znajdziesz najbardziej aktualne dane kontaktowe.


