1. Koniec produktuview
The Kungfuking Wall Mount Power Strip with USB is designed to provide convenient power access and charging capabilities for multiple devices. This unit features 3 standard AC outlets, 2 USB-A ports with QC 3.0 fast charging, and 1 USB-C port with 18W power delivery. It includes surge protection and a 6-foot extension cord, making it suitable for various mounting applications such as under desks, on walls, or on tabletops.
Główne cechy:
- 3 gniazdka prądu przemiennego: Provides standard power connections for electronic devices (100V-125V, 12A=1500W).
- 3 porty USB: Includes 2 QC 3.0 USB-A ports and 1 18W USB-C port for fast charging of compatible devices.
- Ochrona przeciwprzepięciowa: Protects connected devices from power surges.
- Konstrukcja do montażu: Features mounting holes for secure installation on various surfaces (walls, desks, table legs).
- Przedłużacz 6-stopowy: Offers flexibility in placement.
- Na liście UL: Posiada certyfikat potwierdzający zgodność z normami bezpieczeństwa.

Rycina 1: Przód view of the Kungfuking Wall Mount Power Strip, showing 3 AC outlets, 2 USB-A ports, 1 USB-C port, an on/off switch, and the coiled 6-foot power cord.
2. Ważne instrukcje bezpieczeństwa
Aby zapobiec obrażeniom lub uszkodzeniom, przed użyciem produktu należy uważnie przeczytać i zastosować się do wszystkich instrukcji bezpieczeństwa.
- Nie należy przekraczać maksymalnego obciążenia 12A / 1500W.
- This product is for indoor use only. Do not expose to moisture or use in wet environments.
- Nie rozmontowuj ani nie modyfikuj listwy zasilającej. Wszelkie prace serwisowe zlecaj wykwalifikowanemu personelowi.
- Trzymać z dala od dzieci i zwierząt domowych.
- Upewnij się, że przewód zasilający jest całkowicie włożony do uziemionego gniazdka ściennego.
- Avoid running the power cord under carpets or in areas where it can be tripped over or damaged.
- If the power strip shows signs of damage, discontinue use immediately.
- The surge protector feature protects against power surges; however, it is not a substitute for proper grounding or protection against direct lightning strikes.
3. Konfiguracja i instalacja
The Kungfuking Wall Mount Power Strip offers flexible installation options. Choose the method that best suits your needs.
Instrukcja montażu:
- Wybierz lokalizację: Choose a flat, stable surface for mounting, such as a wall, under a desk, or on table legs. Ensure the location is dry and free from obstructions.
- Oznacz punkty mocowania: Position the power strip in the desired location. Use a pencil to mark the positions of the four mounting holes located on the flanges at each end of the power strip.
- Wywierć otwory pilotażowe (jeśli to konieczne): Depending on the mounting surface material, you may need to drill small pilot holes at the marked points. Use an appropriate drill bit size for the screws provided (or suitable screws for your surface).
- Secure the Power Strip: Align the mounting holes on the power strip with the pilot holes (or marks) and secure the unit using screws. Ensure the power strip is firmly attached and does not wobble.
- Podłącz do zasilania: Plug the 6-foot extension cord into a standard grounded wall outlet.

Figure 2: Illustration of the power strip's mounting holes for secure installation.

Rysunek 3: Examples of mounting locations: tabletop, under desk, and table legs.
4. Instrukcja obsługi
Once installed and connected to power, the power strip is ready for use.
Włączanie/wyłączanie:
- Locate the red ON/OFF switch on the power strip.
- Press the switch to the "ON" position to supply power to the outlets and USB ports. The switch will illuminate when power is active.
- Press the switch to the "OFF" position to cut power to all connected devices.
Korzystanie z gniazdek prądu zmiennego:
- Plug your electronic devices directly into the 3 AC outlets.
- Ensure that the total power consumption of all connected devices does not exceed 1500W.
Korzystanie z portów ładowania USB:
- Porty USB-A (QC 3.0): Connect compatible devices using a USB-A cable for fast charging. These ports support Quick Charge 3.0 for accelerated charging speeds.
- USB-C Port (18W): Connect compatible devices using a USB-C cable for 18W power delivery. This port is suitable for charging smartphones, tablets, and other USB-C powered devices.
- The USB ports provide power automatically when a device is connected and the power strip is on.
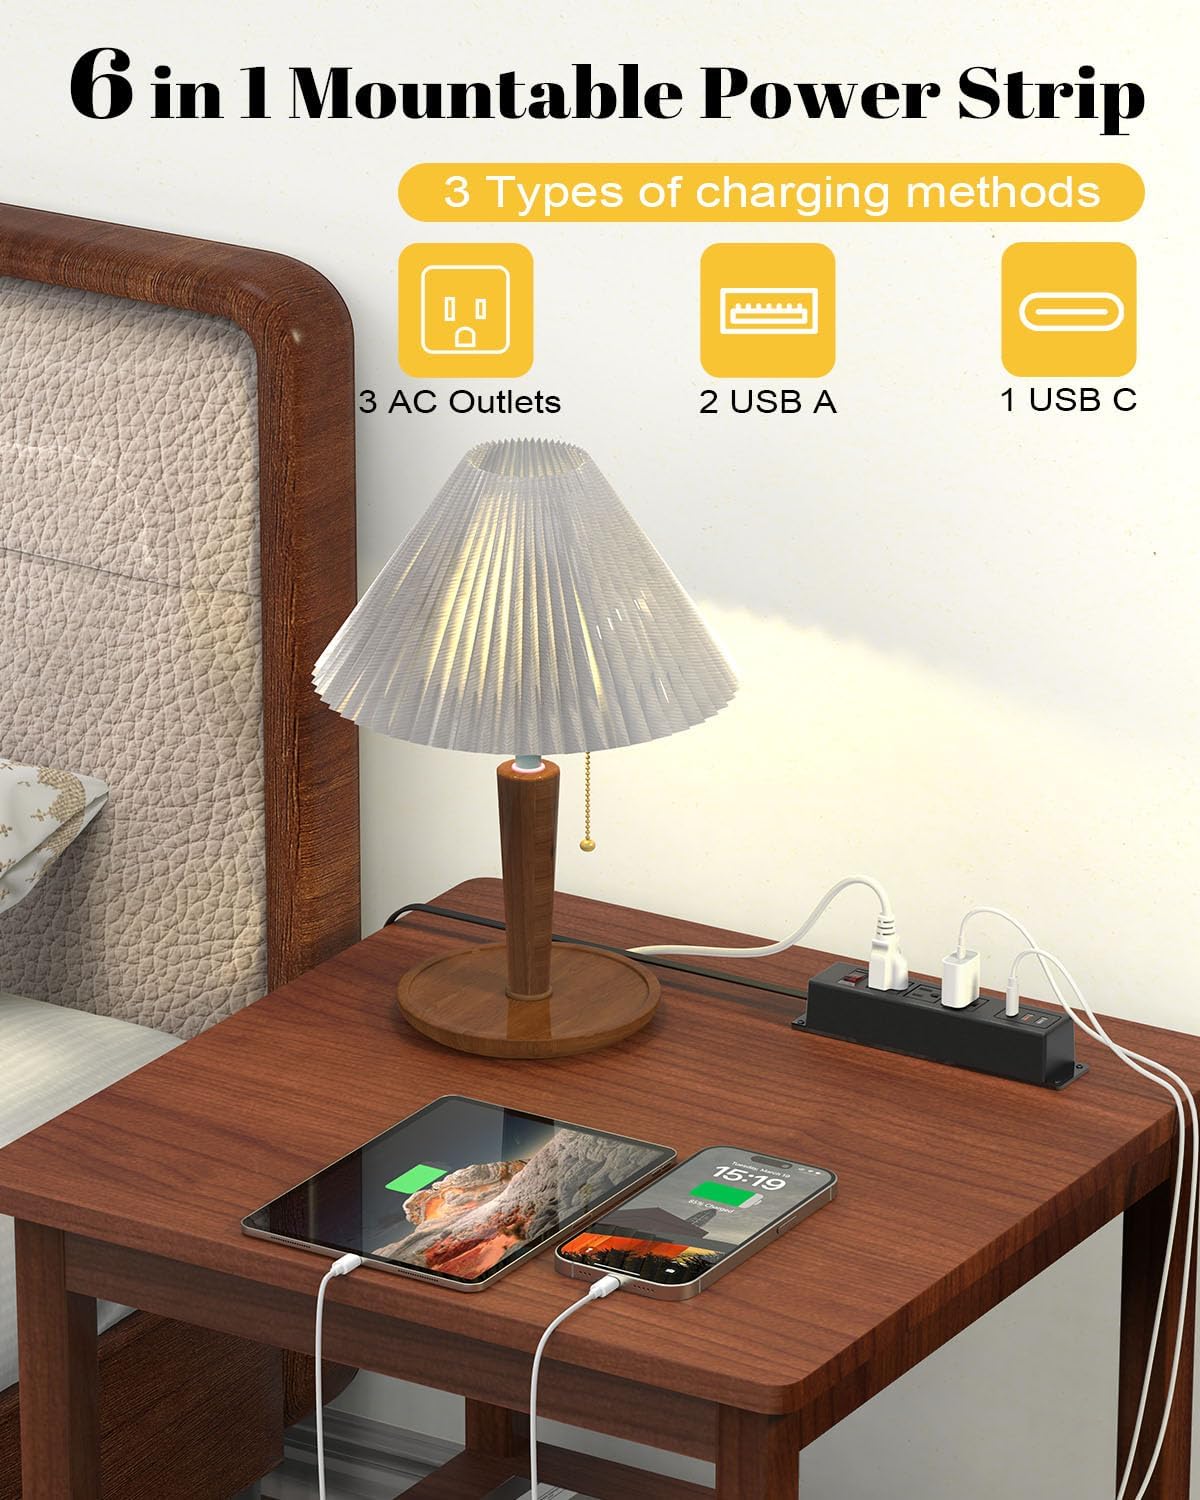
Figure 4: The power strip providing power to a lamp, phone, and tablet via AC and USB ports.

Figure 5: A device charging rapidly via the 18W USB-C port.
5. Konserwacja
Proper maintenance ensures the longevity and safe operation of your power strip.
- Czyszczenie: Disconnect the power strip from the wall outlet before cleaning. Use a dry, soft cloth to wipe the exterior. Do not use liquid cleaners or aerosols.
- Kontrola: Periodically inspect the power cord and the power strip for any signs of damage, such as frayed wires, cracks, or loose connections. If damage is found, discontinue use and replace the unit.
- Składowanie: If storing the power strip, ensure it is disconnected from power and stored in a dry, cool place away from direct sunlight.
6. Rozwiązywanie Problemów
Jeśli masz problemy z listwą zasilającą, zapoznaj się z poniższymi typowymi problemami i ich rozwiązaniami:
| Problem | Możliwa przyczyna | Rozwiązanie |
|---|---|---|
| Brak zasilania gniazdek/portów USB. |
|
|
| Urządzenia nie ładują się przez USB. |
|
|
| Listwa zasilająca jest ciepła. |
|
|
7. Specyfikacje
| Funkcja | Szczegół |
|---|---|
| Marka | kungfucking |
| Model | B0CT5QM5KD |
| Gniazda prądu przemiennego | 3 |
| Porty USB | 2 x USB-A (QC 3.0), 1 x USB-C (18W) |
| Tomtage Ocena | 100 V-125 V |
| Wyjście prądu przemiennego | 12A / 1500W (maks.) |
| Długość przedłużacza | 6 stóp |
| Waga przedmiotu | 15.8 uncji |
| Wymiary (pakiet) | 9.21 x 3.62 x 2.87 cala |
| Cechy specjalne | Desk Mount, Wall Mount, On/Off Switch, USB Slot, Surge Protection |
| Certyfikaty | Posiada certyfikat UL |
8. Gwarancja i wsparcie
For warranty information or technical support, please contact Kungfuking customer service. You can find more information and contact details on the official Kungfuking store page:
