Wstęp
Thank you for choosing the RAINPOINT 2-Outlet Water Timer. This digital sprinkler timer is designed to simplify your watering routine, offering precise control over your garden and lawn irrigation. With its dual-zone programming, rain delay, and manual watering options, you can ensure efficient and effective watering while conserving water.
This manual provides detailed instructions for installation, operation, maintenance, and troubleshooting to help you get the most out of your new water timer.
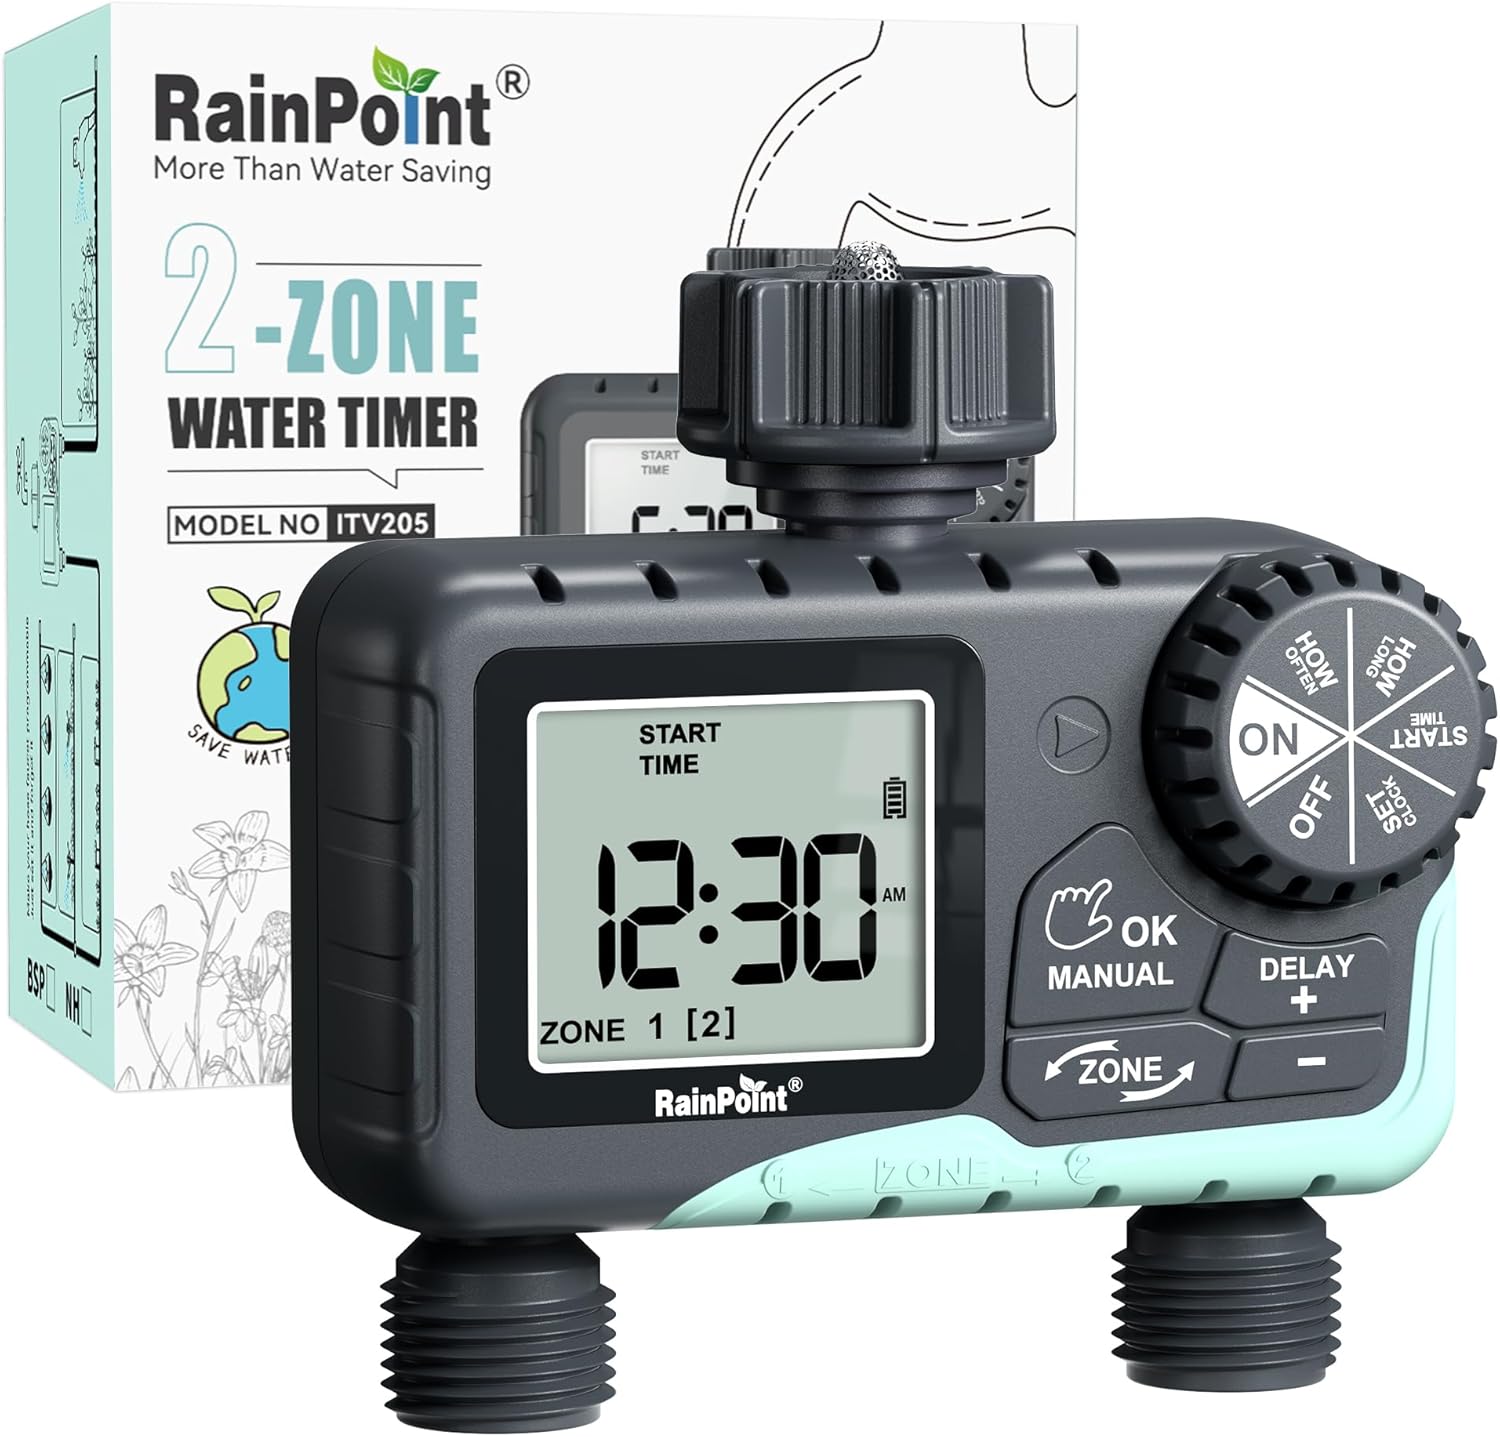
Image: The RAINPOINT 2-Outlet Water Timer, showing the device and its retail packaging. This timer features a digital display and intuitive controls for managing two separate watering zones.
Główne cechy
- Sterowanie dwustrefowe: Independently program two separate watering zones for customized irrigation.
- Elastyczne programowanie: Set start times, watering duration (1 minute to 3 hours 59 minutes), and frequency (hourly to weekly).
- Ręczny tryb nawadniania: Instantly water for a specified duration (1 minute to 8 hours) for Zone 1, Zone 2, or both.
- Funkcja opóźnienia deszczu: Aby oszczędzać wodę w okresie deszczowym, rezygnuj z podlewania na 24, 48 lub 72 godziny.
- Duży wyświetlacz LCD: Easy-to-read 2.5-inch screen shows watering time, next irrigation plans, and power status.
- Low Power Auto Shutoff: Alerts when battery is below 5% and automatically closes the valve to prevent water wastage.
- Trwała konstrukcja: Made from IP54 high-impact plastic with a built-in metal filter and 2-generation valve diaphragm for longevity.
- 360° Rotatable Interface: Designed for easy installation and access.

Image: Illustration demonstrating the independent programming capabilities of Zone 1 and Zone 2, allowing for different start times and durations for each watering area.
Zawartość opakowania
Sprawdź zawartość paczki, aby upewnić się, że znajdują się w niej wszystkie elementy:
- 1 x RAINPOINT 2-Outlet Water Timer (Model: G-ITV205NH)
- 1 x Instrukcja obsługi
- (Batteries not included - requires 2 x AA batteries)
Przewodnik po konfiguracji
1. Instalacja baterii
- Znajdź komorę baterii z tyłu timera.
- Aby otworzyć pokrywę baterii, przesuń ją w dół.
- Włóż dwie (2) nowe baterie alkaliczne AA, zwracając uwagę na prawidłową biegunowość (+/-).
- Close the battery cover securely. The added seal ring helps prevent water leaks.
Ważny: Replace batteries when the low battery indicator appears on the LCD screen. The valve will automatically close to prevent water wastage when power is critically low.

Image: The water timer display showing a low battery warning, indicating the need for battery replacement to ensure continuous operation.
2. Podłączanie do kranu
- Upewnij się, że zewnętrzny kran jest zakręcony.
- Screw the timer's top connector (with the 3/4" internal thread and built-in filter) onto your standard outdoor faucet. Hand-tighten only. Do not overtighten.
- The 360° rotatable interface allows for easy positioning of the timer.
3. Podłączanie węży
- Attach your garden hoses to the two NH3/4" outlet fittings at the bottom of the timer.
- Ensure a tight connection to prevent leaks.

Image: The RAINPOINT 2-Outlet Water Timer installed on an outdoor faucet, with two hoses connected to its independent outlets, demonstrating its dual-zone capability.

Image: A detailed diagram labeling the various parts of the RAINPOINT water timer, including the 3/4" internal thread, 2.5" LCD screen, control dial, buttons, and outlet fittings.
Instrukcja obsługi
The RAINPOINT water timer features a large dial for mode selection and several buttons for setting parameters. The dial has positions for ON, OFF, HOW OFTEN, HOW LONG, START TIME, and SET CLOCK.
1. Ustawianie zegara
- Ustaw pokrętło w pozycji USTAW ZEGAR.
- Użyj + I - przyciski do zmiany aktualnego czasu.
- Naciskać OK/RĘCZNIE to confirm and move to the next setting (e.g., AM/PM).
- Once the time is set, turn the dial to ON aby zapisać i wyjść.
2. Programming Watering Schedules (Automatic Mode)
You can program independent schedules for Zone 1 and Zone 2. Use the STREFA button to switch between zones.
a. Set Start Time
- Ustaw pokrętło w pozycji CZAS ROZPOCZĘCIA.
- Naciśnij STREFA button to select either Zone 1 or Zone 2.
- Używać + I - to set the desired start time for the selected zone.
- Naciskać OK/RĘCZNIE aby potwierdzić.
b. Set How Long (Watering Duration)
- Ustaw pokrętło w pozycji JAK DŁUGO.
- Naciśnij STREFA button to select either Zone 1 or Zone 2.
- Używać + I - to set the watering duration (from 1 minute to 3 hours 59 minutes).
- Naciskać OK/RĘCZNIE aby potwierdzić.
c. Set How Often (Watering Frequency)
- Ustaw pokrętło w pozycji JAK CZĘSTO.
- Naciśnij STREFA button to select either Zone 1 or Zone 2.
- Używać + I - to set the watering frequency (e.g., every 12 hours, every 2 days, etc.).
- Naciskać OK/RĘCZNIE aby potwierdzić.
Note: After setting all parameters, turn the dial to ON to activate the programmed schedule.

Image: The water timer display showing options for setting watering duration (1 min - 3h 59m) and frequency (1 hour - 7 days), illustrating the flexibility of automatic scheduling.
3. Tryb podlewania ręcznego
This mode allows for immediate, temporary watering without affecting your programmed schedule.
- Ensure the dial is in the ON pozycja.
- Naciśnij OK/RĘCZNIE button. The display will show "MANUAL".
- Naciśnij STREFA button to cycle through watering options: Zone 1, Zone 2, or BOTH ZONE.
- Używać + I - to set the desired manual watering duration (from 1 minute to 8 hours).
- Naciskać OK/RĘCZNIE again to start watering. The timer will count down the duration.
- To stop manual watering early, press OK/RĘCZNIE ponownie lub obróć pokrętło, aby WYŁĄCZONY i z powrotem do ON.
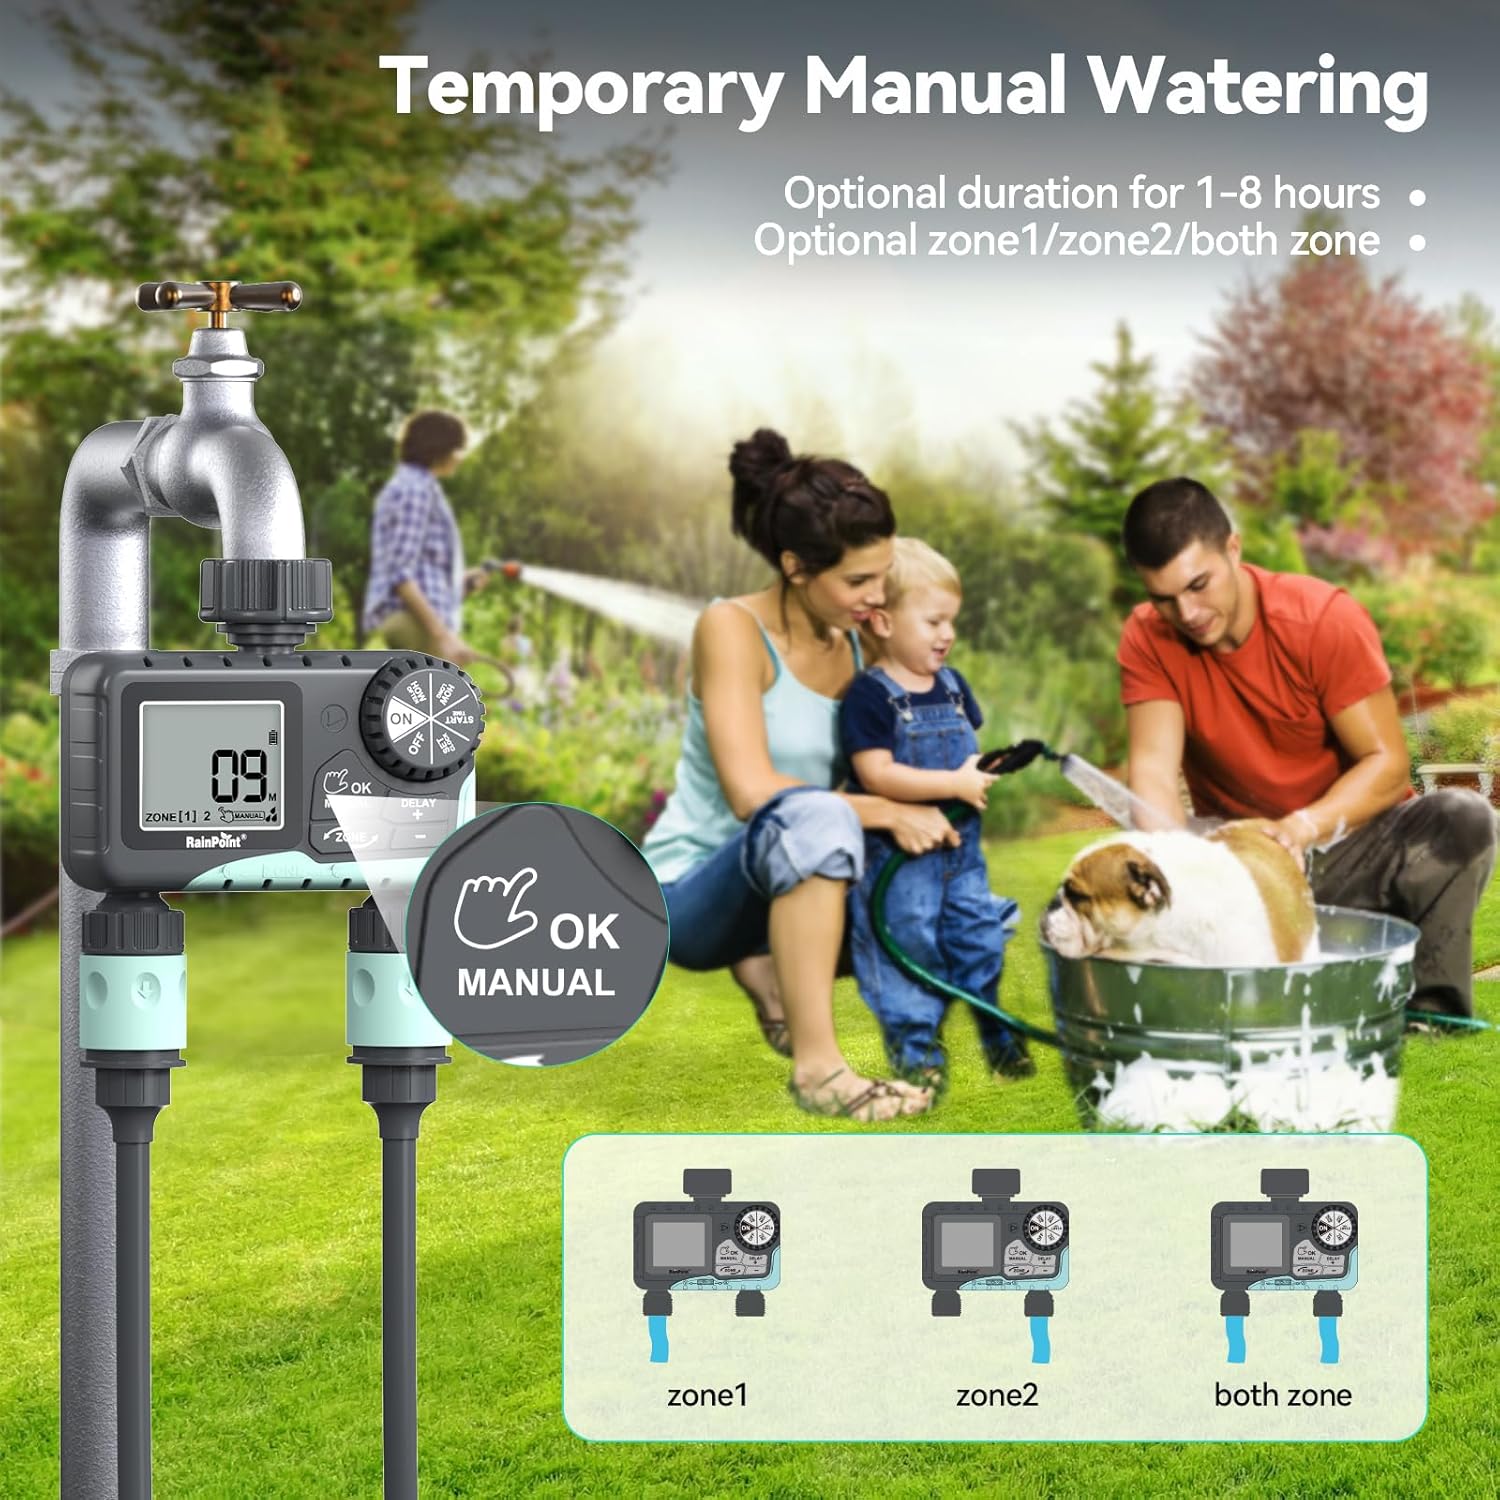
Image: The water timer display showing the manual watering mode, with options to select Zone 1, Zone 2, or both zones for immediate watering, and setting the duration.
4. Funkcja opóźnienia deszczu
The rain delay function allows you to pause your watering schedule for a set period, preventing overwatering during rainfall.
- Ensure the dial is in the ON pozycja.
- Naciśnij i przytrzymaj DELAY + button for approximately 3 seconds until "DELAY" appears on the screen.
- Użyj + I - buttons to select the delay duration: 24 hours, 48 hours, or 72 hours.
- Naciskać OK/RĘCZNIE to confirm the rain delay. The timer will resume its schedule automatically after the delay period.
- Aby anulować opóźnienie spowodowane deszczem, naciśnij i przytrzymaj DELAY + ponownie przez 3 sekund.
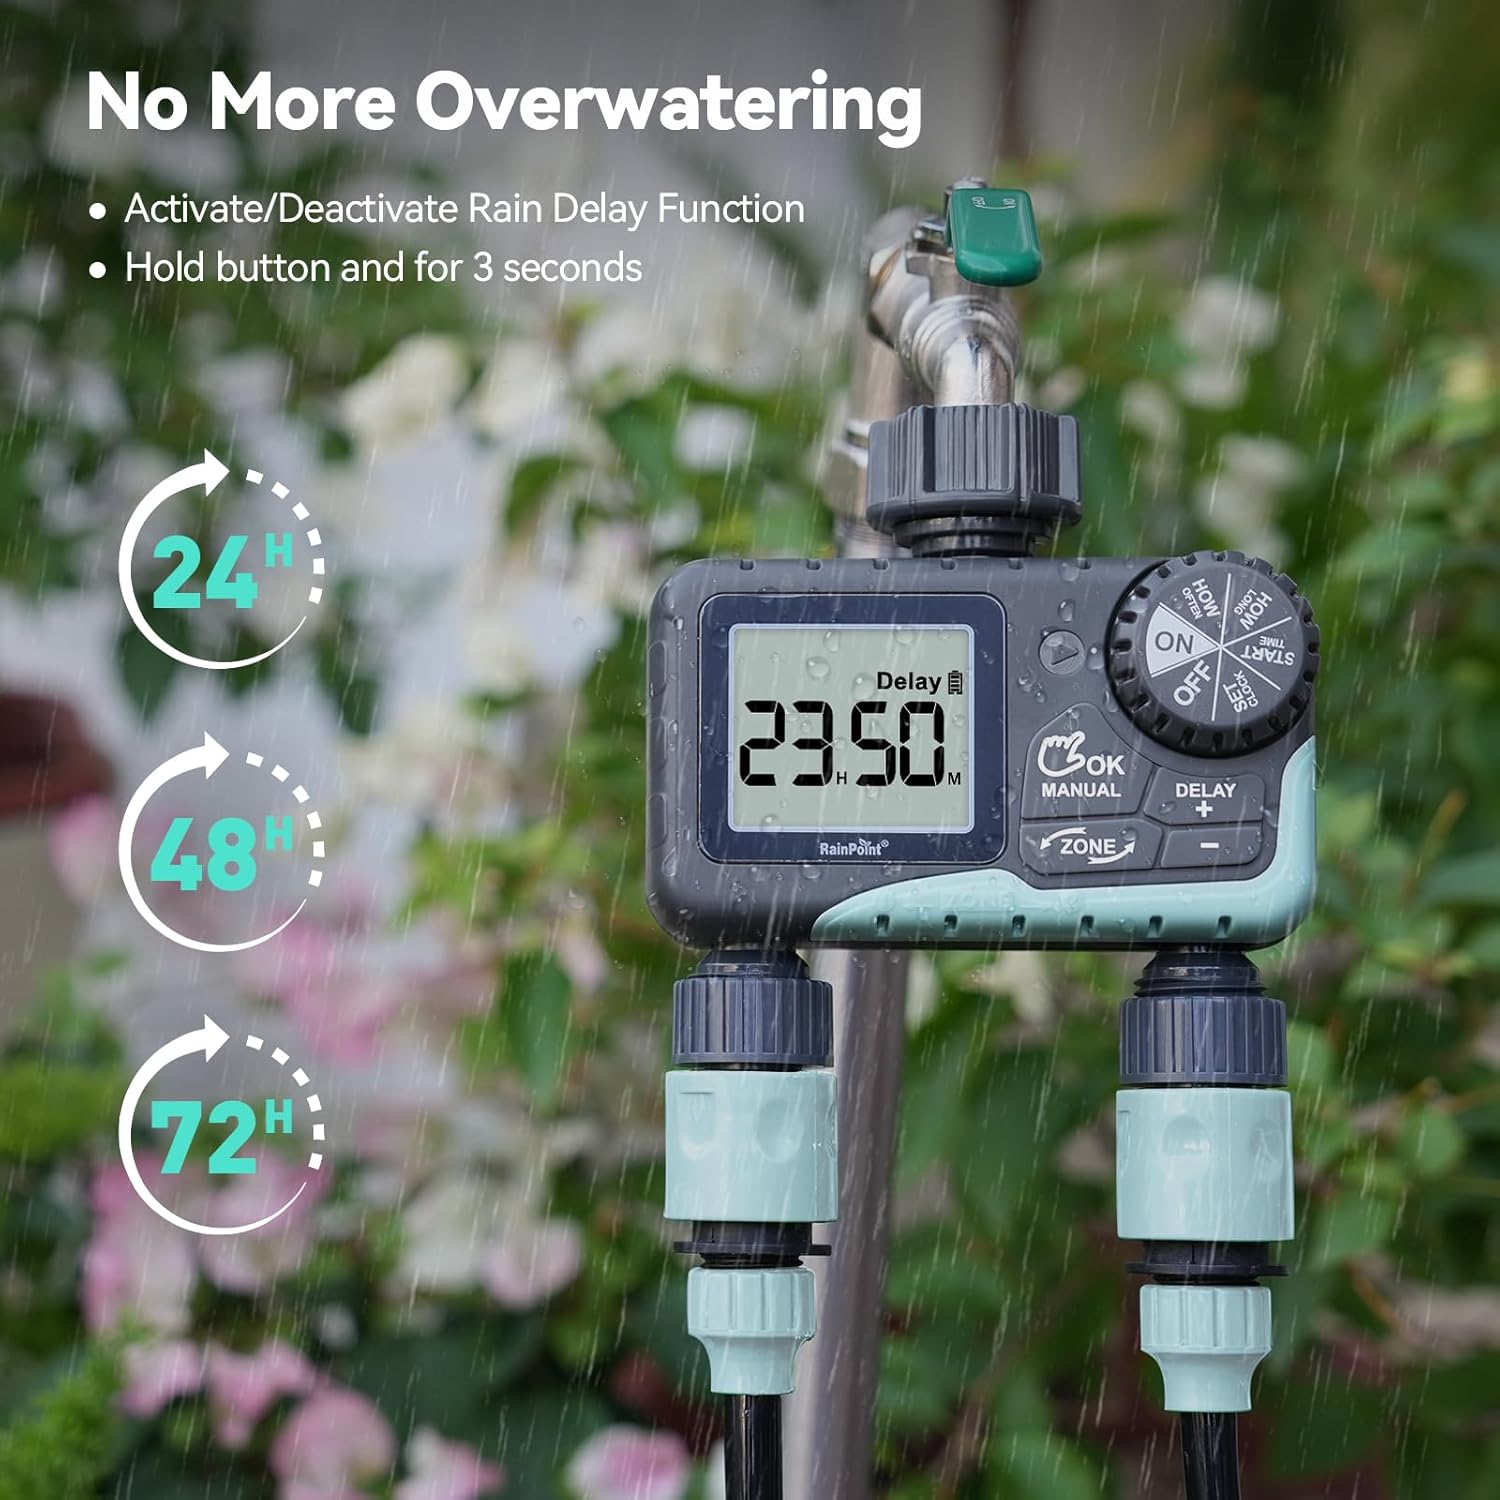
Image: The water timer display showing the rain delay function activated, with options for 24, 48, or 72-hour delays to prevent overwatering during rainy conditions.
5. Wyłączanie timera
To stop all watering and programming, turn the dial to WYŁĄCZONY. All active programs will be paused.
Konserwacja
1. Czyszczenie filtra
The timer has a built-in metal filter to prevent debris from entering the unit. Periodically check and clean this filter to ensure optimal water flow and prevent blockages.
- Odkręć timer od kranu.
- Remove the filter screen from the top connector.
- Wypłucz filtr pod bieżącą wodą, aby usunąć wszelkie nagromadzone zanieczyszczenia.
- Reinsert the clean filter and reattach the timer to the faucet.
2. Wymiana baterii
Wymień baterie, gdy na ekranie LCD pojawi się wskaźnik niskiego poziomu naładowania baterii. Zawsze używaj nowych baterii alkalicznych AA.
- Ustaw pokrętło w pozycji WYŁĄCZONY.
- Otwórz komorę baterii.
- Remove old batteries and insert new ones, observing polarity.
- Dokładnie zamknij komorę baterii.
- The timer will retain your programming for a short period during battery replacement.
3. Zimowanie
To prevent damage from freezing temperatures, remove the water timer from the faucet before the first frost.
- Disconnect the timer from the faucet and hoses.
- Wyjmij baterie.
- Przechowuj timer w pomieszczeniu suchym i chronionym przed mrozem.
Rozwiązywanie problemów
| Problem | Możliwa przyczyna | Rozwiązanie |
|---|---|---|
| Timer się nie włącza/wyświetlacz jest pusty. | Rozładowane lub nieprawidłowo zainstalowane baterie. | Wymień baterie na nowe baterie alkaliczne AA, zwracając uwagę na prawidłową biegunowość. |
| Brak przepływu wody. | Faucet is off; timer is in OFF mode; low battery; clogged filter; incorrect programming. | Turn on faucet; turn dial to ON; replace batteries; clean filter; check programming (start time, duration, frequency). |
| Wyciek wody z przyłączy. | Luźne połączenia, zużyte podkładki. | Ensure all connections are hand-tight; check and replace rubber washers if damaged. |
| Timer nie podlewa o zaplanowanej porze. | Incorrect clock setting; incorrect program settings; rain delay active. | Verify current time; re-check start time, duration, and frequency for each zone; check if rain delay is active. |
| Display shows "LOW BATT". | Baterie są słabe. | Replace batteries immediately to prevent valve closure and program loss. |
Specyfikacje
| Numer modelu | G-ITV205NH |
| Wymiary produktu | 5.36" gł. x 5.92" szer. x 5.55" wys. |
| Tworzywo | High-impact Plastic, Metal |
| Kolor | Posiniaczony |
| Źródło zasilania | 2 baterie alkaliczne AA (brak w zestawie) |
| Zakres ciśnienia wody | Up to 35 kg (approx. 500 PSI) |
| Przepływ | 5-35 l/min |
| Czas podlewania | 1 minut do 3 godzin 59 minut |
| Częstotliwość podlewania | Hourly (up to 12 hours) or Daily (up to 7 days) |
| Czas podlewania ręcznego | Od 1 minuty do 8 godzin |
| Rain Delay Options | 24, 48, 72 godziny |
| Stopień wodoodporności | IP54 |
Gwarancja i wsparcie
RAINPOINT products are designed for durability and performance. For warranty information and customer support, please refer to the official RAINPOINT webodwiedź witrynę lub skontaktuj się bezpośrednio z działem obsługi klienta.
Aby uzyskać dalszą pomoc, odwiedź stronę: www.rainpointonline.com
Or contact customer support via email: support@rainpointonline.com


