1. Ważne wskazówki dotyczące bezpieczeństwa
Please read this manual thoroughly before operating your Gyroor C1 PRO Electric Scooter. Failure to follow safety instructions may result in serious injury or damage to the scooter.
- Noś kask: Podczas jazdy należy zawsze nosić certyfikowany kask i inny sprzęt ochronny (ochraniacze na kolana i łokcie).
- Przepisy lokalne: Adhere to all local traffic laws and regulations regarding electric scooter usage.
- Limit wagowy: Nie należy przekraczać maksymalnego limitu wagowego wynoszącego 265 funty (120 kg).
- Ograniczenie wiekowe: Ta hulajnoga jest przeznaczona do użytku przez osoby dorosłe.
- Warunki atmosferyczne: Avoid riding in wet conditions, heavy rain, or on icy surfaces.
- Kontrola przed jazdą: Before each ride, ensure tires are properly inflated, brakes are functioning, and all quick-release mechanisms are secure.
- Świadomość: Bądź świadomy swojego otoczenia, pieszych i innych pojazdów.
2. Zawartość opakowania
Sprawdź, czy w opakowaniu znajdują się wszystkie elementy:
- Gyroor C1 PRO Electric Scooter
- Charger (X 1)
- User Manual (X 1)
- Narzędzia montażowe (jeśli dotyczy)
- Odłączany kosz

Image: The Gyroor C1 PRO Electric Scooter, featuring its integrated basket and a separate LCD display unit.
3. Montaż i konfiguracja
3.1 Rozpakowanie i wstępna inspekcja
- Ostrożnie wyjąć wszystkie elementy z opakowania.
- Inspect the scooter for any signs of damage during transit. Contact customer support immediately if any issues are found.
3.2 Montaż kierownicy
- Podnieś mostek kierownicy do pozycji pionowej.
- Secure the folding mechanism latch firmly until it clicks into place.
- Attach the handlebars to the stem, ensuring all cables are not pinched. Tighten any screws as per the included tool kit.
3.3 Seat and Basket Attachment
- Insert the seat post into the designated tube on the scooter frame. Adjust the height for comfortable riding and secure it with the quick-release clamp.
- Attach the rear basket to the mounting points on the scooter frame using the provided hardware.

Image: Close-up of the adjustable saddle and breathable seat, highlighting its ergonomic design for rider comfort.
3.4 Początkowe ładowanie akumulatora
- Przed pierwszym użyciem należy całkowicie naładować akumulator hulajnogi.
- Podłącz ładowarkę do portu ładowania w hulajnodze, a następnie do gniazdka elektrycznego.
- The charging indicator light on the charger will change (e.g., from red to green) when charging is complete. This typically takes approximately 5 hours.

Obraz: Wnętrze view illustrating the high-capacity 37V/10.4AH battery cells, which provide a maximum range of 25 miles.
4. Instrukcja obsługi
4.1 Włączanie/wyłączanie zasilania
Naciśnij i przytrzymaj przycisk zasilania na wyświetlaczu LCD, aby włączyć lub wyłączyć hulajnogę.
4.2 Starting the Ride
Place one foot on the deck and push off with the other foot to gain initial momentum. Once moving, gently press the throttle to engage the motor.
4.3 tryby prędkości
The scooter features multiple speed modes (e.g., 3-gear speed mode) which can be selected via the controls on the handlebar. Refer to the LCD display for the current speed mode.
4.4 Układ hamulcowy
The Gyroor C1 PRO is equipped with a dual braking system (front and rear disc brakes) for effective stopping power. Apply both brake levers simultaneously for optimal control and safety.

Obraz: szczegółowy view of the dual disc braking system on both the front and rear wheels, designed for enhanced stopping performance.
4.5 Cyfrowy monitor LCD
Wyświetlacz LCD dostarcza informacji w czasie rzeczywistym:
- Obecna prędkość: Displays your riding speed.
- Poziom naładowania baterii: Wskazuje pozostały poziom naładowania baterii.
- Tryb prędkości: Shows the selected speed setting.
- Całkowity przebieg: Śledzi całkowity przebyty dystans.
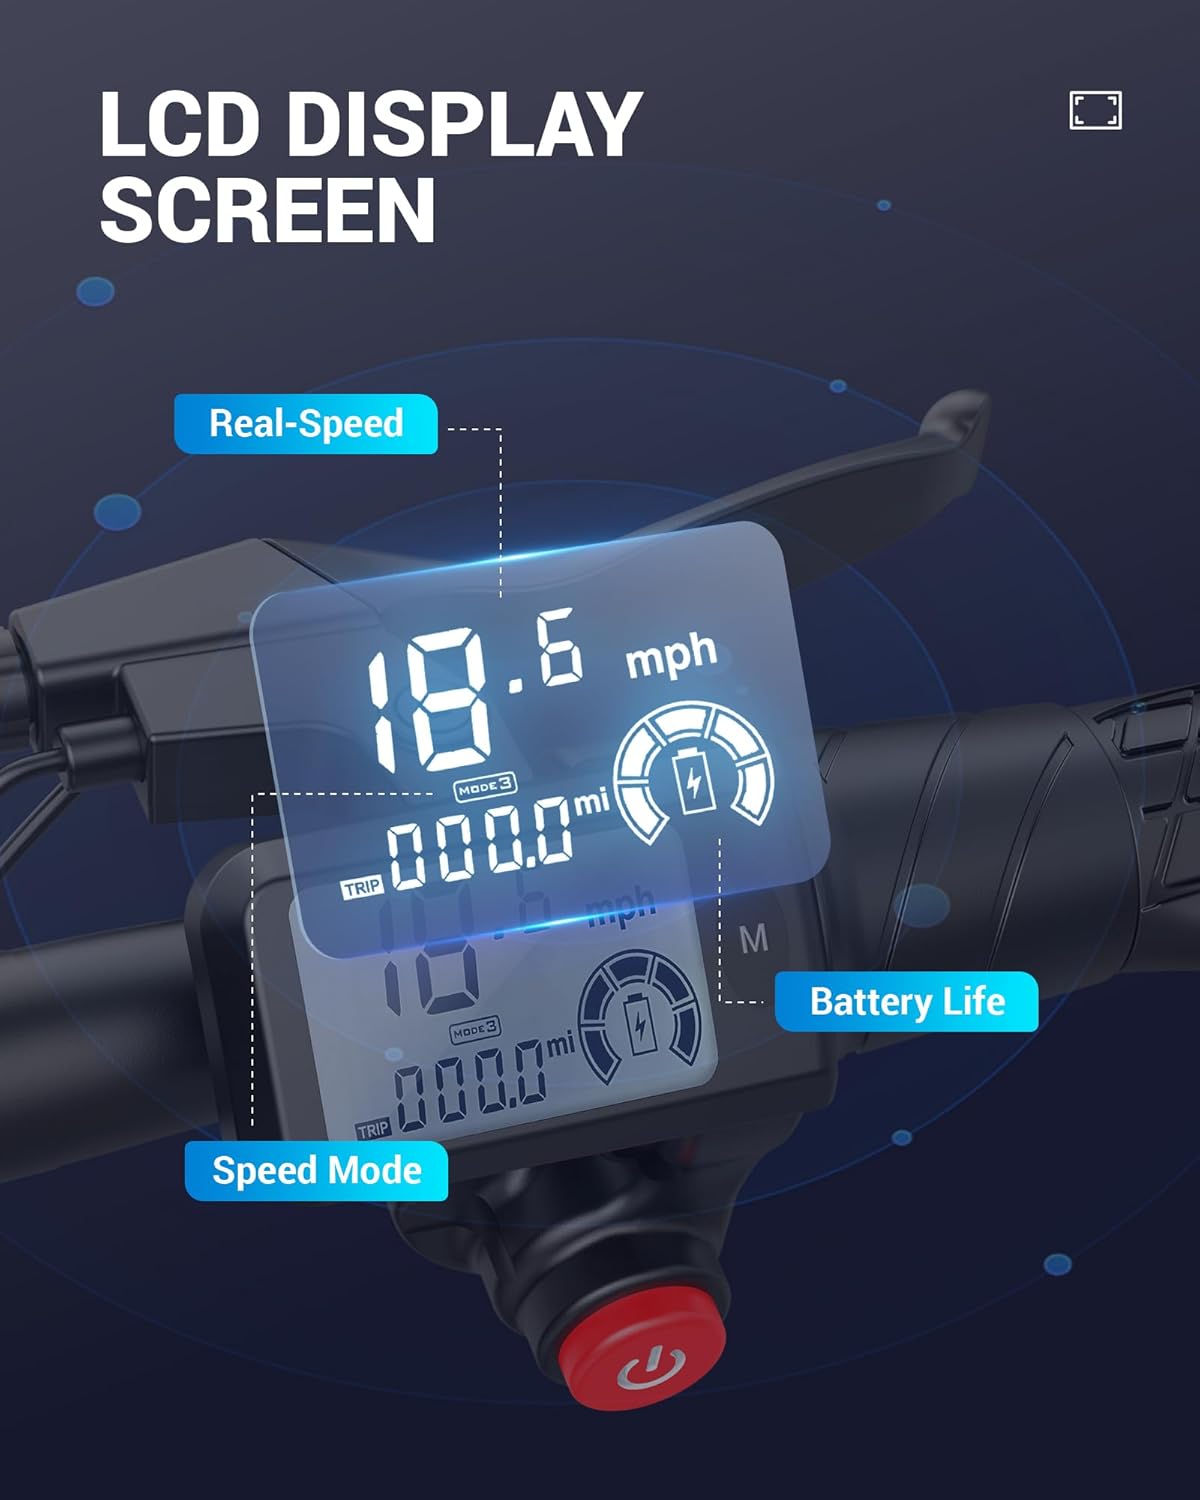
Obraz: wyraźny view of the LCD digital monitor, displaying current speed (18.6 mph), battery level, and total mileage.
4.6 Riding with a Pet
The scooter's design allows for carrying small pets in the front basket. Ensure your pet is securely contained and comfortable before riding. Always prioritize safety and maintain control of the scooter.
Video: A person riding the Gyroor C1 PRO electric scooter with a dog in the front basket, demonstrating its utility for pet owners. The video shows the scooter in various urban and park settings, highlighting its maneuverability and the convenience of the basket.
5. Konserwacja
5.1 Pielęgnacja baterii
- Aby wydłużyć żywotność akumulatora, należy go regularnie ładować, nawet jeśli nie jest używany.
- Unikaj całkowitego rozładowania akumulatora przed ponownym ładowaniem.
- Przechowuj skuter w chłodnym, suchym miejscu, z dala od bezpośredniego światła słonecznego i ekstremalnych temperatur.
5.2 Ciśnienie w oponach
Regularly check and maintain the correct tire pressure for the 12-inch pneumatic tires. Proper inflation ensures optimal performance, range, and safety.
5.3 Czyszczenie
Wyczyść skuter za pomocą adamp szmatką. Nie używaj strumieni wody pod wysokim ciśnieniem ani nie zanurzaj hulajnogi w wodzie, ponieważ może to uszkodzić podzespoły elektroniczne.
5.4 Przechowywanie
When storing the scooter for extended periods, ensure the battery is charged to approximately 50-70% and store it in a dry, temperature-controlled environment. The foldable handlebar allows for compact storage.

Image: Two individuals loading folded Gyroor C1 PRO scooters into the trunk of a car, illustrating the scooter's portable design for easy transport.
6. Rozwiązywanie Problemów
Aby zapoznać się z typowymi problemami i ich rozwiązaniami, zapoznaj się z poniższą tabelą:
| Problem | Możliwa przyczyna | Rozwiązanie |
|---|---|---|
| Hulajnoga się nie włącza | Low battery; loose connection | Charge battery fully; check all cable connections. |
| Silnik nie włącza się | Throttle issue; safety mechanism engaged | Ensure scooter has initial momentum; check throttle connection. |
| Zmniejszony zasięg/prędkość | Low tire pressure; heavy load; battery degradation | Inflate tires to recommended pressure; reduce load; contact support for battery check. |
| Hamulce są słabe | Brake pads worn; cable adjustment needed | Inspect brake pads; adjust brake cable tension; consult a professional if unsure. |
7. Specyfikacje
Key technical details of the Gyroor C1 PRO Electric Scooter:
| Funkcja | Szczegół |
|---|---|
| Marka | Gyroor |
| Nazwa modelu | C1 |
| Moc silnika | 450 W |
| Maksymalna prędkość | 18.6 mil na godzinę |
| Maksymalny zasięg odległości | 25 mil |
| Bateria | 37V/10.4AH High-Capacity |
| Czas ładowania | 5 godzin |
| Ograniczenie wagowe | 265 funtów |
| Rozmiar koła | 12 cali |
| Typ koła | Pneumatyczny |
| Styl hamulca | Hamowanie przednie, hamowanie tylne (podwójna tarcza) |
| Materiał ramy | Aluminium |
| Wymiary produktu | 43.7" dł. x 9.8" szer. x 38.66" wys. |
| Funkcja specjalna | Dual Shock Absorbers, LCD Digital Monitor |
| Certyfikaty | Certyfikat UL2272 |
8. Gwarancja i obsługa klienta
8.1 Informacje o gwarancji
The Gyroor C1 PRO Electric Scooter comes with a limited warranty:
- Bateria: Half a year (6 months) by manufacturer.
- Inne elementy: 1 year by manufacturer.
For detailed warranty terms and conditions, please refer to the official Gyroor webodwiedź witrynę lub skontaktuj się z działem obsługi klienta.
8.2 Obsługa klienta
If you have any questions, require assistance with assembly, operation, maintenance, or need to claim warranty service, please contact Gyroor customer support through their official channels. Keep your purchase receipt and product serial number handy for faster service.


