1. Wprowadzenie
The SmallRig VT-20 Aluminum Mini Tripod is a versatile and compact support solution designed for various cameras and devices. Its robust aluminum construction, adjustable features, and 360° ball head make it suitable for a wide range of photography and videography applications, from desktop use to travel. This manual provides detailed instructions for proper setup, operation, and maintenance to ensure optimal performance and longevity of your tripod.

Image 1: SmallRig VT-20 Aluminum Mini Tripod with a mirrorless camera mounted.
2. Zawartość opakowania
Sprawdź, czy w przesyłce znajdują się wszystkie elementy wymienione poniżej:
- Tripod Kit x 1
- Klucz imbusowy x 1
- Uchwyt do smartfona x 1
- Hook x 1
- Instrukcja obsługi x 1

Image 2: Package contents of the SmallRig VT-20 Mini Tripod.
3. Główne cechy
- Kompaktowy i wygodny: Foldable aluminum alloy legs and center column design for compact storage (18cm/7 inches length, under 700g/1.5lbs weight). Ideal for compact DSLRs, mirrorless cameras, smartphones, and action cameras.
- Effortless Height Adjustments: Features a 5-section leg design and a quick tightening mechanism, allowing height adjustments from 17cm/6.7in to 52cm/20in.
- Wszechstronne kąty fotografowania: Quick angle adjustment lever offers three leg angle options (23°/50°/80°). The center column can be disassembled and installed in reverse for low-angle shooting perspectives.
- 360-degree Ball Head: Arca-Swiss compatible ball head provides 360° panoramic movements and a 90° notch for vertical shooting. Supports a maximum load of 6kg/13.2lbs.
- Możliwość rozbudowy: Includes a 1/4"-20 threaded hole for attaching accessories like magic arms, microphones, monitors, and other transmission devices.

Obraz 3: Koniecview of the SmallRig VT-20's compact size and load capacity.
4. Konfiguracja
4.1 Rozpakowanie
Carefully remove all components from the packaging. Inspect for any signs of damage. Retain the packaging for future storage or transport.
4.2 Attaching Your Camera/Device
- Ensure the quick release plate is securely attached to your camera or device via the 1/4"-20 screw.
- Align the quick release plate with the Arca-Swiss compatible clamp na głowicy kulowej.
- Slide the plate into the clamp until it clicks into place. Tighten the locking knob on the ball head to secure the device.
4.3 Regulacja kątów nóg
The tripod legs feature a quick angle adjustment lever, offering three preset angles for stability and versatility:
- Pull the red lever at the top of each leg to release the lock.
- Adjust each leg to the desired angle (23°, 50°, or 80°).
- Release the lever to lock the leg in position.
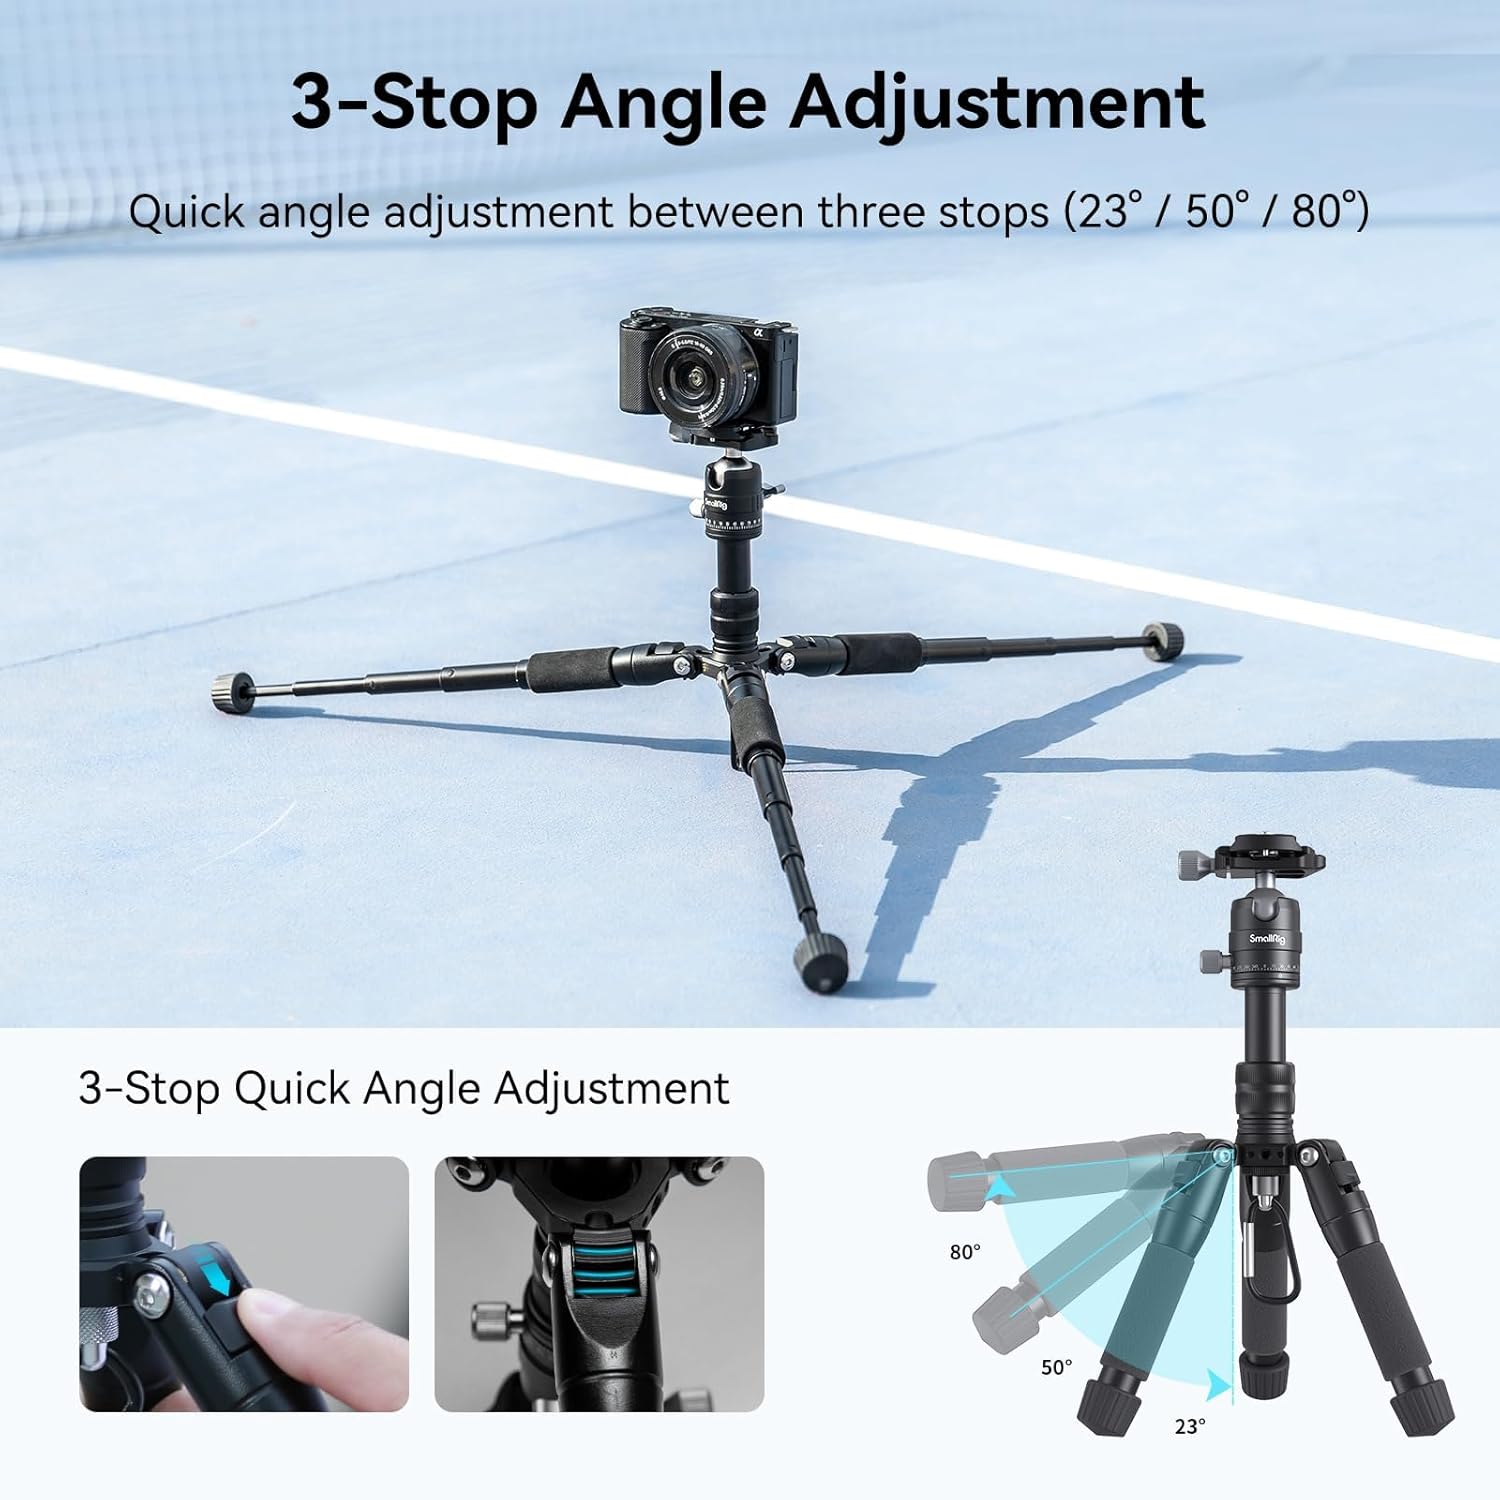
Image 4: Adjusting the leg angles of the tripod.
4.4 Regulacja wysokości
The tripod's height can be adjusted using its 5-section legs and extendable center column:
- Wyprost nóg: Rotate the leg locking knob counter-clockwise to loosen, extend the leg sections to the desired length, then rotate clockwise to tighten and lock.
- Center Column Extension: Loosen the locking collar at the base of the center column. Pull the center column upwards to extend, then tighten the collar to secure it.

Image 5: Tripod height adjustments from 17cm to 52cm.
4.5 Inverted Center Column for Low-Angle Shooting
W przypadku ujęć z bardzo niskiego kąta, środkową kolumnę można odwrócić:
- Unscrew the hook at the bottom of the center column and remove the center column.
- Re-insert the center column upside down into the tripod base.
- Tighten the locking collar to secure the inverted column.
- Attach your camera to the quick release plate on the inverted column.
Image 6: Inverting the center column for low-angle shots.
5. Instrukcja obsługi
5.1 Obsługa głowicy kulowej
The integrated ball head offers precise control over your camera's position:
- Regulacja kąta: Loosen the main locking knob on the ball head to freely adjust the camera's tilt and pan. Tighten the knob to secure the position.
- 360° Panoramic Movement: The ball head features a 360° panoramic base. Loosen the dedicated panoramic locking knob (usually smaller, at the base of the ball head) to rotate the camera horizontally without affecting tilt.
- 90° Vertical Shooting: A dedicated notch allows the camera to be tilted 90° for vertical orientation.
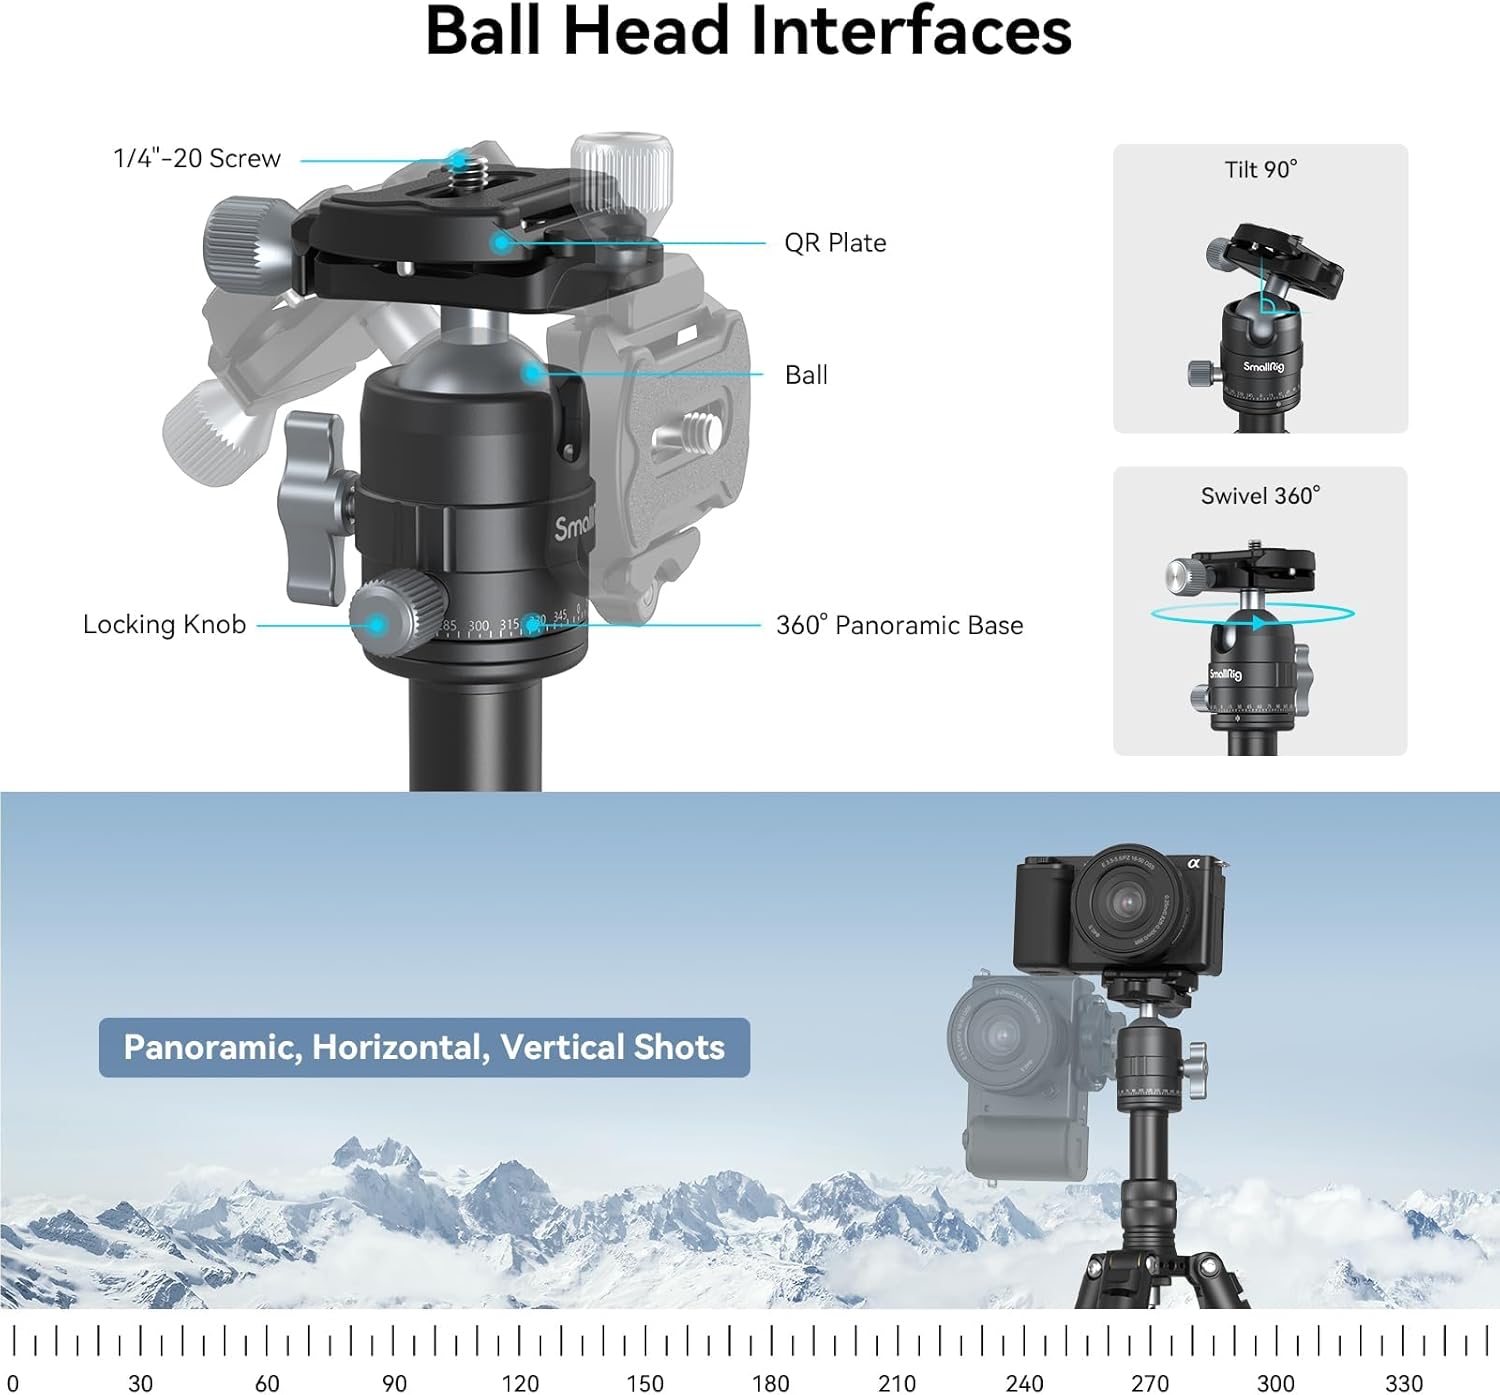
Image 7: Ball head interfaces and adjustment points.
5.2 Możliwość rozbudowy
Utilize the 1/4"-20 threaded hole located on the tripod body to attach additional accessories:
- Screw compatible accessories, such as magic arms, directly into the threaded hole.
- Ensure accessories are securely fastened to prevent accidental detachment.

Image 8: Tripod with an accessory mounted on the 1/4"-20 threaded hole.
5.3 Oficjalny film o produkcie
Watch this official video from SmallRig for a visual guide on the VT-20 Mini Tripod's features and usage:
Video 1: SmallRig Aluminum Tripod for DSLR Camera Video Camcorder - Official Product Overview.
6. Konserwacja
- Regularly clean the tripod with a soft, dry cloth to remove dust and debris.
- Unikaj stosowania silnych środków chemicznych i materiałów ściernych, które mogą uszkodzić wykończenie.
- Ensure all locking mechanisms are free of obstructions and operate smoothly.
- Przechowuj statyw w suchym i chłodnym miejscu, z dala od bezpośredniego światła słonecznego i ekstremalnych temperatur.
7. Rozwiązywanie Problemów
- Niestabilność statywu: Ensure all leg sections are fully extended and locked, and leg angles are set appropriately for the terrain. Verify the camera is securely mounted to the quick release plate and ball head.
- Stiff leg sections: Check for any debris in the locking mechanisms. Apply a small amount of silicone-based lubricant if necessary, avoiding excessive application.
- Głowica kulowa nie utrzymuje pozycji: Ensure the main locking knob and panoramic locking knob are fully tightened. Verify the camera's weight does not exceed the maximum load capacity (13.2 lbs / 6 kg).
8. Specyfikacje
| Funkcja | Szczegół |
|---|---|
| Wymiary produktu | 7.09 x 3.46 x 3.15 cala |
| Waga przedmiotu | 1.54 funta (700 gramów) |
| Numer modelu | 16566 |
| Marka | MAŁY RIG |
| Kolor | Czarny |
| Kompatybilne urządzenia | Kamera, aparat, smartfon |
| Cechy specjalne | Adjustable, Compact, Flexi, Lightweight |
| Tworzywo | Aluminium |
| Ograniczenie wagowe | 13.2 funtów (6 kg) |
| Maksymalna wysokość | 20.5 cala (52 centymetra) |
| Typ głowicy statywu | Głowice kulowe |
9. Gwarancja i wsparcie
SmallRig products are designed and manufactured to high-quality standards. For warranty information, technical support, or service inquiries, please refer to the official SmallRig webOdwiedź stronę internetową lub skontaktuj się bezpośrednio z działem obsługi klienta. Zachowaj paragon jako dowód zakupu na wypadek reklamacji.


