Wstęp
Thank you for choosing the Peakeep Digital Alarm Clock. This manual provides comprehensive instructions for setting up, operating, and maintaining your new clock. Designed for clarity and convenience, this clock features a large LED display, adjustable brightness, multiple alarm volume options, and a reliable battery backup system.
Główne cechy
- Podwójne zasilanie: Operates via USB-C cord (included) with 4 AA batteries (not included) for backup, ensuring settings are retained during power outagt.j.
- Mirror Face & Large LED Numbers: The 6.8-inch long and 3.1-inch high mirror screen displays large, easy-to-read LED numbers, also serving as a convenient makeup mirror.
- Regulowana jasność: Six dimmer levels (L01-L05 and OFF) allow customization for optimal visibility in any lighting condition, protecting eyesight.
- Regulowana głośność alarmu: Five alarm volume levels cater to different needs, from light sleepers to heavy sleepers, with a gentle increase in volume.
- Funkcja drzemki: A 9-minute snooze function provides extra rest.
- Formaty czasu: Supports 12-hour and 24-hour time display.
- Czas letni (DST): Easy toggle for DST adjustment.

Przód view of the Peakeep Digital Alarm Clock, showcasing its mirror-finish display and large, easy-to-read LED digits.

The clock's mirror-finish surface can also function as a convenient makeup mirror, visible behind the large time display.

The clock offers 6 levels of adjustable brightness (L01 to L05, plus OFF) for the LED display, allowing users to customize visibility for day or night.

The alarm clock features 5 adjustable volume levels, designed to be loud enough for heavy sleepers while also offering quieter settings for comfort.
This official product video provides a visual guide to the Peakeep LED Mirror Surface Alarm Clock, showcasing its mirror display, large numbers, and various adjustable settings.
Przewodnik po konfiguracji
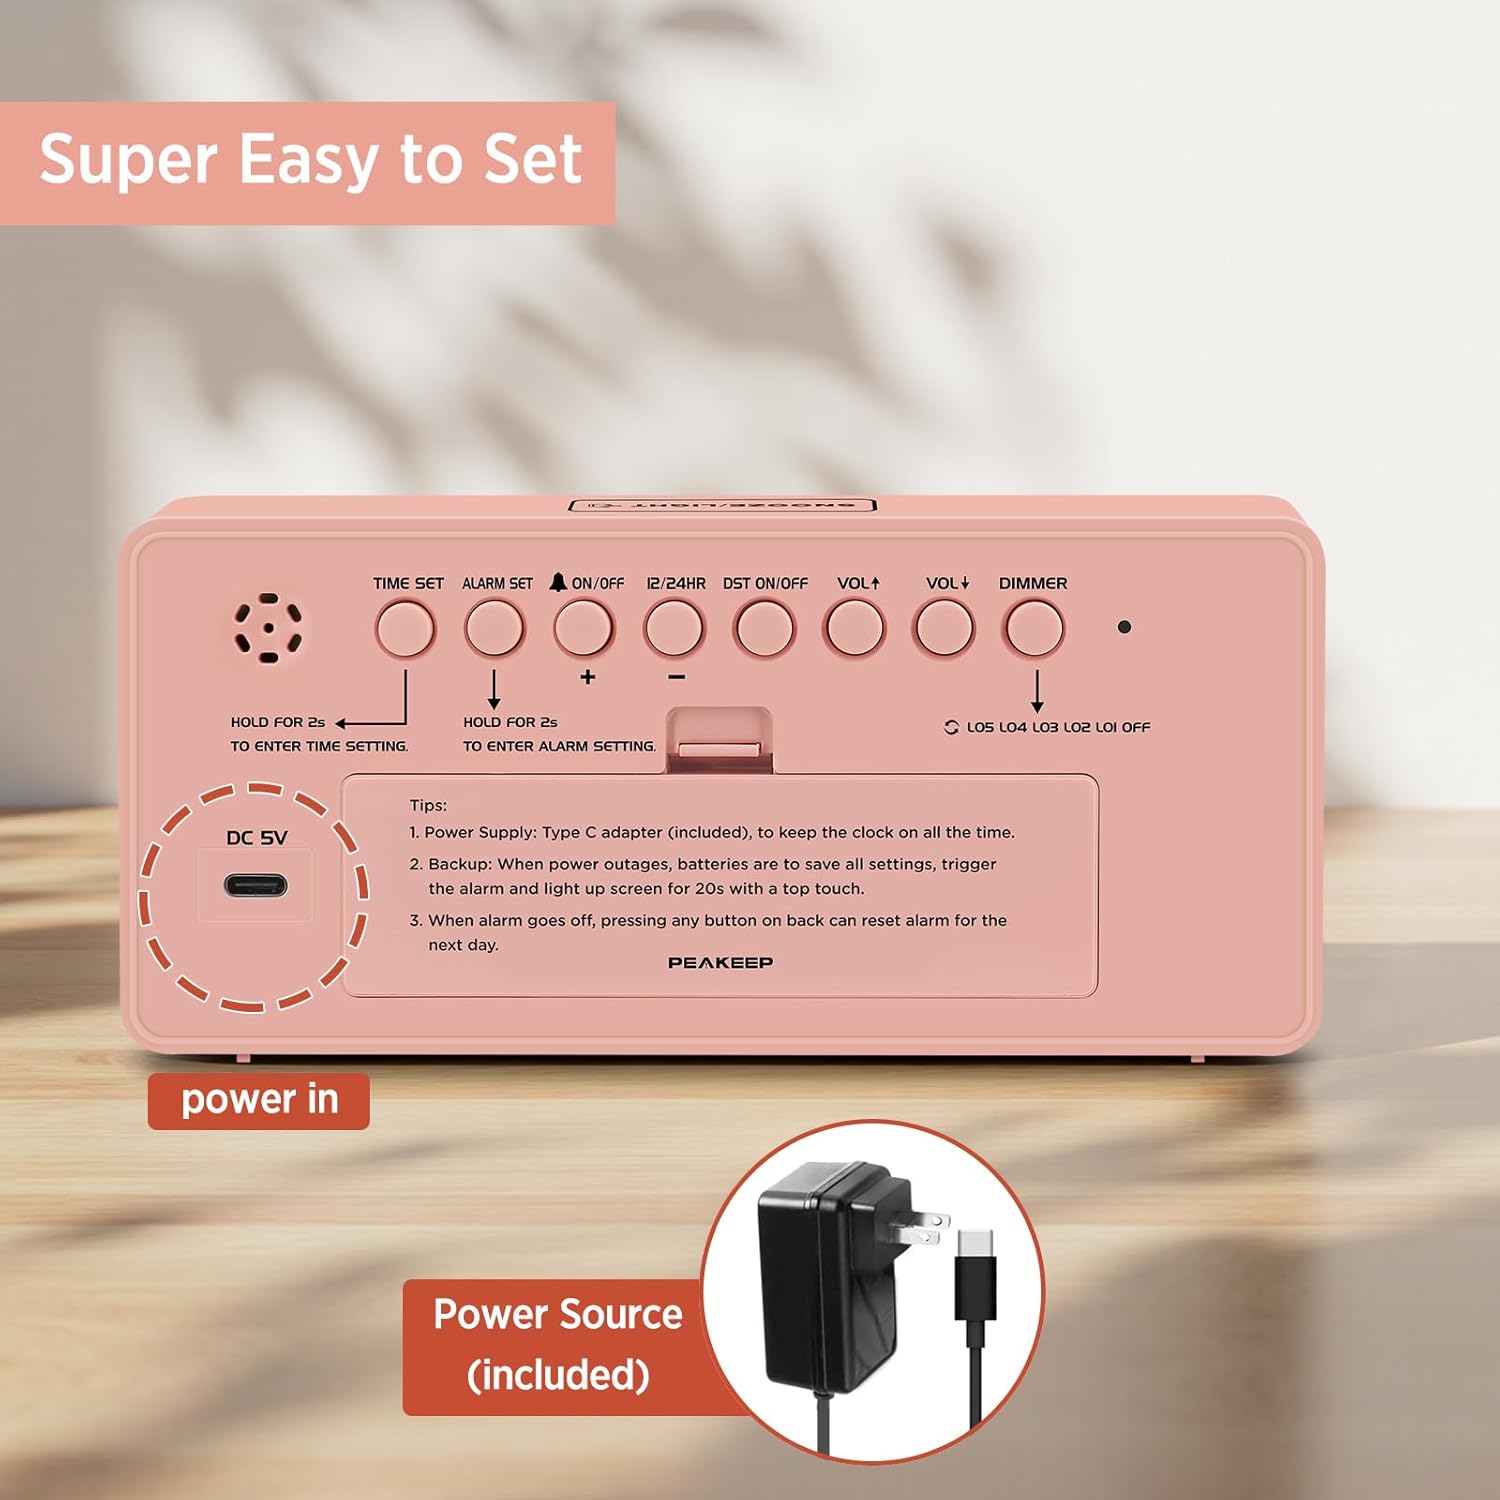
- Podłączenie zasilania: Connect the included USB Type-C cord to the DC 5V port on the back of the clock and plug the other end into a compatible USB power adapter (not included) or USB port. The display will light up.
- Zasilanie bateryjne (opcjonalne, ale zalecane): Open the battery compartment on the back of the clock and insert 4 AA batteries (not included). This ensures that time and alarm settings are saved during a power outage. The display will light up for 20 seconds with a simple touch on top during power outagt.j.
The clock is powered via an included USB Type-C cord. It also supports 4 AA batteries for backup during power outagt.j.

Diagram illustrating the dimensions of the alarm clock and its dual power supply options: USB-C cord (included) and 4 AA batteries (not included) for backup.
Instrukcja obsługi
All control buttons are located on the back panel of the clock.

Tył view of the alarm clock, highlighting the control buttons for time setting, alarm setting, volume, dimmer, and other functions, designed for easy operation.
Ustawianie czasu
- Naciśnij i przytrzymaj USTAWIENIE CZASU Naciśnij przycisk przez 2 sekundy, aby wejść w tryb ustawiania czasu. Cyfry godzin zaczną migać.
- Użyj + or - przyciski do regulacji godziny.
- Naciskać USTAWIENIE CZASU Naciśnij ponownie, aby potwierdzić godzinę i przejść do ustawiania minut. Cyfry minut zaczną migać.
- Użyj + or - przyciski, aby ustawić minuty.
- Naciskać USTAWIENIE CZASU jeszcze raz, aby potwierdzić i wyjść z trybu ustawiania czasu.
Ustawianie alarmu
- Naciśnij i przytrzymaj ZESTAW ALARMU button for 2 seconds to enter alarm setting mode. The alarm hour digits will flash.
- Użyj + or - przyciski do ustawienia godziny alarmu.
- Naciskać ZESTAW ALARMU Naciśnij ponownie, aby potwierdzić godzinę alarmu i przejść do ustawiania minut alarmu. Cyfry minut alarmu zaczną migać.
- Użyj + or - przyciski do regulacji minut alarmu.
- Naciskać ZESTAW ALARMU jeszcze raz, aby potwierdzić i wyjść z trybu ustawiania alarmu.
- To turn the alarm ON/OFF, short press the WŁ./WYŁ. przycisk. Gdy alarm jest aktywny, na wyświetlaczu pojawi się ikona dzwonka.
Funkcja drzemki
Gdy zabrzmi alarm, naciśnij duży przycisk SNOOZE / LIGHT button on top of the clock to activate the 9-minute snooze function. The alarm will temporarily stop and sound again after 9 minutes. To turn off the alarm completely for the day, press any button on the back panel.
Format 12/24 godzinny
Naciśnij krótko 12/24 godz przycisk umożliwiający przełączanie między formatem czasu 12-godzinnym (ze wskaźnikiem AM/PM) i 24-godzinnym.
Czas letni (DST)
Naciśnij krótko DST ON / OFF button to activate or deactivate Daylight Saving Time. The DST indicator will appear on the display when active.
Regulacja głośności
Naciśnij krótko Objętość + or TOM- buttons to adjust the alarm volume. There are 5 levels (U01 to U05).
Brightness Dimmer
Naciśnij krótko OPORNIK button to cycle through the 6 brightness levels (L05, L04, L03, L02, L01, and OFF). Select the level that best suits your environment.
Konserwacja
- Czyszczenie: Przetrzyj powierzchnię zegara miękką, suchą ściereczką. Unikaj stosowania środków czyszczących o właściwościach ściernych i rozpuszczalników.
- Wymiana baterii: If using battery backup, replace all 4 AA batteries when the display no longer lights up during power outages or settings are not retained. Ensure correct polarity.
- Składowanie: Jeśli zegar nie będzie przechowywany przez dłuższy czas, należy wyjąć baterie, aby zapobiec ich wyciekaniu.
Rozwiązywanie problemów
- Wyświetlacz jest pusty: Ensure the USB-C power cord is securely connected to both the clock and a working power source. If using battery backup, check if batteries are inserted correctly and have sufficient charge.
- Alarm nie włącza się: Verify that the alarm is turned ON (bell icon visible). Check the alarm volume level (U01-U05).
- Ustawienia czasu/alarmu zostaną utracone po wyłączeniu zasilaniatage: Ensure 4 AA batteries are installed for the backup function.
- Wyświetlacz jest zbyt jasny/ciemny: Dostosuj jasność za pomocą OPORNIK guzik z tyłu.
Specyfikacje
| Funkcja | Szczegół |
|---|---|
| Marka | Szczyt |
| Numer modelu | MHP6010 |
| Kolor | Różowy |
| Typ wyświetlacza | PROWADZONY |
| Wymiary produktu | 7" szer. x 3.3" wys. |
| Źródło zasilania | Corded Electric (USB Type C) |
| Zapasowa bateria | Wymagane 4 baterie AA (brak w zestawie) |
| Tworzywo | Plastikowy |
| Waga przedmiotu | 6.1 uncji |
Gwarancja i wsparcie
For warranty information or technical support, please refer to the product packaging or contact Peakeep customer service directly. Contact details are typically provided on the product box or the manufacturer's official webstrona.


