
Sharp ES-NIH814BWA-EN
Instrukcja obsługi zintegrowanej pralki Sharp ES-NIH814BWA-EN
Model: ES-NIH814BWA-EN | Capacity: 8kg | Spin Speed: 1400 rpm
1. Wprowadzenie
1.1 Produkt powyżejview
Thank you for choosing the Sharp ES-NIH814BWA-EN Integrated Washing Machine. This appliance is designed to provide efficient and reliable laundry care for your home. With an 8kg capacity and a 1400 rpm spin speed, it offers powerful cleaning performance while integrating seamlessly into your kitchen or utility space.

Rycina 1.1: Przód view of the Sharp ES-NIH814BWA-EN Integrated Washing Machine, showing its sleek design and integrated panel.
1.2 Informacje dotyczące bezpieczeństwa
Before operating your washing machine, please read all safety instructions carefully. Keep this manual for future reference. Improper installation, maintenance, or use can cause serious injury or damage. Always disconnect the appliance from the power supply before cleaning or maintenance.
- Upewnij się, że urządzenie jest prawidłowo uziemione.
- Nie pozwalaj dzieciom bawić się urządzeniem.
- Do not open the detergent dispenser during the wash cycle.
- Nie dotykaj urządzenia mokrymi rękami.
- Materiały opakowaniowe należy przechowywać w miejscu niedostępnym dla dzieci.
2. Konfiguracja i instalacja
2.1 Rozpakowanie
Carefully remove all packaging materials. Check for any transport damage. Remove all transit bolts from the rear of the machine before installation. These bolts are essential for safe transport but must be removed for operation to prevent vibration and damage.
2.2 Lokalizacja i poziomowanie
Place the washing machine on a firm, level floor. Adjust the adjustable feet to ensure the machine is perfectly level and stable. This prevents excessive vibration and noise during operation.
2.3 Podłączenie wody
Connect the water inlet hose to a cold water tap with a 3/4-inch thread. Ensure all connections are tight to prevent leaks. The drain hose should be securely placed into a standpipe or connected to a suitable drain system, ensuring it is not kinked.

Rysunek 2.1: Tył view pralki, przedstawiający podłączenia węża dopływowego i spustowego wody.
2.4 Podłączenie elektryczne
Podłącz przewód zasilający do uziemionego gniazdka elektrycznego. Upewnij się, że napięcietage and frequency match the specifications on the rating plate of the appliance. Do not use extension cords or multiple adapters.
2.5 Pierwsze użycie
Before the first wash, run an empty cycle with a small amount of detergent at 60°C to clean the drum and remove any manufacturing residues.
3. Instrukcja obsługi
3.1 Panel sterowania ponadview
The control panel consists of a program selection dial, a digital display, and function buttons for customizing your wash cycle.
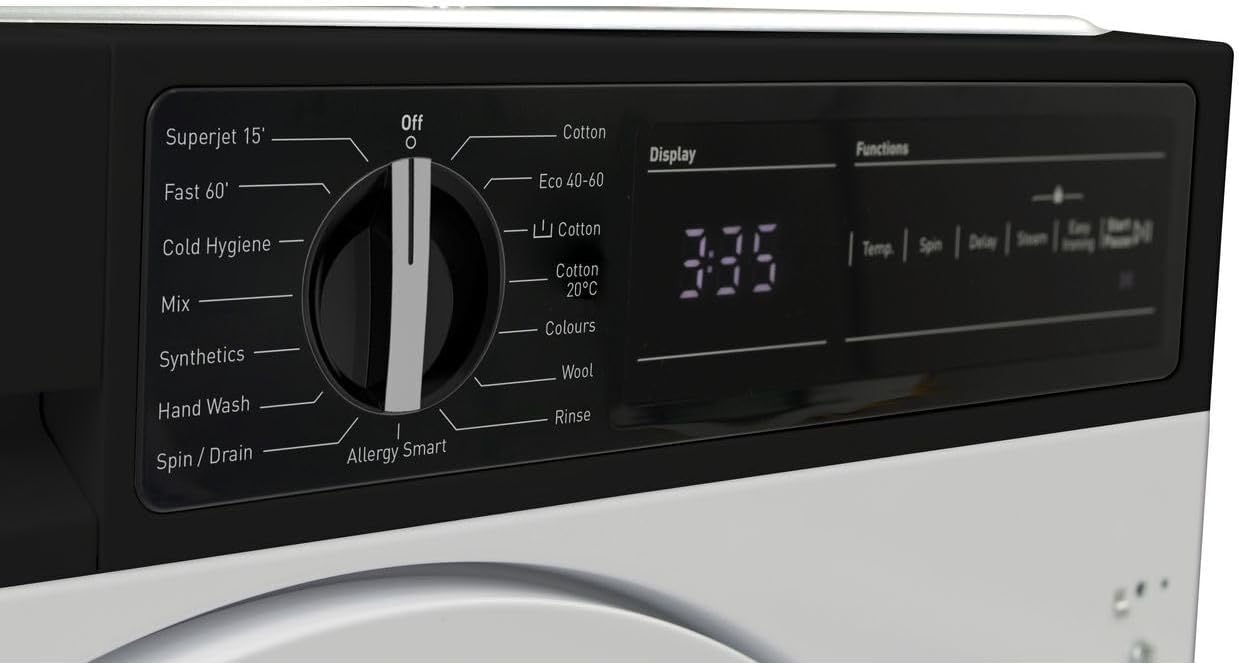
Rysunek 3.1: Szczegółowy view of the program selection dial and digital display.

Figure 3.2: Close-up of the digital display showing time remaining and function buttons for Temp, Spin, Delay, Steam, and Easy Ironing.
3.2 Załadunek prania
Open the washing machine door and load your laundry. Do not overload the machine; leave enough space for clothes to tumble freely. Close the door firmly until it clicks.

Figure 3.3: The washing machine door open, revealing the drum for loading laundry.

Rysunek 3.4: Wnętrze view of the stainless steel drum, designed for effective washing.
3.3 Dodawanie detergentów i dodatków
Pull out the detergent dispenser drawer. Add the appropriate amount of detergent to the main wash compartment and fabric softener to its designated compartment. Refer to your detergent packaging for dosage recommendations.

Rysunek 3.5: Szuflada na detergent, pokazująca przegródki na detergent i płyn do zmiękczania tkanin.
3.4 Wybór programu prania
Turn the program selection dial to choose your desired wash program. Available programs include:
- Superjet 15': Quick wash for lightly soiled items.
- Fast 60': A faster cycle for everyday loads.
- Cold Hygiene: For hygienic washing at lower temperatures.
- Mieszać: For mixed fabric loads.
- Syntetyki: For synthetic fabrics.
- Mycie ręczne: Gentle cycle for delicate items.
- Wirowanie / Opróżnianie: To spin and drain water from laundry.
- Alergia Smart: Designed to remove allergens.
- Bawełna: Standard program for cotton items.
- Eko 40-60: Energy-efficient program for cottons and mixed items at 40-60°C.
- Bawełna 20°C: Low-temperature cotton wash.
- Zabarwienie: For colored garments to preserve vibrancy.
- Wełna: Gentle program for woolens.
- Płukanie: To rinse laundry without washing.
3.5 Dostosowywanie ustawień
After selecting a program, you can customize settings using the function buttons:
- Temp: Adjust wash temperature.
- Kręcić się: Change spin speed.
- Opóźnienie: Set a delayed start time.
- Para: Add a steam function for better hygiene or wrinkle reduction.
- Łatwe prasowanie: Reduces creasing dla łatwiejszego prasowania.
3.6 Rozpoczęcie cyklu prania
Naciśnij Start/Pauza button to begin the selected wash cycle. The display will show the remaining time.
3.7 Zakończenie cyklu prania
Once the cycle is complete, the machine will signal. The door will unlock after a short delay. Remove your laundry promptly.
4. Konserwacja i pielęgnacja
Regularna konserwacja zapewnia optymalną wydajność i wydłuża żywotność pralki.
4.1 Czyszczenie dozownika detergentu
Okresowo wyjmuj i czyść szufladę dozownika detergentu pod bieżącą wodą, aby zapobiec gromadzeniu się resztek detergentu.
4.2 Czyszczenie bębna
Run a maintenance wash (e.g., a hot cycle with a washing machine cleaner or vinegar) monthly to clean the drum and remove any odors or residue.
4.3 Czyszczenie filtra
Locate the drain pump filter, usually at the bottom front of the machine. Open the cover, drain any residual water, and carefully remove and clean the filter. This should be done regularly to prevent blockages.
4.4 Czyszczenie powierzchni zewnętrznej
Przetrzyj zewnętrzne powierzchnie miękką, damp ściereczka. Nie należy używać środków czyszczących o właściwościach ściernych ani rozpuszczalników.
5. Rozwiązywanie Problemów
Jeśli masz problemy z pralką, zapoznaj się z poniższymi, często spotykanymi problemami i rozwiązaniami, zanim skontaktujesz się z obsługą klienta.
| Problem | Możliwa przyczyna | Rozwiązanie |
|---|---|---|
| Maszyna się nie uruchamia | Brak zasilania; Drzwi nie są zamknięte; Program nie został wybrany; Przycisk Start/Pauza nie został naciśnięty. | Check power supply; Ensure door is latched; Select a program; Press Start/Pause. |
| Brak poboru wody | Zamknięty kran; Wąż dopływowy zagięty; Ciśnienie wody zbyt niskie. | Otwórz kran; Wyprostuj wąż; Sprawdź ciśnienie wody w gospodarstwie domowym. |
| Woda nie spływa | Wąż spustowy jest zagięty; filtr pompy spustowej jest zablokowany. | Wyprostuj wąż spustowy; Wyczyść filtr pompy spustowej. |
| Nadmierne wibracje/hałas | Nie usunięto śrub transportowych; Maszyna nie jest wypoziomowana; Nierównomierny ładunek. | Remove transit bolts; Adjust feet to level machine; Redistribute laundry. |
| Resztki detergentu w dozowniku | Too much detergent; Low water pressure; Dispenser blocked. | Reduce detergent amount; Check water pressure; Clean dispenser. |
6. Specyfikacje techniczne
| Funkcja | Specyfikacja |
|---|---|
| Marka | Ostry |
| Model | ES-NIH814BWA-EN |
| Pojemność | 8 kilograma |
| Maksymalna prędkość obrotowa | 1400 obr./min. |
| Typ instalacji | Zintegrowany |
| Konsola kontrolna | Buttons, Dial, Digital Display |
| Dostęp do lokalizacji | Ładowanie od przodu |
| Materiał (bęben) | Stal nierdzewna |
| Tomtage | 2.2E+2 V (prąd przemienny) |
| Kolor | Biały |
7. Gwarancja i obsługa klienta
Your Sharp ES-NIH814BWA-EN Washing Machine comes with a manufacturer's warranty. Please refer to the separate warranty card provided with your appliance for specific terms and conditions, including warranty period and coverage.
For technical assistance, spare parts, or to schedule a service appointment, please contact Sharp customer support. Contact details can typically be found on the Sharp official webmiejscu lub w dokumentacji gwarancyjnej.
When contacting support, please have your model number (ES-NIH814BWA-EN) and serial number ready. The serial number is usually located on a sticker inside the door frame or on the back of the appliance.
Ask a question about this manual
Ask about setup, troubleshooting, compatibility, parts, safety, or missing instructions. Manuals+ will review the question and use this page’s manual context to help answer it.