1. Wprowadzenie
This manual provides detailed instructions for the operation and maintenance of your Landtek Decibel Meter Sound Level Meter with Data Logging, Model B0CHYSJBK2. This device is designed for accurate measurement and recording of sound levels in various environments.
Główne cechy:
- 13-inch Large LCD Display for clear readings.
- Integrated Data Logging function with PC connectivity.
- 16.4 ft (5m) corded sound sensor for flexible placement.
- Audible and Visual Alarm with adjustable thresholds and external output.
- Multiple mounting options: desktop, wall mount, hanging, tripod attachment.
2. Zawartość opakowania
Sprawdź, czy w opakowaniu znajdują się wszystkie elementy:
- Landtek Decibel Meter Main Unit
- Corded Sound Sensor (16.4 ft / 5m cable)
- Kabel USB
- Zasilacz (DC 5 V/1 A)
- Mounting Hardware (screws, wall anchors, hanging hooks)
- Instrukcja obsługi

Image: Contents of the Landtek Decibel Meter package, including the main unit, sensor, cables, mounting hardware, and manual.
3. Koniec produktuview
The Landtek Decibel Meter features a large display and a remote sensor for versatile noise monitoring.

Obraz: Przód view of the Landtek Decibel Meter, displaying a sound level reading and showing the connected remote sound sensor.
Składniki:
- Duży wyświetlacz LCD: 13-inch screen for clear visibility of decibel readings.
- Czujnik dźwięku: A 6mm condenser microphone sensor attached via a 16.4 ft (5m) cable for flexible placement away from the main unit.
- Przyciski sterujące: Includes 'SEL' for selection, arrow buttons for adjustment, and a power button.
- Wskaźniki: REC (recording), USB (connection), and Alarm indicators.
- Porty: DC 5V/OUT for power and external alarm, USB for PC connection.

Image: Diagram illustrating the dimensions of the 13-inch display and the approximate 196-inch (16.4 ft) length of the sound probe cable.
4. Konfiguracja
4.1 Włączanie
- Connect the power adapter to the DC 5V/OUT port on the side of the decibel meter.
- Podłącz zasilacz do standardowego gniazdka elektrycznego. Urządzenie włączy się automatycznie.
4.2 PC Software Installation and Synchronization
To utilize the data logging features and configure advanced settings, the device must be connected to a PC with the dedicated software. The software is compatible with Windows 7, 8, 10, and 11 (64-bit versions).

Image: Step-by-step instructions for downloading software via QR code, connecting the device to a PC, and synchronizing for data logging.
- Oprogramowanie do pobrania: Scan the QR code provided in the physical manual or visit https://cd50.net/389/ aby pobrać oprogramowanie na PC.
- Podłącz urządzenie: Use the provided USB cable to connect the decibel meter to your PC.
- Uruchom oprogramowanie: Open the downloaded software on your PC. The software should display "Connected" once the device is recognized.
- Synchronizować: Press the "SYNC" button within the software to synchronize the device. Wait for the save confirmation.
Important Note: The device requires a continuous power supply to retain settings. If power is disconnected, settings may revert to default, requiring re-synchronization with the PC software.
5. Instrukcja obsługi
5.1 Pomiar podstawowy
Once powered on, the device will immediately begin measuring ambient sound levels and display the decibel (dB) value on the large LCD screen.
5.2 Zrozumienie wyświetlacza
The display shows the current decibel reading. An analog bar level indicator on the right side provides a quick visual reference of the noise level range.

Image: Close-up of the decibel meter display, accompanied by a chart explaining the color-coded analog bar level indicator and corresponding dB ranges.
5.3 Rejestracja danych
The device can record sound level data at 2-second intervals for up to one year. This data can be retrieved and analyzed using the PC software.
- Rozpocznij/zatrzymaj nagrywanie: Press the '▼' (down arrow) button for 2 seconds to start or stop recording. The 'REC' indicator light will flash when active.
- Pobieranie danych: Connect the device to your PC and use the software to view, export, and analyze recorded data.
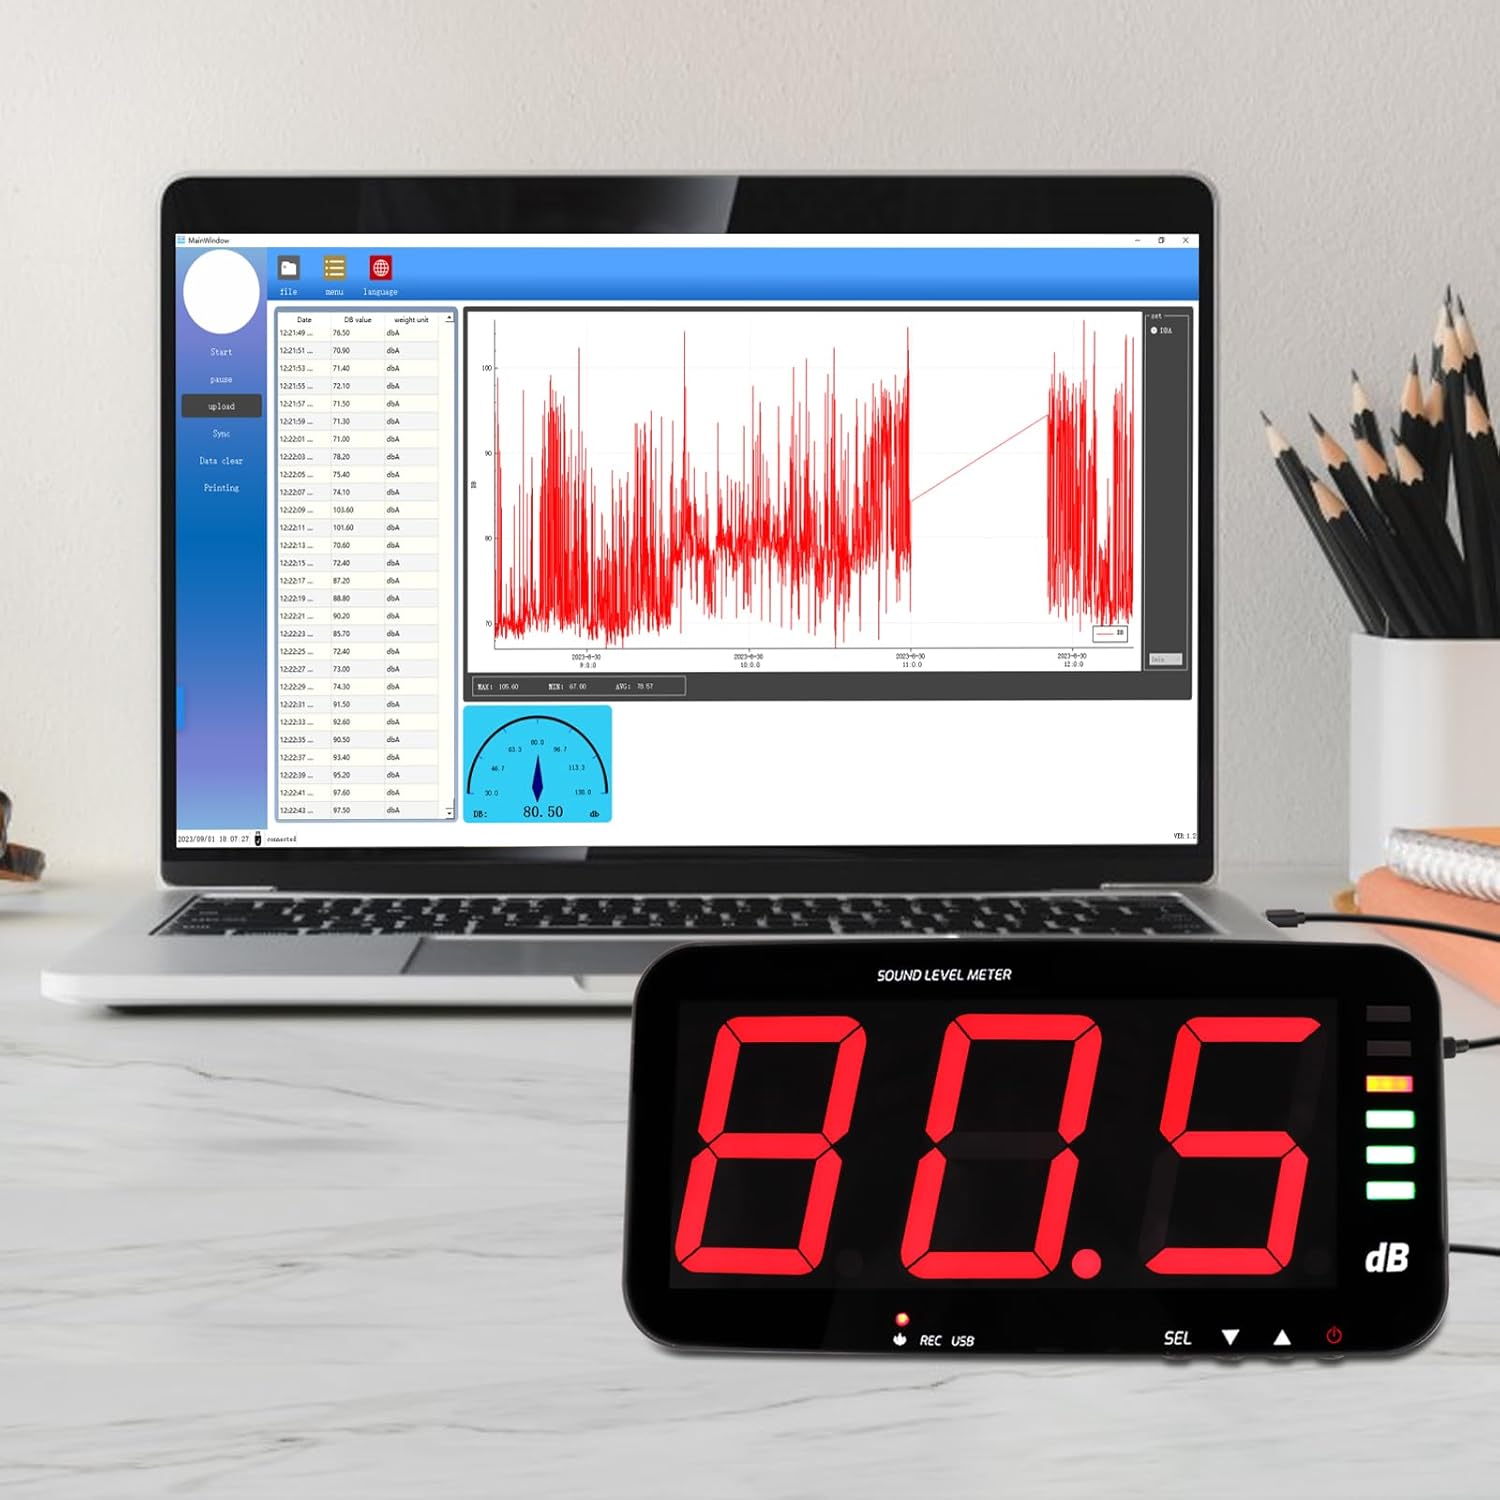
Image: The decibel meter connected to a laptop, displaying the data logging software interface with a graph of recorded sound levels.
5.4 funkcji alarmu
The meter features audible and visual alarms when a predefined decibel threshold is exceeded. The default alarm threshold is 120dB.
- Ustawianie progów: Long press the 'SEL' button to enter alarm settings. Use the arrow buttons to adjust the decibel threshold and alarm duration.
- Alarm wizualny: The alarm indicator light will illuminate or flash when the threshold is met.
- Słyszalny alarm: An internal buzzer will sound.
- External Alarm Output: The device includes a 3.5mm jack port for connecting an external 12V alarm speaker (not included).

Image: The decibel meter displaying a sound level with the alarm indicator light active, signifying an audio and visual alarm condition.

Obraz: Bok view of the decibel meter showing the DC 5V/OUT port connected to an external red alarm speaker, demonstrating the external alarm output interface.
6. Opcje montażu
The Landtek Decibel Meter offers several flexible mounting solutions to suit various environments.
- Umieszczenie na pulpicie: Use the integrated stand for discreet tabletop placement.
- Mocowanie ścienne: Utilize the provided mounting hardware to secure the unit to a wall.
- Wiszące: The device can be hung using hooks or chains (not included) from a ceiling or overhead structure.
- Mocowanie do statywu: A standard tripod screw hole allows for attachment to a camera tripod (tripod not included).

Image: A collage demonstrating four different ways to mount the decibel meter: wall mount, hanging, tabletop placement, and attachment to a tripod.
7. Specyfikacje
| Funkcja | Specyfikacja |
|---|---|
| Zakres pomiaru | 30 ~ 130dB |
| Dokładność | ±1.5 dB (at 94dB@1KHz) |
| Rezolucja | 0.1 dB (<100dB); 1 dB (>100dB) |
| Ważenie częstotliwości | Ważenie |
| Odpowiedź częstotliwościowa | 31.5 Hz ~ 8.5 kHz |
| Sampling Oceń | 2 razy / sekundę |
| Ważenie czasu | FAST, 0.5 seconds |
| Transduktor | 6-milimetrowy czujnik mikrofonu pojemnościowego |
| Test Probe Cable Length | 5 metra (ok. 16.4 stopy) |
| Wyświetlacz | LED digital tube, single character 4 inches |
| Wyjście alarmowe | 12V high level |
| Alert alarmowy | Dźwięk i światło |
| Zasilacz | DC 5V / 1A |
| Wymiary | 323 x 173 x 40 mm (około 12.7 x 6.8 x 1.6 cala) |
| Waga | Około 980 gramów (2.16 funta) |
8. Konserwacja
To ensure the longevity and accuracy of your decibel meter, follow these maintenance guidelines:
- Czyszczenie: Wytrzyj wyświetlacz i casinCzyścić miękką, suchą ściereczką. Nie używać środków czyszczących ani rozpuszczalników o działaniu ściernym.
- Składowanie: Przechowywać urządzenie w chłodnym i suchym miejscu, z dala od bezpośredniego światła słonecznego i ekstremalnych temperatur.
- Pielęgnacja czujnika: Keep the microphone sensor clean and free from dust or debris to maintain measurement accuracy.
- Zasilanie: Aby zapobiec uszkodzeniu urządzenia, zawsze należy używać dołączonego zasilacza.
9. Rozwiązywanie Problemów
- Device loses settings after power off: This device requires continuous power to retain custom settings. If the power supply is interrupted, settings may revert to default. Reconnect to PC and re-synchronize using the software to restore desired settings.
- Wyświetlacz jest pusty: Upewnij się, że zasilacz jest solidnie podłączony do urządzenia i do sprawnego gniazdka elektrycznego.
- No data logging on PC: Verify that the USB cable is properly connected and the PC software is running. Ensure the device is synchronized with the software (refer to Section 4.2). Check that recording is active on the device (REC indicator flashing).
- Alarm nie uruchamia się: Check the alarm threshold settings via the PC software or by long-pressing the 'SEL' button. Ensure the threshold is set appropriately for the noise levels being monitored.
- Slow update intervals: The device updates approximately once per second. This is normal operation. For very short, transient sounds, the meter may not register the peak value instantly.


