Wstęp
Thank you for choosing the Auronic Electric Air Dehumidifier. This appliance is designed to effectively remove excess moisture from the air, creating a more comfortable and healthier indoor environment. It is ideal for use in various spaces such as bathrooms, basements, and living areas, helping to prevent issues like mold, mildew, and dampness. Please read this manual thoroughly before operation to ensure proper use, maintenance, and safety.

Figure 1: Auronic Electric Air Dehumidifier (Model AU3129 12L)
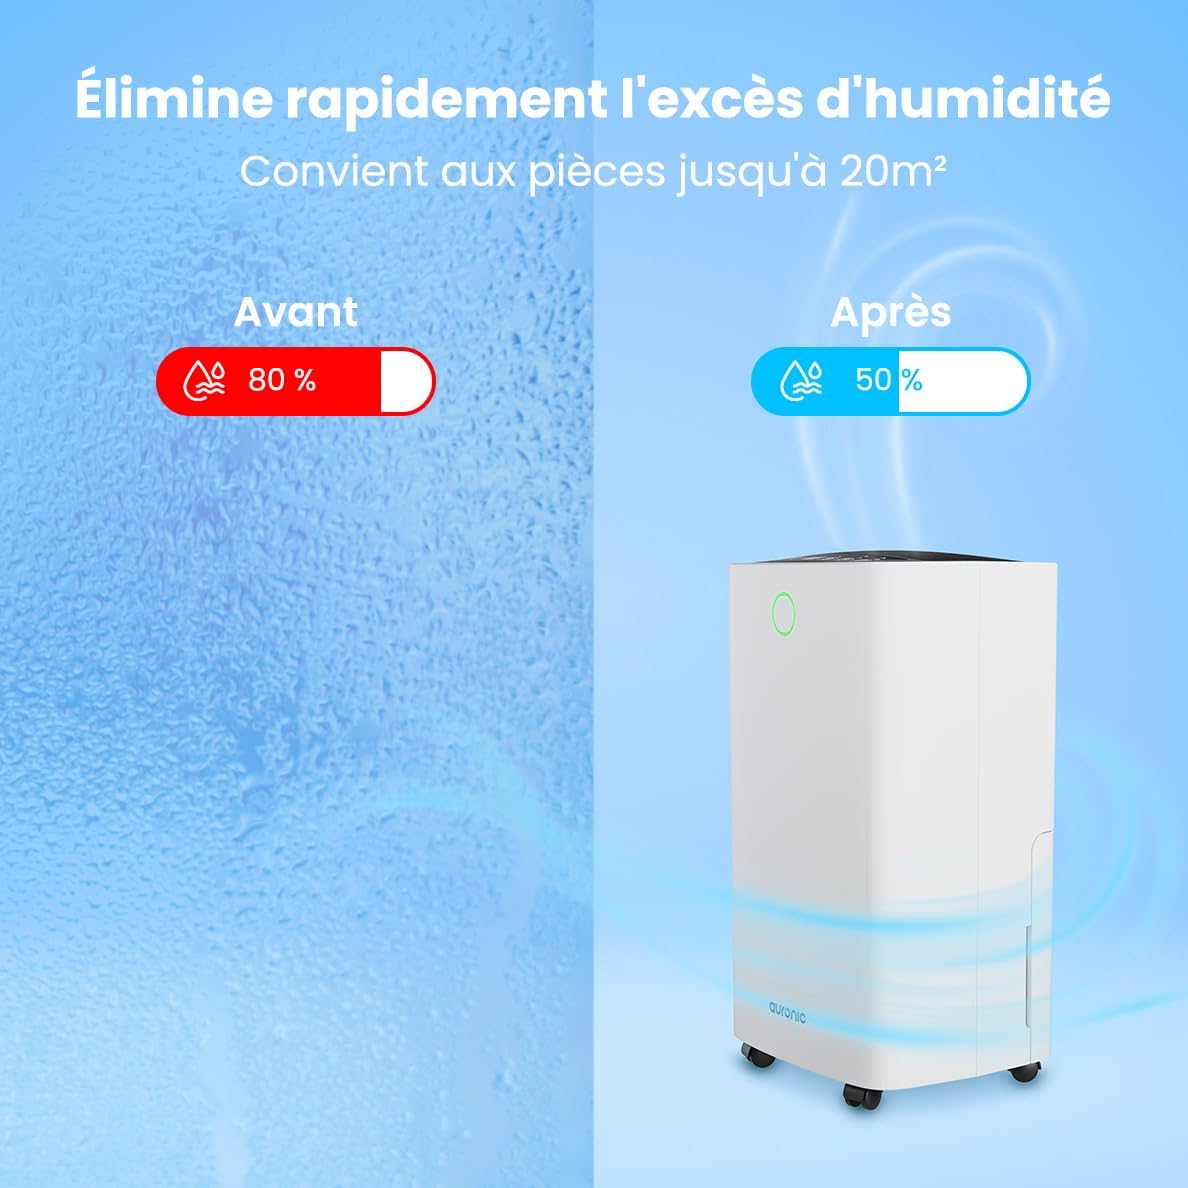
Figure 2: Humidity Reduction Effectiveness
Informacje dotyczące bezpieczeństwa
Aby zmniejszyć ryzyko pożaru, porażenia prądem lub obrażeń ciała, zawsze należy przestrzegać poniższych podstawowych środków ostrożności:
- Przed użyciem urządzenia należy przeczytać całą instrukcję.
- Upewnij się, że zasilanie jest zgodne z objtage podano na tabliczce znamionowej.
- Nie należy używać osuszacza powietrza, jeśli przewód zasilający lub wtyczka są uszkodzone.
- Urządzenie należy zawsze umieszczać na stabilnej i równej powierzchni.
- Keep the appliance at least 20 cm away from walls or other objects to ensure proper airflow.
- Nie wkładaj palców ani ciał obcych do wlotu lub wylotu powietrza.
- Przed czyszczeniem, przenoszeniem lub wykonywaniem prac konserwacyjnych odłącz osuszacz powietrza od zasilania.
- Nie używaj urządzenia w mokrym lub damp environments where water may splash.
- Przechowywać w miejscu niedostępnym dla dzieci.
- If the unit has been tilted, allow it to stand upright for at least 24 hours before plugging it in.
Produkt ponadview
Familiarize yourself with the components of your Auronic Dehumidifier.

Figure 3: Dehumidifier Dimensions and Included Accessories

Figure 4: Easy Portability with Wheels and Handle
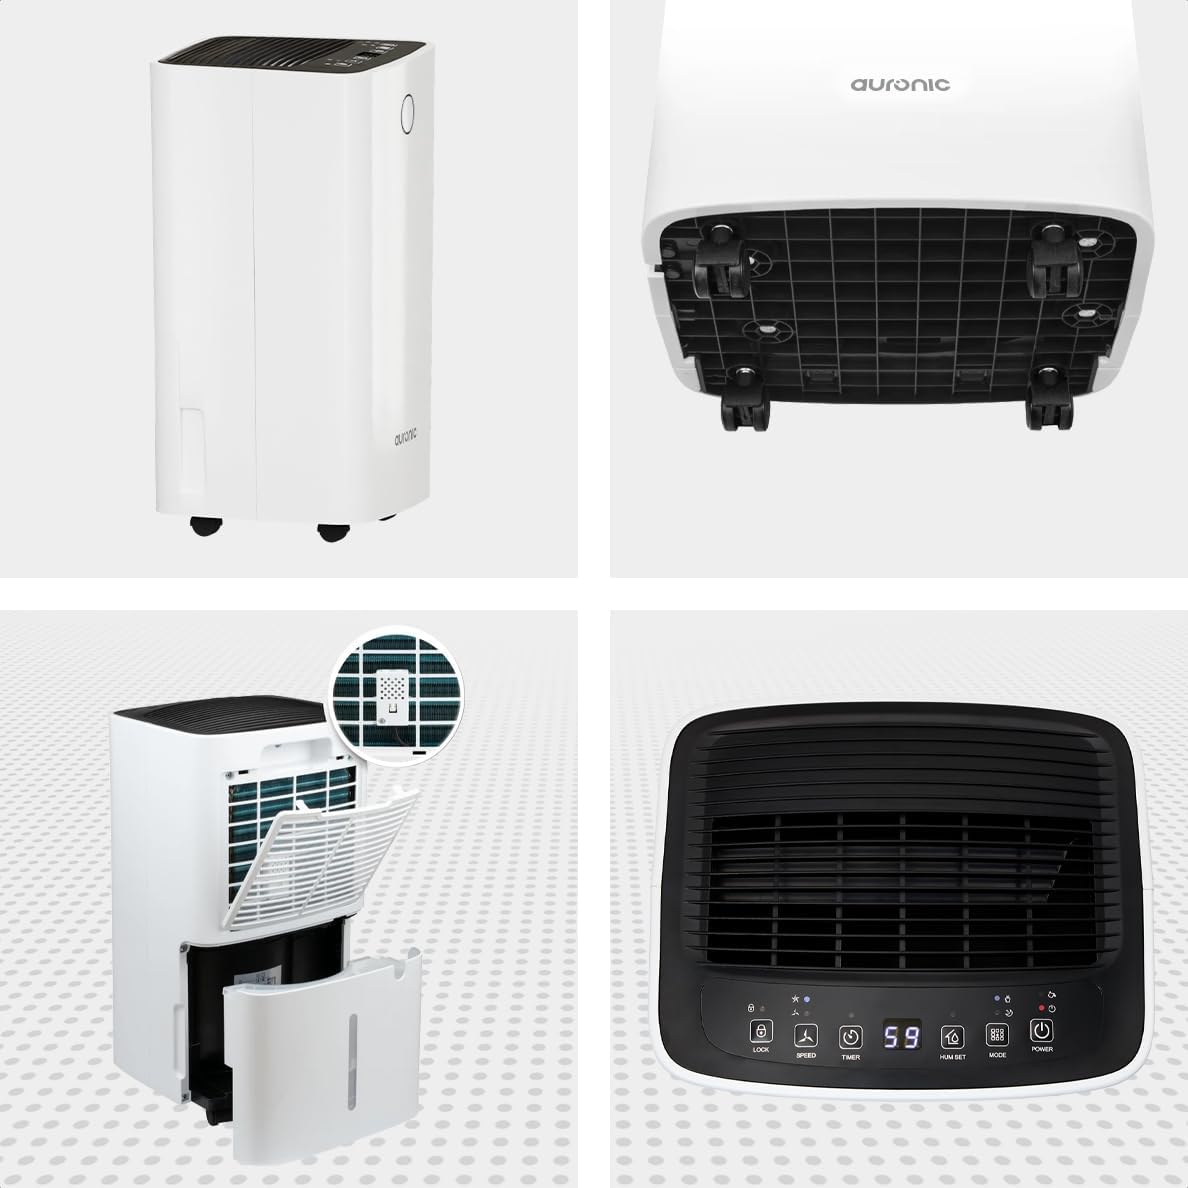
Figure 5: Multi-Angle View of the Dehumidifier

Rysunek 6: Panel sterowaniaview
Kluczowe komponenty:
- Panel sterowania: Intuitive interface for setting modes, humidity levels, and timer.
- Wlot/wylot powietrza: Where air enters and exits the unit. Ensure these are not obstructed.
- Zbiornik na wodę: Removable 2-liter tank for collecting condensed water.
- Ciągły wylot spustowy: Port for attaching a hose for continuous drainage.
- Koła i uchwyty: Dla łatwego przenoszenia.
- Filtr powietrza: Located at the back, helps filter dust from the air.
Organizować coś
- Rozpakowywanie: Ostrożnie wyjmij osuszacz powietrza z opakowania. Zachowaj opakowanie do późniejszego przechowywania lub transportu.
- Umieszczenie: Place the unit upright on a firm, level surface in the desired location. Ensure there is at least 20 cm of clear space around all sides for proper air circulation.
- Początkowy stan gotowości: If the unit was tilted during transport, let it stand upright for a minimum of 24 hours before plugging it in. This allows the refrigerant to settle.
- Podłączenie zasilania: Podłącz przewód zasilający do uziemionego gniazdka elektrycznego.
- Zbiornik na wodę: Upewnij się, że zbiornik na wodę jest prawidłowo włożony do urządzenia. Osuszacz powietrza nie będzie działał, jeśli zbiornik będzie pełny lub nieprawidłowo osadzony.
Instrukcja obsługi
Funkcje panelu sterowania:
| Przycisk/wskaźnik | Funkcjonować |
|---|---|
| Przycisk zasilania | Włącza lub wyłącza urządzenie. |
| Przycisk trybu | Cycles through operating modes (e.g., Dehumidify, Laundry Drying, Sleep). |
| Hum Set Button | Dostosowuje pożądany poziom wilgotności (np. 40% - 80% RH). |
| Przycisk timera | Ustawia timer automatycznego włączania lub wyłączania (do 12 godzin). |
| Przycisk prędkości | Adjusts fan speed (e.g., High, Low). |
| Przycisk blokady | Blokuje panel sterowania, aby zapobiec przypadkowym zmianom. |
| Humidity Indicator LED | Changes color based on current humidity level (e.g., Blue: <45%, Green: 45-65%, Red: >65%). Figure 7: Humidity Indicator LED Explained |
Ogólne zasady działania:
- Włączyć coś: Naciśnij Moc button. The display will show the current room humidity.
- Ustaw żądaną wilgotność: Naciśnij Hum Set button repeatedly to select your desired humidity level. The unit will operate until this level is reached, then cycle on and off to maintain it.
- Wybierz tryb: Naciśnij Tryb button to choose between different operating modes.
- Tryb osuszania: Standardowa czynność mająca na celu redukcję wilgotności otoczenia.
- Tryb suszenia prania: Increases fan speed and continuous operation to assist in drying clothes.

Figure 8: Using the Dehumidifier for Laundry Drying
- Tryb uśpienia: Operates at a lower fan speed and reduced noise level for quiet nighttime use.

Figure 9: Silent Operation for Nighttime Use
- Ustaw minutnik: Naciśnij Regulator czasowy button to set an auto-off time (when the unit is on) or an auto-on time (when the unit is off).

Figure 10: Integrated Timer Function
- Prędkość wentylatora: Użyj Prędkość button to adjust the fan speed as desired.
- Blokada dziecięca: Naciśnij i przytrzymaj Zamek button for 3 seconds to activate/deactivate the child lock function.
Drenaż ciągły:
For continuous operation without emptying the water tank, you can connect the included drain hose to the continuous drain outlet. Ensure the hose is sloped downwards to allow gravity drainage into a suitable receptacle or drain.

Figure 11: Continuous Drainage Setup
Konserwacja
Regularna konserwacja zapewnia optymalną wydajność i wydłuża żywotność osuszacza powietrza.
Opróżnianie zbiornika na wodę:
When the water tank is full, the unit will automatically stop operating and an indicator light will illuminate. Carefully remove the tank, empty the collected water, and reinsert it firmly until it clicks into place.

Figure 12: Removing the 2-Liter Water Tank
Czyszczenie filtra powietrza:
Filtr powietrza należy czyścić co dwa tygodnie lub częściej, w zależności od intensywności użytkowania i jakości powietrza.
- Wyłącz osuszacz powietrza i odłącz go od zasilania.
- Znajdź i wyjmij filtr powietrza znajdujący się z tyłu urządzenia.
- Clean the filter with warm, soapy water or use a vacuum cleaner to remove dust.
- Dokładnie wypłucz i pozostaw filtr do całkowitego wyschnięcia na powietrzu przed ponownym włożeniem.
Czyszczenie zewnętrznej części jednostki:
Przetrzyj zewnętrzną część osuszacza miękką, damp płótno. Nie używaj ostrych środków chemicznych ani ściernych środków czyszczących.
Rozwiązywanie problemów
Przed skontaktowaniem się z obsługą klienta zapoznaj się z poniższymi typowymi problemami i rozwiązaniami:
| Problem | Możliwa przyczyna | Rozwiązanie |
|---|---|---|
| Osuszacz powietrza nie włącza się. | Brak zasilania, luźny przewód zasilający, pełny zbiornik na wodę lub nieprawidłowo osadzony. | Sprawdź podłączenie do zasilania, opróżnij zbiornik na wodę i włóż go ponownie prawidłowo. |
| Nie zebrano wody. | Room humidity too low, temperature too low, air filter clogged, continuous drain hose connected. | Check room humidity/temperature, clean air filter, ensure continuous drain hose is not connected if tank collection is desired. |
| Urządzenie jest głośne. | Jednostka nie stoi na równej powierzchni, filtr powietrza jest zatkany, wystąpił problem z wewnętrznymi podzespołami. | Połóż na równej powierzchni i wyczyść filtr powietrza. Jeśli hałas nadal występuje, skontaktuj się z pomocą techniczną. |
| Dehumidification is slow or ineffective. | Room size too large, doors/windows open, air inlets/outlets blocked, air filter dirty. | Ensure room is sealed, clear obstructions, clean air filter. |
Specyfikacje
| Funkcja | Szczegół |
|---|---|
| Marka | Auronowy |
| Nazwa modelu | Auronic Silent Low Consumption Dehumidifier |
| Wymiary produktu (dł. x szer. x wys.) | Wymiary 21.5 x 47 x 25.5 cm |
| Waga przedmiotu | 11 kilograma |
| Wydajność (osuszanie) | 12 XNUMX litrów dziennie |
| Pojemność zbiornika na wodę | 2 litrów |
| Moc | 185 watów |
| Kolor | Biały |
| Cechy specjalne | Easy to use, Laundry Drying function, Prevents and effectively eliminates humidity, 2-liter tank, Automatic shut-off. |
| Zalecane zastosowanie | Domowy |
Gwarancja i wsparcie
Auronic products are manufactured to the highest quality standards. For warranty information, technical support, or service inquiries, please refer to the contact details provided on your purchase receipt or visit the official Auronic website. Please have your model number (AU3129 12L) and purchase date ready when contacting support.


