1. Wprowadzenie
Thank you for choosing the Commax CMV-70S 7-inch LED Intercom System. This manual provides essential information for the safe and efficient installation, operation, and maintenance of your new intercom system. Please read this manual thoroughly before use and keep it for future reference.
2. Informacje dotyczące bezpieczeństwa
- Ensure all electrical connections are made by a qualified professional to prevent electric shock or fire.
- Nie wystawiaj urządzenia na działanie wody, wilgoci ani ekstremalnych temperatur.
- Do not attempt to open or repair the unit yourself. Refer all servicing to authorized personnel.
- Use only the specified power supply (AC 100V - 240V).
- Trzymaj urządzenie z dala od bezpośredniego światła słonecznego i źródeł ciepła.
3. Zawartość opakowania
Sprawdź, czy wszystkie wymienione poniżej elementy znajdują się w Twojej paczce. Jeśli brakuje któregokolwiek z nich lub jest on uszkodzony, skontaktuj się ze sprzedawcą.
- Commax CMV-70S Monitor Unit
- Uchwyt montażowy
- Instrukcja obsługi
- Screws (T)4 x 18mm (4 pcs)
- Screw (M)3 x 6mm (1 pc)
- Connection Cables (2P(1EA), 4P(3EA))
- Door Camera (if included in your specific kit)

Rysunek 3.1: Zawartość opakowania
4. Koniec produktuview
The Commax CMV-70S features a 7-inch LED screen and intuitive touch controls for visitor communication and door access. Familiarize yourself with the components of the monitor unit:
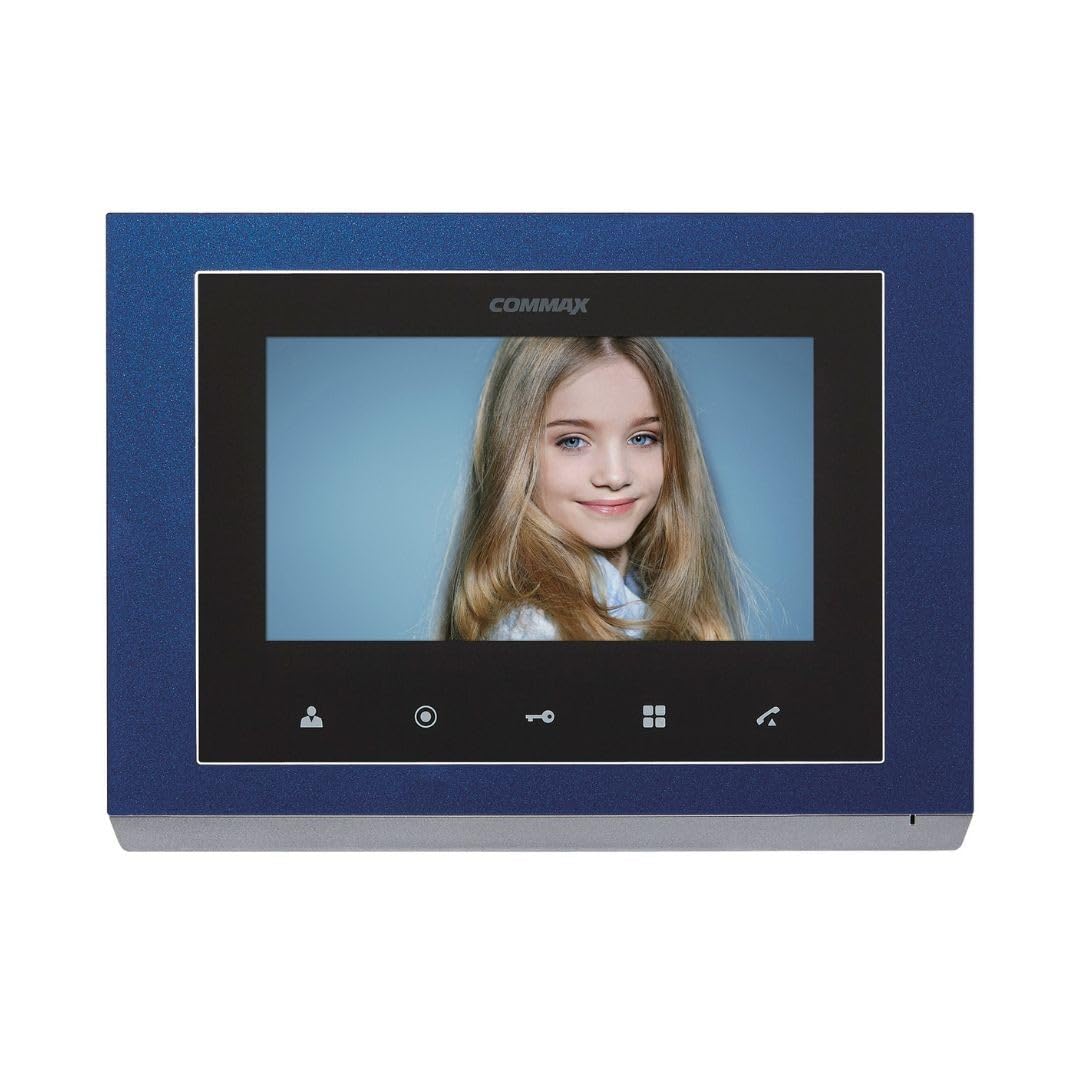
Rysunek 4.1: Elementy panelu przedniego
Elementy panelu przedniego
| NIE. | Nazwa części | NIE. | Nazwa części | NIE. | Nazwa części |
|---|---|---|---|---|---|
| 1 | 7" TFTLCD | 2 | Głośnik | 3 | Przycisk monitorowania |
| 4 | Guard and interphone button | 5 | Przycisk otwierania drzwi | 6 | Menu button (touch) |
| 7 | Przycisk rozmowy | 8 | C-MIC | 9 | Menu button (side) |
| 10 | Przycisk Enter | 11 | przycisk △ | 12 | ▽ button |
| 13 | Włączanie/wyłączanie zasilania | 14 | Zaciski przyłączeniowe |
5. Konfiguracja
5.1 Montaż monitora
- Choose a suitable location for the monitor, typically near the main entrance or a central area.
- Przymocuj uchwyt montażowy do ściany za pomocą dołączonych śrub. Upewnij się, że jest wypoziomowany i solidnie zamocowany.
- Connect all necessary wiring to the monitor's connecting terminals (refer to Section 5.2).
- Carefully attach the monitor unit to the mounting bracket.
5.2 połączeń przewodów
The CMV-70S system requires professional hardwire installation. Refer to the diagram below for terminal connections. Ensure power is disconnected before making any wiring connections.

Figure 5.1: Connecting Terminals (Rear View)
- Podłączenie zasilania: Connect the AC 100V - 240V power supply to the designated power terminals.
- Podłączenie kamery drzwiowej: Connect the door camera to the 'CAM' terminals. The system supports up to two door cameras.
- Intercom Connection: For multi-unit setups or additional indoor phones, connect them to the 'INTER' terminals.
- Zwolnienie zamka drzwi: Connect the electronic door lock to the appropriate terminals for remote release functionality.
This system is expandable up to two screens, two door cameras, and two indoor phones, especially when utilizing Fine View technology for single-house applications.
6. Instrukcja obsługi
The Commax CMV-70S is designed for ease of use with its touch-sensitive buttons.
6.1 Podstawowe funkcje
- Odbieranie połączenia: When a visitor presses the call button on the door camera, the monitor will ring and display the visitor's image. Press the Talk button (7) komunikować się.
- Monitorowanie: Naciśnij Monitoring button (3) Do view the outside area through the door camera at any time.
- Otwieranie drzwi: Podczas połączenia lub monitorowania naciśnij przycisk Door release button (5) aby otworzyć drzwi.
- Intercom/Guard Call: Naciśnij Guard and interphone button (4) to initiate a call to another indoor unit or the guard station (if configured).
6.2 Nawigacja po menu
The CMV-70S features both touch and side menu buttons for system settings.
- Naciśnij Menu button (touch) (6) or Menu button (side) (9) aby uzyskać dostęp do ustawień systemowych.
- Użyj △ button (11) I ▽ button (12) aby poruszać się po opcjach menu.
- Naciśnij Enter button (10) aby wybrać opcję lub potwierdzić ustawienie.
- Ten Power ON/OFF button (13) controls the unit's power.
7. Konserwacja
- Czyszczenie: Wipe the monitor screen and body with a soft, dry cloth. Do not use abrasive cleaners or solvents.
- Cykl zasilania: If the unit is unresponsive, try turning it off using the Power ON/OFF button (13), waiting a few seconds, and then turning it back on.
- Regularne kontrole: Okresowo sprawdzaj wszystkie połączenia przewodów, aby mieć pewność, że są bezpieczne.
8. Rozwiązywanie Problemów
If you encounter issues with your Commax CMV-70S, refer to the following common problems and solutions:
| Problem | Możliwa przyczyna | Rozwiązanie |
|---|---|---|
| Brak obrazu na ekranie | Power off; Loose connection; Faulty camera | Check power (13); Verify wiring (14); Test camera connection. |
| No sound during call | Volume too low; Faulty speaker/microphone; Loose connection | Adjust volume in menu; Check wiring; Contact support. |
| Zamek drzwi nie jest otwartyasing | Incorrect wiring; Faulty lock; Insufficient power | Verify lock wiring; Test lock independently; Ensure adequate power supply. |
| Monitor unresponsive | Błąd oprogramowania; Problem z zasilaniem | Perform a power cycle (13); Check power connection. |
If the problem persists after trying these solutions, please contact Commax customer support or a qualified technician.
9. Specyfikacje
| Funkcja | Specyfikacja |
|---|---|
| Producent | Kommax |
| Numer modelu | CMV-70S |
| Rozmiar ekranu | 7-calowa dioda LED |
| Źródło zasilania | Corded Electric (AC 100V - 240V) |
| Pobór mocy | 6 watów |
| Technologia łączności | Przewodowy |
| Metoda instalacji | Professional Hardwire |
| Kompatybilne urządzenia | Apartment complex, single house |
| Możliwość rozbudowy | Up to 2 screens, 2 door cameras, 2 indoor phones (Fine View technology for single house) |
| Zawarte komponenty | Security screen, door camera |
| Waga przedmiotu | 1.2 kilograma |
| Wymiary opakowania | Wymiary 30.4 x 24.8 x 6.9 cm |
| Tworzywo | Plastikowy |
| Kolor | Niebieski |
| Tryb pracy | Tylko ruch |
| Wymagane baterie | NIE |
10. Gwarancja i wsparcie
Commax products are designed for reliability and performance. For warranty information, technical support, or service inquiries, please refer to the warranty card included with your product or visit the official Commax webZachowaj paragon jako dowód zakupu na wypadek reklamacji.


