Ważne instrukcje bezpieczeństwa
Please read these instructions carefully before operating the unit and retain them for future reference.
- Nie wystawiaj urządzenia na działanie kapiącej lub pryskającej wody.
- Nie należy stawiać na urządzeniu przedmiotów wypełnionych płynami, np. wazonów.
- Zapewnij odpowiednią wentylację. Nie blokuj żadnych otworów wentylacyjnych.
- Nie należy instalować w pobliżu źródeł ciepła, takich jak grzejniki, kratki wentylacyjne, piece lub inne urządzenia (w tym amp(lifiers) wytwarzające ciepło.
- Stosować wyłącznie dodatki/akcesoria wskazane przez producenta.
- Odłącz to urządzenie podczas burzy lub gdy nie jest używane przez dłuższy czas.
- Wszelkie czynności serwisowe należy powierzyć wykwalifikowanemu personelowi serwisowemu. Serwis jest wymagany, gdy urządzenie zostało w jakikolwiek sposób uszkodzone.
Produkt ponadview
The Muse M17CB is a compact dual PLL FM/MW digital alarm clock radio designed for reliable timekeeping and audio playback. It features a clear 0.9-inch white LED display with a dimmer function and a 24-hour time format. Users can set two independent alarms, choosing to wake up to either the radio or a buzzer. The digital tuner allows for 6 preset stations (3 FM and 3 MW) for quick access to your favorite broadcasts. Additional functions include SNAP, SLEEP, and SNOOZE for enhanced user convenience.
Przód View

Opis obrazu: This image displays the front of the Muse M17CB alarm clock radio. It features a prominent 0.9-inch white LED display showing "12:00". Above the display are various control buttons and two rotary knobs. The buttons include P.1, P.2, P.3, DIM., O/SOURCE, and a large SNOOZE button. The left rotary knob is for VOLUME, and the right is for TUNING/SET. A small "muse" logo tag is visible on the left side.
Sterowanie na górnym panelu

Opis obrazu: Na tym obrazie widać widok z góry view of the Muse M17CB alarm clock radio, highlighting the control panel. It shows two large rotary knobs for Volume and Tuning/Set, along with several push buttons: P.1, P.2, P.3 (for radio presets), DIM. (dimmer), O/SOURCE (power/source selection), and a large circular SNOOZE button. The layout is clear and intuitive.
Połączenia na tylnym panelu

Opis obrazu: This image shows the rear panel of the Muse M17CB alarm clock radio. It clearly displays the "AC~" power input socket, the "FM ANT." wire antenna, and an "AUX IN" 3.5mm jack for connecting external audio devices. A speaker grille is also visible on the right side.
Organizować coś
Podłączenie zasilania
- Unpack the Muse M17CB unit and all accessories.
- Connect the AC power cord to the "AC~" input on the rear of the unit.
- Podłącz drugi koniec przewodu zasilającego do standardowego gniazdka ściennego.
- Zaświeci się wyświetlacz LED, wskazując, że urządzenie jest zasilane.
Konfiguracja anteny
- For optimal FM reception, fully extend the FM wire antenna located at the back of the unit.
- Adjust the position of the antenna for the best possible signal reception.
Instrukcja obsługi
Ustawianie czasu
- Upewnij się, że urządzenie jest włączone.
- Naciśnij i przytrzymaj TUNING/SET knob for approximately 2 seconds until the hour digits flash on the display.
- Obróć TUNING/SET pokrętło do regulacji godziny.
- Naciśnij TUNING/SET knob once to confirm the hour; the minute digits will flash.
- Obróć TUNING/SET pokrętło do ustawiania minut.
- Naciśnij TUNING/SET knob again to confirm the minutes and exit time setting mode.
- Czas jest wyświetlany w formacie 24-godzinnym.
Setting the Alarm (Alarm 1 and Alarm 2)
Urządzenie posiada dwa niezależne alarmy (Alarm 1 i Alarm 2).
- Naciśnij P.1 przycisk (dla alarmu 1) lub P.2 button (for Alarm 2) once. The alarm icon and hour digits will flash.
- Obróć TUNING/SET pokrętło do regulacji godziny alarmu.
- Naciśnij TUNING/SET knob to confirm the hour; the minute digits will flash.
- Obróć TUNING/SET pokrętło do regulacji minut alarmu.
- Naciśnij TUNING/SET knob to confirm the minutes. The alarm source (radio or buzzer) will flash.
- Obróć TUNING/SET knob to select either Radio or Brzęczyk as the alarm sound.
- Naciśnij TUNING/SET knob to confirm the alarm source. The alarm volume will flash (if radio is selected).
- Obróć TOM knob to set the desired alarm volume (for radio alarm).
- Naciśnij TUNING/SET knob to save the alarm settings. The corresponding alarm icon will appear on the display, indicating the alarm is active.
Aby dezaktywować alarm, naciśnij odpowiedni przycisk P.1 or P.2 Naciskaj przycisk, aż ikona alarmu zniknie z wyświetlacza.
Radio Operation (FM/MW)
- Naciśnij O/SOURCE button to turn on the radio. Press it repeatedly to cycle between FM, MW, and AUX modes.
- Obróć TUNING/SET knob to manually tune to a desired frequency.
- Aby automatycznie wyszukać stacje, naciśnij i przytrzymaj TUNING/SET knob for 2 seconds. The radio will scan and stop at the next available station.
Setting and Recalling Presets (P.1, P.2, P.3)
- Aby zapisać ustawienie wstępne: Tune to the desired station. Press and hold one of the preset buttons (P.1, P.2, Lub P.3) for 2 seconds until the display confirms the preset is saved.
- Aby przywołać ustawienie wstępne: Briefly press the desired preset button (P.1, P.2, Lub P.3) to tune to the stored station.
Funkcja ściemniacza
Naciśnij CIEMNY. button repeatedly to adjust the brightness of the LED display to your preference (e.g., High, Medium, Low, Off).
Funkcja drzemki
Gdy zabrzmi alarm, naciśnij duży przycisk DRZEMKA Naciśnij przycisk, aby tymczasowo wyciszyć alarm. Alarm włączy się ponownie po około 9 minutach.
Funkcja snu
Funkcja snu umożliwia zaśnięcie przy radiu, które wyłączy się automatycznie po upływie ustawionego czasu.
- Podczas odtwarzania radia naciśnij przycisk P.3 button (often doubles as SLEEP function) repeatedly to cycle through available sleep timer durations (e.g., 90, 60, 30, 15 minutes, or OFF).
- Radio wyłączy się automatycznie po upływie wybranego czasu.
SNAP Function
The specific operation of the SNAP function is not detailed in the provided product description. Please refer to the full printed manual included with your device for instructions on using the SNAP feature.
Wejście pomocnicze (AUX IN)
Podłącz zewnętrzne urządzenie audio (np. odtwarzacz MP3, smartfon) do AUX IN jack on the rear of the unit using a 3.5mm audio cable. Press the O/SOURCE button repeatedly until "AUX" appears on the display to switch to auxiliary input mode. Audio from the connected device will play through the alarm clock's speaker.
Konserwacja
- Czyszczenie: Do czyszczenia zewnętrznej części urządzenia należy używać miękkiej, suchej ściereczki. Nie należy używać środków ściernych, wosków ani rozpuszczalników.
- Składowanie: If the unit is not used for an extended period, unplug it from the power outlet and store it in a cool, dry place.
- Unikaj wilgoci: Trzymaj urządzenie z dala od wody i wilgoci.
Rozwiązywanie problemów
| Problem | Możliwa przyczyna | Rozwiązanie |
|---|---|---|
| Brak zasilania / Wyświetlacz wyłączony | Przewód zasilający nie jest prawidłowo podłączony. | Ensure the AC power cord is securely plugged into the unit and a working wall outlet. |
| Słaby odbiór radia | FM antenna not extended or positioned correctly. | Fully extend and adjust the position of the FM wire antenna for better reception. Try moving the unit to a different location. |
| Alarm nie włącza się | Alarm nie został aktywowany lub został nieprawidłowo ustawiony. | Verify that the alarm icon is displayed. Recheck alarm time and source settings. Ensure alarm volume is not set to minimum if radio alarm is selected. |
| Wyświetlacz jest zbyt jasny/ciemny | Należy dostosować ustawienia ściemniacza. | Naciśnij CIEMNY. Naciskaj przycisk wielokrotnie, aby przełączać poziomy jasności. |
Specyfikacje
- Model: M17CB
- Wyświetlacz: 0.9-inch White LED with Dimmer
- Format czasu: 24 godzin
- Tuner: Digital FM/MW PLL
- Ustawienia wstępne: 6 (3 FM + 3 MW)
- Alarmy: Dual Alarm (Radio or Buzzer)
- Funkcje: SNAP, SLEEP, SNOOZE
- Źródło zasilania: Zasilanie prądem zmiennym
- Wymiary: 13 cm (długość) x 11 cm (szerokość) x 6.5 cm (wysokość)
- Kolor: Turkus
- Tworzywo: Resin or Plastic
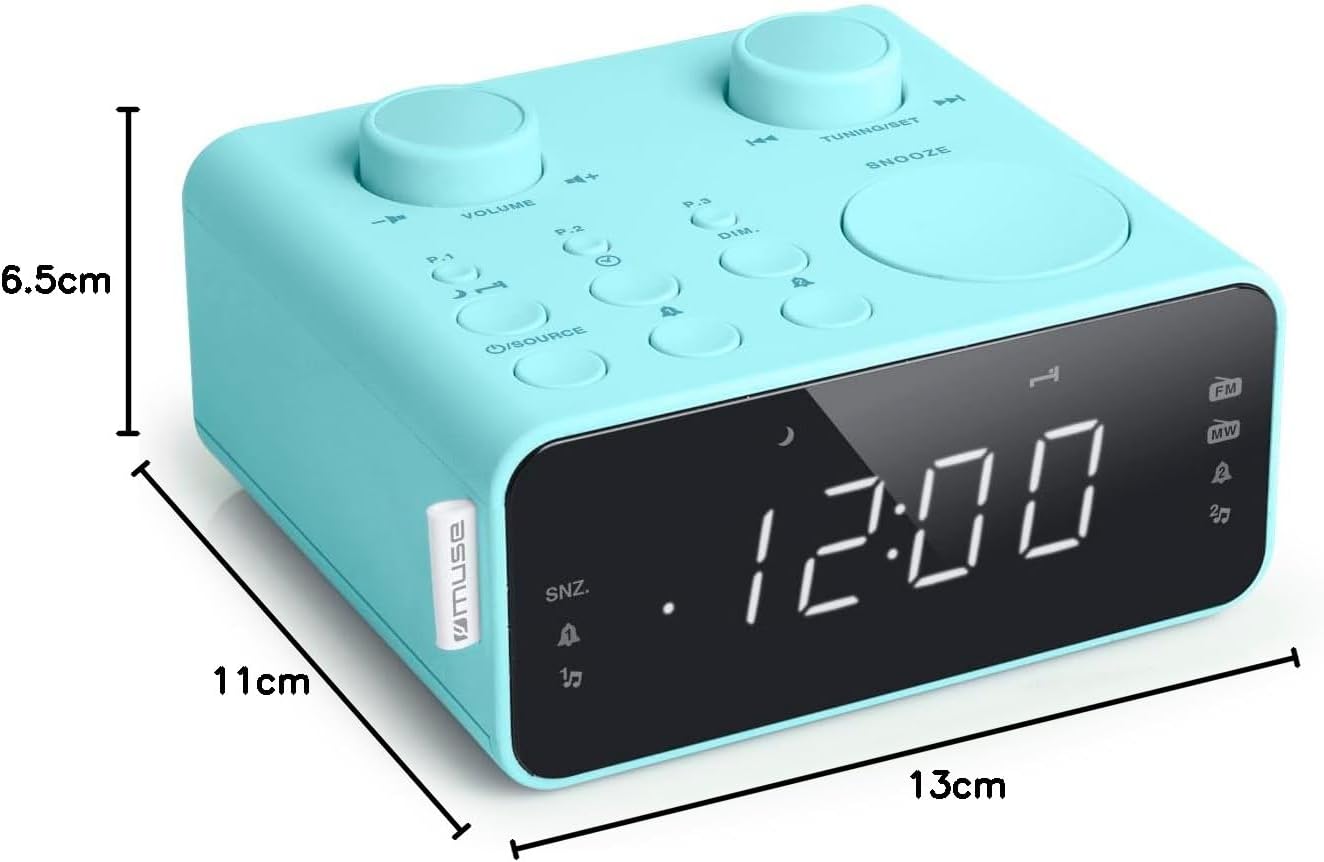
Opis obrazu: This image illustrates the dimensions of the Muse M17CB alarm clock radio. It shows the unit with measurements indicating a length of 13cm, a width of 11cm, and a height of 6.5cm.
Gwarancja i wsparcie
Aby uzyskać informacje dotyczące gwarancji i pomocy technicznej, zapoznaj się z kartą gwarancyjną dołączoną do produktu lub odwiedź oficjalną stronę internetową Muse webZachowaj paragon jako dowód zakupu.
The product includes a user manual (as indicated by "Pièces incluses: Manuel du propriétaire").


