1. Wprowadzenie
The Voxelab Aquila X3 Plus is an advanced FDM (Fused Deposition Modeling) 3D printer designed for both beginners and experienced users. It features a large build volume of 300×300×300mm, 25-point auto-leveling for simplified setup, and a removable magnetic PEI steel platform for easy print removal. With a typical printing speed of 100mm/s and a maximum speed of 200mm/s, it offers efficient and high-quality 3D printing.

Figure 1: Voxelab Aquila X3 Plus FDM 3D Printer.
2. Przewodnik konfiguracji
2.1 Rozpakowanie i wstępna kontrola
Carefully remove all components from the packaging. Inspect the printer for any visible damage that may have occurred during transit. Ensure all accessories listed in the package contents are present.
2.2 Montaż
The Voxelab Aquila X3 Plus comes largely pre-installed, significantly reducing assembly time. Typically, it takes only about 10 minutes to complete the setup. Follow the included quick start guide for detailed steps on attaching the gantry, connecting cables, and securing the touchscreen.

Figure 2: Simplified assembly process for the Aquila X3 Plus.
2.3 Połączenie zasilania
Connect the power cable to the printer and then to a suitable power outlet. Ensure the voltage switch (if present) is set correctly for your region before powering on the device.
2.4 Ładowanie filamentu
Mount your filament spool onto the filament holder. Feed the filament through the filament run-out sensor (if applicable) and into the extruder. Use the 'Load Filament' option on the touchscreen to automatically feed the filament until it extrudes from the nozzle.

Figure 3: Compatible filament types and included nozzle sizes.
3. Instrukcja obsługi
3.1 Interfejs sterowania
The Aquila X3 Plus features an intuitive touchscreen interface for easy navigation and control. Use the rotary knob and touch functions to access menus for printing, settings, control, and information.
3.2 25-Point Auto Leveling
The printer is equipped with a 25-point auto-leveling system, significantly simplifying bed leveling. From the control menu, select the auto-leveling option. The printer will automatically probe 25 points on the print bed to create a mesh for accurate first layer adhesion. This process takes approximately 5 minutes and greatly reduces the need for tedious manual leveling.

Figure 4: Comparison of 25-point auto-leveling and manual leveling.
3.3 Drukowanie z karty SD
Prepare your 3D model using a slicing software (e.g., Cura, Voxelab Slicing Software) and save the G-code file to the provided Micro SD card. Insert the Micro SD card into the printer's slot. Navigate to the 'Print' menu on the touchscreen, select your desired G-code file, and confirm to begin printing.
3.4 Filament Run-out Detection and Resume Printing
The Aquila X3 Plus features filament run-out detection, which pauses the print if the filament runs out, preventing failed prints and wasted material. Additionally, the resume printing function allows the printer to continue a print from the exact spot it left off after a power outage, saving time and resources.

Figure 5: Illustration of the resume printing function.
3.5 Printing Speed and Quality
The Voxelab Aquila X3 Plus offers high-efficiency printing with a typical speed of 100mm/s and a maximum speed of 200mm/s. This allows for faster completion of prints without compromising quality. The upgraded nozzle design also contributes to improved printing efficiency.

Figure 6: High-efficiency printing with the Aquila X3 Plus.
3.6 Compatible Filaments
The printer supports a wide range of filament types, including PLA, PETG, and ABS. The package includes copper nozzles of various sizes (0.3/0.4/0.6/0.8mm) to accommodate different printing needs and materials.

Figure 7: Wide compatibility with PLA, ABS, and PETG filaments.
4. Konserwacja
4.1 Cleaning the PEI Steel Platform
The removable magnetic PEI steel platform is durable and easy to maintain. After each print, allow the platform to cool down before gently flexing it to remove the printed object. For optimal adhesion, clean the surface with isopropyl alcohol and a microfiber cloth periodically to remove any residue or oils.
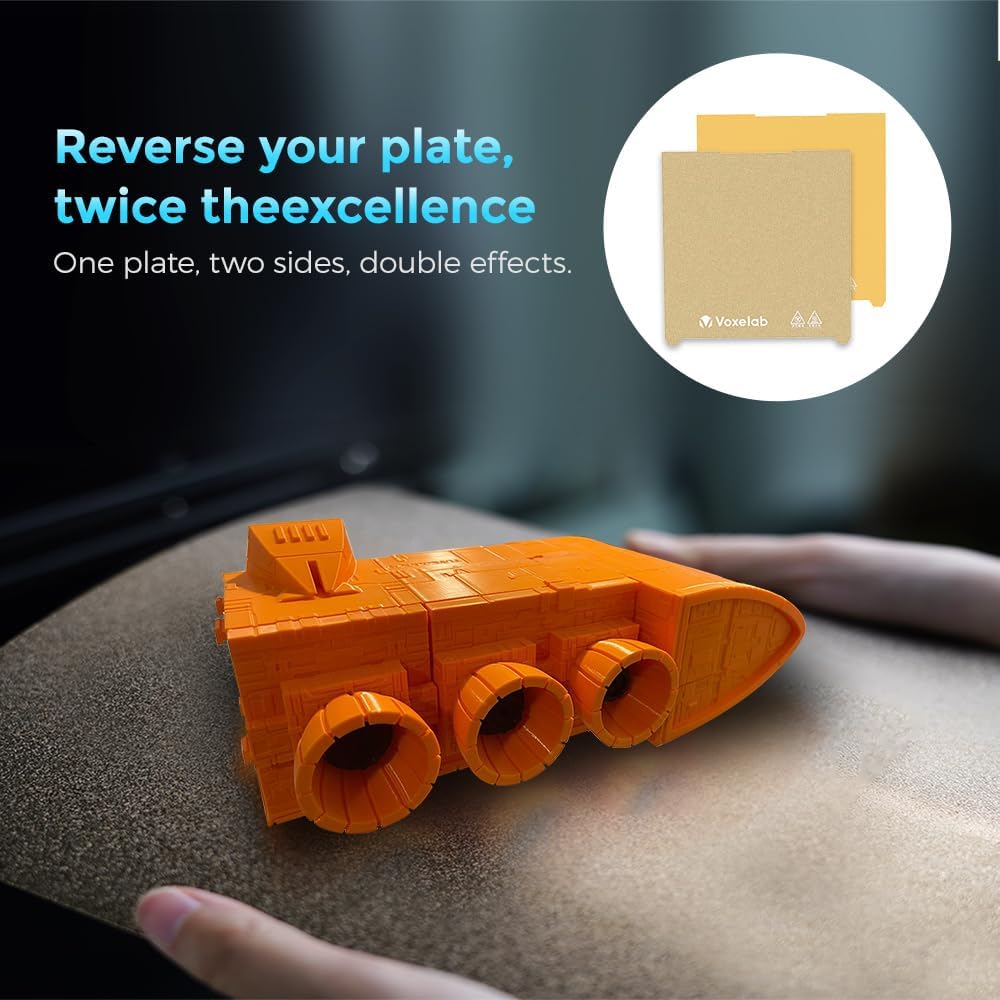
Figure 8: Removable magnetic PEI steel platform for easy print removal.
4.2 Wymiana dyszy
Over time, nozzles may wear out or become clogged. The package includes multiple copper nozzles of various sizes for replacement. To replace a nozzle, ensure the hotend is heated to printing temperature, then carefully unscrew the old nozzle using a wrench and screw in the new one. Always exercise caution as the hotend will be very hot.
4.3 Ogólna opieka
Regularly check and tighten all screws and belts to ensure proper printer operation. Keep the printer in a clean, dust-free environment. Lubricate moving parts as recommended in the detailed user manual (not provided here) to ensure smooth motion and extend the lifespan of your printer.
5. Rozwiązywanie Problemów
This section covers common issues and their potential solutions. For more detailed troubleshooting, please refer to the comprehensive user manual or contact Voxelab support.
5.1 Problemy z przyczepnością wydruków
- Problem: Prints do not stick to the build plate or warp during printing.
- Rozwiązanie: Ensure the print bed is clean and free of oils. Re-run the 25-point auto-leveling process. Adjust initial layer height and print bed temperature in your slicing software. Consider using an adhesive like glue stick or hairspray for difficult materials.
5.2 Problemy z podawaniem filamentu
- Problem: Filament is not extruding or is extruding inconsistently.
- Rozwiązanie: Check for tangled filament on the spool. Ensure the extruder gear is clean and gripping the filament properly. Verify the nozzle is not clogged; perform a cold pull or replace the nozzle if necessary. Confirm the correct printing temperature for your filament type.
5.3 Słaba jakość wydruku
- Problem: Prints show layer shifting, stringing, or poor surface finish.
- Rozwiązanie: Check belt tension on X and Y axes. Ensure the printer is on a stable surface. Adjust retraction settings in your slicing software to reduce stringing. Optimize cooling settings for better surface finish. Calibrate E-steps for accurate extrusion.
6. Specyfikacje
| Funkcja | Specyfikacja |
|---|---|
| Wymiary produktu | 11.8 x 11.8 x 11.8 inches (300D x 300W x 300H mm) |
| Waga przedmiotu | 33 funta (15 kilograma) |
| Numer modelu przedmiotu | Aquila X3 Plus |
| Marka | Wokselab |
| Zgodność materiałów | PLA, PETG, ABS |
| Automatyczne poziomowanie | 25-Point Auto Leveling |
| Zbuduj platformę | Removable Magnetic PEI Steel Platform |
| Typowa prędkość drukowania | 100 mm/s |
| Maksymalna prędkość drukowania | 200 mm/s |
| Included Nozzle Sizes | 0.3mm, 0.4mm, 0.6mm, 0.8mm (one of each) |
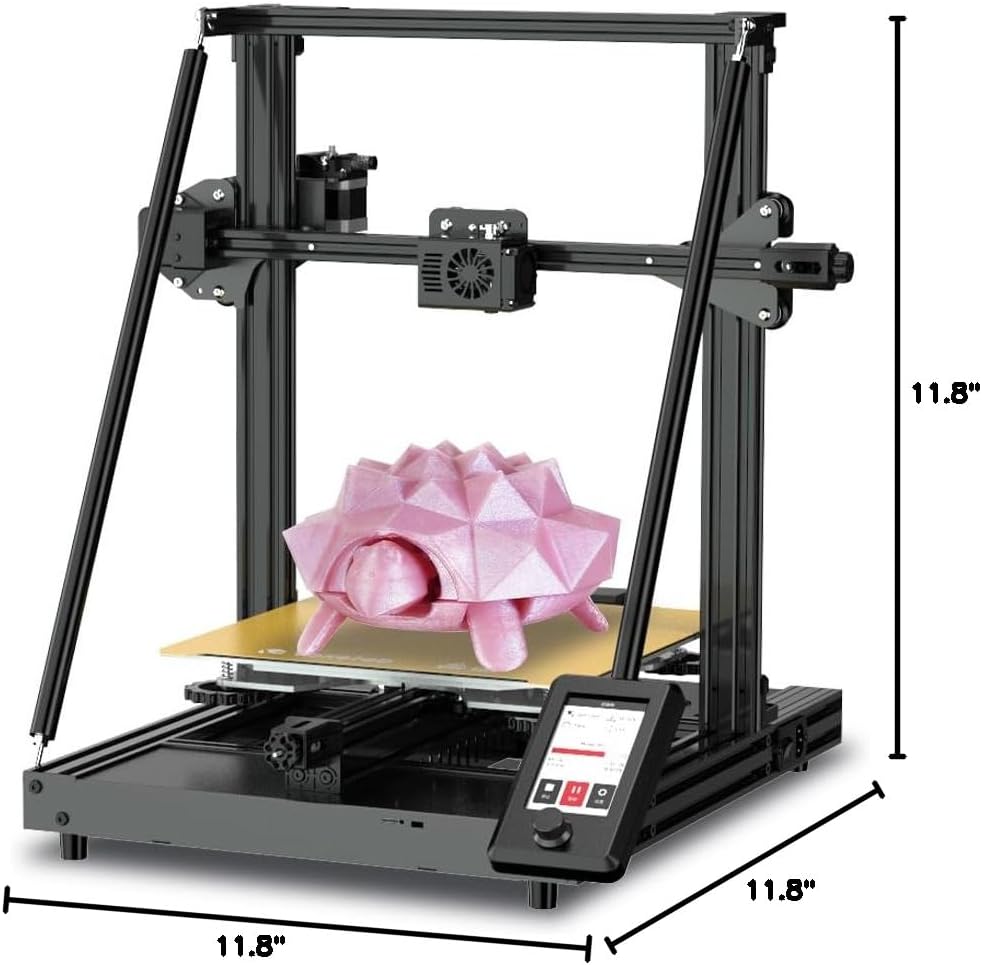
Figure 9: Key dimensions of the Aquila X3 Plus.
7. Gwarancja i wsparcie
Voxelab FDM 3D printers come with a roczna gwarancjaDodatkowo klienci otrzymują dożywotnie wsparcie techniczne. If you encounter any questions or issues during the use of your printer, please do not hesitate to contact our dedicated after-sales team. We are committed to providing a fast response within 24 hours to assist you.
For further assistance, please visit the official Voxelab website or refer to the detailed user manual that came with your product.


