Wstęp
The SmallRig AP-02 Lightweight Travel Tripod is designed for photographers and videographers seeking a compact, portable, and stable support solution. Constructed from durable aluminum alloy, this tripod features an innovative center column and square-shaped leg tubes for maximum compactness, making it ideal for travel. It offers versatile shooting angles, a detachable ball head with panoramic capabilities, and integrated expansion points for accessories.

Image: The SmallRig AP-02 Lightweight Travel Tripod shown with its quick release plate, Allen wrenches, and silicone foot pads.
Informacje dotyczące bezpieczeństwa
- Ensure all locks are securely tightened before mounting equipment or adjusting the tripod.
- Do not exceed the maximum load capacity of 17.6 lbs (8 kg) to prevent damage to the tripod or attached equipment.
- Avoid placing the tripod on unstable or slippery surfaces.
- Keep hands and fingers clear of moving parts, especially when extending or collapsing legs and the center column.
- Do not leave the tripod unattended with valuable equipment, especially in windy conditions.
- Czyść statyw miękką, suchą ściereczką. Unikaj stosowania silnych środków chemicznych i materiałów ściernych.
Zawartość opakowania
Sprawdź, czy w przesyłce znajdują się wszystkie elementy wymienione poniżej:
- 1 x SmallRig AP-02 Tripod
- 1 x Torba transportowa
- 3 x Silicone Foot Pad
- 2 x Klucz imbusowy
- 1 x QR Plate (Quick Release Plate)
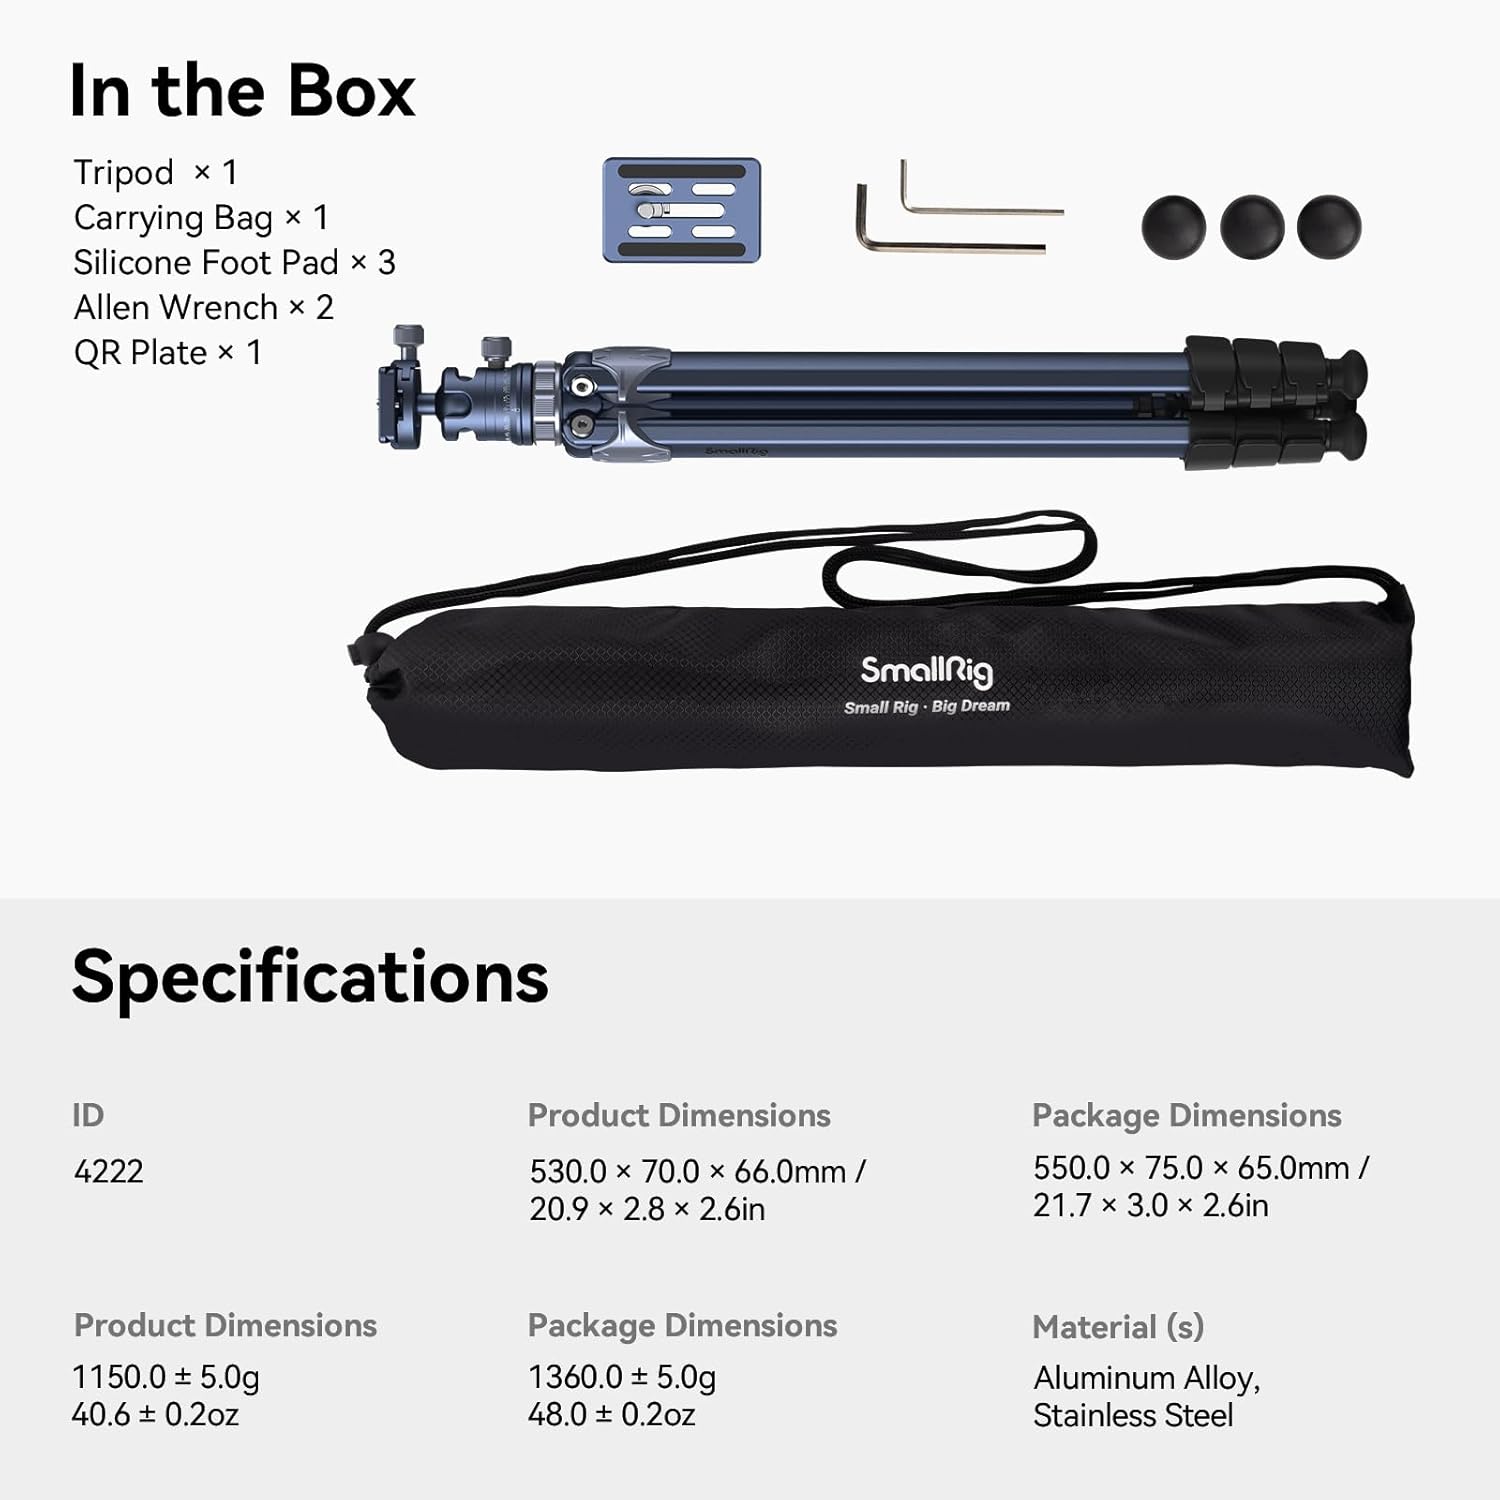
Image: Visual representation of the items included in the SmallRig AP-02 package.
Konfiguracja i montaż
1. Rozpakowanie i początkowa konfiguracja
Remove the tripod and all accessories from the carrying bag. The tripod is designed for extreme compactness, featuring square-shaped leg tubes for efficient storage.
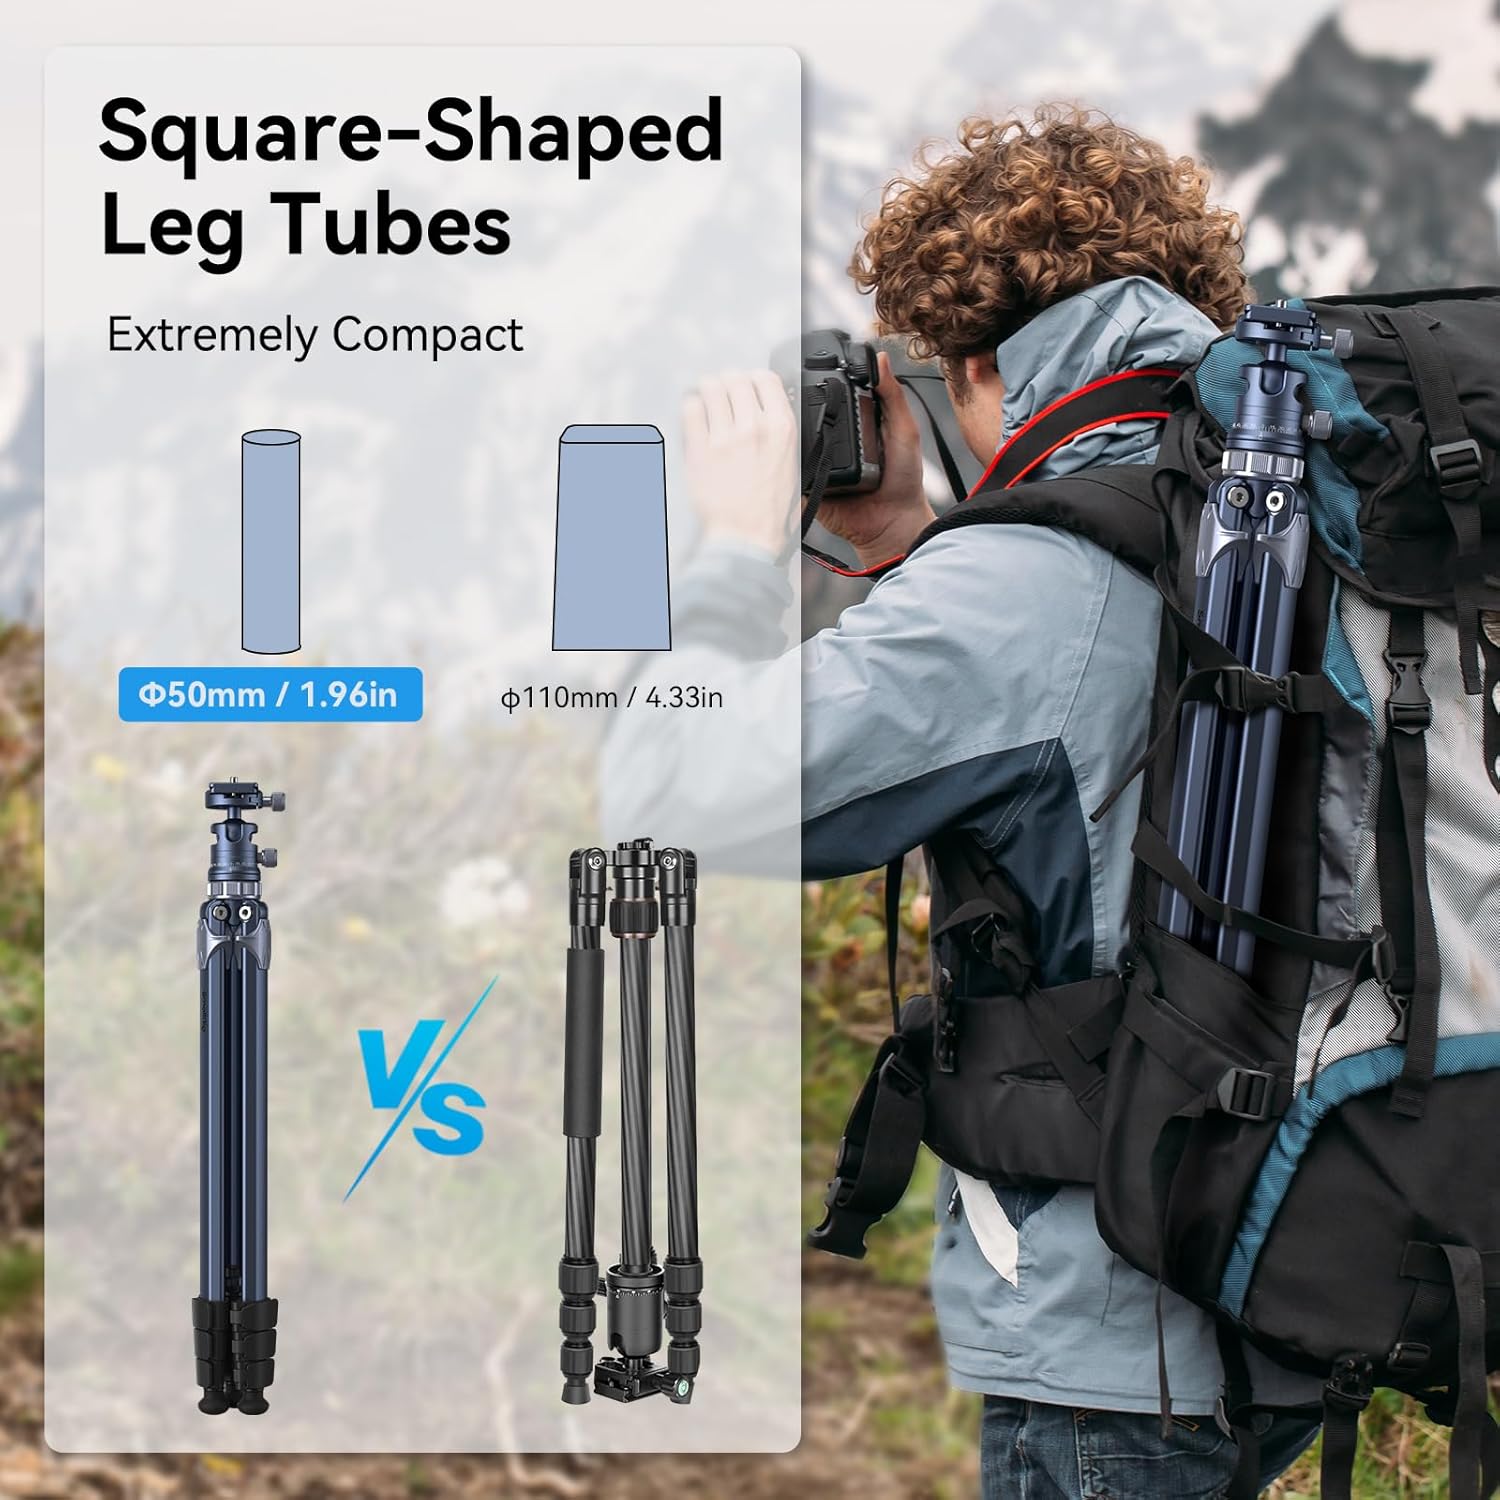
Image: Comparison illustrating the compact design of the SmallRig AP-02's square-shaped leg tubes.
2. Wysuwanie nóg statywu
To extend the tripod, release the quick release flip-locks on each of the 4-section column legs. Extend the legs to your desired height. The tripod can be adjusted from 16.9 inches (43 cm) to 62.6 inches (160 cm).

Image: The tripod demonstrating its adjustable height capabilities, from folded to maximum extension.
3. Podłączanie aparatu
The tripod features a detachable ball head with a quick-release plate. Attach the quick-release plate to the bottom of your camera. Then, slide the plate with your camera into the ball head and secure it using the plate buckle lock. The ball head includes two built-in bubble levels for precise horizontal and vertical leveling.

Obraz: Szczegółowy view of the ball head's features, including the quick release plate and leveling bubbles.
4. Regulacja kątów nóg
The tripod allows for quick angle adjustments with a plate buckle, offering three shooting angles: 23°, 55°, and 87°. This versatility enables various shooting scenarios, from standard height to low-angle shots.

Image: The tripod configured for high-angle, low-angle, and inverted center column shooting positions.
5. Utilizing Expansion Threaded Holes
The tripod is equipped with three innovative expansion threaded holes (1/4"-20) for mounting additional equipment such as a magic arm, microphone, monitor, or image transmission equipment. This enhances your shooting experience by allowing for a more comprehensive setup.

Image: Close-up of the tripod highlighting the accessory mounting points and the retractable metal foot nails.
6. Adapting to Terrain with Hidden Foot Nails
For increased stability on uneven or soft terrain, metal foot nails are hidden within the silicone foot pads at the bottom of the stand. These can be deployed by twisting the silicone pads to expose the spikes, providing better grip.
Przewodnik po konfiguracji wideo
Watch this official video for a visual guide on setting up and using your SmallRig AP-02 Lightweight Travel Tripod:
Video: Official SmallRig demonstration of the AP-02 tripod's features, setup, and usage scenarios.
Instrukcja obsługi
Adjusting Height and Stability
To adjust the tripod's height, open the flip-locks on each leg section and extend or retract the legs as needed. Close the flip-locks firmly to secure the desired height. For maximum stability, ensure the legs are fully spread and the center column is not excessively extended, especially with heavier cameras. The tripod has a maximum bearing capacity of 17.6 lbs (8 kg).
Panoramiczne strzelanie
The ball head features a 360° horizontal scale at its base. Loosen the panoramic lock knob, rotate the camera to the desired panoramic position, and then tighten the knob to secure. This allows for smooth and precise panoramic photography.
Low Angle and Macro Photography
For extremely low-angle shots or macro photography, the center column can be inverted. To do this, fully extend the center column, unscrew the hook at the bottom, and then remove the center column. Reinsert it upside down and secure it. This allows your camera to be positioned very close to the ground.
Konserwacja
- Czyszczenie: Przetrzyj statyw miękką ściereczką.amp cloth after each use, especially if used in dusty, sandy, or wet environments. Ensure all parts are dry before storing.
- Smarowanie: Periodically check leg locks and moving parts for smooth operation. If necessary, apply a small amount of silicone-based lubricant to the leg sections to maintain smooth extension and retraction. Avoid oil-based lubricants.
- Składowanie: Przechowuj statyw w pokrowcu, w chłodnym i suchym miejscu, z dala od bezpośredniego światła słonecznego i ekstremalnych temperatur.
- Kontrola: Regularly inspect the tripod for any signs of wear, damage, or loose components. Tighten any loose screws using the provided Allen wrenches.
Rozwiązywanie problemów
| Problem | Możliwa przyczyna | Rozwiązanie |
|---|---|---|
| Statyw wydaje się niestabilny i chwiejny. | Legs not fully extended or locked; center column too high; uneven terrain; overloaded. | Ensure all leg locks are securely fastened. Lower the center column if possible. Adjust leg angles for a wider stance. Deploy metal foot nails on soft ground. Verify equipment weight is within limits. |
| Trudności z wysuwaniem lub chowaniem sekcji nóg. | Dirt or debris inside leg sections; lack of lubrication. | Clean leg sections thoroughly. Apply a small amount of silicone lubricant if needed. |
| Ball head does not lock securely. | Locking knob not tightened sufficiently; internal mechanism issues. | Ensure the ball head locking knob is fully tightened. If the issue persists, contact customer support. |
| Quick release plate is stuck or difficult to remove. | Plate buckle lock is not fully disengaged; debris. | Ensure the plate buckle lock is completely open. Check for any obstructions or debris around the plate. |
Specyfikacje
| Funkcja | Szczegół |
|---|---|
| Wymiary produktu | 20.87 x 2.76 x 63 cala (53.0 x 7.0 x 160 cm) |
| Waga przedmiotu | 2.54 funtów (1.15 kg) |
| Numer modelu | 4222 |
| Marka | MAŁY RIG |
| Kolor | Ciemnoniebieski |
| Kompatybilne urządzenia | Camcorder, Camera |
| Cechy specjalne | Rotatable, Lightweight, Adjustable |
| Tworzywo | Aluminium, Stal nierdzewna |
| Ograniczenie wagowe | 17.6 funtów (8 kg) |
| Maksymalna wysokość | 63 cala (160 cm) |
| Typ głowicy statywu | Głowice kulowe |
Gwarancja i wsparcie
SmallRig products typically come with a limited warranty. For specific warranty details, product registration, or technical support, please visit the official SmallRig webOdwiedź stronę internetową lub skontaktuj się bezpośrednio z działem obsługi klienta. Zachowaj paragon jako dowód zakupu.
Więcej informacji i wsparcia znajdziesz na stronie Oficjalny sklep SmallRig na Amazon.


