1. Koniec produktuview
The Yaheetech Nightstand with 3 Drawers and Charging Station is designed to provide convenient storage and power access for your bedroom or living space. It features three spacious drawers for organized storage and an integrated charging station with two power outlets and two USB ports, allowing you to charge electronic devices easily.

Rysunek 1.1: Assembled Yaheetech Nightstand. This image shows the complete nightstand with its three drawers and the integrated charging station on top.

Rysunek 1.2: Yaheetech Nightstand positioned next to a sofa, demonstrating its use as a side table with a lamp and charging devices.
2. Zawartość opakowania
Before assembly, please verify that all components and hardware listed below are present and undamaged. Refer to the installation video for a visual guide to identifying each part.

Rysunek 2.1: All parts and hardware laid out for assembly. This image displays the various wooden panels, drawer slides, and fasteners included in the package.
Lista części:
- Panel górny
- Panele boczne (2)
- Dolny panel
- Panel tylny
- Fronty szuflad (3)
- Panele boczne szuflady (6)
- Tylne panele szuflad (3)
- Dolne panele szuflad (3)
- Nogi (4)
- Jednostka stacji ładowania
Lista sprzętu:
- Śruby (różne rozmiary)
- Drewniane kołki
- Zamki krzywkowe i śruby krzywkowe
- Prowadnice do szuflad (6 par)
- Drawer Pulls (3)
- Klips do kabla zasilającego
- Klucz imbusowy (jeśli dotyczy)
3. Instrukcje bezpieczeństwa
- Aby zapobiec zarysowaniom, produkt należy zawsze składać na miękkiej i czystej powierzchni.
- Przed użyciem upewnij się, że wszystkie śruby i elementy mocujące są mocno dokręcone. Regularnie sprawdzaj i dokręcaj w razie potrzeby.
- Do not exceed the maximum recommended load capacity of 106 pounds for the top surface.
- Trzymaj małe części i sprzęt poza zasięgiem dzieci, aby uniknąć ryzyka zadławienia.
- For electrical safety, do not overload the power outlets or USB ports. Ensure the power cord is not pinched or damaged.
- Do not expose the nightstand to excessive moisture or direct sunlight.
- Use only the provided hardware for assembly. Substituting parts may compromise stability and safety.
4. Instrukcja montażu
Follow these steps carefully for proper assembly. It is recommended to have two people for certain steps to ensure stability and ease of construction. An installation video is provided below for visual guidance.
Wideo 4.1: Installation video for the Yaheetech Nightstand. This video provides a step-by-step visual guide to assembling the nightstand, including attaching drawer slides, constructing the frame, and installing the charging station.
Przewodnik krok po kroku:
- Złóż szuflady:
- Attach the drawer side panels to the drawer front and back panels using the provided screws and dowels.
- Wsuń dolny panel szuflady w rowki.
- Secure the drawer pulls to the drawer fronts.
- Attach the drawer slides (H-2(L) and H-2(R)) to the sides of each drawer using screws.
- Złóż ramę główną:
- Attach the side panels to the bottom panel using cam locks and cam bolts.
- Przymocuj tylny panel do zmontowanej ramy.
- Attach the main drawer slides (H-1(L) and H-1(R)) to the inner sides of the main frame using screws. Ensure they are aligned correctly for smooth drawer operation.
- Przymocuj nogi:
- Insert the wooden dowels into the designated holes on the bottom panel.
- Attach the four solid rubberwood legs to the bottom panel, aligning them with the dowels and securing them with screws.

Rysunek 4.1: This image highlights the robust construction of the solid rubberwood legs, emphasizing their strength and stability compared to MDF legs.
- Montaż panelu górnego:
- Place the top panel onto the assembled frame, aligning the pre-drilled holes.
- Secure the top panel using screws.
- Zainstaluj stację ładującą:
- Carefully feed the power cord of the charging station through the cutout on the top panel.
- Insert the charging station unit into the opening on the top panel.
- Secure the charging station with the provided screws.

Rysunek 4.2: Szczegółowy view of the charging station, showing 2 AC outlets (125V/12A), 2 USB ports (5V/2A), a power switch, and the 6.5-foot power cord with a hook & loop strap for management.
- Włóż szuflady:
- Carefully slide each assembled drawer into the corresponding drawer slides on the main frame.
- Ensure smooth operation. If a drawer is stiff, check alignment of the slides.

Rysunek 4.3: Z bliska view illustrating the smooth operation of the drawer slides, designed for quiet and effortless opening and closing.
5. Instrukcja obsługi (stacja ładująca)
Zintegrowana stacja ładowania zapewnia wygodny dostęp do zasilania urządzeń elektronicznych.
- Podłączenie zasilania: Plug the 6.5-foot power cord into a standard 120V AC wall outlet.
- Gniazdka AC: Stacja ładująca zawiera dwa gniazda prądu przemiennego 125 V/12 A. Można ich używać do zasilania urządzeń wymagających standardowego zasilania ściennego, takich jak:amps, laptops, or small appliances.
- Porty USB: Do ładowania smartfonów, tabletów i innych urządzeń zasilanych przez USB dostępne są dwa porty USB 5 V/2 A.
- Przycisk zasilania: A master power switch controls the flow of electricity to both the AC outlets and USB ports. Press the switch to turn the charging station ON or OFF.
- Zarządzanie przewodami: Use the included hook & loop strap to manage excess power cord length and keep your space tidy.
Ważny: Do not exceed the maximum electrical load capacity of the charging station. Avoid plugging in high-power appliances that may draw more than 12A. If the charging station trips a circuit breaker, unplug devices and reset the breaker before resuming use.
6. Konserwacja i pielęgnacja
Proper care will help maintain the appearance and longevity of your nightstand.
- Czyszczenie: Przetrzyj powierzchnię miękką, damp ściereczką. W przypadku uporczywych zabrudzeń użyj łagodnego, nieściernego środka czyszczącego. Natychmiast osusz czystą ściereczką.
- Wycieki: The nightstand features a water-resistant painting. Promptly wipe up any spills to prevent damage to the finish.
- Unikaj silnych środków chemicznych: Do not use abrasive cleaners, ammonia-based products, or silicone-based polishes, as these can damage the finish.
- Prowadnice szuflad: Okresowo sprawdzaj płynność działania prowadnic szuflad. Jeśli staną się sztywne, możesz nałożyć niewielką ilość smaru silikonowego.
- Elementy złączne: Regularly check all screws and bolts to ensure they remain tight. Re-tighten as needed to maintain structural integrity.

Rysunek 6.1: Demonstrates wiping water droplets from the nightstand surface, highlighting its easy-to-clean and water-resistant properties.
7. Rozwiązywanie Problemów
If you encounter any issues with your Yaheetech Nightstand, refer to the following common problems and solutions:
| Problem | Możliwa przyczyna | Rozwiązanie |
|---|---|---|
| Szuflady nie wysuwają się płynnie. | Niewłaściwie ustawione prowadnice szuflad lub luźne śruby. | Check the alignment of the drawer slides on both the drawer and the main frame. Tighten all screws securing the slides. Apply a small amount of silicone lubricant if needed. |
| Stacja ładowania nie zasila urządzeń. | Power cord not plugged in, power switch off, or circuit overload. | Ensure the power cord is securely plugged into a working wall outlet. Check if the power switch on the charging station is ON. Unplug some devices if overloaded and check your household circuit breaker. |
| Stolik nocny wydaje się chwiejny. | Luźne elementy złączne lub nierówna podłoga. | Tighten all assembly screws and bolts. Ensure the nightstand is placed on a level surface. If necessary, use furniture pads under the legs to stabilize. |
8. Specyfikacje
- Wymiary produktu: 15.75 x 15.75 x 23.62 cali (dł. x szer. x wys.)
- Waga przedmiotu: 27.2 funta
- Maksymalne zalecane obciążenie: 106 pounds (top surface)
- Drawer Storage Space: 10 x 11.3 x 4 cali (szer. X gł. X wys.)
- Przybory: CARB P2 MDF board, Solid Rubberwood legs
- Stacja ładowania:
- Gniazda prądu zmiennego: 2 (125 V/12 A)
- Porty USB: 2 (5 V/2 A)
- Długość przewodu zasilającego: nóżki 6.5
- Wymagany montaż: Tak
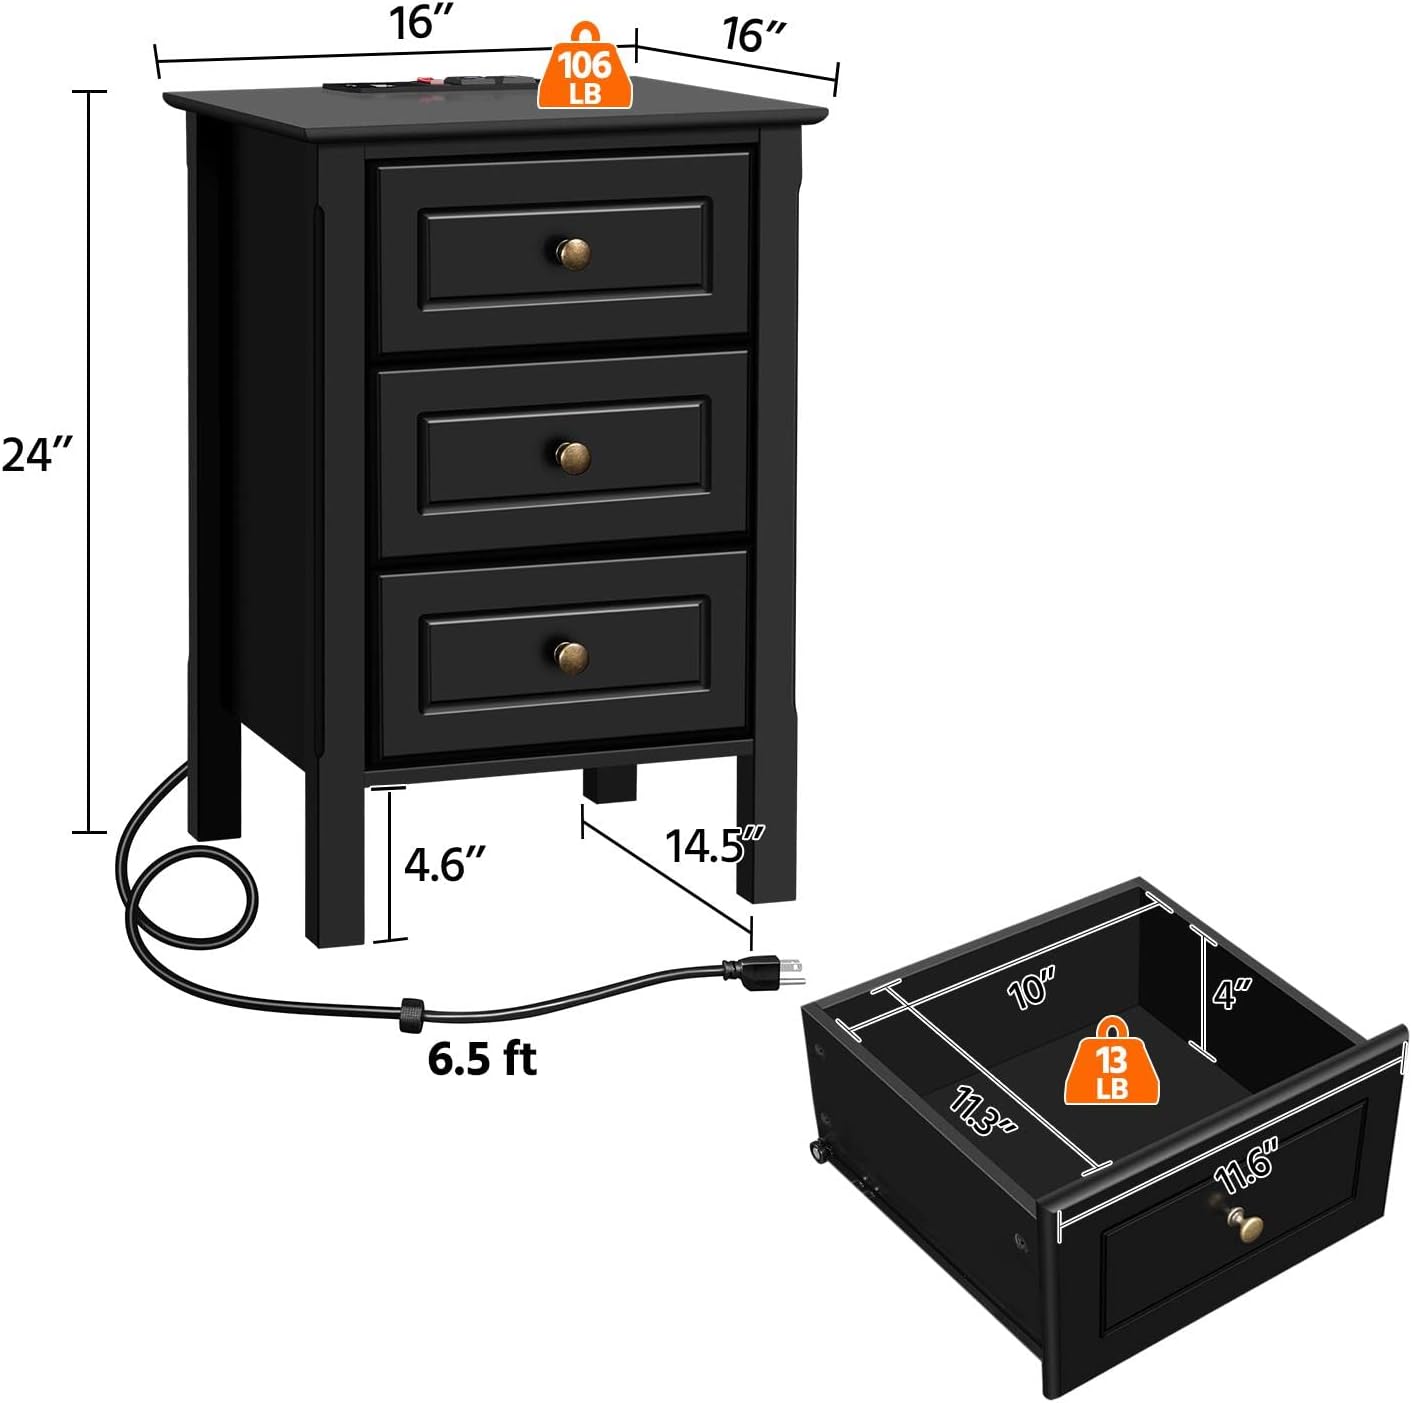
Rysunek 8.1: Diagram illustrating the overall dimensions of the nightstand (16" W x 16" D x 24" H) and the internal dimensions of a drawer (10" W x 11.3" D x 4" H), along with weight capacities.
9. Gwarancja i wsparcie
For warranty information, technical support, or any questions regarding your Yaheetech Nightstand, please contact Yaheetech customer service. Refer to the product packaging or the official Yaheetech webstrona dla danych kontaktowych.
Producent: Yaheetech


