1. Wprowadzenie
This manual provides detailed instructions for the installation, operation, and maintenance of your Roca VICTORIA PLUS A5A2J18C00 Thermostatic Bath-Shower Column. Please read this manual thoroughly before installation and use to ensure proper function and safety. Keep this manual for future reference.

Figure 1: Roca VICTORIA PLUS A5A2J18C00 Thermostatic Bath-Shower Column
2. Informacje dotyczące bezpieczeństwa
- Przed rozpoczęciem instalacji należy upewnić się, że wszystkie linie doprowadzające wodę są zamknięte.
- Jeśli masz wątpliwości co do jakiegokolwiek etapu instalacji, skonsultuj się z wykwalifikowanym hydraulikiem.
- Nie należy używać do czyszczenia produktu środków czyszczących o działaniu ściernym ani silnych środków chemicznych, gdyż może to uszkodzić wykończenie.
- Regularly check for leaks and address them promptly to prevent water damage.
- The thermostatic mixer is designed to maintain a constant water temperature. Do not tamper with the factory settings unless necessary and with caution.
3. Zawartość opakowania
Przed instalacją sprawdź, czy wszystkie komponenty są obecne i nieuszkodzone:
- Mieszacz termostatyczny
- Adjustable height shower column (1295 mm to 1670 mm)
- Overhead shower head (ø 245 mm)
- Hand shower (ø 100 mm, 3 functions)
- 1.7 m metallic flexible hose
- Shower column mounting kit
4. Specyfikacje
| Funkcja | Specyfikacja |
|---|---|
| Numer modelu | A5A2J18C00 |
| Marka | Roca |
| Tworzywo | Metal |
| Kolor/Wykończenie | Chrom |
| Typ montażu | Montaż ścienny |
| Regulowana wysokość | 1295 mm do 1670 mm |
| Średnica głowicy prysznicowej | ø245 mm |
| Średnica słuchawki prysznicowej | ø 100 mm (3 functions) |
| Długość węża | 1.7m |
| Liczba uchwytów | 1 |
| Wymiary produktu | Wymiary 128.5 x 53.5 x 137 cm |
| Waga produktu | 6.16 kilogramów |
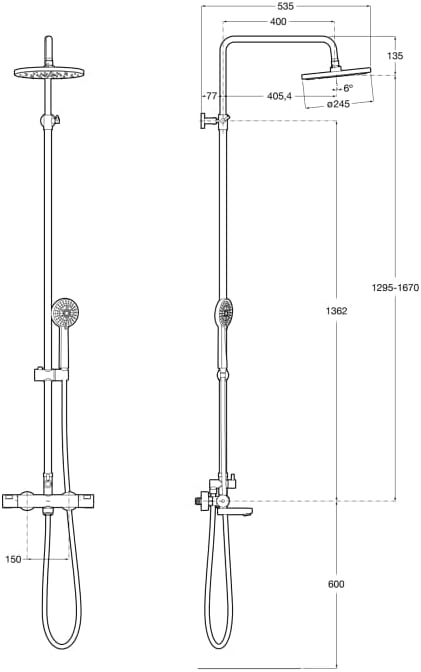
Rysunek 2: Rysunek techniczny z kluczowymi wymiarami montażowymi.
5. Instalacja
Professional installation is recommended. Ensure you have all necessary tools and safety equipment before proceeding.
5.1. Przygotuj miejsce instalacji
- Zamknij dopływ wody do łazienki.
- Zdemontuj wszelkie istniejące elementy wyposażenia prysznica.
- Clean the wall surface where the shower column will be mounted.
5.2. Mount the Thermostatic Mixer
- Install the eccentric connectors into the wall water outlets. Ensure they are securely tightened and properly aligned.
- Attach the decorative escutcheons over the eccentric connectors.
- Connect the thermostatic mixer to the eccentric connectors. Ensure the hot water inlet (marked red) and cold water inlet (marked blue) are correctly aligned. Tighten the nuts using a wrench, protecting the finish with a cloth.
5.3. Install the Shower Column
- Attach the lower part of the shower column to the top outlet of the thermostatic mixer.
- Assemble the adjustable height mechanism onto the main column.
- Mark the position for the upper wall bracket on the wall, ensuring the column is vertical and at the desired height.
- Drill holes at the marked positions, insert wall plugs, and secure the upper wall bracket.
- Secure the shower column to the upper wall bracket using the provided screws and Allen key.
5.4. Attach Shower Components
- Screw the overhead shower head onto the shower arm. Ensure a watertight seal.
- Connect the metallic flexible hose to the hand shower and the outlet on the thermostatic mixer.
- Place the hand shower into its adjustable holder on the column.
6. Działanie
6.1. Thermostatic Mixer
- Kontrola temperatury: The right handle controls the water temperature. Push the safety button and turn to adjust above 38°C.
- Kontrola przepływu: The left handle controls the water flow and diverts water between the overhead shower, hand shower, and bath filler (if applicable).
6.2. Funkcje prysznica ręcznego
The hand shower features 3 spray functions. Rotate the shower head face to switch between spray patterns.
6.3. Adjustable Height and Angle
- The hand shower holder can be adjusted up or down the column and tilted to your preferred angle.
- The overhead shower head can be tilted and swiveled to adjust the spray direction.
7. Konserwacja
7.1. Czyszczenie
- Clean the chrome surfaces regularly with a soft cloth and mild soap or a non-abrasive cleaner specifically designed for bathroom fixtures.
- Unikaj stosowania szorstkich gąbek, gąbek ściernych i silnych środków czyszczących, gdyż mogą one uszkodzić wykończenie.
- For shower heads, periodically rub the silicone nozzles to dislodge any limescale buildup.
7.2. Usuwanie kamienia
In hard water areas, limescale can build up. Use a descaling solution suitable for bathroom fixtures, following the manufacturer's instructions. Rinse thoroughly after cleaning.
8. Rozwiązywanie Problemów
| Problem | Możliwa przyczyna | Rozwiązanie |
|---|---|---|
| Brak przepływu wody lub niskie ciśnienie | Water supply off, clogged filters, kinked hose | Check water supply, clean filters in the mixer, straighten hose. |
| Temperatura wody ulega wahaniom | Inconsistent hot/cold water supply, thermostatic cartridge issue | Check water heater, consult a professional for cartridge inspection. |
| Wycieki z połączeń | Luźne połączenia, uszkodzone uszczelki | Tighten connections, replace seals/washers if damaged. |
| Shower head/hand shower spray uneven | Osadzanie się kamienia w dyszach | Clean nozzles by rubbing or using a descaling solution. |
9. Gwarancja i wsparcie
For warranty information and customer support, please refer to the documentation provided with your purchase or visit the official Roca webZachowaj dowód zakupu na wypadek roszczeń gwarancyjnych.


