Wstęp
This manual provides comprehensive instructions for the installation, operation, and maintenance of your Natec Cabassu G2 Midi Tower PC Case. Please read this manual thoroughly before beginning installation to ensure proper setup and optimal performance.
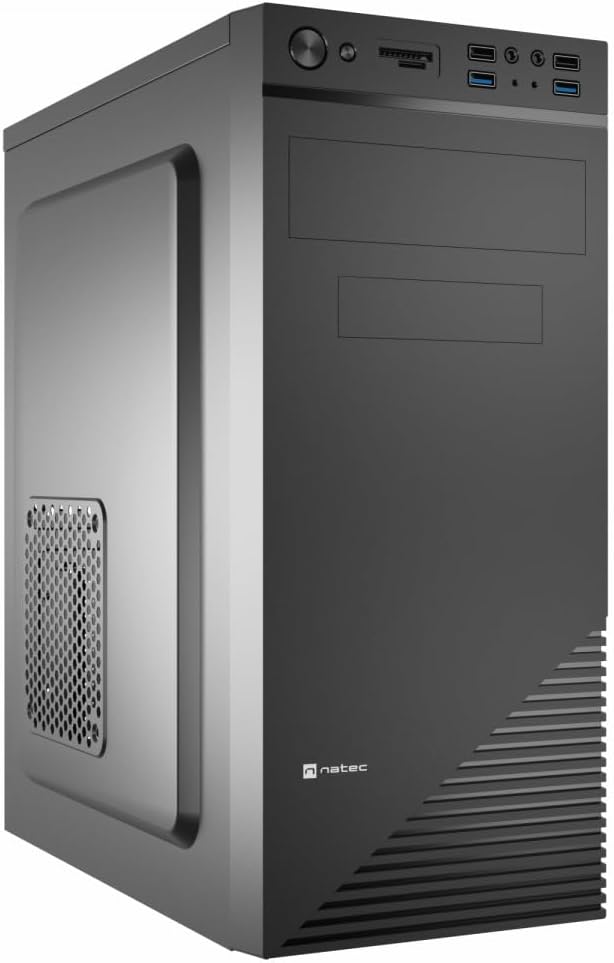
Figure 1: Natec Cabassu G2 Midi Tower PC Case. This image shows the front and left side of the black PC case, highlighting its sleek design and front panel layout.
Informacje dotyczące bezpieczeństwa
- Przed instalacją lub demontażem jakichkolwiek podzespołów należy zawsze odłączyć zasilacz od gniazdka ściennego.
- Aby zapobiec uszkodzeniom spowodowanym elektrycznością statyczną, należy obchodzić się z elementami ostrożnie.
- Chroń obudowę przed wodą, wilgocią i ekstremalnymi temperaturami.
- Aby zapobiec przegrzaniu, należy zapewnić odpowiednią wentylację.
- Do not attempt to open the power supply unit.
Zawartość opakowania
Sprawdź, czy w opakowaniu znajdują się wszystkie elementy:
- Natec Cabassu G2 Midi Tower PC Case
- Accessory kit (screws, standoffs, cable ties)
- Instrukcja obsługi (ten dokument)
Konfiguracja i instalacja komponentów
1. Przygotowanie sprawy
- Połóż obudowę na płaskiej i stabilnej powierzchni.
- Remove the side panels by unscrewing the thumbscrews at the rear and sliding the panels backward.

Rysunek 2: Wnętrze view of the Natec Cabassu G2 case with the side panel removed, illustrating the internal layout for component installation.
2. Instalacja płyty głównej
- Zainstaluj osłonę I/O w tylnym otworze obudowy.
- Align the motherboard with the pre-installed standoffs. The Cabassu G2 supports Mini ITX, Micro ATX, and ATX motherboards.
- Przymocuj płytę główną za pomocą dołączonych śrub.
3. Instalacja zasilania
- The power supply mounts at the bottom of the case.
- Slide the power supply into its designated bay from the rear of the case.
- Secure it with screws from the rear.
4. Instalacja dysku pamięci masowej
- 2.5" Drives (SSDs/HDDs): The case features 3 x 2.5" drive bays. Mount drives using the provided screws in the designated locations.
- 3.5" Drives (HDDs): The case also supports 3.5" drives.
5. Instalacja karty rozszerzeń
- Remove the necessary expansion slot covers from the rear of the case (7 expansion slots available).
- Umieść kartę graficzną lub inną kartę rozszerzeń w gniazdach PCIe płyty głównej.
- Przymocuj karty za pomocą śrub.

Rysunek 3: Tył view of the Natec Cabassu G2 case, detailing the I/O shield cutout, power supply opening, and seven expansion slots.
6. Zarządzanie kablami
Route cables behind the motherboard tray where possible to improve airflow and aesthetics. Use the included cable ties to secure bundles.
7. Podłączanie kabli panelu przedniego
Connect the front panel cables (USB 2.0, USB 3.0, audio, power switch, reset switch, HDD LED, power LED) to the corresponding headers on your motherboard. Refer to your motherboard manual for exact pin assignments.

Figure 4: Close-up of the Natec Cabassu G2 front panel, showing 2x USB 2.0 ports, 2x USB 3.0 ports, audio jacks, and power/reset buttons.
Instrukcja obsługi
Włączanie/wyłączanie
- Włączanie: Naciśnij przycisk zasilania znajdujący się na panelu przednim.
- Wyłączone: Initiate shutdown through your operating system. For a forced shutdown, press and hold the power button for several seconds.
- Reset: Press the reset button on the front panel to restart the system.
Using Front Panel Ports
Panel przedni zapewnia wygodny dostęp do:
- 2 porty USB 2.0
- 2 porty USB 3.0
- Audio input (microphone) and output (headphone) jacks
Connect compatible devices to these ports as needed.
Konserwacja
Czyszczenie
- Regularnie czyść zewnętrzną część obudowy miękką,amp płótno. Unikaj ściernych środków czyszczących.
- Use compressed air to remove dust from fan filters and internal components. Ensure the system is powered off and unplugged before cleaning.
Filtry przeciwpyłowe
The case may include removable dust filters. Periodically remove and clean these filters to maintain optimal airflow and cooling performance.
Rozwiązywanie problemów
| Problem | Możliwa przyczyna | Rozwiązanie |
|---|---|---|
| System nie włącza się. | Power cables not connected properly. Faulty power supply. | Check all power connections (motherboard, CPU, GPU, power supply to wall). Ensure power supply switch is ON. |
| Porty USB na przednim panelu nie działają. | Kable USB na przednim panelu nie są podłączone do płyty głównej. | Verify that the USB 2.0 and USB 3.0 headers are correctly connected to the motherboard. |
| Excessive fan noise. | Dust accumulation. Loose fan. | Clean dust from fans and filters. Ensure all fans are securely mounted. |
Specyfikacje
| Funkcja | Szczegół |
|---|---|
| Nazwa modelu | Cabassu G2 |
| Numer modelu przedmiotu | S5624687 |
| Typ sprawy | Wieża Midi |
| Wymiary (dł. x szer. x wys.) | 19.69 x 19.69 x 11.02 cala (50 x 50 x 28 cm) |
| Waga | 7.04 funtów (3.19 kg) |
| Tworzywo | Akrylonitryl-butadien-styren (ABS), stal stopowa |
| Zgodność płyty głównej | Mini ITX, Micro ATX, ATX |
| Zatoki na dyski 2.5" | 3 |
| Gniazda rozszerzeń | 7 |
| Przednie porty we / wy | 2 x USB 2.0, 2 x USB 3.0, wejście/wyjście audio |
| Wsparcie fanów | 120mm (rear, pre-installed if applicable) |
| Metoda chłodzenia | Powietrze |
| Montaż zasilacza | Mocowanie dolne |
Informacje o gwarancji
Natec products are covered by a manufacturer's warranty. Specific warranty terms and conditions may vary by region and retailer. Please refer to the warranty card included with your product or visit the official Natec webstrona zawierająca szczegółowe informacje dotyczące zakresu gwarancji i roszczeń.
Wsparcie
For technical assistance, troubleshooting, or further inquiries, please visit the official Natec support webOdwiedź witrynę lub skontaktuj się z działem obsługi klienta. Dane kontaktowe zazwyczaj znajdują się na opakowaniu produktu lub oficjalnej stronie marki. webstrona.
Webstrona: www.natec-zone.com (Byłyample link, rzeczywisty link może się różnić)


