1. Wprowadzenie
Welcome to the Gotrax R1 Folding Electric Bike user manual. This manual provides essential information for the safe and efficient operation, assembly, and maintenance of your new electric bicycle. Please read it thoroughly before your first ride to ensure a safe and enjoyable experience.
The Gotrax R1 is designed for versatile use, including daily commuting, campus travel, park riding, and other adventures. It features a powerful motor, long-range battery, and a convenient foldable design.
2. Informacje dotyczące bezpieczeństwa
Twoje bezpieczeństwo jest najważniejsze. Podczas jazdy zawsze noś kask i odpowiedni sprzęt ochronny. Przestrzegaj wszystkich lokalnych przepisów ruchu drogowego. Regularna konserwacja jest kluczowa dla bezpiecznej eksploatacji.
Ważne środki ostrożności:
- Always perform a pre-ride inspection: check tire pressure, brakes, lights, and battery connection.
- Nie należy jeździć pod wpływem alkoholu lub narkotyków.
- Unikaj jazdy w niesprzyjających warunkach pogodowych (ulewny deszcz, śnieg, lód).
- Ensure the battery is properly installed and activated before riding. Turn the key clockwise to the end to activate battery output. Press and hold the M button for two seconds to turn on the display and start riding. Press and hold the M button again to switch off the power.
- Bądź świadomy swojego otoczenia i innych użytkowników drogi.
- Nie należy przekraczać maksymalnej zalecanej wagi wynoszącej 264 funtów.
- Keep the two battery keys safe. Replacement keys may take a long time to obtain.
3. Koniec produktuview i komponenty
The Gotrax R1 electric bike is equipped with several key components designed for performance and convenience.

Figure 3.1: Gotrax R1 Folding Electric Bike (White)
This image shows the Gotrax R1 electric bike in its full, unfolded state, highlighting its main features. An inset image displays the bike in its compact, folded configuration, demonstrating its portability.
Kluczowe komponenty:
- Rama: Durable iron frame, foldable for easy storage and transport.
- Silnik: 350W motor with a peak power of 500W, providing speeds up to 20mph.
- Bateria: 48V/7.8Ah removable lithium-ion battery, offering up to 40 miles of range in Pedal-assist1 mode or 15.5 miles in pure electric mode.
- Koła: 20-inch wheels with 2.6-inch resistant tires.
- Hamulce: Dual 160mm mechanical disc brakes for reliable stopping power.
- Wyświetlacz: Large smart LCD display showing speed, battery level, and mileage.
- Oświetlenie: LED headlight and rear reflector for increased visibility.
- Bagażnik tylny: Integrated rear cargo rack for enhanced portability and carrying capacity.
- Kierownica: Height-adjustable handlebar for customized comfort.
4. Instalacja i montaż
The Gotrax R1 electric bike comes partially assembled. Follow these steps to complete the assembly and prepare for your first ride.
Kroki montażu:
- Rozpakowywanie: Ostrożnie wyjmij wszystkie elementy z opakowania. Zachowaj opakowanie do transportu lub przechowywania w przyszłości.
- Rozkładanie ramy: Unfold the main frame of the bike until it locks securely into place. Ensure all quick-release levers are tightened.
- Montaż przedniego koła: Attach the front wheel to the fork. Ensure the disc brake rotor aligns correctly with the caliper. Secure the wheel with the provided quick-release skewer or nuts.
- Montaż kierownicy: Insert the handlebar stem into the head tube and adjust the height to your preference. Tighten the stem clamp securely. Ensure the handlebars are straight and aligned with the front wheel.
- Montaż sztycy i siodełka: Insert the seat post with the saddle attached into the seat tube. Adjust the saddle height for comfortable pedaling, ensuring your leg has a slight bend at the bottom of the pedal stroke. Secure the seat post with the quick-release clamp.
- Attaching Pedals: Identify the left (L) and right (R) pedals. The left pedal threads counter-clockwise, and the right pedal threads clockwise. Apply a small amount of grease to the threads and screw them firmly into the crank arms.
- Montaż baterii: Ensure the battery is securely inserted into its compartment. Turn the key to the 'ON' position to activate the battery.
- Kontrole przed jazdą: Before your first ride, double-check all bolts, nuts, and quick-release levers for tightness. Verify brake functionality, tire pressure (recommended 35-45 PSI), and ensure the display powers on.

Figure 4.1: Foldable and Lightweight Frame
This image illustrates the compact, folded state of the Gotrax R1 electric bike, demonstrating how easily it can be carried, such as up a flight of stairs, emphasizing its portability.
5. Instrukcja obsługi
Familiarize yourself with the operating modes and controls of your Gotrax R1 electric bike.
5.1 Włączanie/wyłączanie i korzystanie z wyświetlacza
- Włączanie: Ensure the battery key is fully turned clockwise to the end. Press and hold the 'M' button on the display for two seconds to power on the bike and activate the display.
- Wyłączone: Press and hold the 'M' button again for two seconds to power off the bike.
- Funkcje wyświetlacza: The smart display shows current speed, battery level, and trip mileage. Refer to the detailed display manual (if provided separately) for specific function key operations and settings.
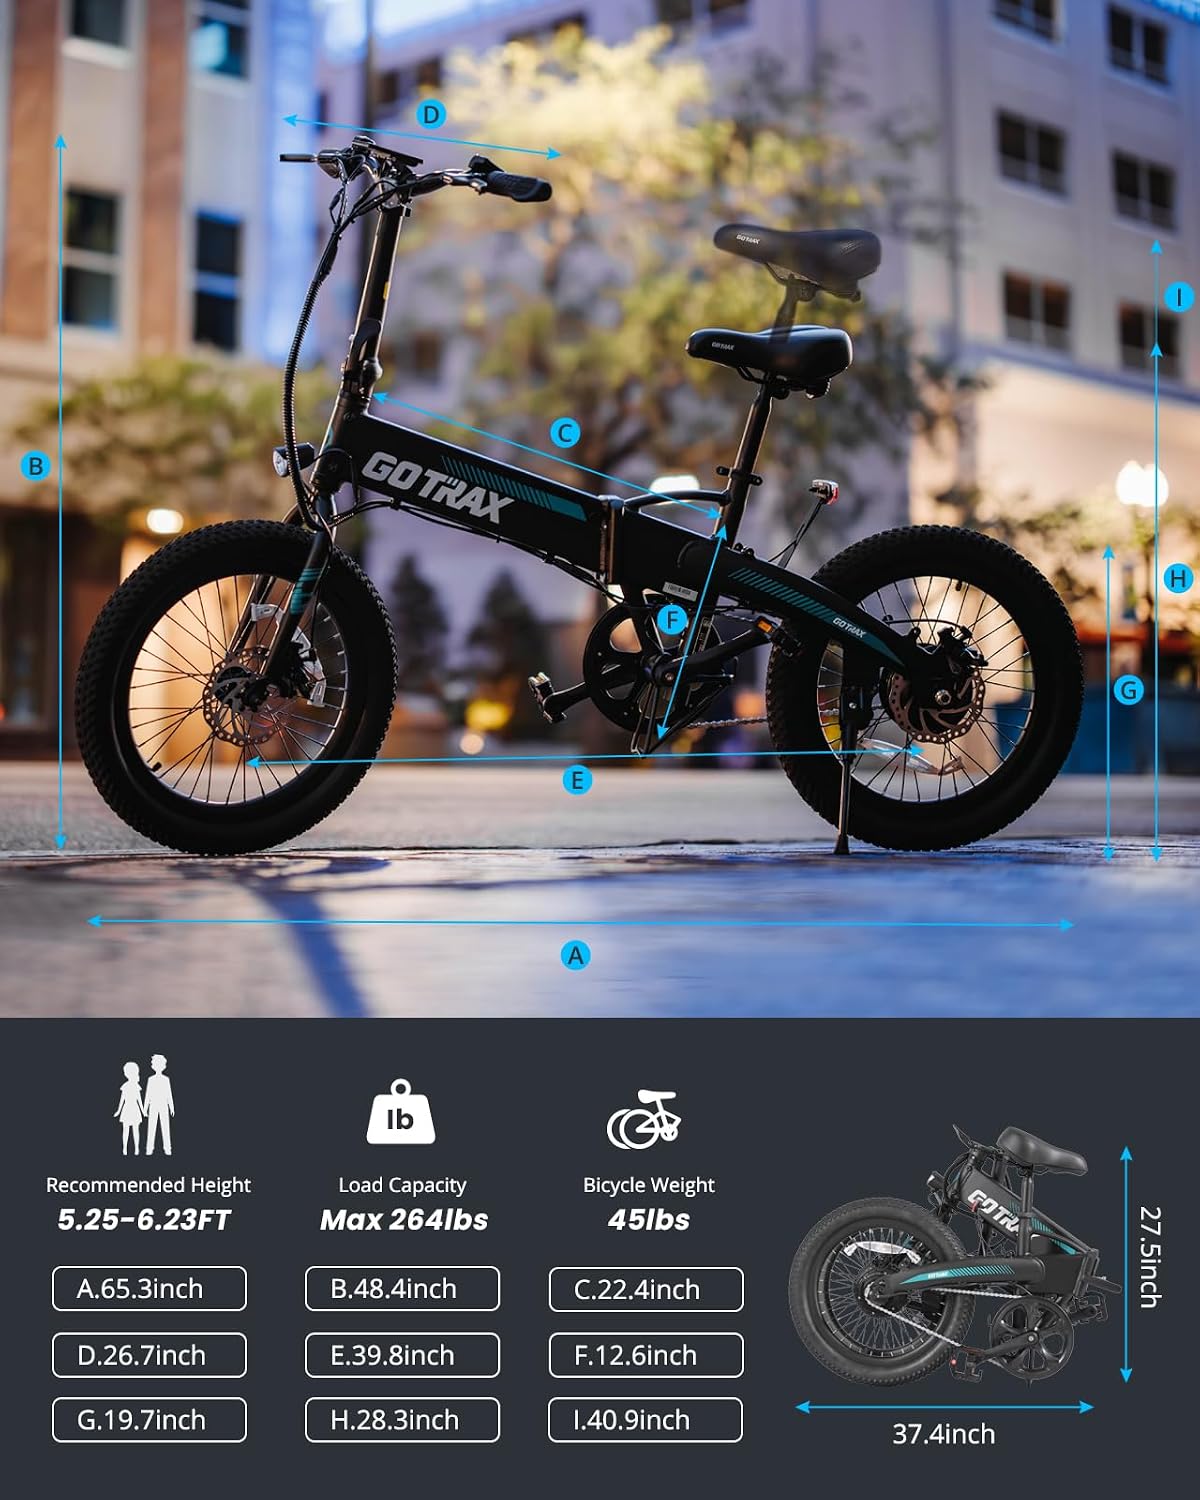
Figure 5.1: Smart Display
Na tym zdjęciu widać zbliżenie view of the bike's smart LCD display, which shows essential riding information such as speed, battery level, and mileage in real-time.
5.2 Tryby jazdy
The Gotrax R1 offers three riding modes:
- Tryb wspomagania pedałowania (PAS): This mode provides electric assistance as you pedal. There are 5 pedal-assist levels. Higher levels provide more assistance and speed.
Pedal-Assist Performance Poziom PAS Prędkość (mil na godzinę) Mileage (Miles) 1 8-11 40 2 11-13 35 3 13-14 31 4 14-17 28 5 17-20 25 *All tests were performed on flat ground, with tires at 35 PSI. Few starts and stops, total payload about 176lbs/80kg.
- Tryb czysto elektryczny (tylko przepustnica): Use the throttle to propel the bike without pedaling. This mode offers a maximum speed of 20mph and a range of approximately 15.5 miles.
- Normalny tryb rowerowy: Jeździj na rowerze jak na zwykłym rowerze, bez wspomagania elektrycznego.
5.3 Ładowanie akumulatora
The 48V/7.8Ah battery can be fully charged in approximately 5.5 hours. You can charge the battery while it is installed on the bike or remove it for charging.
- Podłącz ładowarkę do portu ładowania w rowerze lub bezpośrednio do akumulatora, jeśli jest wyjęty.
- Podłącz ładowarkę do standardowego gniazdka ściennego.
- Podczas ładowania kontrolka ładowarki zazwyczaj świeci na czerwono, a po pełnym naładowaniu na zielono.
- Always use the original charger provided with your bike.
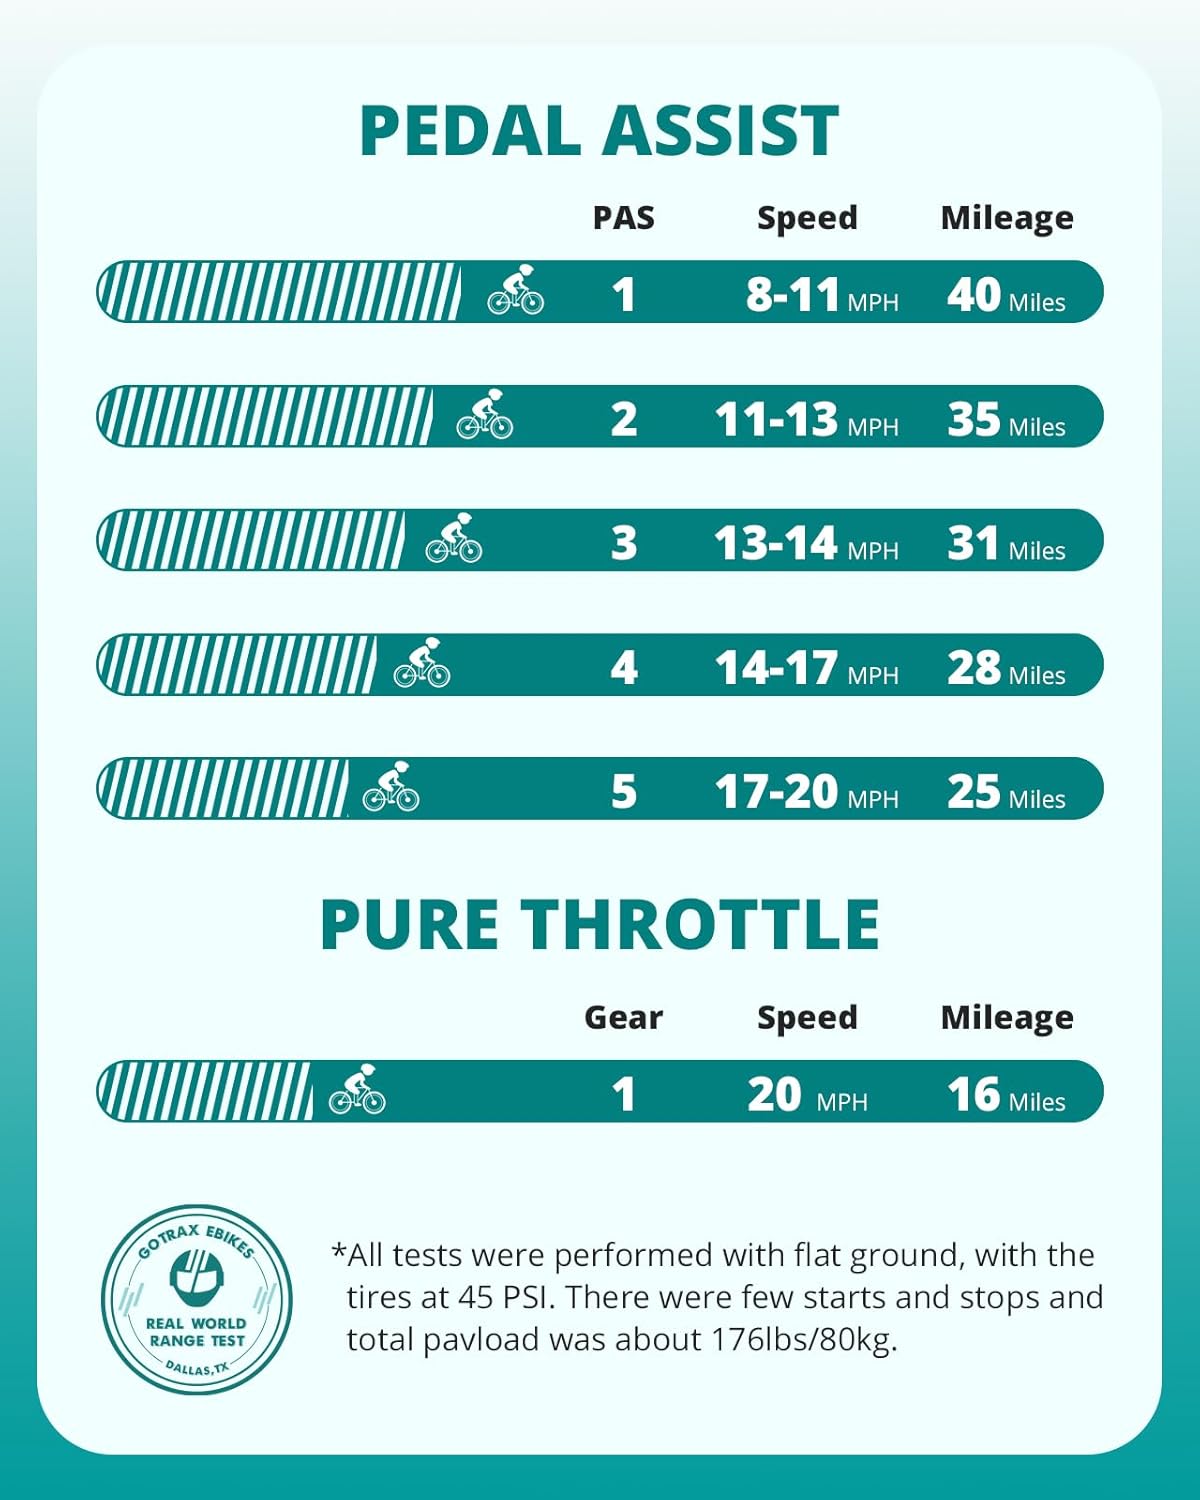
Figure 5.2: Battery Charging Options
This image illustrates the two convenient charging methods for the Gotrax R1's 48V 7.8Ah removable battery: charging while installed on the bike or charging the battery separately after removal. It also highlights the 5.5-hour fast charge time and up to 40 miles range.
6. Konserwacja
Regular maintenance ensures the longevity and safe operation of your Gotrax R1 electric bike.
Ogólne wskazówki dotyczące konserwacji:
- Opony: Check tire pressure regularly (recommended 35-45 PSI) and inspect for wear or damage.
- Hamulce: Periodically check brake pads for wear and ensure brake levers provide firm and responsive stopping power. Adjust as needed.
- Łańcuch: Utrzymuj łańcuch w czystości i smarowaniu, aby zapewnić jego płynną pracę i zapobiec rdzewieniu.
- Pielęgnacja baterii: Store the battery in a cool, dry place. If storing for extended periods, charge it to about 50-70% every few months. Avoid fully discharging the battery.
- Czyszczenie: Wyczyść rower za pomocą adamp szmatką. Unikaj bezpośredniego polewania elementów elektrycznych strumieniem wody pod wysokim ciśnieniem.
- Elementy złączne: Regularly check and tighten all bolts, nuts, and quick-release mechanisms.
7. Rozwiązywanie Problemów
This section addresses common issues you might encounter with your Gotrax R1 electric bike.
| Problem | Możliwa przyczyna | Rozwiązanie |
|---|---|---|
| Rower nie włącza się | Akumulator nie jest aktywowany lub jego poziom naładowania jest niski; luźne połączenia. | Ensure battery key is fully turned. Charge battery. Check all electrical connections. |
| Silnik nie wspomaga | Pedal-assist level too low; brake levers engaged; motor connection issue. | Increase PAS level. Ensure brake levers are fully released. Check motor cable connection. |
| Hamulce są słabe | Worn brake pads; loose brake cable; disc rotor misalignment. | Inspect and replace brake pads if worn. Adjust brake cable tension. Realign disc rotor. |
| Zmniejszony zasięg | Under-inflated tires; frequent use of throttle; riding uphill; cold weather. | Inflate tires to recommended PSI. Use pedal-assist more. Battery performance can be affected by temperature. |
| Wyświetlacz nie działa prawidłowo | Loose display cable; software glitch. | Check display cable connection. Try powering off and on the bike. If issues persist, contact customer service. |
8. Specyfikacje
| Funkcja | Szczegół |
|---|---|
| Typ roweru | Rower elektryczny |
| Nazwa modelu | R1 White |
| Moc silnika | 350 W (szczyt 500 W) |
| Bateria | 48 V 7.8 Ah litowo-jonowy (374.4 watogodziny) |
| Maksymalna prędkość | 20 mil na godzinę |
| Max Range (Pedal-assist1) | Do 40 mil |
| Max Range (Throttle Only) | Do 15.5 mil |
| Czas ładowania | Około 5.5 godzin |
| Rozmiar koła | 20 cali |
| Rozmiar opony | 20" x 2.6" |
| Materiał ramy | Żelazo |
| Styl hamulca | Disc (160mm mechanical) |
| Liczba prędkości | 5 (Pedal-Assist Levels) |
| Waga przedmiotu | 45 funtów |
| Maksymalna zalecana waga | 264 funtów |
| Rozmiar po złożeniu | 37.4 x 17.7 x 27.5 cala |
| Wymiary po rozłożeniu (dł. x szer. x wys.) | 65.3 x 26.7 x 48.4 cala |
| Zalecany wzrost jeźdźca | 5.25 - 6.23 Feet |
| Certyfikacja UL | Certyfikat UL2849 |
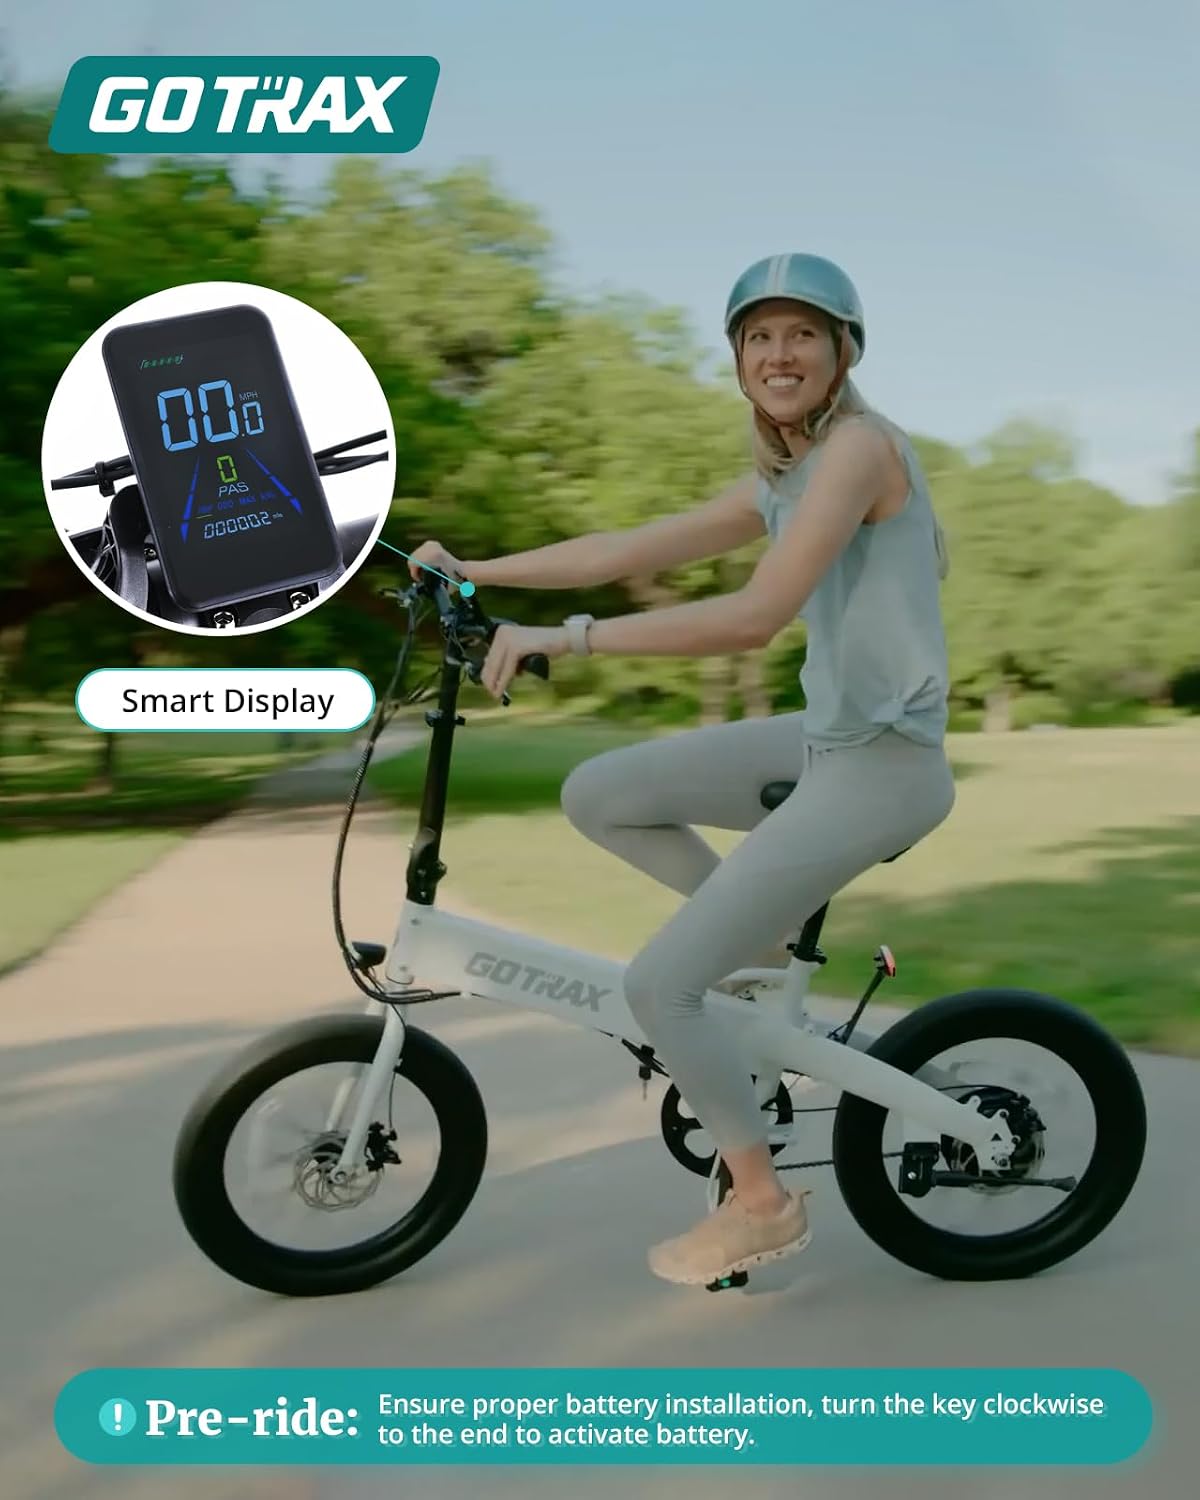
Figure 8.1: Gotrax R1 Dimensions and Specifications
This diagram provides detailed measurements of the Gotrax R1 electric bike in its unfolded state, along with recommended rider height and maximum load capacity, ensuring proper fit and safe usage.
9. Gwarancja i wsparcie
Gotrax is committed to providing quality products and customer service.
- Gwarancja: The Gotrax R1 comes with a Limited 180 Day Warranty that covers parts or issues due to manufacturer defects.
- Part Assurance: Gotrax offers a 365-day part assurance.
- Obsługa klienta: For any questions, concerns, or support needs, please contact Gotrax customer service. They offer 24-hour customer service.
- Certyfikat UL2849: The Gotrax R1 is UL2849 certified, ensuring it meets high safety standards.
For further assistance, please refer to the official Gotrax webodwiedź witrynę lub skontaktuj się bezpośrednio z działem wsparcia.


