1. Wprowadzenie
This user manual provides essential information for the safe and efficient operation of your HYCHIKA 3.6V Cordless Electric Rechargeable Screwdriver Drill Set. Please read this manual thoroughly before first use and keep it for future reference.
The HYCHIKA 3.6V Cordless Electric Screwdriver is designed for various screwing and light drilling tasks around the home. It features a maximum torque of 6 N-m, a 6.35 mm quick-change chuck, and a versatile design that allows for both pistol and straight grip configurations.
2. Instrukcje bezpieczeństwa
Aby zminimalizować ryzyko pożaru, porażenia prądem i obrażeń ciała, należy zawsze przestrzegać podstawowych zasad bezpieczeństwa podczas korzystania z narzędzi elektrycznych.
- Bezpieczeństwo w miejscu pracy: Utrzymuj swoje miejsce pracy w czystości i dobrym oświetleniu. Zagracone lub ciemne pomieszczenia sprzyjają wypadkom. Nie używaj elektronarzędzi w atmosferach wybuchowych, takich jak łatwopalne ciecze, gazy lub pyły.
- Bezpieczeństwo elektryczne: Unikaj kontaktu ciała z uziemionymi powierzchniami, takimi jak rury, grzejniki, kuchenki i lodówki. Nie wystawiaj elektronarzędzi na działanie deszczu ani wilgoci.
- Bezpieczeństwo osobiste: Always wear eye protection. Use safety glasses, goggles, or a face shield. Wear hearing protection when operating noisy tools. Dress properly; avoid loose clothing or jewelry.
- Używanie i konserwacja narzędzia: Nie używaj elektronarzędzia na siłę. Używaj elektronarzędzia odpowiedniego do danego zastosowania. Odłącz wtyczkę od źródła zasilania i/lub wyjmij akumulator przed wykonaniem jakichkolwiek regulacji, wymianą akcesoriów lub przechowywaniem elektronarzędzia.
- Użytkowanie i konserwacja akumulatora: Ładuj wyłącznie za pomocą ładowarki wskazanej przez producenta. Nie używaj akumulatorów z innymi elektronarzędziami. Gdy akumulator nie jest używany, trzymaj go z dala od innych metalowych przedmiotów.
3. Zawartość opakowania
Sprawdź, czy wszystkie wymienione poniżej elementy znajdują się w Twojej paczce. Jeśli brakuje któregokolwiek z nich lub jest on uszkodzony, skontaktuj się z obsługą klienta.
- 1 x HYCHIKA 3.6V Cordless Screwdriver
- 19 x wkręcania
- 1 x przedłużacz
- 1 x adapter ładujący
- 1 x Instrukcja obsługi

Figure 3.1: Contents of the HYCHIKA 3.6V Cordless Screwdriver package, including the screwdriver, various bits, and charging adapter.
4. Cechy i komponenty produktu
Familiarize yourself with the different parts of your cordless screwdriver.

Figure 4.1: Key components of the screwdriver, including the magnetic chuck, PUSH button, front LED light, On/Off switch, LED charger indicator, 3.5mm charger port, and forward & reverse button.
- Magnetic Chuck: 1/4 inch (6.35mm) quick-change chuck for easy bit installation and removal.
- Przednie światło LED: Illuminates the work area for improved visibility in dark environments.
- Przełącznik włączania/wyłączania: Activates and deactivates the screwdriver.
- Forward & Reverse Button: Controls the rotation direction for screwing and unscrewing.
- LED Charger Indicator: Provides status of battery charging.
- 3.5mm Charger Port: Punkt podłączenia adaptera ładowania.
- Naciśnij przycisk: Used to adjust the grip configuration from pistol to straight.
5. Konfiguracja
5.1 Ładowanie akumulatora
The screwdriver is powered by a 3.6V 2000 mAh Lithium-Ion battery. Before first use, fully charge the battery.
- Connect the charging adapter to the 3.5mm charger port on the screwdriver.
- Podłącz ładowarkę do standardowego gniazdka elektrycznego.
- The LED charger indicator will illuminate during charging. Once fully charged, the indicator may change color or turn off depending on the model.
- Odłącz ładowarkę po zakończeniu ładowania.

Figure 5.1: The screwdriver connected to its charging adapter, indicating a full charge.
The screwdriver is designed to maintain full power output even when the battery is low, ensuring consistent performance until the battery is depleted.
5.2 Montaż bitów wkrętakowych
The screwdriver features a 1/4 inch (6.35mm) magnetic quick-change chuck for easy bit installation.
- Wybierz odpowiednią końcówkę wkrętakową do swojego zadania.
- Insert the bit into the magnetic chuck until it is securely seated. The magnetic chuck will hold the bit firmly in place.
- To remove a bit, simply pull it out of the chuck. Bits with grooves are designed for easier removal.

Figure 5.2: Visual guide for inserting a bit into the magnetic chuck and removing it.
6. Instrukcja obsługi
6.1 Adjusting Grip Configuration
The screwdriver can be used in two grip configurations: pistol grip or straight grip, for enhanced versatility and comfort.
- To change the grip, press and hold the "PUSH" button located at the top of the screwdriver.
- While holding the button, rotate the handle ninety degrees to switch between pistol and straight configurations.
- Release the "PUSH" button once the desired configuration is achieved. The handle will lock into place.
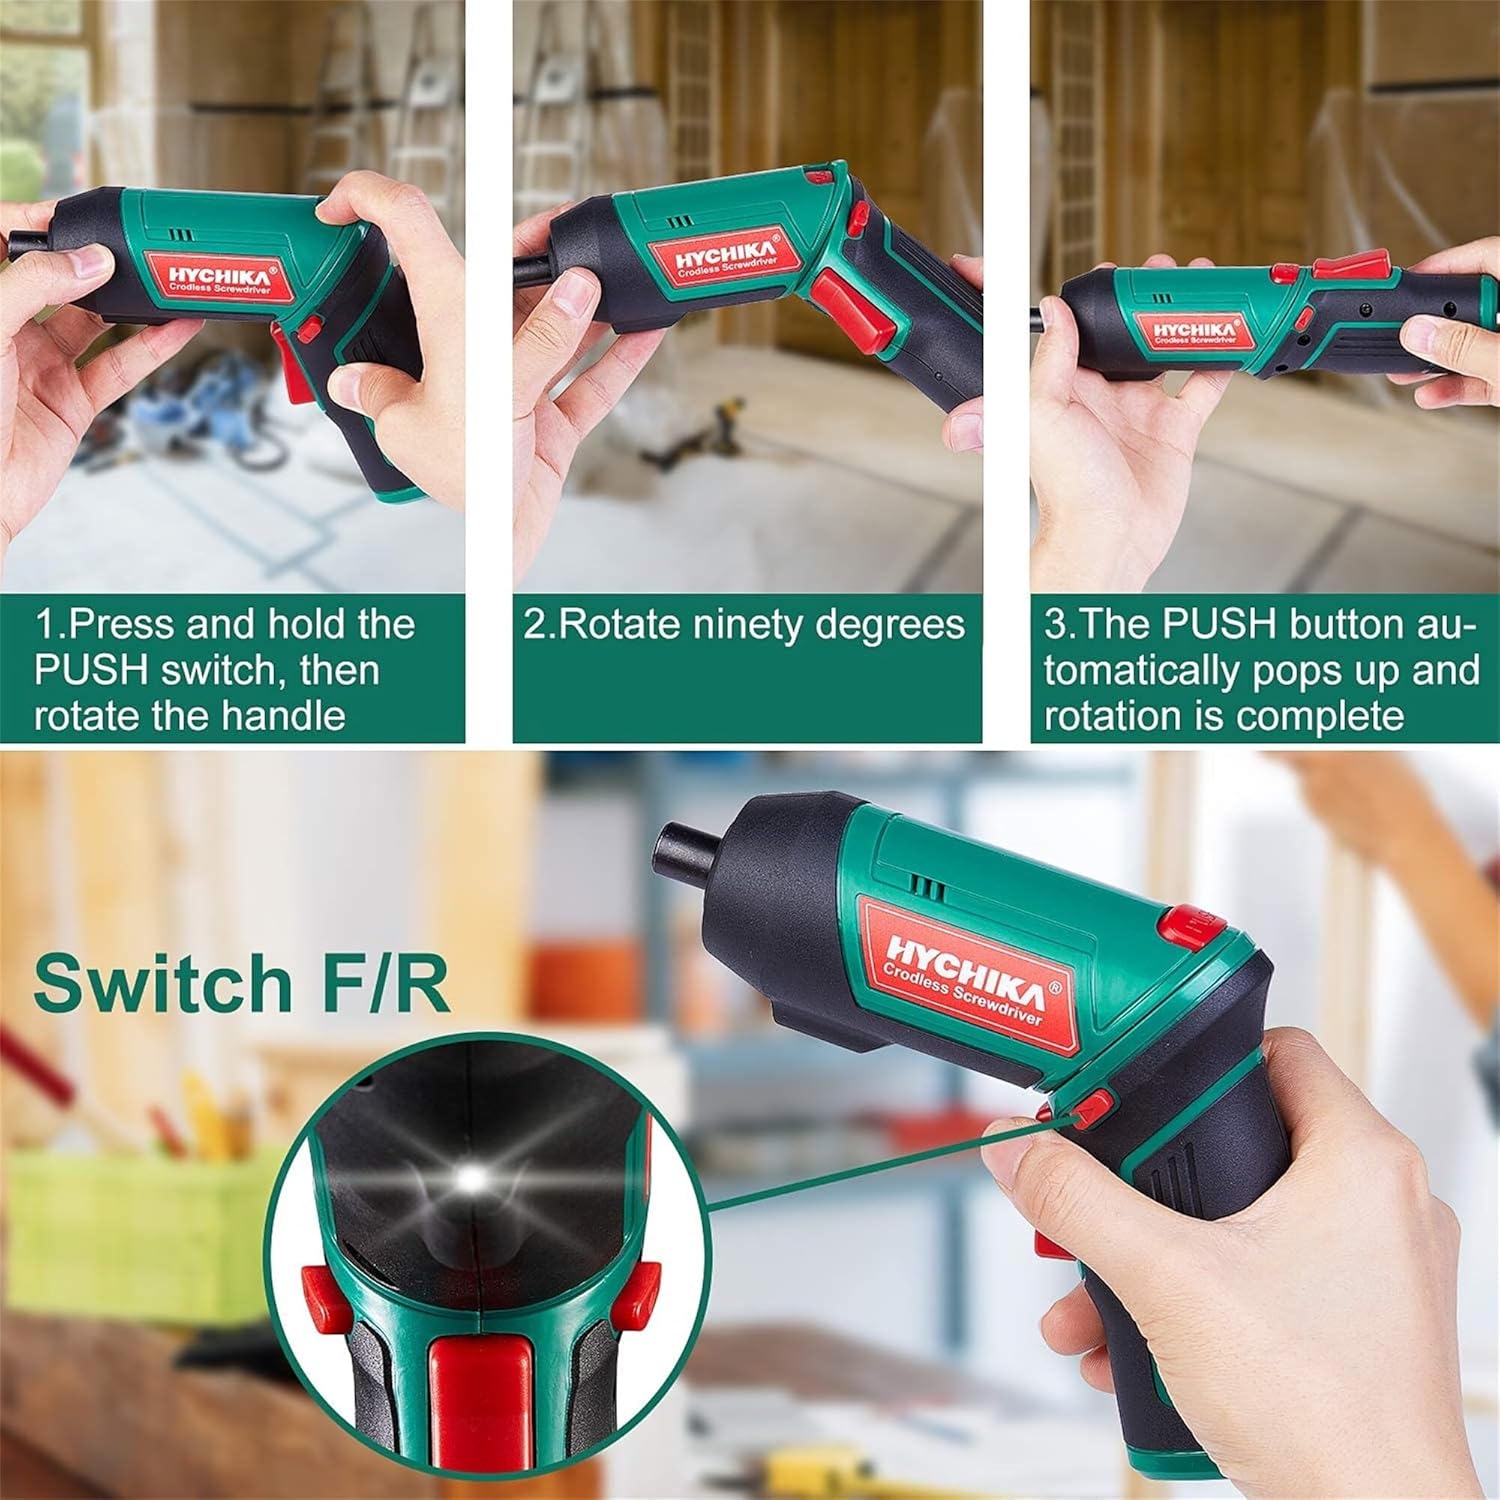
Figure 6.1: Demonstrates the process of transforming the screwdriver's grip by pressing the PUSH button and rotating the handle.
6.2 Działanie do przodu i do tyłu
The forward/reverse button controls the direction of rotation for screwing and unscrewing.
- To drive screws (forward rotation), push the forward/reverse button to the left (when viewz tyłu narzędzia).
- To remove screws (reverse rotation), push the forward/reverse button to the right.
- When the button is in the center position, the tool is locked, preventing accidental activation.
6.3 Korzystanie z lampy roboczej LED
The built-in LED light automatically illuminates when the screwdriver is in operation, providing visibility in dimly lit areas.

Figure 6.2: The integrated LED light provides clear illumination for working in dark environments.
7. Konserwacja
Regular maintenance ensures the longevity and optimal performance of your screwdriver.
- Czyszczenie: Utrzymuj otwory wentylacyjne w czystości i bez kurzu. Używaj miękkiej,amp ściereczka do czyszczenia narzędzia casing. Nie należy używać silnych środków chemicznych ani ściernych środków czyszczących.
- Pielęgnacja bitów: Clean screwdriver bits after use. Store them in the provided case to prevent loss and damage.
- Przechowywanie baterii: If storing the tool for an extended period, ensure the battery is partially charged (around 50%) and store it in a cool, dry place. Recharge the battery every 3-6 months to maintain its health.
- Generalna Inspekcja: Periodically check for any loose screws, damaged cords, or worn parts. Do not use the tool if any damage is observed.
8. Rozwiązywanie Problemów
This section addresses common issues you might encounter with your screwdriver.
| Problem | Możliwa przyczyna | Rozwiązanie |
|---|---|---|
| Śrubokręt nie włącza się. | Bateria jest rozładowana. Forward/Reverse switch is in the center (locked) position. | Całkowicie naładuj baterię. Przesuń przełącznik przód/tył w lewo lub w prawo. |
| Śrubokręt szybko traci moc. | Akumulator nie jest w pełni naładowany. Battery life degraded. | Przed użyciem sprawdź, czy akumulator jest całkowicie naładowany. If battery life is significantly reduced, contact customer support for replacement options. |
| Bits are not held securely in the chuck. | Bit is not fully inserted. Chuck is dirty or damaged. | Push the bit firmly into the chuck until it clicks into place. Clean the chuck area. If damage is visible, contact customer support. |
Jeśli po wypróbowaniu tych rozwiązań problem nadal występuje, skontaktuj się z obsługą klienta.
9. Specyfikacje
| Funkcja | Specyfikacja |
|---|---|
| Marka | Overstock (HYCHIKA) |
| Numer modelu | c131a012-0da9-4306-aeab-b1d9ff5cd4b7 |
| Tomtage | 3.6 wolty |
| Źródło zasilania | Zasilany bateryjnie |
| Prędkość | 180 obr./min. |
| Pozycja Moment obrotowy | 6 Newton Meters (6 N-m) |
| Typ baterii | Litowo-jonowy |
| Pojemność baterii | 2000 mAh |
| Rozmiar uchwytu | 1/4 cala (6.35 mm) |
| Tworzywo | Plastik, Guma |
| Kolor | Zielony |
| UPC | 616859793583 |
10. Gwarancja i wsparcie
Overstock offers lifetime after-sales service for this product. For any questions, concerns, or technical assistance, please contact our customer support team.
Please have your model number (c131a012-0da9-4306-aeab-b1d9ff5cd4b7) and purchase information ready when contacting support.


