1. Wprowadzenie i koniecview
The Waveshare Jetson AGX Orin Developer Kit is a high-performance, power-efficient platform designed for advanced robotics and edge AI applications. It features an NVIDIA Jetson AGX Orin module with options for 32GB/64GB memory, delivering up to 275 TOPS of AI performance. This kit is ideal for developing multiple concurrent AI inference pipelines and running the NVIDIA AI software stack, enabling solutions for manufacturing, logistics, retail, service, agriculture, smart city, healthcare, and life sciences.
The Jetson AGX Orin provides 8X the performance of its predecessor, Jetson AGX Xavier, within the same compact form factor and compatible pinouts. It integrates an NVIDIA Ampere architecture GPU, Arm Cortex-A78AE CPU, and next-generation deep learning and vision accelerators. High-speed interfaces, faster memory bandwidth, and multi-mode sensor support ensure robust performance for demanding AI applications.

Image 1.1: Waveshare Jetson AGX Orin Developer Kit, top-down view.
2. Zawartość opakowania
Upon unboxing your Waveshare Jetson AGX Orin Developer Kit, please verify that all components listed below are present:
- Jetson AGX Orin Developer Kit (main unit)
- Zasilacz
- Kabel USB typu C do typu A.
- Getting Started Booklet (or similar documentation)

Image 2.1: Contents of the Waveshare Jetson AGX Orin Developer Kit package.
3. Instrukcje konfiguracji
The Jetson AGX Orin Developer Kit comes pre-flashed with Linux, simplifying the initial setup process. Follow these steps to get started:
- Connect a monitor to the DisplayPort (DP) connector on the back of the developer kit.
- Connect a USB keyboard and mouse to the available USB Type-A ports.
- Connect the power adapter to the barrel jack power connector on the back of the kit and plug it into a power outlet. The kit will power on automatically.
- Upon first boot, you will be prompted to configure basic system settings, including a username, password, and Wi-Fi network connection.
- After initial setup, you can install the latest JetPack SDK and other necessary software from the internet. A system reboot may be required after software installation.
For a visual guide to the product and its features, please refer to the video below:
Wideo 3.1: Produkt w całościview of the Jetson AGX Orin Developer Kit, detailing its components and basic setup.

Image 3.2: The Jetson AGX Orin Developer Kit, highlighting its server-class AI performance.
4. Instrukcja obsługi
Once the initial setup is complete and the necessary software is installed, the Jetson AGX Orin Developer Kit is ready for operation. The kit runs on a Linux-based operating system, providing a familiar environment for developers.
- Rozwój oprogramowania: Utilize the NVIDIA AI software stack, including JetPack SDK, CUDA-X, and various application frameworks, to develop and deploy AI models.
- Łączność: Leverage the multiple USB ports, 10 Gigabit Ethernet, and wireless networking capabilities to connect peripherals, sensors, and integrate with other systems.
- Ekspansja: The kit supports various expansion options, including PCIe slots and M.2 connectors, allowing for custom hardware integration and increased functionality.
- Zarządzanie energią: The system is designed for power efficiency. Refer to NVIDIA documentation for optimal power modes and performance tuning for your specific applications.

Obraz 4.1: Bok view of the Jetson AGX Orin Developer Kit, illustrating its various ports and connectors.
5. Konserwacja
To ensure the longevity and optimal performance of your Waveshare Jetson AGX Orin Developer Kit, adhere to the following maintenance guidelines:
- Zachowaj czystosc: Regularly clean the exterior of the device with a soft, dry cloth. Ensure ventilation openings are free from dust and debris to prevent overheating.
- Prawidłowa wentylacja: Operate the kit in a well-ventilated area. Avoid placing it in enclosed spaces or on soft surfaces that may block airflow.
- Aktualizacje oprogramowania: Keep the operating system and JetPack SDK updated to the latest versions to benefit from performance improvements, bug fixes, and security patches.
- Warunki środowiskowe: Operate the device within recommended temperature and humidity ranges. Avoid extreme conditions that could damage internal components.
6. Rozwiązywanie Problemów
If you encounter issues with your Waveshare Jetson AGX Orin Developer Kit, consider the following troubleshooting steps:
- Brak zasilania: Verify that the power adapter is securely connected to both the kit and a working power outlet. Check the power indicator light on the device.
- Brak wyświetlacza: Ensure the monitor is correctly connected to the DisplayPort and is powered on. Try a different cable or monitor if available.
- System nie odpowiada: If the system becomes unresponsive, press and hold the power button for several seconds to force a shutdown, then restart the device. Use the Force Recovery button if standard rebooting fails.
- Problemy z oprogramowaniem: For software-related problems, ensure all drivers and SDK components are up-to-date. Consult NVIDIA's official Jetson developer forums and documentation for specific error messages or issues.
- Peripheral Detection: If a connected peripheral (e.g., camera, sensor) is not detected, ensure it is properly connected and its drivers are installed.
7. Specyfikacje
Detailed technical specifications for the Waveshare Jetson AGX Orin Developer Kit:
| Funkcja | Opis |
|---|---|
| Wydajność AI | 275 TOPY |
| Procesor graficzny | Nvidia Ampere architecture with 2048 NVIDIA® CUDA® cores and 64 tensor cores |
| Procesor | 12-core Arm Cortex-A78AE v8.2 64-bit CPU, 3MB L2 + 6MB L3 |
| Akcelerator DL | 2x NVDLA v2.0 |
| Akcelerator wizji | PVA wersja 2.0 |
| Pamięć | 32GB/64GB 256-bit LPDDR5, 204.8 GB/s |
| Składowanie | 64 GB eMMC 5.1 |
| Kodowanie wideo | 2x 4K60 | 4x 4K30 | 8x 1080p60 | 16x 1080p30 (H.265) |
| Dekodowanie wideo | 1x 8K30 | 3x 4K60 | 7x 4K30 | 11x 1080p60 | 22x 1080p30 (H.265) |
| Kamera | 16 lane MIPI CSI-2 connector |
| PCIe | x16 PCIe slot; Lower x8 PCIe Gen4 |
| RJ45 | Up to 10 GbE |
| M.2 Klucz M | x4 PCIe 4 generacji |
| M.2 Klucz E | x1 PCIe Gen 4, USB 2.0, UART, I2S |
| USB typu C | 2x USB 3.2 Gen2 with USB-PD support |
| USB typu A | 2x USB 3.2 Gen2, 2x USB 3.2 Gen1 |
| USB Micro-B | USB 2.0 |
| DisplayPort | DisplayPort 1.4a (+MST) |
| Gniazdo microSD | Karty UHS-1 do trybu SDR104 |
| Inny | 40-pin header (I2C, GPIO, SPI, CAN, I2S, UART, DMIC), 12-pin automation header, 10-pin audio panel header, 10-pin JTAG header, 4-pin fan header, 2-pin RTC battery backup connector, DC power jack, Power, Force Recovery, and Reset buttons |
| Wymiary | 110mm x 110mm x 71.65mm (Height includes feet, carrier board, module, and thermal solution) |
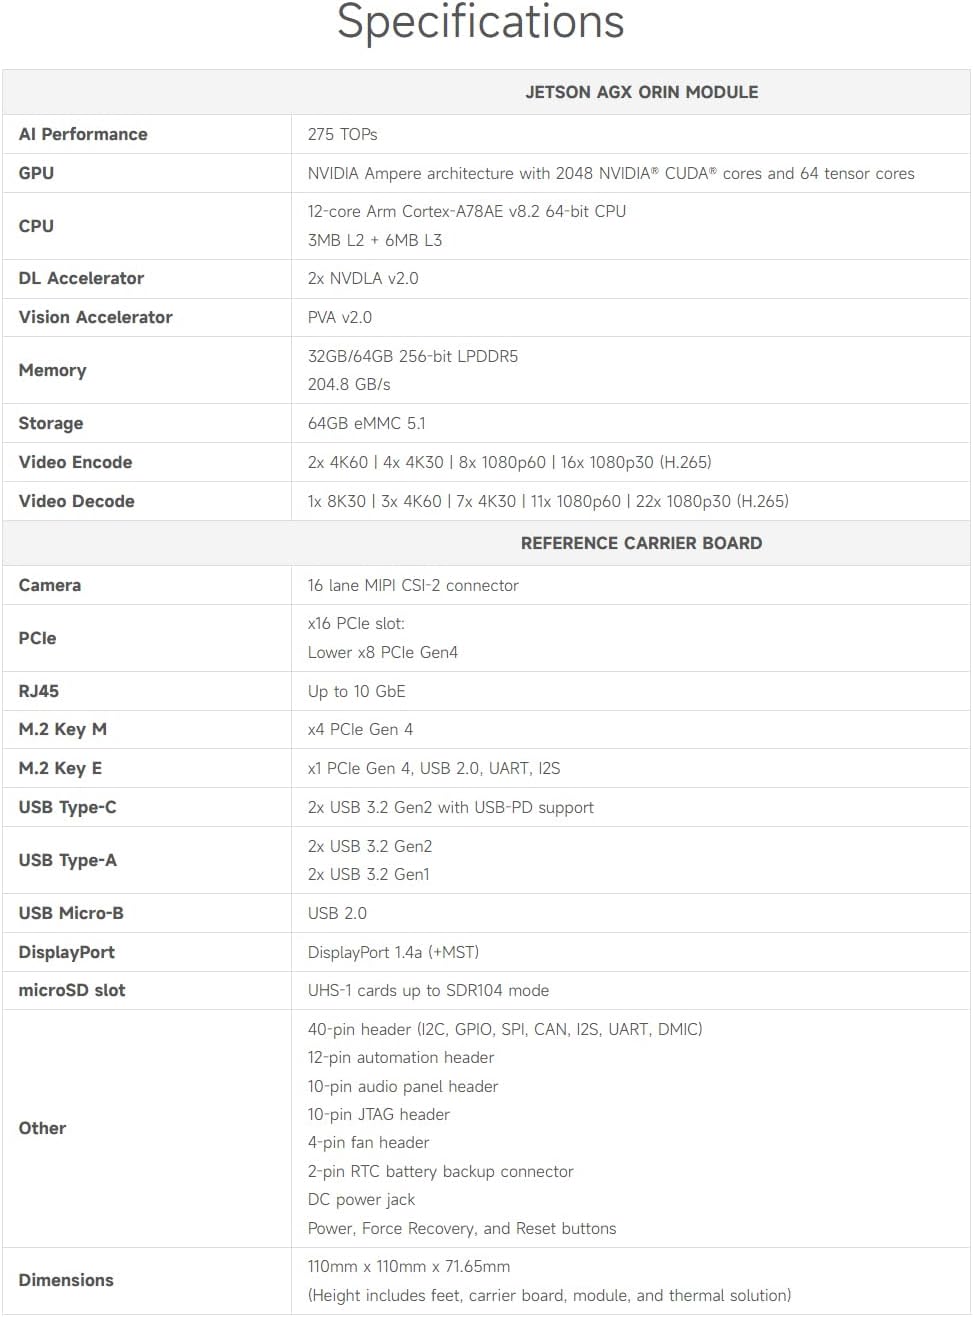
Image 7.1: Visual representation of the detailed specifications for the Jetson AGX Orin Developer Kit.
8. Informacje o gwarancji
This Waveshare product is covered by a standard limited warranty against manufacturing defects. For specific warranty terms, duration, and claim procedures, please refer to the warranty card included in your product packaging or visit the official Waveshare webZachowaj dowód zakupu w celu potwierdzenia gwarancji.
9. Wsparcie
Aby uzyskać dalszą pomoc, wsparcie techniczne lub dostęp do dodatkowych zasobów, zapoznaj się z poniższymi informacjami:
- Instrukcja obsługi online: A detailed online user manual is available on the Waveshare official webstrona.
- NVIDIA Jetson Developer Resources: For comprehensive documentation, tutorials, and community support related to the Jetson platform and JetPack SDK, visit the official NVIDIA Jetson developer webstrona.
- Contact Waveshare: For product-specific inquiries or hardware support, please contact Waveshare customer service through their official channels.


