ENERLITES 1-Hour Countdown Timer Switch
Model: HET06-J6-W
Instrukcja obsługi
Wstęp
The ENERLITES HET06-J6-W is a 1-hour countdown timer switch designed to automatically turn off connected loads after a selected time interval. This device is suitable for controlling various electrical appliances such as bathroom fans, heaters, and lights, helping to conserve energy and prevent devices from being left on unintentionally. It features multiple countdown options and an LED indicator for operational feedback.
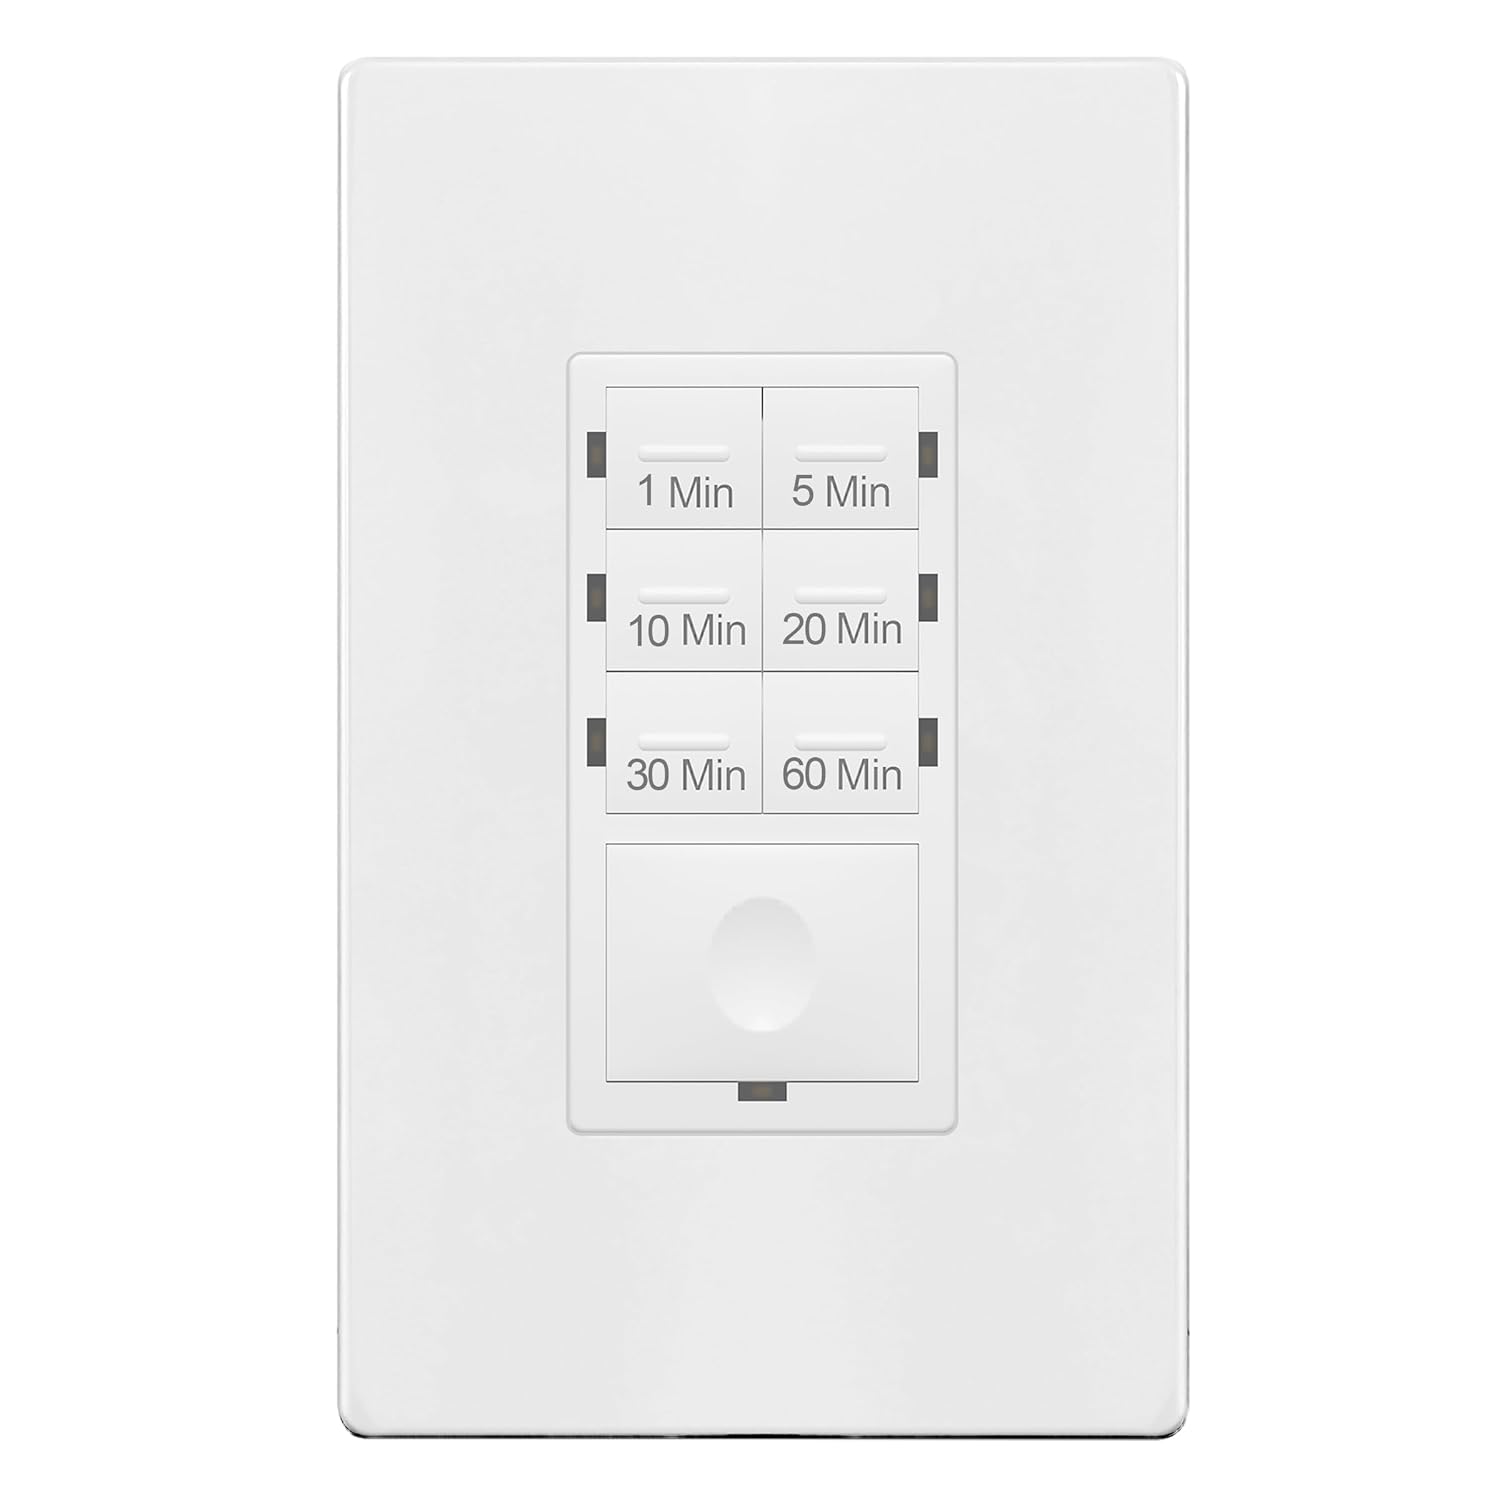
Obraz: Przód view of the ENERLITES HET06-J6-W 1-Hour Countdown Timer Switch, showing the six timer buttons and the main ON/OFF button.
Informacje dotyczące bezpieczeństwa
OSTRZEŻENIE: To avoid fire, shock, or death; turn off power at the circuit breaker or fuse and test that the power is off before wiring. This device is intended for installation in accordance with the National Electrical Code and local regulations. It is UL Listed, ensuring compliance with safety standards.
- Always turn off power at the service panel before beginning installation.
- Use only copper wire for connections.
- Sprawdź, czy wszystkie połączenia przewodów są solidne.
- This device requires a ground wire connection. A neutral wire is NOT required.
- Jeśli masz wątpliwości co do jakiegokolwiek etapu procesu instalacji, skonsultuj się z wykwalifikowanym elektrykiem.
Zawartość opakowania
- ENERLITES HET06-J6-W 1-Hour Countdown Timer Switch
- Bezśrubowa płyta ścienna
- Drut nakrętki
- Śruby montażowe
Specyfikacje
| Numer modelu | HET06-J6-W |
| Wejście Voltage | 120VAC, 60Hz |
| Obciążenie żarowe/halogenowe | 800 W |
| LED/CFL Load | 150 W |
| Obciążenie silnika | 1/4 KM |
| Opcje timera | 1 minut, 5 minut, 10 minut, 20 minut, 30 minut, 60 minut |
| Temperatura pracy | od 32°F do 131°F (od 0°C do 55°C) |
| Ocena palności | UL94V2 |
| Certyfikaty | Posiada certyfikat UL |
| Wymiary | 4.05 x 1.73 x 1.7 cala |
| Tworzywo | Miedź (elementy wewnętrzne) |
Konfiguracja i instalacja
Follow these steps for proper installation of your timer switch. If you are unfamiliar with electrical wiring, please consult a qualified electrician.
- Wyłącz zasilanie: Locate the circuit breaker or fuse that controls the power to the switch box. Turn it OFF. Verify power is off using a voltagtester.
- Usuń stary przełącznik: Carefully remove the existing wall plate and switch from the wall box. Disconnect the wires from the old switch.
- Identyfikacja przewodów: You will typically find a Line (hot) wire, a Load wire, and a Ground wire. This timer switch does NOT require a neutral wire.

Obraz: Tył view of the ENERLITES HET06-J6-W timer switch, illustrating the wiring terminals for Line, Load, and Ground connections.
- Wire the Timer Switch:
- Połącz Linia (gorąca) wire from the wall box to the terminal labeled 'LINE' on the timer switch.
- Połącz Obciążenie wire (to the appliance/light) from the wall box to the terminal labeled 'LOAD' on the timer switch.
- Połącz Grunt wire from the wall box to the 'GROUND' terminal on the timer switch. Ensure all connections are tight using wire nuts.

Image: A person carefully installing a wall switch into an electrical box, demonstrating the typical installation process.
- Zamontuj przełącznik: Gently push the wired switch into the wall box. Secure it with the provided mounting screws.
- Zamontuj płytę ścienną: Install the screwless wall plate over the switch.
- Przywróć zasilanie: Włącz ponownie zasilanie za pomocą wyłącznika.
- Rozgrzewka początkowa: After restoring power, the device requires a warm-up period of 1-2 minutes to function correctly. During this time, the switch may not respond immediately or predictably. Allow this period to complete before testing operation.
Instrukcja obsługi
The ENERLITES HET06-J6-W timer switch offers six preset countdown options and a manual ON/OFF function.

Image: A diagram highlighting the timer buttons (1, 5, 10, 20, 30, 60 minutes), the LED indicator, and the main ON/OFF button on the ENERLITES timer switch.
- Selecting a Countdown Time: Press and release one of the six timer buttons (1 Min, 5 Min, 10 Min, 20 Min, 30 Min, or 60 Min) to activate the countdown. The connected load will turn ON and remain on for the selected duration, then automatically turn OFF.
- Wskaźnik LED: When a time delay is selected, the blue LED indicator will flash twice to confirm the setting. After flashing, the LED will turn OFF. This design is intended to minimize light disturbance, particularly in bedrooms.
- Ręczne WŁ./WYŁ.: The large button at the bottom serves as a manual override.
- Pressing this button while a countdown is active will turn the load OFF immediately.
- Pressing this button when the load is OFF will turn the load ON for the last selected timer duration.
- To turn the load ON indefinitely (until manually turned off), press and hold the large button for approximately 8 seconds.

Image: A detailed close-up of the timer buttons on the ENERLITES HET06-J6-W switch, showing the 1, 5, 10, 20, 30, and 60-minute options.
Konserwacja
The ENERLITES HET06-J6-W timer switch requires minimal maintenance. To clean the device, ensure power is turned off at the circuit breaker. Use a soft, damp cloth to wipe the surface. Avoid using harsh chemicals or abrasive cleaners, as these can damage the finish or internal components.
Rozwiązywanie problemów
- Device Not Responding After Installation:
- Ensure power is fully restored at the circuit breaker.
- Allow 1-2 minutes for the device to warm up after initial power restoration. The switch may not function immediately during this period.
- Verify all wiring connections are secure and correct (Line, Load, Ground).
- Load Does Not Turn ON:
- Sprawdź czy wyłącznik jest włączony.
- Ensure the connected load (light, fan, heater) is functional.
- Confirm the wiring is correct.
- Load Does Not Turn OFF:
- Verify that a timer duration was selected.
- If the load was turned on indefinitely (by holding the manual ON/OFF button for 8 seconds), press the manual ON/OFF button once to turn it off.
- Wskaźnik LED nie miga:
- The LED flashes only twice upon selection and then turns off. This is normal operation.
Gwarancja i wsparcie
The ENERLITES HET06-J6-W 1-Hour Countdown Timer Switch comes with a 1-year limited warranty from the date of purchase. This warranty covers defects in materials and workmanship under normal use. For technical support, warranty claims, or further assistance, please contact ENERLITES customer service or visit the official ENERLITES store online.


