1. Wprowadzenie
This manual provides essential instructions for the proper installation, operation, and maintenance of your Interphone Cellularline U-Com 6R Motorcycle Bluetooth Intercom. Please read this manual thoroughly before using the device to ensure optimal performance and safety.
The U-Com 6R is designed to enhance your riding experience with reliable Bluetooth 5.2 communication, allowing connection with up to two riders over a distance of 1 kilometer. It offers compatibility with various OEM and GPS systems and features a long-lasting, replaceable battery.
2. Informacje dotyczące bezpieczeństwa
Always prioritize safety while riding. Operating the intercom should not distract you from road conditions or traffic. Ensure the device is securely mounted and all cables are properly routed to avoid interference with helmet functionality or rider movement.
- Nie próbuj demontować ani modyfikować urządzenia.
- Trzymaj urządzenie z dala od ekstremalnych temperatur i bezpośredniego światła słonecznego.
- Aby zachować wodoodporność, należy upewnić się, że pokrywa portu ładowania jest szczelnie zamknięta, gdy urządzenie nie jest ładowane.
- Adjust volume to a safe level that allows you to hear ambient traffic sounds.
3. Zawartość opakowania
Sprawdź, czy w przesyłce znajdują się wszystkie elementy wymienione poniżej:
- U-Com 6R Main Unit
- Helmet Mounting Bracket (Clip and Adhesive options)
- Zestaw głośników
- Boom Microphone
- Mikrofon przewodowy
- Kabel ładujący USB-C
- Podkładki rzepowe do głośników i mikrofonów
- Gąbki mikrofonowe
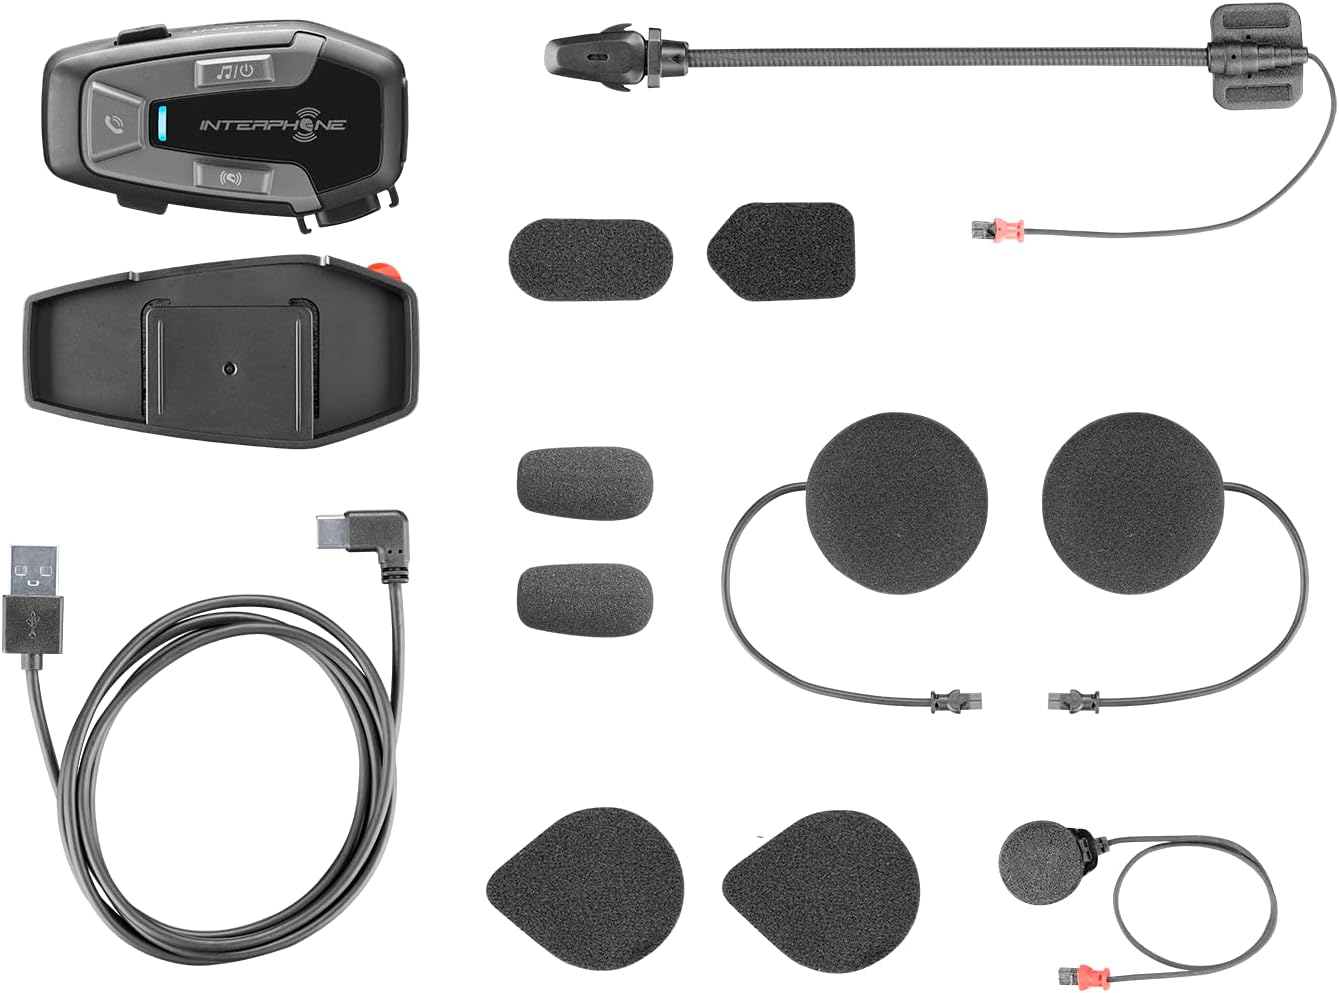
Rysunek 3.1: All components included in the Interphone U-Com 6R package. This image displays the main intercom unit, mounting accessories, speakers, two types of microphones (boom and wired), and the USB-C charging cable.
4. Urządzenie ponadview
4.1. Elementy sterujące jednostki głównej

Rysunek 4.1: Przód view of the Interphone U-Com 6R main unit. This image highlights the primary control buttons for music, call management, and intercom functions, along with the LED indicator.
- Przycisk muzyczny: Controls music playback (play/pause, skip tracks).
- Przycisk dzwonienia: Manages phone calls (answer/end, voice assistant).
- Przycisk domofonu: Initiates and manages intercom conversations.
- Wskaźnik LED: Displays device status (pairing, charging, power).
4.2. Porty i złącza

Rysunek 4.2: Strona view of the Interphone U-Com 6R unit. This image clearly shows the USB-C charging port and the speaker/microphone connector.
- Port USB-C: Służy do ładowania urządzenia.
- Złącze głośnika/mikrofonu: Connects the speaker and microphone assembly to the main unit.
5. Instalacja
5.1. Montaż jednostki głównej
The U-Com 6R can be mounted to your helmet using either the clip mount or the adhesive mount.
- Mocowanie klipsowe: Slide the clip between the helmet shell and the inner padding on the left side. Ensure it is securely fastened.
- Mocowanie samoprzylepne: Clean the desired mounting area on the left side of your helmet. Peel off the protective film from the 3M adhesive on the bracket and firmly press it onto the helmet for at least 30 seconds. Allow 24 hours for the adhesive to fully cure before use.

Rysunek 5.1: Adhesive mounting bracket for the Interphone U-Com 6R. This image shows the bracket with the 3M adhesive backing, ready for attachment to a helmet.
5.2. Instalowanie głośników i mikrofonu
Position the speakers inside the helmet's ear pockets. The microphone should be placed in front of your mouth, ensuring clear voice pickup.
- Attach the speakers to the helmet's interior using the provided Velcro pads. Ensure the speaker with the shorter wire is for the left ear and the longer wire for the right.
- Wybierz odpowiedni mikrofon do typu swojego kasku:
- Mikrofon na wysięgniku: Ideal for open-face or modular helmets. Attach it to the inside of the helmet near your mouth.
- Mikrofon przewodowy: Suitable for full-face helmets. Attach it to the inside of the chin bar, close to your mouth.
- Connect the speaker and microphone assembly to the main U-Com 6R unit.
- Tuck all wires neatly under the helmet padding to prevent discomfort or entanglement.

Rysunek 5.2: Installation of speakers and wired microphone inside a full-face helmet. This diagram illustrates the placement of the flat speakers in the ear recesses and the wired microphone near the chin bar.

Rysunek 5.3: Installation of speakers and boom microphone inside an open-face helmet. This diagram shows the placement of speakers and the flexible boom microphone extending towards the rider's mouth.
6. Konfiguracja i podstawowa obsługa
6.1. Ładowanie urządzenia
Before first use, fully charge the U-Com 6R. Connect the supplied USB-C cable to the charging port on the unit and to a USB power source. The LED indicator will show charging status and turn off when fully charged. A full charge provides approximately 15 hours of talk time.
6.2. Włączanie/wyłączanie zasilania
- Włączanie: Press and hold the Music button for 3 seconds. The LED will flash blue.
- Wyłączone: Press and hold the Music button for 5 seconds. The LED will turn red and then off.
6.3. Parowanie Bluetooth z telefonem komórkowym
- With the U-Com 6R powered off, press and hold the Call button for 5 seconds until the LED flashes red and blue alternately, indicating pairing mode.
- Włącz Bluetooth w telefonie komórkowym i wyszukaj nowe urządzenia.
- Select "Interphone U-Com 6R" from the list of available devices.
- Once paired, the LED on the U-Com 6R will flash blue periodically.
6.4. Intercom Pairing (Up to 2 Riders)
The U-Com 6R supports communication with one other rider. For Mesh 2.0 technology with multiple riders, refer to the advanced features section or the full online manual.
- Ensure both U-Com 6R units are powered on and not connected to other devices.
- On both units, press and hold the Intercom button for 5 seconds until the LED flashes red and blue alternately.
- The units will automatically search and pair with each other. Once connected, the LEDs will flash blue.
- To initiate an intercom conversation, briefly press the Intercom button on either unit.
7. Działanie
7.1. Rozmowy telefoniczne
- Odbierz połączenie: Krótko naciśnij przycisk połączenia.
- Zakończ połączenie: Krótko naciśnij przycisk połączenia.
- Odrzuć połączenie: Naciśnij i przytrzymaj przycisk połączenia przez 2 sekundy.
- Asystent głosowy: Briefly press the Call button twice to activate your phone's voice assistant (Siri, Google Assistant).
7.2. Odtwarzanie muzyki
- Odtwórz/Pauza: Briefly press the Music button.
- Następny utwór: Press the Music button twice.
- Poprzedni utwór: Press the Music button three times.
7.3. Regulacja głośności
The U-Com 6R features dedicated buttons for volume control, typically integrated with the main control panel. Refer to the device overview (Figure 4.1) for button locations.
- Zwiększ głośność: Naciśnij przycisk zwiększania głośności.
- Zmniejsz głośność: Naciśnij przycisk „Zmniejsz głośność”.
7.4. GPS and OEM System Compatibility
The U-Com 6R is designed with Bluetooth 5.2 to ensure broad compatibility with various GPS navigation devices and original equipment manufacturer (OEM) systems found on motorcycles. Pair these devices as you would a mobile phone, following their respective pairing instructions.
8. Konserwacja
- Czyszczenie: Użyj miękkiego, damp cloth to clean the unit. Do not use abrasive cleaners or solvents.
- Wodoodporność: The U-Com 6R is waterproof. However, ensure the USB-C port cover is fully sealed to maintain its water-resistant properties.
- Pielęgnacja baterii: For optimal battery life, avoid fully discharging the battery frequently. Charge the device regularly, especially if it will be stored for extended periods. The integrated battery is replaceable, extending the product's lifespan.
- Składowanie: Przechowuj urządzenie w chłodnym, suchym miejscu, gdy nie jest używane.
9. Rozwiązywanie Problemów
| Problem | Możliwa przyczyna | Rozwiązanie |
|---|---|---|
| Urządzenie nie włącza się. | Niski poziom naładowania baterii. | Całkowicie naładuj urządzenie. |
| Nie można sparować z telefonem/domofonem. | Device not in pairing mode; distance too far; interference. | Upewnij się, że urządzenie jest w trybie parowania (miga na czerwono/niebiesko). Zbliż się do drugiego urządzenia. Wyłącz inne urządzenia Bluetooth. |
| Brak dźwięku lub słaba jakość dźwięku. | Volume too low; speakers incorrectly positioned; loose connection. | Increase volume. Check speaker placement and connections. Ensure microphone is correctly positioned. |
| Połączenie interkomowe jest często zrywane. | Out of range; environmental interference. | Stay within 1 km range. Avoid areas with strong radio interference. |
9.1. Przywracanie ustawień fabrycznych
If issues persist, a factory reset may resolve them. Consult the full online manual or contact customer support for specific instructions on performing a factory reset for the U-Com 6R.
10. Specyfikacje
| Funkcja | Szczegół |
|---|---|
| Numer modelu | INTERPHOUCOM6R |
| Wersja Bluetooth | 5.2 |
| Zasięg domofonu | Up to 1 Kilometer (between 2 riders) |
| Czas rozmowy | Około 15 godzin |
| Typ baterii | Lithium Polymer (included, replaceable) |
| Łączność | Bluetooth, Mesh 2.0 (compatible with Sena) |
| Odporność na wodę | Tak |
| Waga | 0.36 kilograma (12.7 uncji) |
| Wymiary | 9.09 x 5.83 x 2.64 cala (opakowanie) |
| Zgodność | GPS and OEM systems, most other brands on the market |
11. Gwarancja i wsparcie
Interphone products are manufactured to high-quality standards. For warranty information, please refer to the warranty card included with your product or visit the official Interphone website. For technical support or further assistance, please contact Interphone customer service through their official channels.
Więcej informacji i zasobów pomocy znajdziesz na stronie Interphone Store on Amazon.


