1. Wprowadzenie
This manual provides essential information for the safe and efficient operation of your KRIB BLING Full Automatic Washing Machine, Model XQB201A. Please read it thoroughly before use and retain it for future reference.

Figure 1.1: KRIB BLING 17.7 lbs portable automatic washing machine, gold color, front view.
2. Instrukcje bezpieczeństwa
Aby zmniejszyć ryzyko pożaru, porażenia prądem elektrycznym lub obrażeń ciała, należy przestrzegać następujących podstawowych środków ostrożności:
- Przed użyciem urządzenia należy przeczytać całą instrukcję.
- Nie pierz przedmiotów, które były wcześniej czyszczone, prane, moczone lub zaplamione benzyną, rozpuszczalnikami do czyszczenia chemicznego albo innymi substancjami łatwopalnymi lub wybuchowymi, ponieważ wydzielają one opary, które mogą się zapalić lub wybuchnąć.
- Nie dodawaj benzyny, rozpuszczalników do czyszczenia chemicznego ani innych substancji łatwopalnych lub wybuchowych do wody do prania. Substancje te wydzielają opary, które mogą się zapalić lub wybuchnąć.
- Nie pozwalaj dzieciom bawić się na urządzeniu lub w nim. Konieczny jest ścisły nadzór nad dziećmi, gdy urządzenie jest używane w pobliżu dzieci.
- Przed wycofaniem urządzenia z eksploatacji lub wyrzuceniem należy zdjąć drzwiczki komory zmywania.
- Nie wkładaj rąk do urządzenia, jeśli zbiornik lub mieszadło są w ruchu.
- Nie instaluj i nie przechowuj tego urządzenia w miejscu, w którym będzie narażone na działanie warunków atmosferycznych.
- Nie tampz kontrolą.
- Nie naprawiaj ani nie wymieniaj żadnej części urządzenia ani nie próbuj serwisować, chyba że wyraźnie zalecono to w instrukcji konserwacji lub opublikowanej instrukcji naprawy przez użytkownika, którą rozumiesz i masz umiejętności do wykonania.
- Always disconnect the appliance from the power supply before cleaning, servicing, or performing any maintenance.
- Sprawdź, czy przewód zasilający nie jest uszkodzony i jest prawidłowo uziemiony.
3. Koniec produktuview
3.1 Składniki
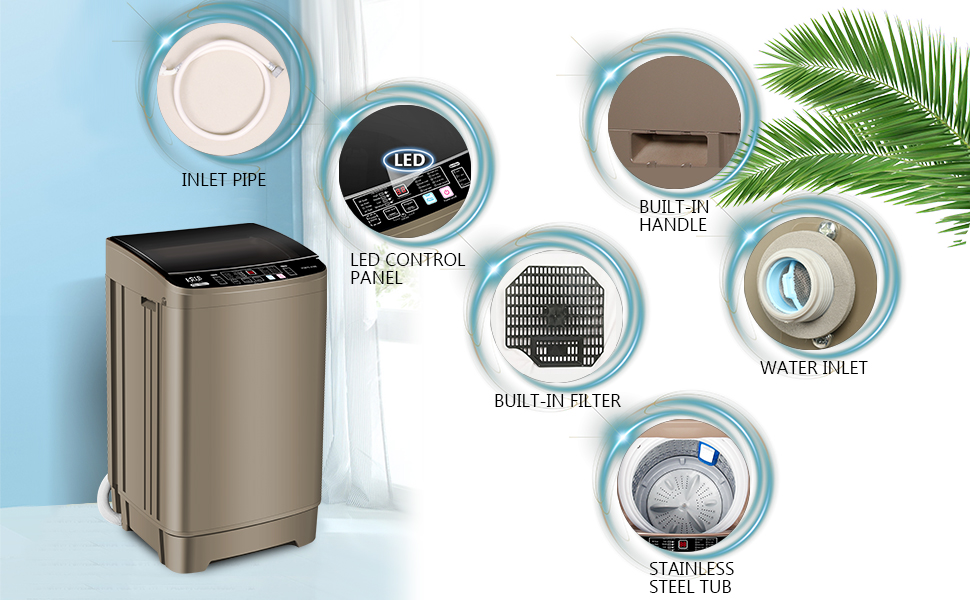
Figure 3.1: Key components of the washing machine, including the inlet pipe, LED control panel, built-in handle, built-in filter, water inlet, and stainless steel tub.
3.2 Funkcje
- Full Automatic Operation: Select a program and water level, and the machine operates independently.
- Zintegrowana pompa spustowa: Allows for flexible drainage from various angles.
- Kompaktowa i przenośna konstrukcja: Ideal for small living spaces such as RVs, apartments, dorms, and for camping.
- Pojemność 17.7 funta: Suitable for 3-4 members, accommodating various laundry loads.
- Automatic Imbalance Adjustment: Minimizes shaking and noise during wash and spin cycles.
- Diamond Honeycomb Inner Tub: Designed to protect clothing from damage during washing.
- Mocny silnik: Ensures effective cleaning and durability.

Figure 3.2: Diamond honeycomb design of the stainless steel inner tub for clothing protection.

Figure 3.3: Motor components emphasizing high speed, all copper wire, stability, and durability.
4. Konfiguracja i instalacja
4.1 Rozpakowanie
Carefully remove all packaging materials. Ensure to remove the foam pad and bottom bracket used for motor protection during transportation. Failure to remove these can cause loud noise or improper operation.
4.2 Lokalizacja
Place the washing machine on a stable, level surface. Ensure it is near a water supply and a suitable drain. Avoid locations exposed to direct sunlight or freezing temperatures.

Figure 4.1: The washing machine is suitable for various compact living spaces.
4.3 Przyłącze zasilania wodą
- Connect the water inlet hose to a suitable faucet.
- Ensure the connection is tight and use the provided adapter and rubber rings to prevent leaks.
- Open the water faucet to allow water into the machine.
4.4 Montaż węża spustowego
Position the drain hose so that its outlet is lower than the machine's drain outlet to ensure proper drainage. The integrated drain pump facilitates drainage from different angles.

Figure 4.2: Illustration of the drain pump and proper drain hose positioning.
4.5 Połączenie zasilania
Podłącz przewód zasilający do uziemionego gniazdka elektrycznego. Upewnij się, że napięcietage odpowiada wymaganiom maszyny.
5. Instrukcja obsługi
5.1 Panel sterowania ponadview

Figure 5.1: Multifunctional control panel with LED display.
The control panel features an LED display and various buttons for program selection, water level adjustment, and operation control.
5.2 Podstawowe kroki operacyjne
- Włącz zasilanie: Press the 'Power on/off' button.
- Set Mode and Water Level: Use the 'Program' button to select your desired washing cycle and the 'Water level' button to adjust the water volume.
- Naciśnij Start: Naciśnij przycisk „Start/Pauza”, aby rozpocząć cykl prania.

Figure 5.2: Basic operation steps for the washing machine.
5.3 Programy prania
The machine offers 10 standard washing programs:
- Standard
- Miękki
- Szybkie mycie
- Ciężki
- Moczyć pranie
- Tylko prać
- Tylko wirowanie
- Tub air dry
- Czyszczenie wanny
- Recykling wody
5.4 Wybór poziomu wody
Choose from 8 water levels to match your laundry load size. The machine's capacity is 17.7 lbs.

Figure 5.3: Capacity guide for common clothing items.
5.5 Funkcja opóźnionego startu
The machine features a 24-hour delay cleaning function. Refer to the control panel for setting instructions.
6. Konserwacja i pielęgnacja
6.1 Czyszczenie filtra kłaczków
Regularly clean the built-in lint filter to ensure optimal washing performance and prevent lint buildup on clothes.
6.2 Czyszczenie powierzchni zewnętrznej
Wytrzyj obudowę urządzenia miękką, damp płótno. Unikaj stosowania ściernych środków czyszczących i rozpuszczalników.
6.3 Cleaning the Inner Tub
Utilize the 'Tub clean' program periodically to maintain the cleanliness and hygiene of the inner tub.
7. Rozwiązywanie Problemów
7.1 Typowe problemy i rozwiązania

Figure 7.1: Visual troubleshooting guide for common problems.
| Problem | Rozwiązanie |
|---|---|
| Washing machine is leaking. | Ensure the water pipe has a gasket and a second gasket is installed. Both ends of the water pipe must be tightened to prevent leakage. |
| Bottom of the washing machine appears broken or machine makes loud noise/does not work correctly. | The foam pad and bottom bracket are used to protect the motor during transportation. These must be removed before use. |
| There is residual water in the washing machine. | Residual water is normal from the production drain test process. This indicates the machine was tested and is not a quality problem or a secondary sale. |
7.2 Kody błędów
- Błąd E2: Indicates a drainage fault. Ensure the drainage pipe is positioned correctly and is not too high, allowing water to drain smoothly.
- 66 Error: The washer will only operate when the water level reaches the set level. Check the water supply and wait to see if the washer can proceed after a certain time.
8. Specyfikacje techniczne
| Specyfikacja | Wartość |
|---|---|
| Nazwa marki | KRIB BLING |
| Informacje o modelu | XQB201A-Gold6 |
| Waga przedmiotu | 46 funta |
| Wymiary produktu | 20 x 20 x 34 cala |
| Numer modelu przedmiotu | XQB201A |
| Efektywność | Efektywność energetyczna |
| Pojemność | 17.7 funtów |
| Poziom hałasu | 59dB |
| Typ instalacji | Wolnostojące |
| Cechy specjalne | Całkowicie automatyczny |
| Kolor | Złoto |
| Konsola kontrolna | Naciśnij przycisk |
| Cykle standardowe | 10 |
| Dostęp do lokalizacji | Ładowanie od góry |
| Zawarte komponenty | Wąż spustowy |
| Znamionowa objętośćtage | 110 V-120 V/60 Hz |
| Ciśnienie hydrauliczne | 0.03~0.78 MPa |
| Washing/Spinning Noise | 59dB / 69dB |
| Moc znamionowa | 260 W |
| Klasa wodoodporności | IPX4 |

Rysunek 8.1: Wymiary produktu.

Figure 8.2: Inner tub dimension: 14.96 inches diameter.
9. Gwarancja i wsparcie
For warranty information or technical support, please refer to the documentation included with your purchase or contact KRIB BLING customer service. Keep your purchase receipt as proof of purchase.


