1. Wprowadzenie
This manual provides essential information for the safe installation, operation, and maintenance of your Lindby Elamira 3-Light Pendant LampPrzed instalacją należy uważnie przeczytać niniejszą instrukcję i zachować ją do wykorzystania w przyszłości.
The Elamira pendant lamp is designed for modern interiors, providing pleasant and comfortable downward-directed light due to its metal shades. Its design is minimalist, yet its illumination is harmonious.
2. Instrukcje bezpieczeństwa
- Bezpieczeństwo elektryczne: Installation must be performed by a qualified electrician in accordance with local wiring regulations. Always disconnect power at the main fuse box before installation, maintenance, or bulb replacement.
- Tomtage: Zapewnij objętość podażytage pasuje do lamptom operacyjnytage (230 V).
- Żarówki: Use only E27 bulbs. Do not exceed the maximum wattage of 60W per bulb. Bulbs are not included.
- Środowisko: To jestamp is designed for indoor use only (IP20 rating). Do not expose to moisture or extreme temperatures.
- Obsługiwanie: Zajmij się lamp elementy ostrożnie, aby uniknąć uszkodzeń.
3. Zawartość opakowania
Przed przystąpieniem do instalacji sprawdź, czy wszystkie komponenty są obecne i nieuszkodzone.
- 1 x Lindby Elamira 3-Light Pendant Lamp osprzęt
- Sprzęt montażowy (śruby, kołki rozporowe)
- Instrukcja obsługi
Note: E27 bulbs are not included and must be purchased separately.
4. Konfiguracja i instalacja
Wymagane narzędzia: Śrubokręt, wiertarka, ściągacz izolacji, tomtage tester, ladder.
- Przygotuj się do instalacji:
- Wyłącz główne zasilanie za pomocą wyłącznika obwodu lub skrzynki bezpiecznikowej.
- Ensure the power is off using a voltagtester.
- Zamontuj płytę sufitową:
- Position the mounting plate against the ceiling at the desired location.
- Zaznacz punkty wiercenia.
- Wywierć otwory i włóż odpowiednie kołki rozporowe (jeśli to konieczne).
- Przymocuj płytę montażową do sufitu za pomocą dołączonych śrub.
- Podłącz okablowanie:
- Podłącz przewody elektryczne do gniazdka elektrycznegoamp's terminal block. Follow standard wiring color codes (e.g., brown to live, blue to neutral, green/yellow to earth).
- Sprawdź, czy wszystkie połączenia są solidne i właściwie zaizolowane.
- Dołącz Lamp Osprzęt:
- Ostrożnie podnieś lamp fixture and attach it to the mounted ceiling plate.
- Secure the fixture using the provided screws or fasteners.
- Zainstaluj żarówki:
- Wkręć trzy żarówki E27 (maks. 60 W każda) do otworu w ścianie.amp gniazda.
- Przywróć zasilanie:
- Włącz ponownie główne zasilanie.
- Przetestuj lampfunkcjonalność.

Figure 1: Product Dimensions. This image illustrates the overall length (1330mm), maximum suspension height (1500mm), and individual shade diameter (310mm) of the Elamira pendant lamp.
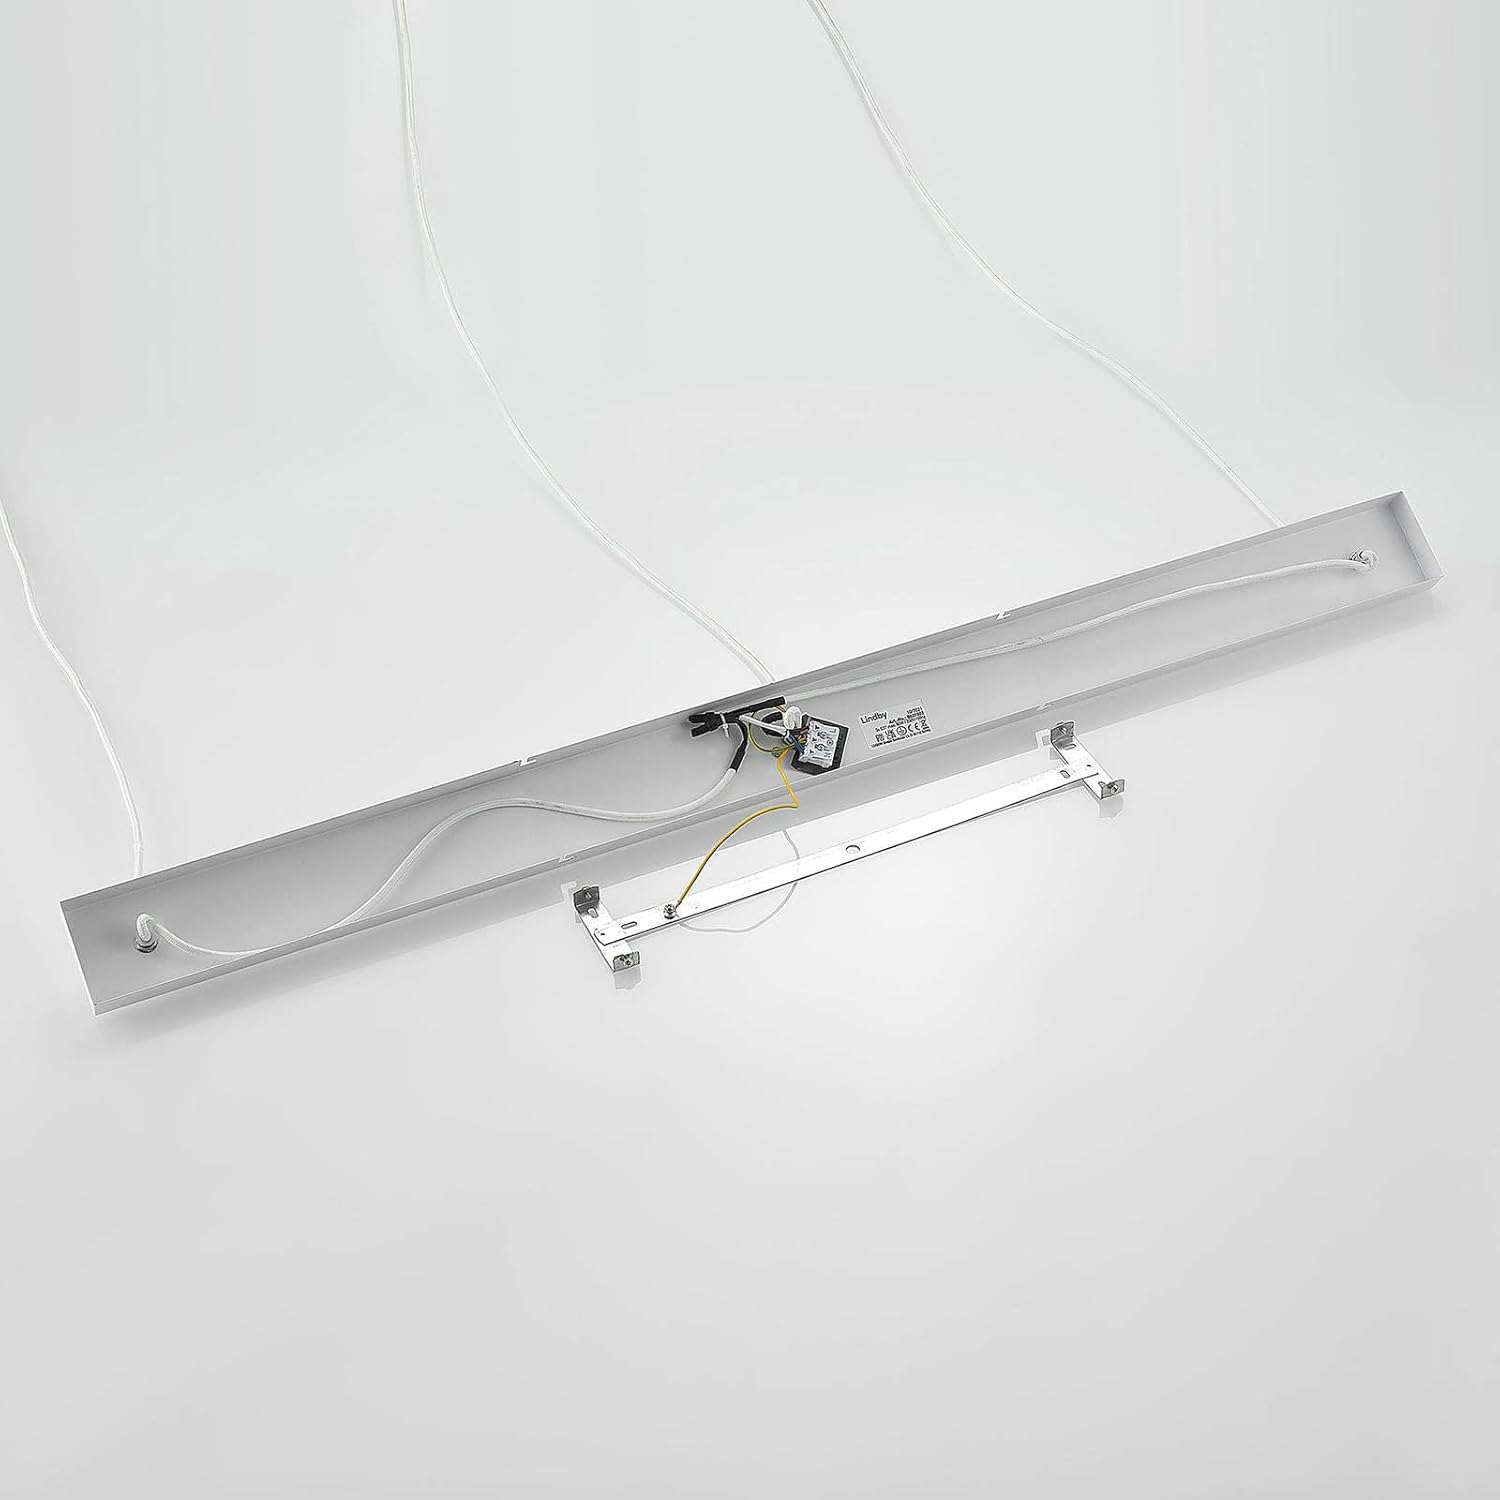
Figure 2: Mounting Bar and Wiring. This image displays the internal wiring and E27 lamp holders within the mounting bar, crucial for electrical connections during installation.
5. Instrukcja obsługi
The Lindby Elamira pendant lamp is operated via a standard wall switch. If connected to a compatible dimmer switch, the light intensity can be adjusted.
- Włączanie/wyłączanie: Użyj przełącznika ściennego podłączonego do lampobwód 's.
- Ściemnianie (opcjonalnie): If a dimmer switch is installed, rotate or slide the dimmer control to adjust the brightness. Ensure that the installed E27 bulbs are dimmable.

Rysunek 3: Lamp in Operation. This image shows the Elamira pendant lamp fully illuminated, demonstrating its aesthetic and light output over a dining area.
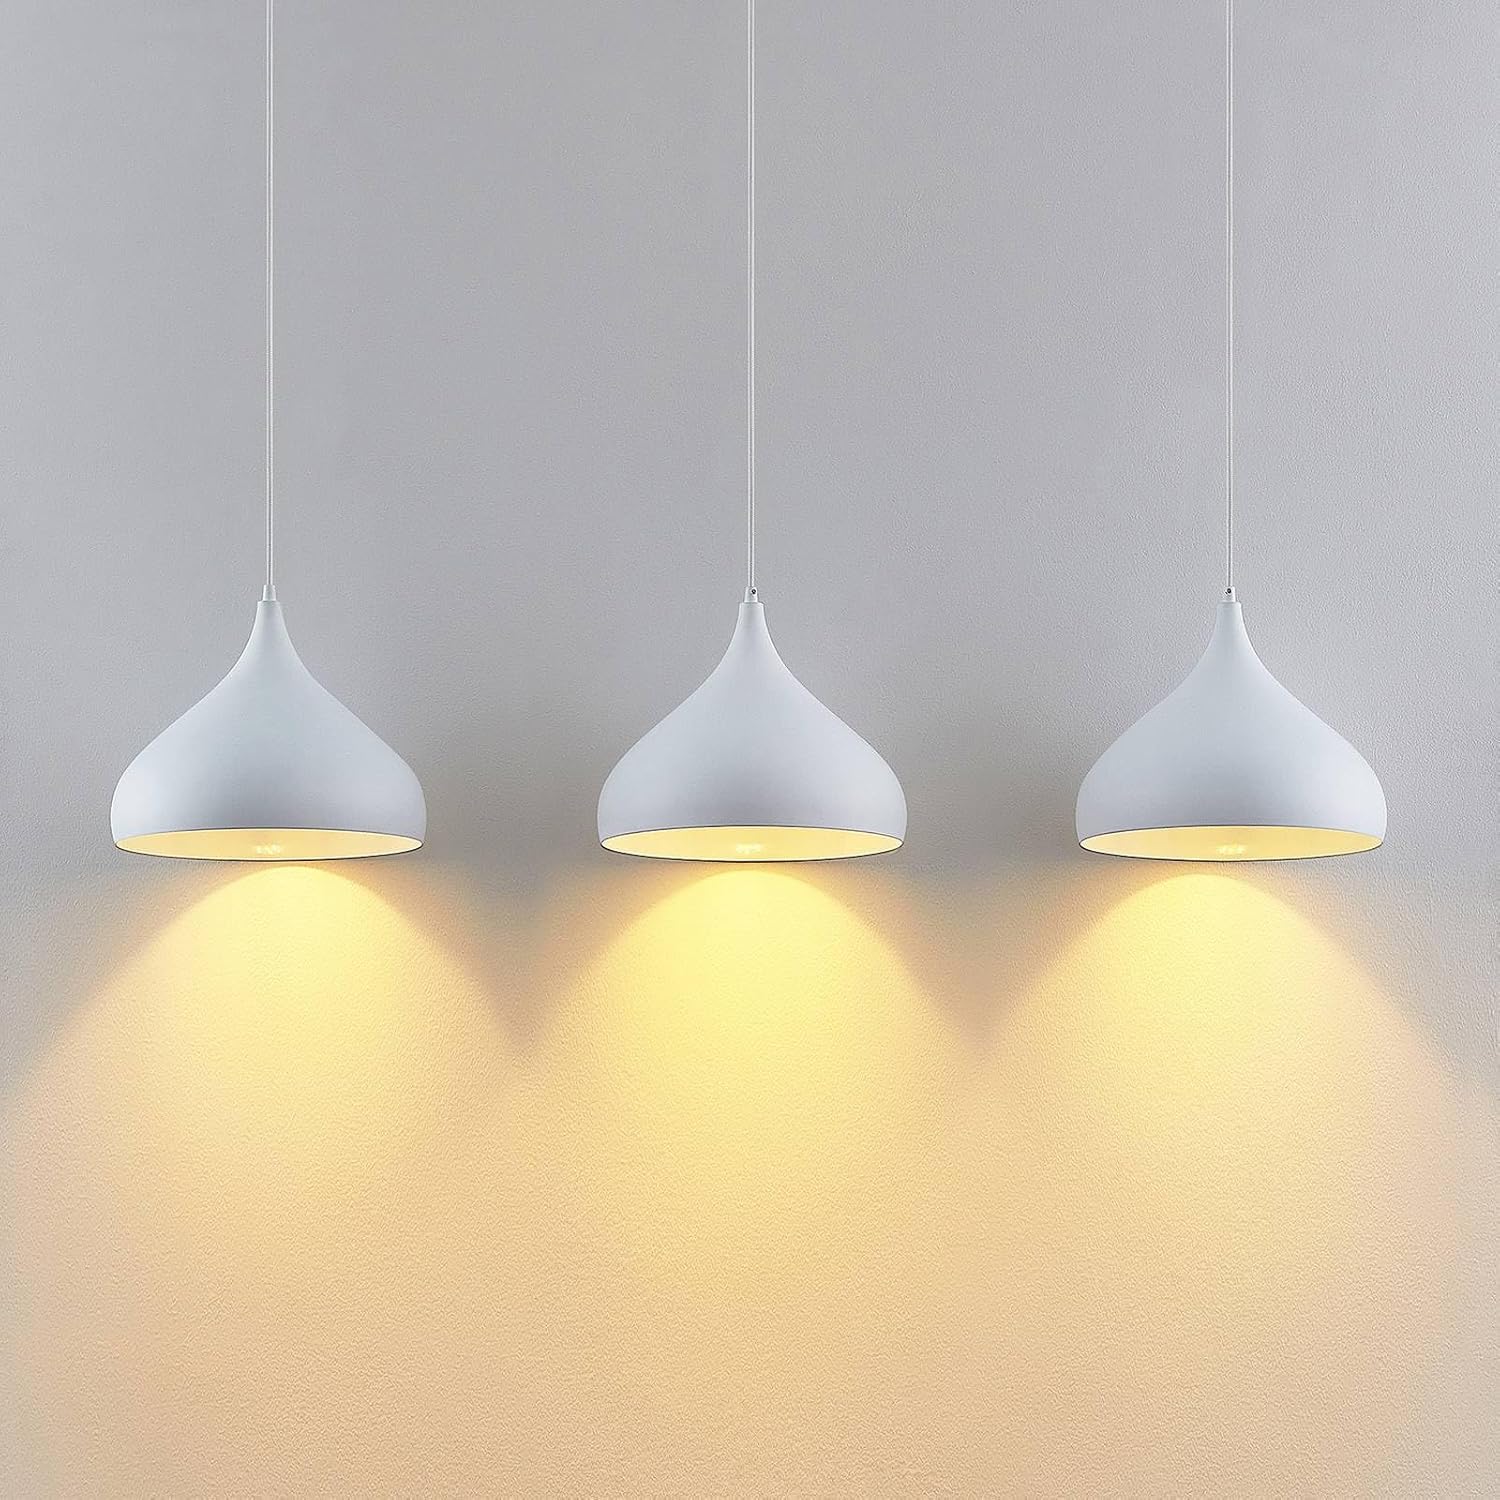
Figure 4: Downward Light Effect. This image focuses on the light cast by the three shades, illustrating the pleasant, downward-directed illumination characteristic of the lamp.
6. Konserwacja
- Czyszczenie: Przed czyszczeniem odłącz zasilanie. Wytrzyjamp with a soft, dry cloth. Do not use abrasive cleaners or solvents, as these may damage the finish.
- Wymiana żarówki:
- Wyłącz zasilanie lamp.
- Przed dotknięciem żarówek należy odczekać, aż całkowicie ostygną.
- Ostrożnie odkręć starą żarówkę E27.
- Screw in a new E27 bulb (max 60W).
- Przywróć zasilanie i przetestuj.
7. Rozwiązywanie Problemów
| Problem | Możliwa przyczyna | Rozwiązanie |
|---|---|---|
| Lamp nie świeci. | Brak zasilania. Wadliwa żarówka. Nieprawidłowe okablowanie. | Sprawdź wyłącznik/bezpiecznik. Wymień żarówkę. Sprawdź połączenia przewodów (skonsultuj się z wykwalifikowanym elektrykiem). |
| Światło migocze. | Luźna żarówka. Niekompatybilny ściemniacz/żarówka. Niestabilne zasilanie. | Dokręć żarówkę. Upewnij się, że ściemniacz i żarówki są kompatybilne. Skonsultuj się z elektrykiem. |
| Dimmer not working. | Non-dimmable bulbs. Niekompatybilny przełącznik ściemniacza. Faulty dimmer switch. | Install dimmable E27 bulbs. Ensure dimmer is compatible with LED/incandescent bulbs. Replace dimmer switch. |
If problems persist, contact a qualified electrician or the retailer.
8. Specyfikacje
| Funkcja | Szczegół |
|---|---|
| Numer modelu | 9627802 |
| Marka | Lindby'ego |
| Producent | Lampogarnięty |
| Wymiary (dł. x szer. x wys.) | 133 x 31 x 150 cm (maksymalna wysokość) |
| Waga | 2.23 kilogramów |
| Tworzywo | Stal stopowa, aluminium |
| Kolor | Matowa biel |
| Liczba świateł | 3 |
| Typ gniazda żarówki | E27 |
| Maksymalna moctage na żarówkę | 60 W |
| Objętość operacyjnatage | 230 V |
| Klasa ochrony IP | IP20 (tylko do użytku w pomieszczeniach) |
| Klasa ochrony | I |
| Źródło zasilania | Elektryczny przewodowy |
| Styl przełączania | Dimmer (requires compatible dimmer switch) |
| Zawarte komponenty | Lamp fixture, mounting hardware (bulbs not included) |
9. Gwarancja i wsparcie
For warranty information or technical support, please refer to the retailer's policy or contact the manufacturer, Lampenwelt, bezpośrednio. Zachowaj dowód zakupu na wypadek roszczeń gwarancyjnych.
If you have questions about the product, you may also contact the seller via their Amazon merchant profile: Lampen24NL Seller Profile.


