1. Wprowadzenie
Dziękujemy za zakupasing the DUAL DL-DAB3-001 DAB+/Bluetooth Alarm Clock Radio. This device combines a digital radio (DAB+ and FM), Bluetooth connectivity for audio streaming, a dual alarm clock, and convenient induction charging for compatible smartphones. This manual provides essential information for safe operation, setup, and maintenance of your device. Please read it thoroughly before use and retain it for future reference.
Rysunek 1.1: The DUAL DL-DAB3-001 alarm clock radio positioned on a bedside table, demonstrating its compact design and integration into a modern bedroom environment. A smartphone is shown on the induction charging pad, and the digital display shows the time and date.
2. Instrukcje bezpieczeństwa
- Przed przystąpieniem do obsługi urządzenia przeczytaj wszystkie instrukcje.
- Nie wystawiaj urządzenia na działanie deszczu, wilgoci ani ekstremalnych temperatur.
- Zapewnij odpowiednią wentylację, nie blokuj żadnych otworów wentylacyjnych.
- Używaj wyłącznie dołączonego zasilacza sieciowego. Korzystanie z nieautoryzowanych zasilaczy może spowodować uszkodzenie urządzenia i unieważnienie gwarancji.
- Nie próbuj demontować ani modyfikować urządzenia. Wszelkie prace serwisowe zlecaj wykwalifikowanemu personelowi.
- Trzymaj urządzenie z dala od silnych pól magnetycznych.
- Baterie należy utylizować zgodnie z lokalnymi przepisami.
3. Zawartość opakowania
Sprawdź, czy w przesyłce znajdują się wszystkie wymienione poniżej elementy:
- DUAL DL-DAB3-001 Alarm Clock Radio
- AC Power Adapter (Input: AC 100-240V ~ 50/60 Hz 1A; Output: DC 9V 2.5A)
- Instrukcja obsługi (ten dokument)
Note: 2 x AAA R4 batteries for backup are not included and must be purchased separately.
4. Koniec produktuview
4.1 Przód i góra View

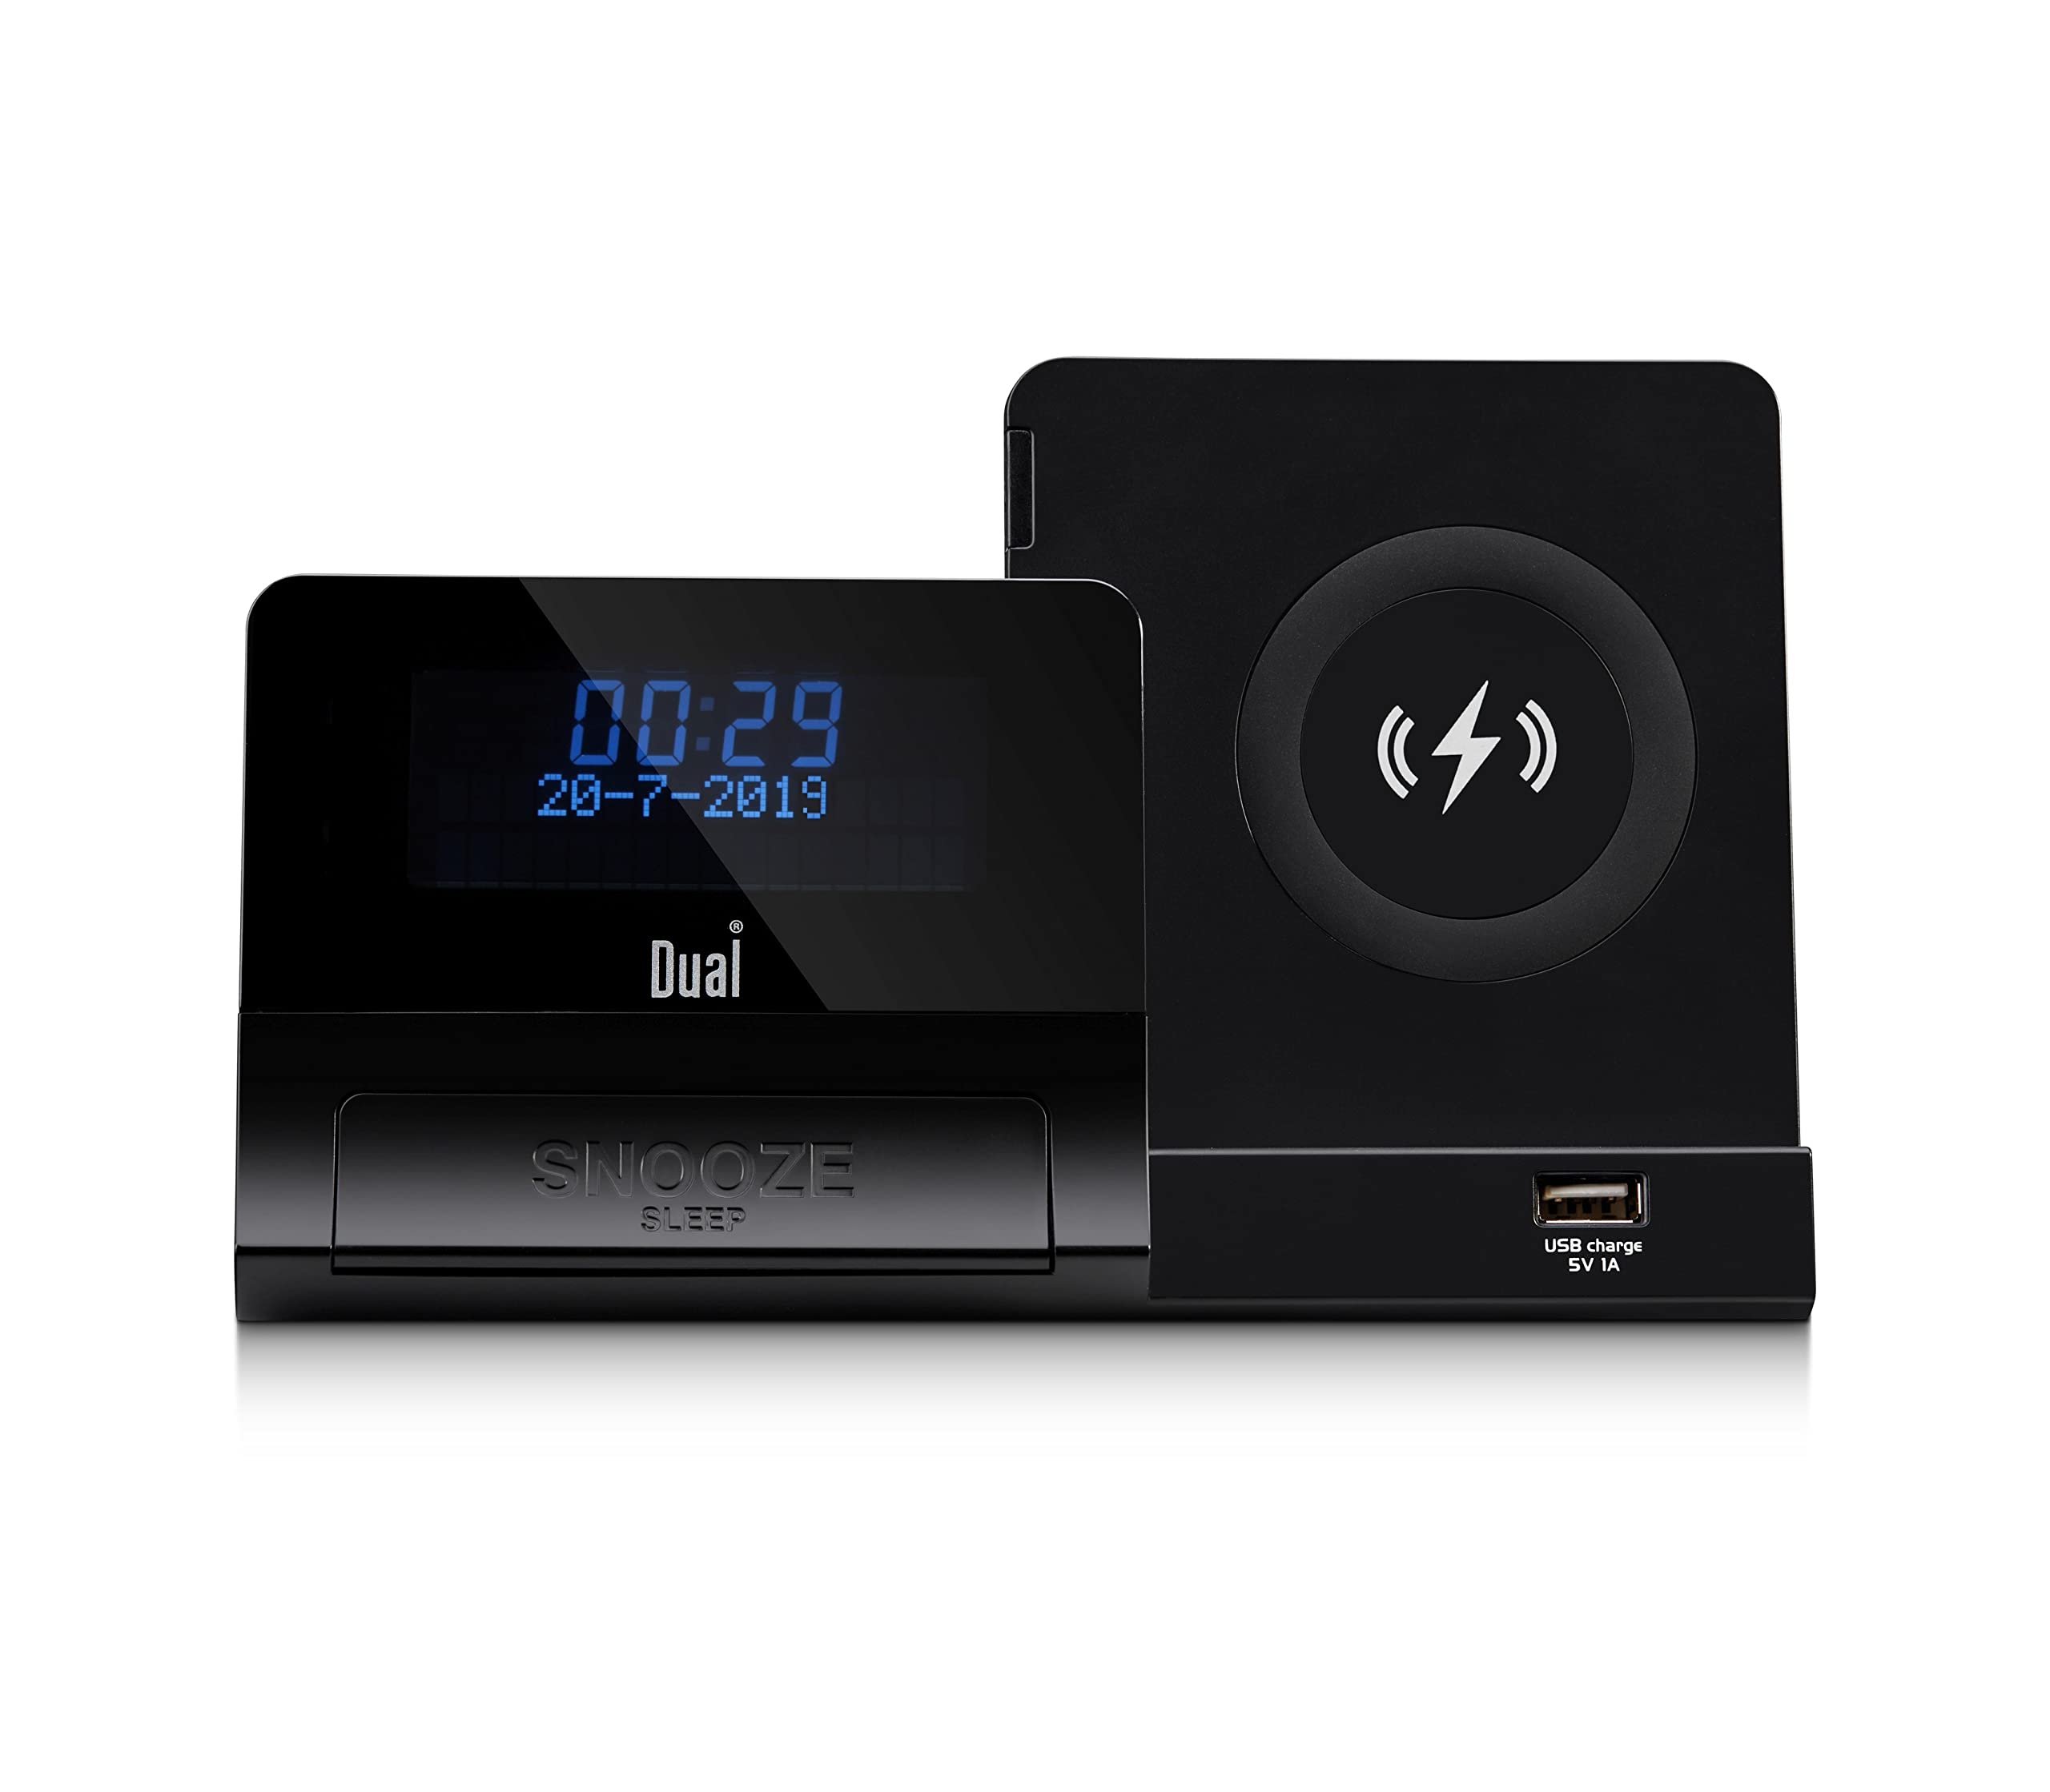
Rysunek 4.1: Szczegółowy view of the DUAL DL-DAB3-001, highlighting the 5-inch LCD display, the large 'SNOOZE' button, the circular wireless induction charging pad on the right, and the USB charging port (5V 1A) located below the charging pad.
- Wyświetlacz LCD: Shows time, date, radio information, and alarm status.
- SNOOZE/SLEEP Button: Activates snooze during an alarm or sleep timer during playback.
- Bezprzewodowa podkładka ładująca: For induction charging of compatible smartphones.
- USB Charging Port (5V 1A): For charging other USB-powered devices.
- Control Buttons (not visible in this view, typically on top/side): Power, Mode, Tune/Scan, Volume, Alarm Set, Presets.
4.2 Panel tylny (opis ogólny)
Na tylnym panelu znajdują się zazwyczaj:
- Gniazdo DC IN: Do podłączenia zasilacza sieciowego.
- Wejście AUX IN: Do podłączania zewnętrznych urządzeń audio.
- Gniazdo słuchawkowe: Do prywatnego słuchania.
- Komora baterii: For 2 x AAA R4 backup batteries.
5. Konfiguracja
5.1 Połączenie zasilania
- Insert the DC plug of the supplied AC adapter into the DC IN jack on the rear of the unit.
- Plug the AC adapter into a standard wall outlet (AC 100-240V ~ 50/60 Hz).
- Urządzenie włączy się lub przejdzie w tryb czuwania.
5.2 Montaż baterii (zapasowej)
Do tworzenia kopii zapasowej ustawień czasu i alarmu podczas zaniku zasilaniatages:
- Otwórz pokrywę komory baterii z tyłu urządzenia.
- Insert 2 x AAA R4 batteries (not included), observing the correct polarity (+/-).
- Dokładnie zamknij pokrywę komory baterii.
5.3 Initial Power On and Time Synchronization
Upon first power-on, the unit will typically attempt to synchronize the time and date automatically via DAB+ signal. Ensure the antenna is extended for optimal reception.
6. Instrukcja obsługi
6.1 Obsługa radia (DAB+/FM)
- Włączanie: Naciśnij Moc przycisk, aby włączyć radio.
- Wybierz tryb: Naciśnij Tryb przycisk do przełączania między radiem DAB+ i FM.
- Automatyczne skanowanie (DAB+): In DAB+ mode, the radio will automatically scan for available stations upon first use. For a manual scan, refer to the specific button (e.g., Skandować or Menu opcje).
- Tuning (FM): W trybie FM użyj Strojenie +/- buttons to manually tune or press and hold for auto-scan to the next available station.
- Zapisywanie ustawień wstępnych: To save a station, tune to the desired station, press and hold the Ustawienie wstępne przycisk, wybierz numer ustawienia wstępnego za pomocą Strojenie +/-i naciśnij Ustawienie wstępne jeszcze raz, aby potwierdzić.
- Przywoływanie ustawień wstępnych: Naciśnij Ustawienie wstępne naciśnij krótko przycisk, a następnie użyj Strojenie +/- aby wybrać żądane ustawienie wstępne.
6.2 Obsługa Bluetooth
- Wejdź w tryb Bluetooth: Naciśnij Tryb button until "Bluetooth" appears on the display. The unit will enter pairing mode, indicated by a flashing Bluetooth icon.
- Łączenie w pary: On your smartphone or other Bluetooth device, enable Bluetooth and search for available devices. Select "DL-DAB3-001" from the list.
- Połączenie: Once paired, the Bluetooth icon on the radio's display will stop flashing and remain solid. You can now stream audio from your device to the radio.
- Kontrola odtwarzania: Use your connected device or the radio's controls (if available) to play, pause, skip tracks, and adjust volume.
6.3 Funkcja budzika
The DL-DAB3-001 features a dual alarm system.
- Ustawianie alarmów: Naciśnij i przytrzymaj Ustawiony alarm button (or similar, refer to specific button labels). Use Strojenie +/- aby ustawić godzinę alarmu, naciśnij Ustawiony alarm to confirm. Repeat for the second alarm.
- Źródło alarmu: Select your preferred alarm source (DAB+ radio, FM radio, or buzzer) using the Tryb or Ustawiony alarm button during the alarm setup process.
- Aktywowanie/Dezaktywowanie alarmów: Naciśnij krótko Ustawiony alarm button to toggle alarms on/off. An alarm icon will appear on the display when active.
- Drzemka: Gdy zabrzmi alarm, naciśnij przycisk DRZEMKA naciśnij przycisk, aby tymczasowo wyciszyć dźwięk na określony czas (np. 9 minut).
- Zatrzymywanie alarmu: Naciśnij Moc button to turn off the alarm completely until the next set time.
- Wyłącznik czasowy: While playing audio, press the DRZEMKA/SEN button repeatedly to cycle through sleep timer options (e.g., 15, 30, 60, 90 minutes) before the unit automatically turns off.
6.4 Induction Charging
The unit features a wireless induction charging pad for Qi-compatible smartphones.
- Ensure the radio is powered on and connected to the AC adapter.
- Place your Qi-compatible smartphone directly onto the wireless charging pad.
- The charging indicator on your phone should activate, confirming that charging has begun.
- If charging does not start, adjust the position of your phone on the pad. Remove any thick cases that may interfere with charging.
6.5 Ładowanie przez USB
The USB port on the front of the unit provides 5V 1A power output for charging other devices.
- Connect your device's USB charging cable to the USB charging port on the radio.
- Ensure the radio is powered on and connected to the AC adapter.
- Ładowanie rozpocznie się automatycznie.
6.6 wejścia pomocnicze
Connect external audio sources (e.g., MP3 player) via the AUX IN jack.
- Connect a 3.5mm audio cable (not included) from your external device's headphone jack to the AUX IN jack on the radio.
- Naciśnij Tryb przycisk umożliwiający wybór trybu AUX.
- Steruj odtwarzaniem i głośnością z urządzenia zewnętrznego.
7. Konserwacja
- Czyszczenie: Disconnect the power before cleaning. Use a soft, dry cloth to wipe the unit. Do not use abrasive cleaners or solvents.
- Składowanie: If storing the unit for an extended period, disconnect it from power and remove the backup batteries. Store in a cool, dry place.
- Antena: Aby uniknąć uszkodzeń, należy obchodzić się z anteną teleskopową ostrożnie.
8. Rozwiązywanie Problemów
| Problem | Możliwa przyczyna | Rozwiązanie |
|---|---|---|
| Brak zasilania | AC adapter not connected or faulty; Power outlet not working. | Sprawdź podłączenie zasilacza sieciowego. Spróbuj użyć innego gniazdka elektrycznego. |
| Słaby odbiór radia (DAB+/FM) | Antena nie jest wysunięta; Słaby sygnał; Zakłócenia. | Fully extend the telescopic antenna. Reposition the unit. Perform a new auto-scan for DAB+ stations. |
| Parowanie Bluetooth nie powiodło się | Device not in pairing mode; Bluetooth disabled on smartphone; Already connected to another device. | Ensure the radio is in Bluetooth pairing mode. Enable Bluetooth on your smartphone. Disconnect from other Bluetooth devices. |
| Induction charging not working | Phone not Qi-compatible; Phone not positioned correctly; Thick phone case. | Verify phone compatibility. Adjust phone position on the pad. Remove phone case. |
| Alarm nie włącza się | Alarm nie został uruchomiony; głośność jest zbyt niska. | Ensure alarm is set and activated (check display icon). Increase volume. |
9. Specyfikacje
- Model: DL-DAB3-001
- Zasilanie: DC 9V 2.5A (via AC adapter)
- Baterie zapasowe: 2 x AAA R4 (not included)
- Tuner radiowy: DAB+, FM
- Wersja Bluetooth: 5.0
- Moc wyjściowa: 2 x 3 watów
- Wyświetlacz: 5-inch LCD (adjustable brightness)
- Induction Charging: Zgodny z Qi
- Wyjście ładowania USB: 5V 1A
- Łączność: Auxiliary Input, Headphone Jack
- Wymiary (dł. x szer. x wys.): Wymiary 18 x 10.8 x 9.8 cm
- Waga: 800 gramów
10. Gwarancja i wsparcie
This DUAL product is covered by a manufacturer's warranty. Please refer to the warranty card included in your package or contact your retailer for specific warranty terms and conditions. For technical support or service inquiries, please contact the customer service department of your place of purchase or visit the official Dual webAby uzyskać dalszą pomoc, odwiedź naszą witrynę.


