1. Wprowadzenie
The Keysight 4395A is a high-performance instrument integrating network, spectrum, and impedance analysis capabilities into a single unit. Designed for laboratory and manufacturing applications, it provides advanced measurement functions for evaluating components and circuits across a wide frequency range.
This manual provides essential information for the safe and effective operation of your Keysight 4395A analyzer. Please read it thoroughly before using the instrument.
Główne cechy:
- Integrated high-performance network, spectrum, and impedance analysis.
- Built-in IBASIC for automated control.
- GPIB port and Digital I/O port for external connectivity.
- Network Analyzer: Frequency range 10 Hz to 500 MHz, 115 dB dynamic range (at 10 Hz IFBW), ±0.05 dB, ±0.3° dynamic accuracy.
- Analizator widma: Frequency range 10 Hz to 500 MHz, -145 dBm/Hz sensitivity (at 10 MHz), Time-gated spectrum analysis option (4395A-1D6).
- Impedance Analyzer (Option 4395A-010): Frequency range 100 kHz to 500 MHz, equivalent circuit analysis function, ±40 V or ±100 mA DC bias (Option 4395A-001).
2. Koniec produktuview
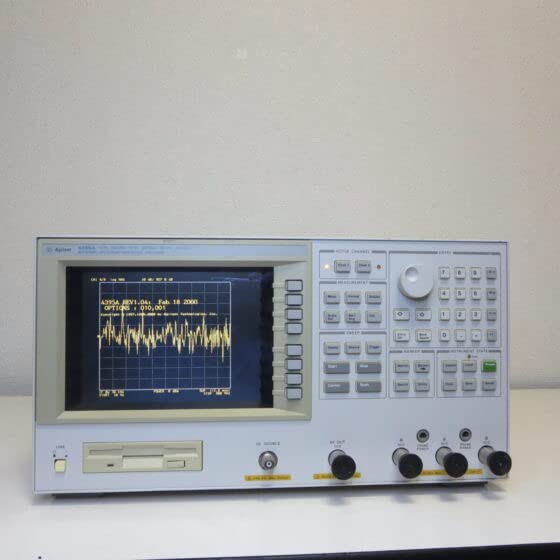
The Keysight 4395A is a versatile measurement device. Below is an image illustrating the front panel of the analyzer, highlighting its display and control interface.
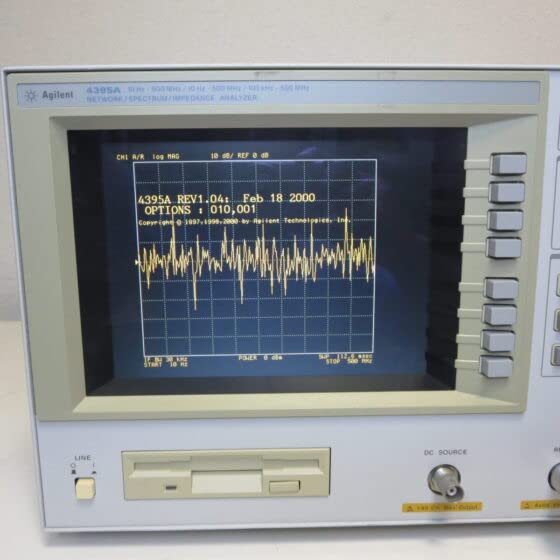
A closer look at the display reveals the measurement interface, where various analysis results are presented.
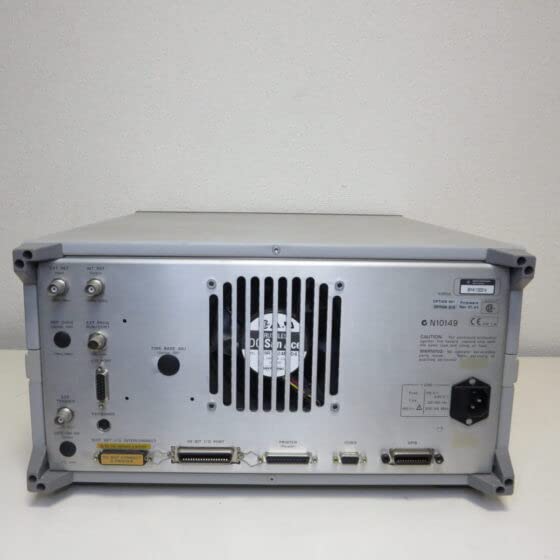
The rear panel provides various input/output ports for connecting to external devices and power.
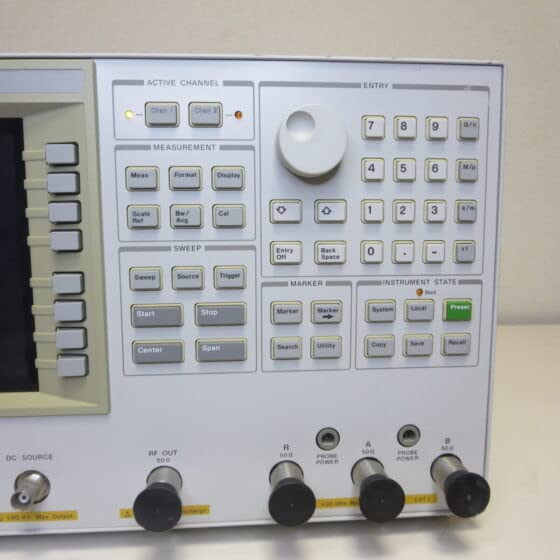
The control panel features a rotary knob and various buttons for navigating menus, setting parameters, and initiating measurements.
3. Konfiguracja
3.1 Rozpakowanie i kontrola
- Carefully remove the 4395A from its packaging.
- Inspect the instrument for any signs of physical damage. If damage is found, contact your supplier immediately.
- Sprawdź, czy wszystkie akcesoria wymienione w liście przewozowym są obecne.
3.2 Połączenie zasilania
- Upewnij się, że wyłącznik zasilania na tylnym panelu jest w pozycji WYŁĄCZONY.
- Connect the supplied power cord to the AC inlet on the rear panel of the 4395A.
- Plug the other end of the power cord into a grounded AC power outlet. The instrument supports standard line voltages (e.g., 100-240V AC, 50/60 Hz).
3.3 Pierwsze włączenie zasilania
- Aby włączyć urządzenie, naciśnij przycisk zasilania na panelu przednim.
- Observe the display for the boot-up sequence. The instrument will perform self-tests.
- Once the boot sequence is complete, the main measurement screen should appear.
3.4 Connecting Test Devices
Depending on the type of analysis (network, spectrum, or impedance), connect your device under test (DUT) to the appropriate RF input/output ports on the front panel. Use high-quality coaxial cables and adapters to ensure accurate measurements.
4. Instrukcja obsługi
The Keysight 4395A offers three primary analysis modes: Network, Spectrum, and Impedance. Each mode has specific setup and measurement procedures.
4.1 Ogólne zasady działania
- Użyj ACTIVE CHANNEL buttons to select the desired measurement channel.
- The rotary knob is used for fine adjustment of parameters and cursor positioning.
- The numeric keypad allows direct entry of values.
- Naciśnij Ustawienie wstępne button to return the instrument to its default settings.
4.2 Network Analysis Mode
To perform network analysis (e.g., S-parameter, gain, phase, group delay measurements):
- Naciśnij POMIAR przycisk, a następnie wybierz Sieć.
- Set the desired frequency range using the Start I Zatrzymywać się frequency buttons under the ZAMIATAĆ sekcja.
- Select the measurement parameter (e.g., S21, S11) using the Środek przycisk.
- Perform a calibration using a suitable calibration kit to ensure measurement accuracy. Access calibration functions via the Kal przycisk.
- Connect the DUT to the appropriate RF ports (e.g., RF OUT and RF IN).
- Naciskać Start pod ZAMIATAĆ aby rozpocząć pomiar.
4.3 Spectrum Analysis Mode
To perform spectrum analysis (e.g., signal power, distortion, noise measurements):
- Naciśnij POMIAR przycisk, a następnie wybierz Widmo.
- Set the center frequency and span using the corresponding buttons.
- Adjust the Resolution Bandwidth (RBW) and Video Bandwidth (VBW) using the Bw/Avg przycisk.
- Connect the signal source to the RF input port.
- Naciskać Start pod ZAMIATAĆ to acquire the spectrum.
4.4 Impedance Analysis Mode (with Option 4395A-010)
To perform impedance analysis (e.g., equivalent circuit analysis):
- Ensure the Impedance Analysis Option (4395A-010) is installed.
- Naciśnij POMIAR przycisk, a następnie wybierz Impedancja.
- Set the frequency range and other parameters as required.
- Connect the DUT to the impedance test fixture.
- Initiate the measurement to display impedance characteristics.
5. Konserwacja
5.1 Czyszczenie
- Regularnie czyść zewnętrzną część instrumentu miękką,amp płótno.
- Do not use abrasive cleaners or solvents that could damage the finish or display.
- Ensure ventilation openings are free from dust and debris to prevent overheating.
5.2 Przechowywanie
- Store the instrument in a clean, dry environment within the specified operating temperature and humidity ranges.
- Protect the display from direct sunlight and physical impact.
5.3 Kalibracja
For optimal measurement accuracy, periodic calibration by qualified personnel is recommended. Refer to the Keysight service manual or contact Keysight support for calibration services and schedules.
6. Rozwiązywanie Problemów
This section provides solutions to common issues you might encounter with the Keysight 4395A.
| Problem | Możliwa przyczyna | Rozwiązanie |
|---|---|---|
| Urządzenie nie włącza się. | Power cord not connected, power switch off, faulty power outlet. | Check power cord connection. Ensure power switch is ON. Test power outlet with another device. |
| Brak sygnału na wyświetlaczu. | DUT not connected correctly, incorrect measurement settings, signal source issue. | Verify DUT connections. Check frequency range, amplitude, and measurement parameters. Ensure signal source is active. |
| Niedokładne pomiary. | No calibration performed, incorrect calibration, faulty cables/connectors. | Perform a fresh calibration. Check the integrity of all cables and connectors. Ensure proper test setup. |
| Na wyświetlaczu pojawia się komunikat o błędzie. | Internal fault, parameter out of range. | Note the error code/message. Refer to the detailed service manual for specific error codes. Try restarting the instrument. |
If you encounter persistent issues not covered here, please contact Keysight technical support.
7. Specyfikacje
The following table outlines the key specifications for the Keysight 4395A Network/Spectrum/Impedance Analyzer.
| Parametr | Wartość |
|---|---|
| Producent | Widok kluczowy |
| Numer modelu | 4395A |
| Network Analyzer Frequency Range | 10 Hz do 500 MHz |
| Spectrum Analyzer Frequency Range | 10 Hz do 500 MHz |
| Impedance Analyzer Frequency Range (Option 4395A-010) | 100 kHz do 500 MHz |
| Network Analyzer Dynamic Range | 115 dB (at 10 Hz IFBW) |
| Spectrum Analyzer Sensitivity | -145 dBm/Hz (at 10 MHz) |
| Wbudowane funkcje | IBASIC, GPIB Port, Digital I/O Port |
| ASIN | B0B7RK35FG |
| Data pierwszej dostępności (Amazon.co.jp) | 2022/07/27 |
8. Gwarancja i wsparcie
8.1 Informacje o gwarancji
This Keysight 4395A instrument is covered by Keysight's standard product warranty. For detailed terms and conditions, including warranty period and coverage, please refer to the warranty documentation provided with your purchase or visit the official Keysight webstrona.
8.2 Wsparcie techniczne
For technical assistance, service, or further inquiries regarding the Keysight 4395A, please contact Keysight Technologies directly. Support resources, including FAQs, drivers, software updates, and contact information, are available on the official Keysight webstrona: www.keysight.com.


