Wstęp
This manual provides instructions for the proper use and maintenance of your Alecto AK-20 Alarm Clock with Thermometer. Please read these instructions carefully before operating the device and retain them for future reference. The AK-20 is designed to display time, date, day, and indoor temperature, featuring multiple alarms, a snooze function, and radio-controlled time synchronization.
Informacje dotyczące bezpieczeństwa
- Nie wystawiaj urządzenia na działanie ekstremalnych temperatur, bezpośredniego światła słonecznego i wysokiej wilgotności.
- Unikaj upuszczania urządzenia i narażania go na silne uderzenia.
- Nie próbuj samodzielnie demontować ani naprawiać urządzenia. Wszelkie prace serwisowe zleć wykwalifikowanemu personelowi.
- Zużytych baterii należy pozbywać się w sposób odpowiedzialny, zgodnie z lokalnymi przepisami.
Zawartość opakowania
Upewnij się, że wszystkie przedmioty są obecne i w dobrym stanie po rozpakowaniu:
- Alecto AK-20 Alarm Clock
- User Manual (NL/EN/DE/FR)
Produkt ponadview
The Alecto AK-20 features a clear digital display and intuitive controls for easy operation.

Rycina 1: Przód view of the Alecto AK-20 Alarm Clock, showing the large digital display with time, date, day, and temperature, along with control buttons at the bottom.

Rysunek 2: Kątowy view of the Alecto AK-20, highlighting the main display and the alarm ON/OFF switches on the right side.
Elementy sterujące i wyświetlacza:
- Duży wyświetlacz cyfrowy: Shows time (AM/PM indicator), date, day of the week, and indoor temperature.
- Przycisk USTAWIANIA CZASU: Służy do wejścia w tryb ustawiania czasu.
- Przyciski - / +: Used to adjust values (decrease/increase).
- Przycisk USTAWIENIA ALARMU: Służy do wejścia w tryb ustawiania alarmu.
- ALARM 1-4 ON/OFF Switches: Located on the side for individual alarm activation.
- Przycisk drzemki/światła: Umieszczony na górze, włącza podświetlenie i funkcję drzemki.
- AUTO LIGHT Switch: Located on the back, controls automatic backlight.
- Przycisk reset: Located on the back, for factory reset.

Rysunek 3: Prawa strona view of the alarm clock, showing the physical ON/OFF switches for Alarm 3 and Alarm 4.

Rysunek 4: Tył view of the alarm clock, showing the battery compartment, RESET button, and AUTO LIGHT switch.
Organizować coś
1. Instalacja baterii
- Znajdź komorę baterii z tyłu budzika (patrz rysunek 4).
- Otwórz pokrywę komory baterii.
- Włóż dwie baterie AA, zwracając uwagę na prawidłową biegunowość (+ i -).
- Dokładnie zamknij pokrywę komory baterii.
The display will light up, and the clock will begin searching for the DCF radio signal for automatic time synchronization.
2. Initial Time and Date Synchronization (DCF)
The AK-20 is a radio-controlled clock. Upon battery installation, it will automatically attempt to synchronize with the DCF signal. This process may take several minutes. A signal icon on the display indicates successful reception.
- Aby uzyskać lepszy odbiór sygnału, ustaw zegar w pobliżu okna.
- Unikaj umieszczania go w pobliżu urządzeń elektronicznych, które mogą powodować zakłócenia.
3. Manual Time and Date Setting (Optional)
If DCF synchronization is not desired or unsuccessful, you can set the time and date manually:
- Naciśnij i przytrzymaj USTAWIENIE CZASU Naciskaj przycisk, aż cyfry godziny zaczną migać.
- Użyj - or + przyciski do regulacji godziny.
- Naciskać USTAWIENIE CZASU jeszcze raz, aby potwierdzić godzinę i przejść do minut.
- Powtórz ten proces dla minut, roku, miesiąca i dnia.
- Naciskać USTAWIENIE CZASU po raz ostatni, aby wyjść z trybu ustawień.
4. Wybór języka
The device supports multiple languages for day display. To change the language:
- W trybie wyświetlania czasu normalnego naciśnij przycisk - Naciśnij przycisk kilkakrotnie.
- The day of the week will cycle through available languages (Dutch, French, German, English, Spanish, Italian, Danish, Russian).
- Stop when your desired language is displayed.
Instrukcja obsługi
1. Ustawianie alarmów
The AK-20 allows setting up to four independent alarms.
- Naciśnij i przytrzymaj ZESTAW ALARMU button until the alarm time (e.g., ALARM-1) starts flashing.
- Użyj - or + buttons to adjust the desired alarm hour.
- Naciskać ZESTAW ALARMU jeszcze raz, aby potwierdzić godzinę i przejść do minut.
- Użyj - or + buttons to adjust the desired alarm minutes.
- Naciskać ZESTAW ALARMU to confirm and move to the next alarm (ALARM-2, ALARM-3, ALARM-4).
- Repeat steps 2-4 for each alarm you wish to set.
- After setting all desired alarms, press ZESTAW ALARMU aby wyjść z trybu ustawiania alarmu.
2. Aktywowanie/dezaktywowanie alarmów
Each alarm has a dedicated ON/OFF switch on the side of the unit (refer to Figure 3).
- Slide the corresponding switch to ON to activate an alarm. An alarm icon will appear on the display.
- Przesuń przełącznik na WYŁĄCZONY to deactivate an alarm. The alarm icon will disappear.
3. Funkcja drzemki
Gdy zabrzmi alarm, naciśnij przycisk DRZEMKA / ŚWIATŁO button on top of the clock. The alarm will temporarily stop and sound again after a few minutes (typically 5-10 minutes, depending on the model's default setting).
4. Funkcja podświetlenia
The display features a backlight for visibility in low-light conditions.
- Podświetlenie ręczne: Naciśnij krótko DRZEMKA / ŚWIATŁO przycisk, aby włączyć podświetlenie na kilka sekund.
- Automatyczne podświetlenie: On the back of the unit, slide the AUTOMATYCZNE ŚWIATŁO przełączyć na ON. The backlight will automatically illuminate in dark environments. Slide to WYŁĄCZONY aby wyłączyć tę funkcję.
5. Wyświetlacz temperatury
The integrated thermometer displays the indoor temperature.
- Aby przełączać się między stopniami Celsjusza (°C) i Fahrenheita (°F), naciśnij przycisk + przycisk w trybie wyświetlania normalnego czasu.
Konserwacja
- Czyść urządzenie miękką, suchą ściereczką. Nie używaj środków czyszczących o właściwościach ściernych ani rozpuszczalników.
- Jeżeli urządzenie nie będzie używane przez dłuższy czas, należy wyjąć baterie, aby zapobiec wyciekowi.
Rozwiązywanie problemów
| Problem | Możliwa przyczyna | Rozwiązanie |
|---|---|---|
| Wyświetlacz jest pusty lub przyciemniony. | Baterie są słabe lub nieprawidłowo włożone. | Wymień baterie na nowe baterie AA, zwracając uwagę na prawidłową biegunowość. |
| Czas jest nieprawidłowy. | Nie odebrano sygnału DCF lub nie ustawiono czasu ręcznego. | Ensure the clock is in an area with good signal reception. Manually set the time if necessary. |
| Alarm nie włącza się. | Alarm nie jest aktywowany lub jest nieprawidłowo ustawiony. | Check the alarm ON/OFF switch on the side. Verify alarm time settings. |
| Podświetlenie nie działa. | AUTO LIGHT switch is OFF or batteries are low. | Check the AUTO LIGHT switch on the back. Replace batteries if needed. |
Jeśli po wypróbowaniu tych rozwiązań problem nadal występuje, skontaktuj się z obsługą klienta.
Specyfikacje
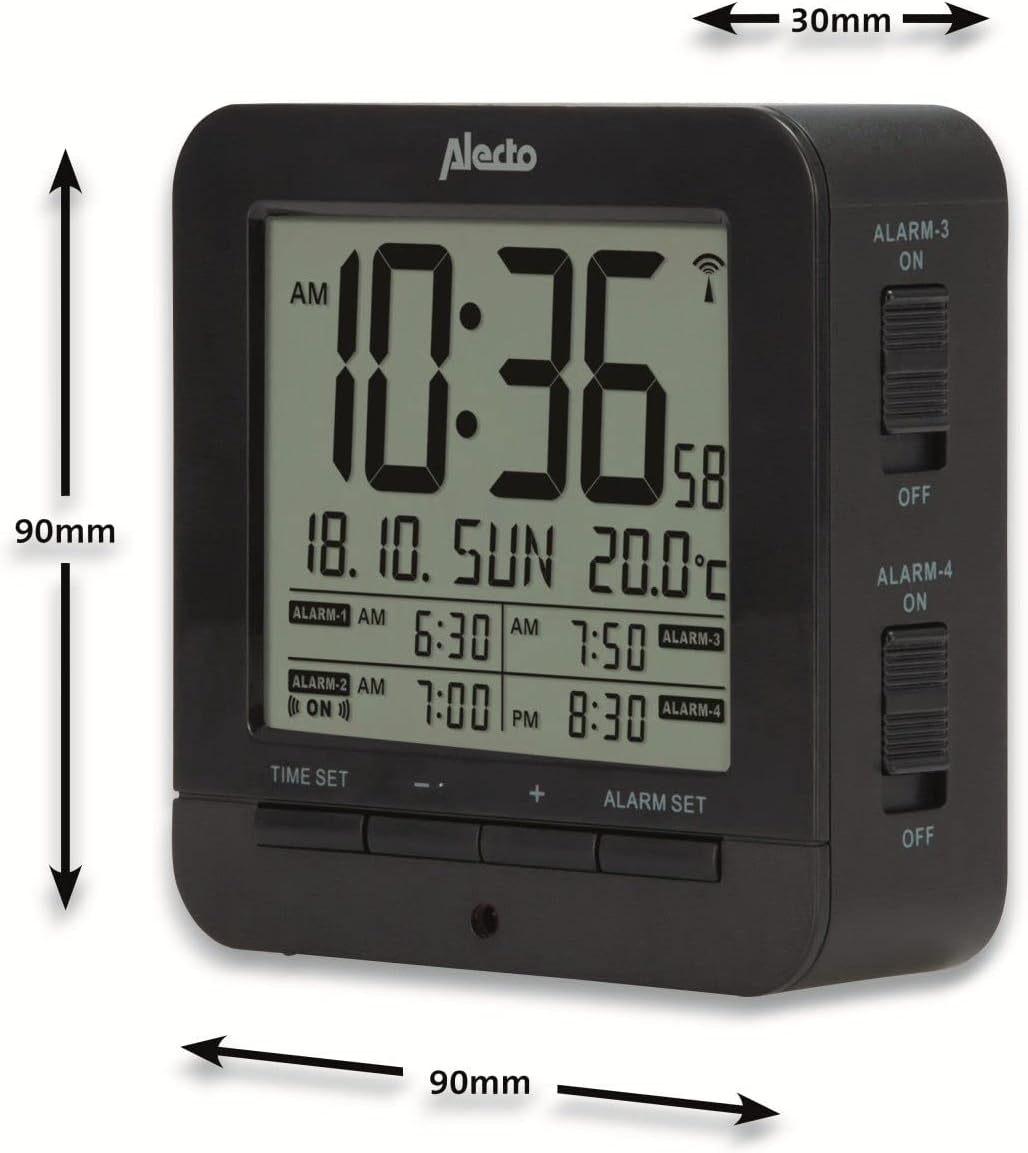
Figure 5: Alecto AK-20 Alarm Clock showing its approximate dimensions: 90mm height, 90mm width, and 30mm depth.
| Funkcja | Szczegół |
|---|---|
| Numer modelu | AK-20 (A003319) |
| Marka | Alekto |
| Kolor | Czarny |
| Tworzywo | Akrylonitryl-butadien-styren (ABS) |
| Wymiary (wys. x szer. x gł.) | 9 x 9 x 3 cm (ok. 3.54 x 3.54 x 1.18 cala) |
| Wymiary ekranu | 6.4 x 5.4 cm (ok. 2.52 x 2.13 cala) |
| Waga | 231 g (ok. 0.51 funta) |
| Źródło zasilania | 2 baterie AA (brak w zestawie) |
| Typ wyświetlacza | Cyfrowy |
| Cechy specjalne | Temperature Display, 4 Alarms, Snooze Function, Backlight, DCF Radio Control |
| Jednostki temperatury | Możliwość wyboru °C / °F |
| Obsługiwane języki | Dutch, French, German, English, Spanish, Italian, Danish, Russian |
Gwarancja i wsparcie
Alecto products are manufactured to high quality standards. For information regarding warranty terms and conditions, please refer to the documentation provided with your purchase or visit the official Alecto website. For technical support or service inquiries, please contact your retailer or the Alecto customer service department.


