Wstęp
Thank you for choosing the WARSUN Y36 and Y39 LED Work Lights. These portable, rechargeable work lights are designed for various applications, including car repair, camping, and emergency situations. This manual provides essential information for the safe and effective use of your device. Please read it thoroughly before operation and retain it for future reference.

Image: WARSUN Y36 (yellow) and Y39 (orange) LED Work Lights.
Informacje dotyczące bezpieczeństwa
Aby zapewnić bezpieczną pracę, należy przestrzegać następujących środków ostrożności:
- Nie należy patrzeć bezpośrednio na włączoną diodę LED, gdyż może to spowodować zmęczenie lub uszkodzenie oczu.
- Keep the device away from water and moisture. This product is not water-resistant.
- Do not disassemble, repair, or modify the device. Contact authorized service personnel for any repairs.
- Przechowywać w miejscu niedostępnym dla dzieci.
- Używaj wyłącznie dostarczonych lub zalecanych kabli i adapterów do ładowania.
- Unikaj wystawiania urządzenia na działanie ekstremalnych temperatur lub bezpośredniego światła słonecznego przez dłuższy czas.
- Baterie i podzespoły elektroniczne należy utylizować zgodnie z lokalnymi przepisami.
Produkt ponadview
Familiarize yourself with the components of your WARSUN LED Work Light.

Image: WARSUN Y36 Component Diagram. This diagram illustrates the key features of the Y36 model, including the COB light panel, magnetic base, integrated hook, and USB port.

Image: WARSUN Y39 Component Diagram. This diagram highlights the COB panel, power switch, wall hanging hole, metal hook, strong magnet, and Micro USB port for the Y39 model.
- Panel LED COB: Provides bright, wide-angle illumination.
- Przycisk zasilania: Controls power and switches between lighting modes.
- USB Input/Output Port: For charging the work light and for using it as a power bank.
- Podstawa magnetyczna: Możliwość przymocowania do powierzchni metalowych w celu zapewnienia obsługi bez użycia rąk.
- Zintegrowany hak: For hanging the light in various locations.
- Bracket Design (Y36): Provides a stand for directional lighting.
- Wall Hanging Hole (Y39): For mounting on a wall.
Organizować coś
Ładowanie światła roboczego
Before first use, fully charge your WARSUN LED Work Light.
- Locate the USB input/output port on the side of the work light.
- Connect the provided USB charging cable to the port and plug the other end into a suitable USB power source (e.g., wall adapter, computer USB port).
- Podczas ładowania kontrolka ładowania będzie świecić na czerwono.
- Po całkowitym naładowaniu lampka kontrolna zmieni kolor na zielony.

Image: Charging Indicator. The red light signifies that the device is currently charging, while the green light indicates that the battery is fully charged.
Używany jako Power Bank
The work light can also be used to charge other devices.
- Connect your mobile phone or other electronic device to the USB output port of the work light using your device's charging cable.
- The work light's internal battery will begin charging your connected device.

Image: Power Bank Function. The Y36 work light can be used to charge mobile phones and other USB-powered devices.
Instrukcja obsługi
Turning On and Changing Modes
The work light features multiple lighting modes:
- Press the power button once to turn on the light in High brightness mode.
- Press the power button again to switch to Medium brightness mode.
- Press the power button a third time to switch to Low brightness mode (or Strobe mode, depending on model).
- Naciśnij przycisk zasilania po raz czwarty, aby wyłączyć światło.
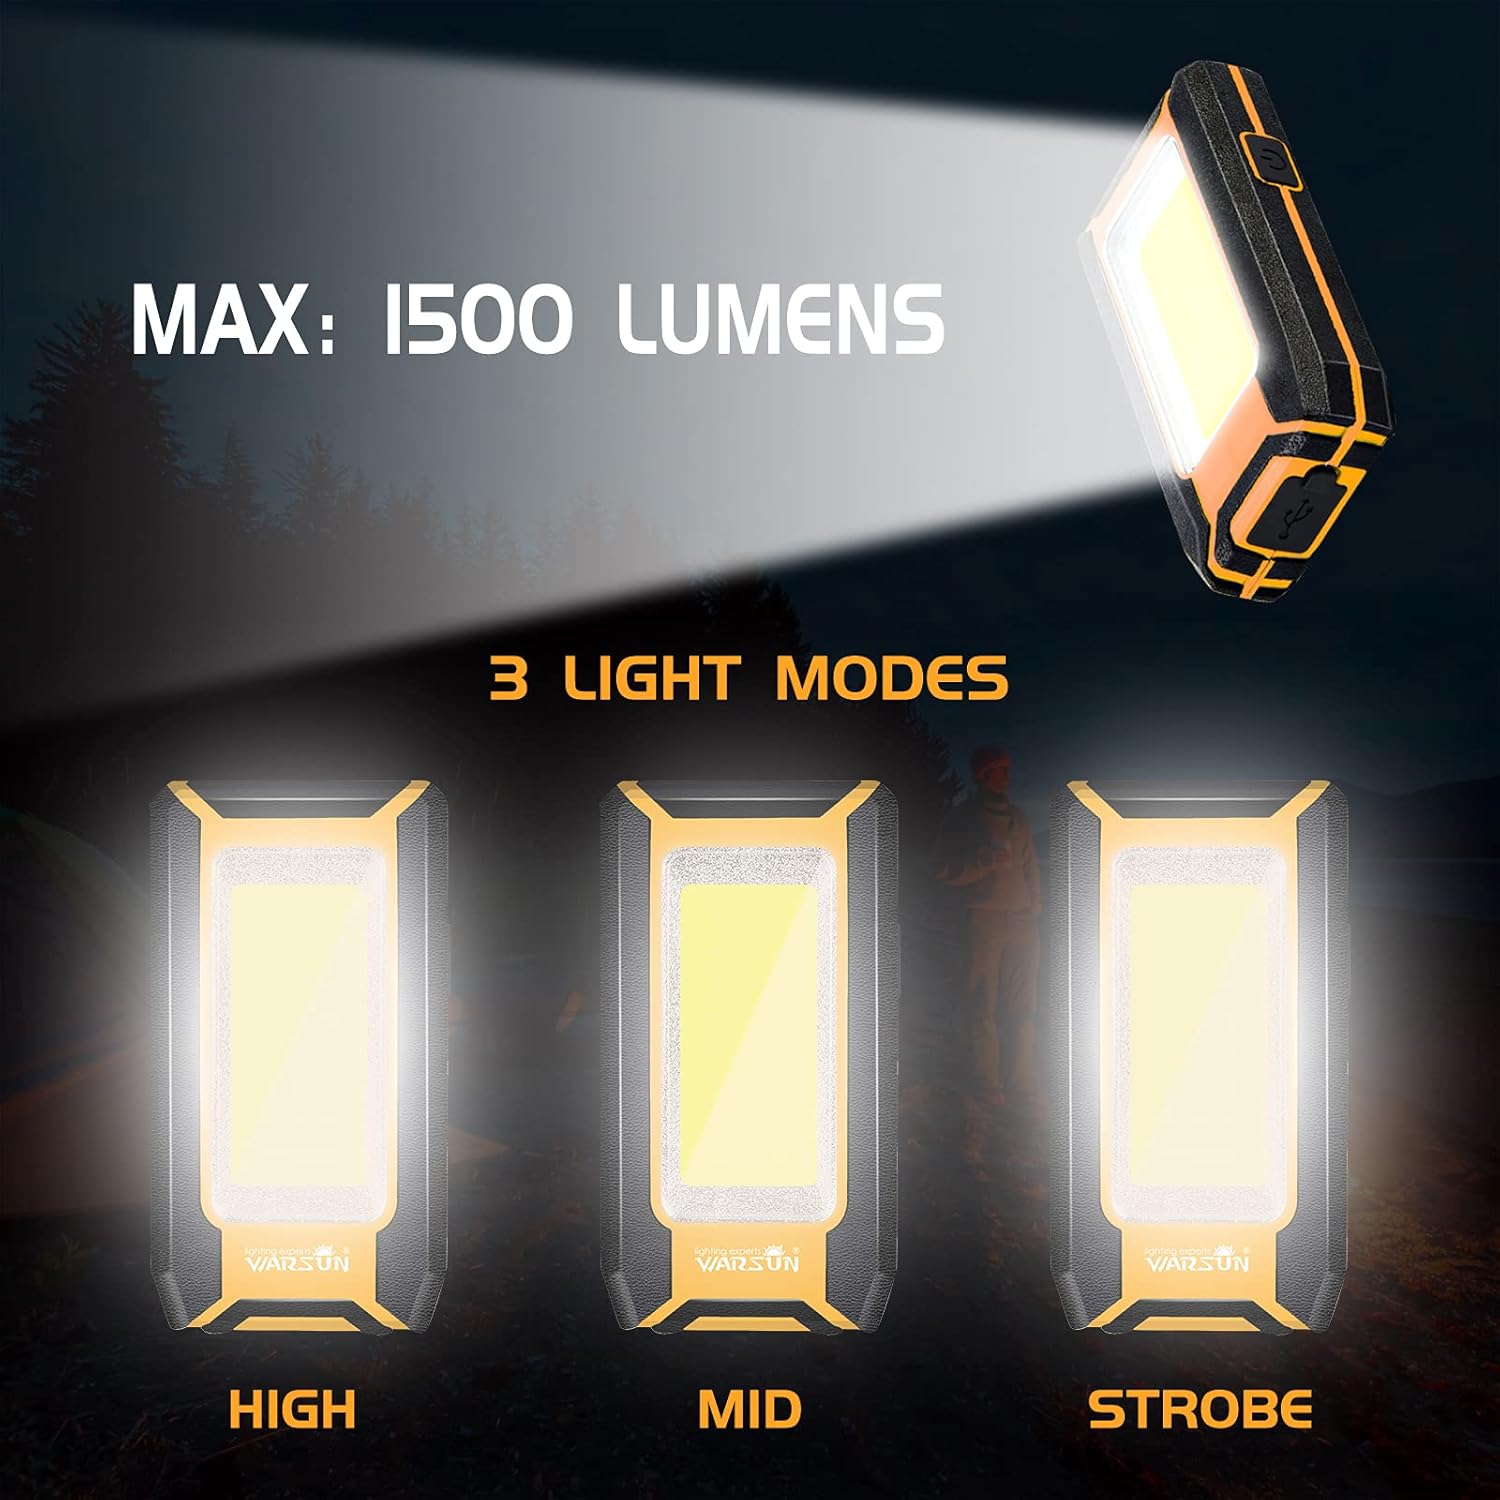
Image: Three Light Modes. The work light offers High, Mid, and Strobe (or Low) brightness settings for various needs.
Korzystanie z podstawy magnetycznej
The strong magnetic base allows for hands-free operation.
- Attach the magnetic base to any ferrous metal surface, such as a car hood, metal beam, or workbench.
- Ensure the light is securely attached before releasing to.

Image: Magnetic Design in Use. The integrated magnet allows the light to be securely attached to metal surfaces, providing convenient hands-free illumination for tasks like car repair.
Using the Integrated Hook
The integrated hook provides additional mounting options.
- Extend the hook from the back of the work light.
- Hang the light on tents, pipes, or other suitable structures for overhead or directional lighting.

Image: Hook Design. The retractable hook allows for versatile hanging options, making it suitable for various environments.
Konserwacja
Czyszczenie
- Przed czyszczeniem należy upewnić się, że urządzenie jest wyłączone i odłączone od źródła zasilania.
- Wipe the exterior of the work light with a soft, damp płótno.
- Nie należy używać środków czyszczących o działaniu ściernym, rozpuszczalników ani silnych środków chemicznych, gdyż mogą one uszkodzić powłokę.
Składowanie
- Przechowuj lampę roboczą w chłodnym i suchym miejscu, z dala od bezpośredniego światła słonecznego i ekstremalnych temperatur.
- Jeśli akumulator będzie przechowywany przez dłuższy okres, należy ładować go do około 50% co 3–6 miesięcy, aby zachować jego sprawność.
Rozwiązywanie problemów
If you encounter issues with your WARSUN LED Work Light, refer to the table below:
| Problem | Możliwa przyczyna | Rozwiązanie |
|---|---|---|
| Światło się nie włącza. | Bateria jest rozładowana. | Naładuj całkowicie lampę roboczą. |
| Światło jest słabe. | Bateria jest słaba. | Naładuj lampę roboczą. |
| Nie można naładować urządzenia zewnętrznego. | Akumulator lampy roboczej jest zbyt słaby lub kabel jest uszkodzony. | Ensure work light is sufficiently charged. Try a different USB cable. |
| Wskaźnik ładowania nie działa. | Problem z kablem ładującym lub źródłem zasilania. | Wypróbuj inny kabel ładujący lub zasilacz USB. |
Specyfikacje
| Funkcja | Szczegół |
|---|---|
| Marka | WARSUN |
| Modele | Rok 36, Rok 39 |
| Typ źródła światła | Dioda LED COB |
| Jasność | Up to 1200 Lumens (Y36), Up to 1500 Lumens (Y39) |
| Źródło zasilania | Zasilany bateryjnie (litowo-jonowy akumulator) |
| Pojemność baterii | 2 x 1800 mAh (łącznie 3600 mAh) |
| Tomtage | 3.7 V (prąd stały) |
| Tworzywo | Stop aluminium |
| Cechy specjalne | Durable, Portable, Rechargeable, Magnetic Base, Integrated Hook, Power Bank Function |
| Poziom wodoodporności | Nie jest wodoodporny |
| Zawarte komponenty | Bateria |
Gwarancja i wsparcie
WARSUN offers a 30-day money-back guarantee and a 1-year limited warranty for this product. For warranty claims or technical support, please refer to your purchase documentation or contact WARSUN customer service through the retailer where the product was purchased.


