Wstęp
Thank you for choosing the Senicare Digital LED Alarm Clock. This manual provides detailed instructions for setting up, operating, and maintaining your new alarm clock. Please read this manual thoroughly before use to ensure proper functionality and to maximize your experience with its features, including dual alarms, a 7-color night light, a dimmable display, and a convenient USB charging port.
Informacje dotyczące bezpieczeństwa
- Upewnij się, że zasilacz jest zgodny z lokalnym napięciem sieciowym (100–240 V AC).
- Nie wystawiaj urządzenia na działanie wody ani nadmiernej wilgotności.
- Unikaj umieszczania zegara w bezpośrednim świetle słonecznym lub w pobliżu źródeł ciepła.
- Używaj wyłącznie dołączonego zasilacza.
- Przechowywać w miejscu niedostępnym dla małych dzieci.
- Nie próbuj samodzielnie demontować ani naprawiać urządzenia. W przypadku problemów skontaktuj się z obsługą klienta.
- Insert batteries correctly, observing polarity (+/-).
Zawartość opakowania
- Senicare Digital LED Alarm Clock (Model KT279)
- Zasilacz
- Kabel ładujący USB
- Instrukcja obsługi (ten dokument)

Figure 1: Senicare Digital LED Alarm Clock and included accessories.
Produkt ponadview
Przód View
The front of the clock features a large LED display for time, and indicators for PM, Alarm 1, and Alarm 2.
Szczyt View (Sterownica)
The top panel houses the main control buttons and the integrated night light bar.
- ALT SET: Alarm 1 Set button.
- AL2 SET: Alarm 2 Set button.
- CZAS: Time setting button.
- KOLOR: Night light color selection button.
- DRZEMKA / ŚWIATŁO: Snooze function and night light on/off.
- HOUR +: Adjusts hour, increases alarm volume.
- MIN -: Adjusts minute, decreases alarm volume.
Strona View (Ports & Dimmer)
The side of the clock includes the power input, USB charging port, and display dimmer slider.
- Port zasilania prądem stałym 5 V: Łączy się z zasilaczem.
- USB Charging Port (5V-1A): Do ładowania urządzeń zewnętrznych.
- ŚCIEMNIACZ WYŚWIETLACZA: Slider to adjust the brightness of the time display (0-100%).
Spód View (Komora baterii)
The bottom of the clock contains the battery compartment for backup power.

Rysunek 2: Tył view highlighting the USB charging port and power input.

Figure 3: Battery compartment for backup power.
Organizować coś
1. Podłączenie zasilania
- Connect the provided power adapter to the DC 5V Power Port on the back of the clock.
- Podłącz zasilacz do standardowego gniazdka ściennego prądu zmiennego 100–240 V.
- The LED display will light up, indicating the clock is powered on.
2. Zapasowa bateria (opcjonalnie)
Dla mocytage protection, install 2 x AAA batteries (not included) into the battery compartment on the bottom of the clock. This will preserve time and alarm settings during a power interruption, though the display will go black.

Figure 4: The clock retains settings during power outages with battery backup.
Instrukcja obsługi
1. Ustawianie czasu
- Naciśnij i przytrzymaj CZAS Naciskaj przycisk, aż cyfry godziny zaczną migać.
- Naciśnij HOUR + przycisk, aby ustawić godzinę.
- Naciśnij MIN - przycisk, aby ustawić minuty.
- Naciśnij CZAS Naciśnij przycisk ponownie, aby potwierdzić i wyjść z trybu ustawiania czasu.
2. Setting Dual Alarms (Alarm 1 & Alarm 2)
The clock features two independent alarms for different schedules.

Rysunek 5: Example of dual alarm functionality.
- To Set Alarm 1: Naciśnij i przytrzymaj ALT SET button until the hour digits for Alarm 1 flash.
- Użyj HOUR + I MIN - przyciski umożliwiające ustawienie żądanej godziny alarmu.
- Naciskać ALT SET again to confirm and activate Alarm 1. The Alarm 1 indicator will appear on the display.
- To Set Alarm 2: Follow the same steps using the ZESTAW AL2 przycisk.
- To turn an alarm on or off, briefly press the corresponding ALT SET or ZESTAW AL2 button. The alarm indicator will appear/disappear.
3. Funkcja drzemki
Gdy zabrzmi alarm, naciśnij duży przycisk DRZEMKA / ŚWIATŁO button on top of the clock to activate the 9-minute snooze function. The alarm will sound again after 9 minutes.

Figure 6: The SNOOZE / LIGHT button for snooze functionality.
4. Regulacja jasności wyświetlacza
The clock features a 0-100% full-range dimmer for the LED time display. Use the WYŚWIETLACZ ŚCIEMNIACZ slider located on the side of the clock to adjust the brightness to your preference.

Figure 7: Adjusting display brightness with the dimmer slider.
5. Funkcje lampki nocnej
The integrated night light offers 7 different colors and adjustable brightness.

Figure 8: The 7-color night light feature.
- Zmiana kolorów: Krótko stuknij w KOLOR button to cycle through the 7 available colors.
- Color Loop Mode: Naciśnij i przytrzymaj KOLOR button for 2 seconds to enter a continuous color-changing loop.
- Turning Off Night Light: Naciśnij DRZEMKA / ŚWIATŁO przycisk, aby wyłączyć lampkę nocną.
- Adjusting Night Light Brightness: The night light brightness can also be adjusted from 0-100% using the WYŚWIETLACZ ŚCIEMNIACZ slider, similar to the main display.
6. Regulacja głośności alarmu
The alarm volume has 5 adjustable levels, ranging from 45dB to 85dB.
- While an alarm is sounding, or when setting an alarm, press the HOUR + przycisk, aby zwiększyć głośność.
- Naciśnij MIN - przycisk, aby zmniejszyć głośność.

Figure 9: Volume adjustment using HOUR + and MIN - buttons.
7. Port ładowania USB
The clock includes a 5V-1A USB charging port on its side, allowing you to charge small electronic devices like smartphones or tablets while the clock is plugged into power.
Konserwacja
- Czyść zegar miękką, suchą ściereczką. Nie używaj środków czyszczących ani rozpuszczalników o działaniu ściernym.
- Keep the clock away from dust and moisture.
- If not in use for an extended period, remove the backup batteries to prevent leakage.
Rozwiązywanie problemów
| Problem | Możliwa przyczyna | Rozwiązanie |
|---|---|---|
| Wyświetlacz zegara jest wyłączony. | No power, or display dimmer set to 0%. | Check power connection. Adjust DISPLAY DIMMER slider. |
| Alarm nie włącza się. | Alarm not set, alarm volume too low, or alarm turned off. | Ensure alarm is set and activated (indicator visible). Increase alarm volume. |
| Czas/ustawienia utracone po wyłączeniu zasilaniatage. | No backup batteries installed, or batteries are dead. | Install fresh 2 x AAA batteries for backup. |
| Ładowanie przez USB nie działa. | Clock not powered by AC, or device requires more than 1A. | Ensure clock is plugged into AC power. Check device's charging requirements. |
Specyfikacje
| Funkcja | Szczegół |
|---|---|
| Model | KT279 |
| Typ wyświetlacza | PROWADZONY |
| Źródło zasilania | Przewodowy prąd elektryczny (100-240 V AC) |
| Zapasowa bateria | 2 baterie AAA (brak w zestawie) |
| Port ładowania USB | 5V-1A |
| Kolory światła nocnego | 7 kolorów |
| Wyświetlacz ściemniacza | 0-100% regulowany |
| Głośność alarmu | 5 poziomów (45 dB do 85 dB) |
| Długość drzemki | 9 minut |
| Wymiary produktu | 5.91" szer. x 3.15" wys. (ok. 150 mm x 80 mm) |
| Waga przedmiotu | 11.7 uncji |
| Tworzywo | Plastikowy |
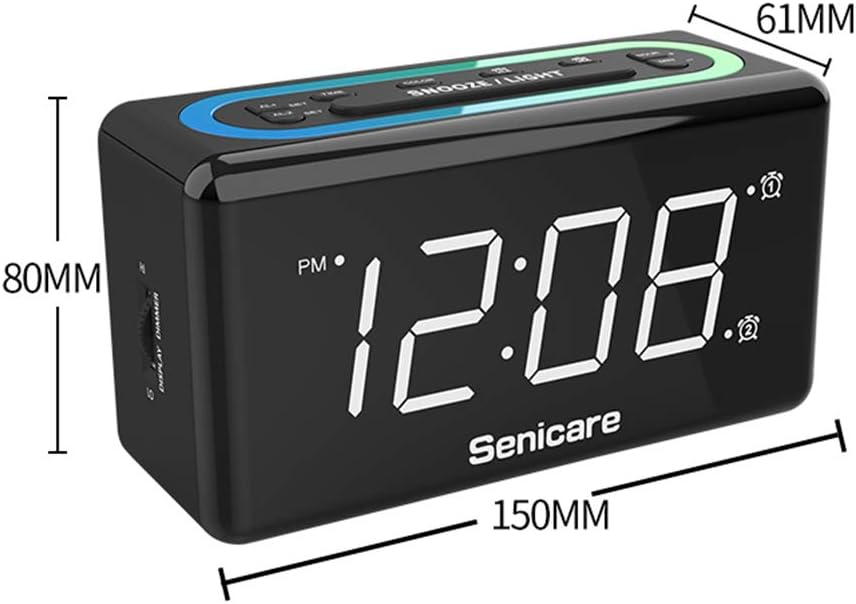
Rysunek 10: Wymiary produktu.
Gwarancja i wsparcie
The Senicare Digital LED Alarm Clock comes with a roczna gwarancja. Oferujemy również 30-dniowa gwarancja zwrotu pieniędzy. For any questions or assistance, please contact our customer service team, available 24 godziny a day. Your satisfaction is our priority.